
Likes
Comments
Share


@CanarianGrow92
Follow
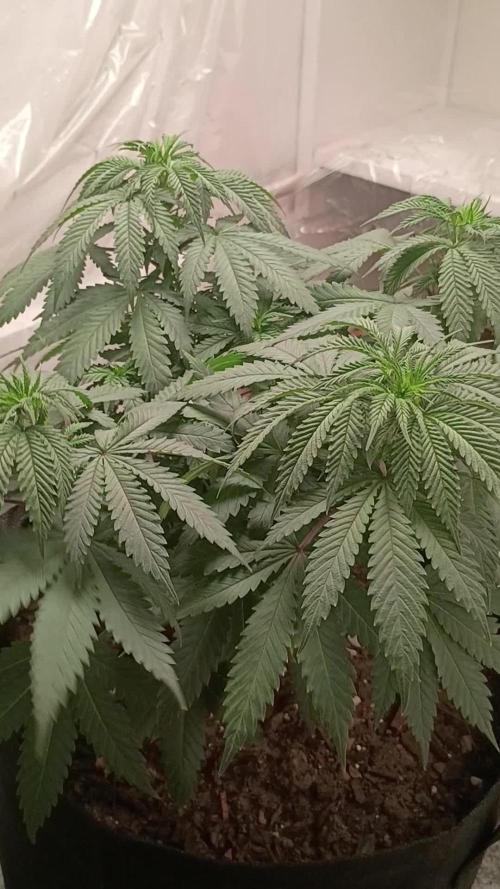
Week 7 for the Caramel 🍯 from Ganja farmers 👨🌾
Awesome results for now, the buds are looking great and getting bigger every week, more and more trichomes are visible.
Not much left so we continue with water for now.
A slight excess of nutrients is visible but nothing to worry about as we are flushing now anyway

Likes
10
Share


@Backwood_scientist
Follow
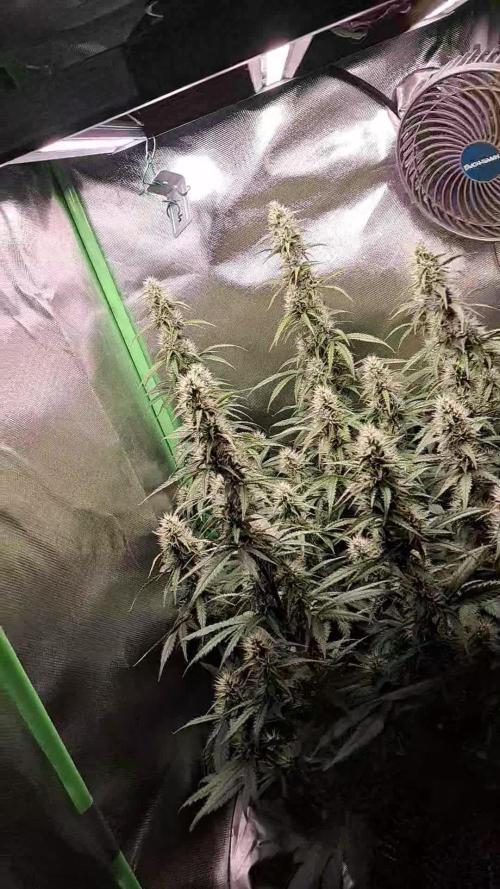
Trichomes getting cloudy and it’s almost time to harvest. Started some flushing this week and their lookin good .

Likes
11
Share


@adam_pawloski87
Follow
Let’s Go Day 47 of 🌺!! These girls are looking so amazing for the most part , on the other hand we got a lil bit of a deficiency on one of the Dirtyblondes, hopefully it’s not too much to worry about so probably gonna go ahead an start flush on the 2 Dirtyblondes and one of the pre98 s this weekend cause they are looking pretty close to being done, hopefully they should be fine! I hope you all enjoy an have an amazing productive day as well as a great upcoming weekend! peace love an positive vibes to all y’all Cheers 😶🌫️💨💨💨💨💨🤙🏻

Likes
25
Share


@Densko
Follow
End of week 8 for medusa 1/5. Plant is looking beautiful with the LST.
I will reduce thd nutrients week by week from now, ensuring for a clean finish without flushing.
I still feel the veg time for these genetics are too short for big yields. I reckon it will yield around 60 grams.
2/5 was topped and will yield more by the looks of the amount of shoots compared to 1/5. Check my other diaries for the entire experiment.
Watering 3L every 2/3 days
Smell is very strong now.
It will probably be ready in 3 weeks time

Likes
8
Share

@CannabisDemon
Follow
I really enjoy this variety I love how the stems are already turning dark purple the plant has grown great so far did a major defoliation I would like to get them into flower in the next week or two but I'm not 100% sure what I'm going to do yet. I would like them to be just a little bit bigger.
Likes
6
Share


@HJM710024
Follow
This is my first ever grow and i have learned a lot and will forever be learning but one thing I’m going to do is upgrade my lights I made the mistake of going as cheap as possible when I should just shell out the money cause despite this genetic not being a big yeilder I’ve seen someone complain and say they wish they had an xl version when they got a whole oz from their plant I’m guessing I got like 4gs if I’m lucky but it was my mistake you live and you learn, much love❤️


Processing
Likes
20
Share


@Mr_nugs_lover_David
Follow
She's looking so beautiful,very nice strain to grow for sure,I'm trying to give her a good shape before flowering starts. I add organic liquids nuts only once a week and looks like she loves it,let's keep up the work!! 💚💛❤️🌱🤩

Likes
9
Share

@Grow4ever
Follow
Week 8.
The buds are getting bigger and the smell stronger.
Overall she has some great main colas and a lot of other big buds coming up. Think it will be one of the biggest auto harvest for me so far. I noticed some brown necrotic spots on some upperleafs and gave some biobizz cal/mag, because my guess is, the Ca could be little low.

Likes
28
Share


@Felloffthegrid420
Follow
Only one plant is not got fire ant in it making the plant stress welp there go my year I learn every year about hit the chop it what waste of good Genetics
Likes
43
Share


@MrGrow
Follow
28.04.2023
🌱 99 giorni dal seme
🌼 27 giorni di fioritura
💦 1.8 litri/48h
📈 ph 5.8
ec 2.1
Andiamo verso la fine della 4 settimana di fioritura, sto spingendo forte con i nutrimenti.
Inizio settimana scorsa, ho fatto l ultima grossa defogliazione e pulizia di rami inferiori, le piante hanno reagito bene al forte stress, non ci sono segni di carenze o blocchi dovuti allo stress.Sembra che le piante apprezzino molto la tabella di marcia dei nutrimenti Canna. Prossima settimana aggiungerò il Pk 13/14 di Canna per iniziare a far gonfiare le cime.
Per il momento è tutto bella gente, al prossimo aggiornamento🙏💚
Likes
24
Share


@Kountryboi90
Follow
Day 38 since flipping and I'm loving what I see. This girls LOVES to eat so I had to switch my feeding cycle to feed, feed, water, instead of feed, water, water. The strong orange citrus aroma is oh so lovely! In the next couple of weeks she should start packing on more weight. I can tell that they are heavy already just but the swaying of the cola from air circulation. I think I messed up by removing my scrog net but I'll tie her up and give her support as needed!

Likes
22
Share


@Polliceverde18
Follow
E quasi la fine lascio andare fino a fine settimana per colorare i tricomi

Likes
6
Share


@eldruida_lamota
Follow
Esa familia e vuelto para actualizaros una semana más de crecimiento de las Original, pues tienen potencial, están muy sanos y bien ramificados, tienen un tallo bastante consistente, y entre nudos hay muy poca distancia.
Se les a practicado una poda de bajos y puede que a una una apical, tengo que asegurar pero creo que esta variedad si se corto alguna para retrasar crecimiento.
Agrobeta:
https://www.agrobeta.com/agrobetatiendaonline/36-abonos-canamo
Mars hydro:
Code discount: EL420
https://www.mars-hydro.com/
Las maximas de temperatura no superan los 25 grados y las mínimas no bajan 19, así que no me puedo quejar.
Los niveles de humedad también son los correctos van entre 50%/65% de humedad relativa.
Por supuesto el Ph lo estamos dejando alrededor de 6.
Hasta aquí es todo poco más la verdad ya con ganas de empezar la floración, buenos humos 💨💨💨


Likes
Comments
Share


Likes
25
Share


@BudHaks
Follow
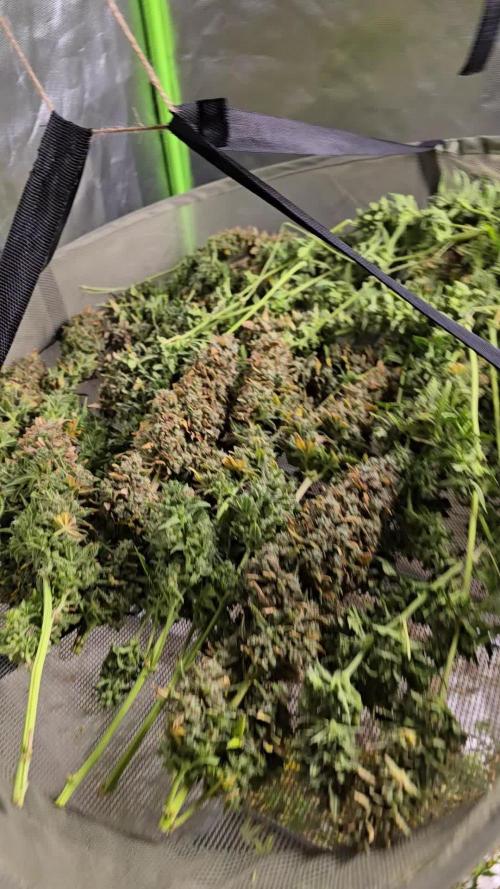
I am now flushing her with plain Brita filtered water PH'd with lime juice to lower her PH.
I initially first flushed her with 42L of water and now I am flushing her once a day for 8 days and then I will put her in for darkness for 3 days and then I will harvest her and dry her for 9 days and then cure her for 28-48 days.

Likes
11
Share


@Chubbs
Follow
420 Fastbuds
BlueDream Auto
Week 4
Holy 420 Fastbuds these girls have exploded thus past week. I'm start to see preflower sites all over which is very exciting because we all know what that means. Off to flower we go. I still have fed them 2 liters of well water daily and so far no signs of any nute deficiencys.
All in all Happy Growing
Likes
3
Share


Likes
3
Share


@Frosth
Follow
She is getting long but upper node still didnt get high. Tried open lower leaves to get light better. Waitinf for lst. Any suggestions ? Last 10 days for continue under real sun at my balconary.
Likes
9
Share


@DonFazool
Follow
Day 57 : AK was fed 2L with just Sensi Bloom A&B @ 2ml/l and Carboload @ 1ml/l . I backed off the Overdrive as i don't think it is time yet. The buds are still really forming and i don't want to burn this one as bad as cheese is showing.
Day 58 : I found out that i've probably been feeding too much cal-mag. I spoke with AN and they told me that their Sensi products have enough cal-mag that i didn't need to be adding it. I've started seeing tip burns only in the past few weeks. I think adding the Carboload and Overdrive may have pushed it over the top with the extra cal-mag going in each feed. Lesson learned.
Cheese is on water from this point on. I figure she'll be ready in the next 9-10 days. Need to start checking the trichomes as soon as my pocket microscope arrives in the next few days.
Man am I ever glad I didn't kill AK off because it was taking too long to flower. That plant is going to be a monster. It has so many side branches and bud sites. And it's starting to put off some kind of funk. Giddy up !
Day 59 : Pocket microscope came in today. Can't wait to check the trichs later on. Cheese is really starting to smell more and more. 8 more days until she gets chopped. AK is fattening up nicely. She'll finish in 11-12 weeks for sure.
AK was fed 2L this evening and is fattening up more and more each day. Cheese is getting close.
Day 60 : Cheese got 2L of water, had a good look at the trichomes and this plant is pretty much ready to go. I should have started the flush earlier but i didn't have the microscope yet. Checked various parts of the plant and I am seeing mostly cloudy with a small amount of amber trichomes. I'm going to let it go 4 more days to try and give it at least 10 days of flush.
Day 61 : Fed AK 2L, brought the base nutes down to 1.8ml/L and started Overdrive. I'm seeing some brown pistils starting to show up. Buds are filling out nicely each day.
Cheese is getting frostier every day now. Only a few while pistils left per bud, many of them starting to curl inward. Not seeing any yellowing yet. Been almost a week of just water. 4 more days and she's coming down !
Day 62 : Fed cheese 2L water this morning. That plant is looking really incredible. So much frost ! 3 more days until chop chop
Day 63 : Fed AK 2L, buds are filling out quite nicely. Some of the pistils are turning brown. Buds are not as fat as they are on cheese, however this AK seems to be a sativa phenotype so the smaller buds are expected. We'll see what the Overdrive does.
Cheese is 2 days away from chop chop ! So much frost.
This concludes week 9 !
