


Processing
Likes
5
Share


@GaiaGreenGiant
Follow
Day 42 - Another week gone by! No issues. Just water when dry. Gaia Green is proving itself to be a valuable addition. Makes growing so much easier. Speaking of easy, this strain takes well to any training induced on it but for this girl, I might just let her go naturally. We’ll see.

Likes
5
Share


Likes
31
Share


@JonnyKush
Follow
everything seems to be growing well! seems to have recovered great, is stretching well the color looks great! I have 3 other growing plants that follow the same diet but they seem to have suffered. she, on the other hand, looks very healthy.
Day 40
Flowering begins! I can say I see her healthy. this is because, not having given her a green sensation with water regulated by ph down but only water with ph down, she was regular at 6.5 for all weeks. this suggests the importance of checking the values every time I change something in the power supply.
keep following me to see the progress. I like it and leave an opinion or some advice. good luck and happy day 🌱💚
Likes
9
Share


@Cogollo_eu
Follow
**Encontrarás la traducción a español al final de la descripción**
From/Desde: 16/09/19 || To/Hasta: 22/09/19
From day/Desde día: 15 || To day/Hasta día: 21
Ocean Grown Cookies Diary / Diario de las Ocean Grown Cookies:
https://growdiaries.com/diaries/38831-oceangrown-cookies-blues-sisters
If you like this week, please hit a like, it costs you nothing! 👊. Thanks in advance 😉!
-----IMAGES & VIDEOS-----
From the next week i will start to record a timelapse video of the tent. Cheers!!
-----WEEK SUMMARY-----
I'm so sorry for the delay this last weeks, hard work times are very bad for my updates. This week is obvious how after remove them from the cheap chinese light, they're growing at high speeds. I'm going to top them the next week, I don't have very clear what I'm going to do, because I'm really without time this las weeks, and that is terrible for the plants, as this are very important weeks if I want to train them in a good way, and i can't, I'm praying to the goods of weed instead expending my time.
Ok ok ok, let's talk about the plants. For me, it's impressive the speed at how are they growing this 3rd week, they are already at about 15 cm tall, and for the next the 20 cm rule it not going to be enough to measure them.
All leaves are very green and I don't see any weird sympthoms, but if any better eye than mine sees something i would be very greatful with him/her if made a comment.
-----WATERING CALENDAR-----
16/09/19 DAY 15 - 1 l with all week nutrients (Organic Grow Half dosed) @ (0.9 EC | PH 6.1 | 25.7ºc)
22/09/18 DAY 21 - 1.5 l with all week nutrients -(Silica Power & Pro Active) @ (1.2 EC | PH 6.1 | 25.7ºc)
*****ESPAÑOL*****
Por favor, si te gusta esta semana dale un like, no te cuesta nada 👊. ¡Gracias por adelantado 😉!
-----IMÁGENES & VÍDEOS-----
A partir de la semana que viene empezaré a graba un timelapse del armario.
-----SUMARIO SEMANAL-----
Siento mucho el retraso sufrido esta semana y la que viene, los tiempo de mucho trabajo son muy perjudiciales para mis updates. Esta semana es obvio como después de haberlas quitado de la luz china malísima se han puesto a crecer a mucha más velocidad. La semana que viene las realizare el topping, no tengo muy claro qué ni cuanto puedo hacer esta vez, por que realmente tengo absorbido el 95% de mi tiempo estas últimas semanas y esto es malísimo para las plantas, ya que estas semanas son muy muy importantes para poder realizar un buen entrenamiento en las plantas y no me está siendo posible. Así que estoy rezando a los dioses de la hierba en vez de gastar el tiempo que no tengo para que todo vaya bien.
Ok ok, hablemos de las plantas. Para mi realmente es impresionante la velocidad a la que están creciendo esta tercera semana, ya están a 15 cm de altura y la semana que viene la regla de 20 cm ya no va a ser suficiente para medirlas.
A mis ojos todas las hojas se ven verdes y sin síntomas raros, estaría muy agradecido si algún ojo más experto que el mío ve algo y deja un comentario.
-----CALENDARIO DE RIEGO-----
16/09/19 DÍA 15 - 1 l Con todos los nutrientes semanales (Organic Grow mitad de la dosis) @ (0,9 EC | PH 6,1 | 25,7ºc)
22/09/18 DÍA 21 - 1,5 l Con todos los nutrientes semanales -(Silica Power y Pro Active) @ (1,2 EC | PH 6,1 | 25,7ºc)

Likes
13
Share


@BrigadeDesTerps
Follow
Les couleurs arrivent sur les demoiselles
Frosty devient une petite boule de neige
Les odeurs sont hyper fruité du côté gotti et Frosty
Aladdin kush buissonne fort et son odeur bien kushy/citron acid
Quelques brûlures sûrement à un surplus
Bouture d’ananas dans de l’eau

Likes
6
Share


@Spliffi
Follow
Germination 07/09/2022
Hi to all the old and new growers out there. Spring has barely started but I'm so AMPED to start again. My first grow attempt was a disaster. I started to early for the season. I wasted some good seeds and those Blasted 🐌 🐌 snails messed up everything. Got up started again and took it as a learning curve. I had 1 seed left from the previous attempt and this had to be the golden ticket.
The first important thing I learned was getting to the correct pH. Used a 1 liter jug not knowing that the pH down was very concentrated substance. Added 1ml of pH down to tap water with a base of 8.5+ pH and brought it down all the way to less than 4.5 pH. I probably tried like 5 times and realized that a single drop made a difference of about 2 pH. I got the feel of it and had to source a better water supply. I had the option of using tap water but didn't have the time to do a 24 hour airstone run ever time I wanted to water the plants. The local water supply shop was a better option. I got a consistent 6 pH and the price was decent.
The Snail 🐌 Problem... I have a plan
for those F**kers.
We have 2 very nice hydroponic shops in my city. Here's the supply list:
Freedom Farms Seed Starter
GHE pH Up
Kushy pH Down
GHE pH Test kit
Freedom Farms 10 liter fabric pot
Simba Genetics: White Widow auto
🌱🌱🌱🌱🌱🌱🌱🌱🌱🌱🌱🌱🌱🌱🌱
"I find it quite ironic that the most dangerous thing about weed is getting caught with it."
Bill Murray
🌱🌱🌱🌱🌱🌱🌱🌱🌱🌱🌱🌱🌱🌱🌱
Thanks for reading
Likes
14
Share


@UnkleSkunk
Follow
Io lo avevo detto che mi scattava qualcosa nel cervello....
Secondo me,col senno di poi,me lo ha detto la pianta...
Ha detto tu fallo e basta...e io l ho fatto ma ci sono andato delicatamente....
Ma lei mi insultava,non sei buono a nulla neanche uno schiaffo sul .....
no scusate è un altra storia quella... comunque alla fine dopo aver tolto la punta ne ho tolto un altro pezzetto 🤯😜
Likes
67
Share


@XG_Jack
Follow
This week was a lot of fun, I never had a plant fade black on me, I knew lemon pie could have purple traits, but this plant is stunning now that it’s finishing. Far from what I expected in a really good way. Going to give her a few more days, because each day the fade just gets better and better.
I can’t wait to try this out, should be ready to share harvest with you soon. One of those plants that’s hard to chop down in the end.


Likes
15
Share


@BlackForestGrower
Follow
After 72 hours of darkness, the RS11 x HOLLYWOOD was hung in the drying tent at 55–60% humidity.

Likes
6
Share

@Bud_vista
Follow
We are starting week 5!
It’s incredible how strong she’s growing since entering the pre flowering stage.
One week after entering preflower she’s stretching nicely and nearly covered the whole space.
After 7days from pre flowering I did another defoliation to improve airflow and focusing on forming potential buds.
Week 5 went smoothly and I’m still happy with the results and growing in coco.
Looking forward to week 6!
Likes
3
Share

@CalGonJim
Follow
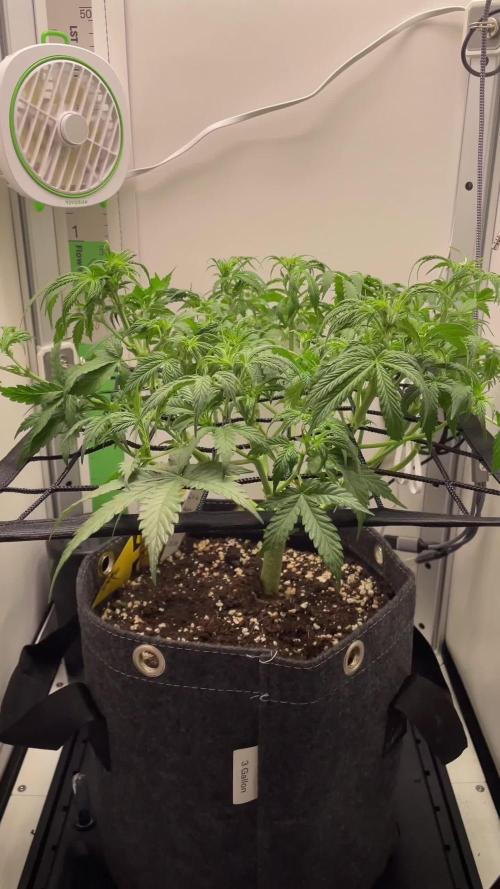
3/16 234AM MONDAY POTATO N WEEK CELEBRATIONS!
The plants in your photos look like healthy, vigorous **RF3 autoflower seedlings** (likely Banana Purple Punch Auto RF3 or similar from Fast Buds' upgraded RF3 line, based on the context of your previous grows with their genetics). They're in early vegetative stage at around 3 weeks from seed—nice bushy structure, good node spacing, dark green leaves, no major deficiencies or burn yet. The coco medium shows some perlite mix, and they're in small pots with what looks like a well-draining setup. Solid start
**RF3 autos** from Fast Buds are bred for stability, vigor, and resilience (often with heavy resin, dense buds, and good yields), but like most modern autos, they're sensitive to overfeeding early on—especially in coco, where salts build fast if not managed.
### Recommended EC at 3 Weeks (Early Veg/Pre-Flower Transition)
At week 3, autos are usually ramping up vegetative growth and may start showing pre-flower signs soon (pistils around nodes). Fast Buds' general autoflower feeding advice (from their guides and nutrient articles) emphasizes starting low and going slow:
- **Target EC: 0.8–1.2 (800–1200 µS/cm)** in the feed solution.
- Start at the lower end (~0.8–1.0 EC) if your plants are still very young-looking or if you've had any tip issues before.
- Push toward 1.0–1.2 EC if they're hungry (rapid growth, pale lower leaves) and responding well—no burn.
- This is often ~400–600 PPM (500 scale) or ~560–840 PPM (700 scale), but always go by EC meter for accuracy in coco.
- Always measure **runoff EC** too—aim for it to be no more than +200–300 above input to avoid salt buildup. If runoff is much higher, do a light flush with FloraKleen (like your 4 mL/gal plan) before bumping up.
- pH the feed to **5.8–6.2** (coco sweet spot), and water to 15–20%+ runoff every feed to prevent the issues you've seen with Purpinator/salts.
Many growers with Fast Buds autos (including RF3 lines like Banana Purple Punch or Cherry Cola RF3) report week 3 feeds around 0.9–1.1 EC in coco/hydro setups, starting lighter if using tap/soft water like yours. Your previous success with lighter Maxi feeds post-flush at ~900–1300 EC later on fits well—don't jump straight to 1.3 yet at week 3; build gradually.
### Recommended PPFD (Light Intensity) at 3 Weeks
PPFD (Photosynthetic Photon Flux Density, in µmol/m²/s) measures usable light for photosynthesis. For autos in early veg:
- **Target PPFD: 300–500 µmol/m²/s** at canopy level.
- 300–400 is safe and conservative for week 3—prevents stretch or light stress while encouraging compact, bushy growth.
- 400–500 if plants are stretching a bit or you want faster veg (RF3s are vigorous, so they can handle it).
- Avoid over 600 early—autos can bleach or foxtail if blasted too hard young.
- Measure at the top of the canopy with a good PAR meter (or app like Photone if calibrated). In Indio's setup (likely LED or HPS?), hang lights higher early (18–24" for LEDs) and lower gradually as they grow.
- Keep 18/6 or 20/4 light schedule—autos thrive on consistent long days.
General tips for your RF3 at this stage:
- If using Maxi series (like your previous grows), mix a light bloom/veg combo—e.g., mostly MaxiGro early, transition to MaxiBloom as pre-flower hits.
- Watch for clawing (N excess😂) or tip burn (high EC)—flush lightly if needed.
- These RF3 upgrades are forgiving but love good airflow and moderate feeds for those dense, resinous buds.
Your plants look primed for a strong run—keep that intuition going! How's the light distance/setup right now, and what's your current feed EC looking like? Any pre-flower signs yet? Drop more pics if they stretch or change post-week 3. You're killing it in coco—keep observing runoff and leaves. 🌿🚀
3/19 330am 👨🔬 **Adding L-Proline (the amino acid supplement growers use) to plants on soft water can provide some helpful support against the stresses you're dealing with, but it's not a full fix—think of it as a stress-buffer rather than a mineral replacement.**
Soft water (low in calcium and magnesium) often triggers **Ca/Mg deficiencies** in bloom stage (especially with Cha Ching or MaxiBloom, which don't supply much Ca/Mg on their own). This leads to issues like tip burn, leaf curl, weak cell walls, nutrient lockouts, oxidative damage (ROS buildup), and overall plant stress that feels like "the plant is struggling to hold it together." Proline steps in here as an **osmoprotectant**—it's one of the compounds plants naturally ramp up under stress.
### What Proline Actually Does in This Situation
- **Helps with osmotic/water balance** — Soft water can disrupt turgor pressure and water movement inside cells (similar to mild drought or salinity stress). Proline stabilizes cell membranes and helps the plant retain water better, reducing wilting or limpness.
- **Reduces oxidative stress** — Ca/Mg shortages cause free radical damage. Proline acts as an antioxidant and protects proteins/enzymes, so deficiency symptoms (yellowing, spotting, slowed bud development) don't spiral as fast.
- **Improves overall resilience** — In cannabis and general hydro/soil grows, L-proline (or full amino acid mixes containing it) has been shown to boost stress tolerance, speed recovery, and even support better nutrient uptake indirectly. Studies and grower reports note it helps under nutrient imbalance, drought-like conditions, and environmental swings—exactly the secondary stresses soft water creates.
- **Bloom-stage bonus** — Since you're already in late flower with Cha Ching/MaxiBloom, proline can support resin/terpene production and bud density without pushing excessive veg growth.
It won't magically add the missing Ca or Mg (those are still critical—soft water + high-P bloom nutes often screams for CalMag), but it can make the plant more tolerant while you correct the root issue.
### How Much Effect to Expect Right Now
- **Positive but moderate** — Many hydro/RO growers add amino acids (including proline) specifically for soft water setups and report less burn, better leaf health, and stronger finishes. It won't turn a severe deficiency around overnight, but it can slow the damage and give your plants a fighting chance in the final weeks.
- **No downside at proper doses** — It's very safe and plants use it quickly.
### How to Add It (Practical Dosing)
- **Source**: Pure L-Proline powder (available cheap online—make sure it's the plant-grade L-form, not human supplements).
- **Root feed** (with your Cha Ching/MaxiBloom): Start at 0.5–1 g per gallon (about 100–200 ppm). Mix into your res or feed water once a week. pH as normal.
- **Foliar spray** (often more effective for quick stress relief): 0.25–0.5 g per gallon + a drop of surfactant. Spray lightly every 5–7 days in the dark period.
- **With your current nutes**: Yes, it layers fine—reduce if you see any tip burn. Many run it alongside MaxiBloom + Cha Ching in soft water without issues.
- **Best timing**: Now through harvest is perfect, especially if you're noticing stress signs already.
**Real talk**: The biggest win will still come from adding a proper CalMag supplement (like Botanicare or General Hydro's) at 0.5–1 ml/gal or whatever your PPM tests call for. Proline + CalMag together is a strong combo for soft water grows. If you're running pure RO/soft, most experienced growers treat this as standard.""👨🔬
3/19 10:09PM RF3 X 2 =6 fail? I have TWO 2 gallon pots filled with coco from the last grow. I can plant a NEW BPP RF3 OR!!! I can top the 3 RF3's and make cuttings and grow the cuttings? It worked before!. FAST turnaround time, not much prep just refresh the coco and transplant the tops!
3/19 10:59PM NO WORK FOR NOW.. HIT WITH MASSIVE WAVES OF NAUSEA AND SHARP PAIN, DIZZY, RUPTURED NECK CYST BLEEDING, PAIN FROM MOVING TOO MUCH LAST FEW DAYS, RINIGNG EARS BAD, SKIN PRONE TO MASSIVE INFLAMMATION ATTACKS NOW, WEAKENING GUT LINING,. LUNGS ..GRIP AND BALANCE OFF, SO PERFECTLY NORMAL!!! THANK THE WEED GODS FOR WEED.
3/21 3:30 AM I think I’m gonna top all three of them. I got lucky all three seem to be different ones. I don’t know which is which one of them is really tall. The other one has really tight in her note spacing it’s really good and the other one is also good little bit different so I think I got three different RF three seeds and I think if I do top them I’m gonna put the top in another 2 gallon and then grow that as a cutting usually works I’m not sure👍🌿
3/23 3:08 PM I cut them all in half today a transplanted the top of the tallest one into one that was still growing just to see if it would work. They’re all doing really good.👍
326 237am Remember how your local ss cant prevent or solve a single problem you pay taxes for. unless you're really really sick and the cowards decide that the most important and pressing issue is to raid weed users and farms and seeds...what a country of fuqs
Processing
Likes
1
Share


@CityFarmer
Follow
Hello everyone,
Been busy but I shoot a little video for yall to see, also if growing is something you guys intended to do, I suggest you guys get yourselves a Digital Microscope or a jewlers loop.
I just got myself a Digital Microscope for under $20.00 on Walmart.com, I got me a cheap one to start with so I can learn how to use it properly. But for under $20.00 this one brings 8 led lights, a adjustable mount, comes with 3 different connection choices build in, magnifies from 50-1000x, can take pictures and also videos and my favorite part, it connects right to my mobile device, you download and install a Google app and your ready to go, ill work with it and add pictures next week...
See you guys soon 👊👊👊
Likes
16
Share


@DrShotzUK
Follow
SUGARLATO - GREEN HOUSE SEEDS - week 8
Already flushing due to her not taking up the water as fast now.
She’s turnt out to be a quick little stunner. Week 8 and already flushing because she’s ready to go.
This strain is new but will definitely be done seed to harvest in 8-9 week max.
Smell is amazing of earth undertones with a gassy pastry smell. Big sized golf ball sized nuggets that are pritty dense
DRSHOTZUK
Likes
17
Share


@Todzilla
Follow
2 Black Cherry Gelato 🍒 Clones from my clone guy-
1000w LED, 4G Autopots,, coco/perlite 65/35, Jacks RO + dry koolblom and humic acid , RO water, AC pro Controller and T8, 5x5 GG Tent with extension. Garage grow SoCal.
Another hot week in the garage averaging 88°. The girls are starting to develop and gain weight. Trichomes are coming along.
We’re running just under 1000ppm with no issues. We switched nutes and reservoir funk is gone.
This weeks accomplishments:
Switch from GH to Jacks RO
Install separate reservoirs for black cherry gelato and purple push pops
Clean all autopots and reservoir lines.
Install separate lines for black cherry gelato
This weeks issues:
Spider mites. Found them in the outside grow and found a few leaves with them inside. Big time nightmare. Primarily on the gelatos inside. Doing manual scouting and removal every day.
Long term issues
It’s hot. High 80s low 90s all week. So the same - Cooling and VPD targets during heat waves
Preventing the spread of mites and mold issues during high humidity conditions
Managing girlfriend expectations through harvest.
I hope you all are having as much fun as I am.
Best of luck gromies.
Check out my purple push pop grow side by side with my indoor grow- same clone batch.
Check out my outdoor light deprivation grow side by side with my indoor grow. This should be a great comparison of indoor versus outdoor grows. 👍

