The Grow Awards 2026 🏆 


Likes
9
Share
@TPBzh
Follow
They are growing fast. I have bend them and broke some branches ... I am trying to fix them. I have cut 2 or 3 Big leaves on each. They are just giving signes of flowering.
Everything look in control for now

Likes
17
Share
@couplethatgrows420
Follow
did not get wet weight on this one but will update dry weight in a few days
Likes
13
Share
@Sticky_icky
Follow
1900x speed 24h time-lapse. Very much happy with their growth speed now after that slow clone phase.

Likes
4
Share
@Serenityjane420
Follow
Full flowering has officially commenced. Lots of bud sites, a bit more defoliation and opening up. I untied the middle four colas so they can shoot up. I’ll be adding a second layer of lights for the lower canopy in a week or two.
Likes
2
Share
@CannaIGrow
Follow
Plant is looking good. Probably the best looking in the grow so far IMO. Can’t wait to see her grow out!
Likes
Comments
Share
@BruWeed
Follow
☘️22/11 - La semilla se hidrato en agua durante 24hs.
☘️23/11 - La puse a germinar en papel húmedo.
☘️25/11 - Ya germino y aproximadamente media 3cm. Ese mismo dia la coloque en un vaso chico con un poco de tierra. En una semana ya la traspaso en una maceta de 10L y ya queda en esa maceta hasta el final.
☘️27/11 - Broto el plantin. Se encuentra bien por el momento. Por lo que noto viene rápido su desarrollo.
☘️Voy a dejarla 2 semanas en crecimiento con luz 18/6. Una vez que este en flora lo cambio a 12/12.
☘️El banco de semillas comenta que en indoor todo su desarrollo es de 75/80 días.
☘️El banco aclara: una variedad para cultivadores experimentados ya que, si se producen diferentes factores de estrés en el cultivo, es una variedad que puede dar alguna inflorescencia masculina en un 2% de los ejemplares, por lo tanto es un dato a tener en cuenta dada su descendencia americana.
☘️Los productos que voy a estar utilizando son los de advance nutrients en toda su etapa.
☘️Con el ph voy arrancar en 5.8 hasta llegar a 6.4.
☘️En estos días estaré publicando mas imágenes de como viene.
☘️🇦🇷Podes seguirme en Instagram como @bruweed_arg para mas contenido.

Likes
3
Share
@Earthsower
Follow
The Double kush cake is doing fine with continued growth and vigour. Her canopy has split wide open with several shoots and five fingered leaves she is a vibrant green with slight burns due to the lights. She stands at approximately 42 cm
Likes
21
Share
@Backtotheroots2222
Follow
So now is the 16th day. This week the weather was rather bad!! Alfa boost has gone all out and couped a little too much N. but she is still young and will cope with it... in my opinion a bit behind but the weather should finally get better and become more consistent. the rain has now quite saturated the soil so that I had to cover the pot with foil to avoid overwatering. I ask for sun and a little dung... roots in the small pot had arrived at the bottom, are OK not lush but healthy and bemyzelt... hope she accelerates the next few days otherwise the bucket was a bit too big. will see.
Likes
Comments
Share
@GanjOS_OG
Follow
We picked up the cuttings for the GanjOS Lab from High4Life on December 30th and put them in our propagator for around 3 days for acclimatization.
Likes
1
Share
@Catawbiense
Follow
🌱 Veg Week 5 – Erholung & Vorbereitung auf den Flip
Veg Woche 5 war etwas holprig. Während ein paar Tagen Abwesenheit standen die Pflanzen zu trocken, kombiniert mit 24h LED-Licht, was zu leichtem Stress und CalMag-Mangel geführt hat (unruhige Blattfarbe, viele kleine Budsites).
Nach Anpassungen:
Umstellung auf 18/6
Licht etwas entschärft
CalMag-Gabe
leichtes Lollipopping & Defolieren
Bereits nach wenigen Tagen zeigen die Pflanzen eine deutliche Erholung: neues Wachstum ist vital, Triebe werden kräftiger und die Pflanzen wirken insgesamt entspannter.
Das Zelt ist gut gefüllt, weitere Trainingsmassnahmen sind nicht geplant. Der Stretch soll den Rest erledigen.
Der Flip in die Blüte ist in den nächsten Tagen geplant, sobald die Erholung vollständig abgeschlossen ist.

Likes
28
Share
@Trickybis82
Follow
Hello growmies,
Quick update the girls are doing fine and are loving life at present everything is going well and they are starting to really bud up.
Not alot more to add at this time. :)
Adios amigo


Likes
41
Share
@Roberts
Follow
Deepforest Super auto is doing well. I have had slight ph issues. She has been very hungry. Everything is looking good. Thank you Spider Farmer, Athena, and Doctor's Choice. 🤜🏻🤛🏻🌱🌱🌱
Thank you grow diaries community for the 👇likes👇, follows, comments, and subscriptions on my YouTube channel👇.
❄️🌱🍻 Happy Growing 🌱🌱🌱
https://youtube.com/channel/UCAhN7yRzWLpcaRHhMIQ7X4g.

Likes
Comments
Share

Likes
46
Share
@GanjaReaper
Follow
At the end of last week, finally flower indicators started to show and these week it went more.
Day 32:
I sprayed them with Rhizotonic this week. This will be the last week for sprays. I don't like to spray my plants while having buds on it even thought it is organic.
Always make sure you spray from below the leafs. They will uptake it better and also spray some above. With the lights off.
Did some defoliation again and removed some lower internodes which will be crappy buds anyways.
Made a video of my feeding bucket as well, in case some of you wonder how I feed all those plants manually.
It is a pump with an gardenhose attached.
Thats it for this week, Until next week!


Likes
25
Share
@AlexanderBeeswax
Follow
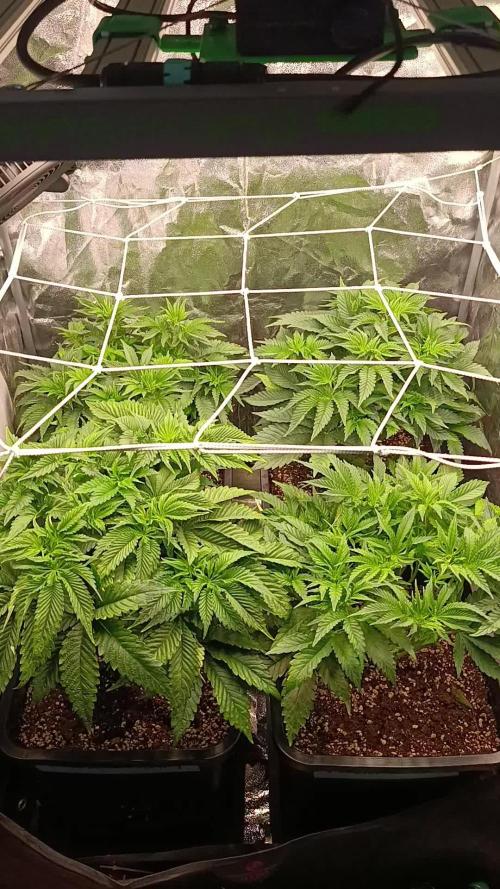
Overwatered the two in the back earlier this week on day 12, not paying attention like an idiot 😫. Will resume watering as normal tomorrow, day 16.
Plan on starting LST this week, depending on size. Plant in the front on the right is almost ready now.
The mutant plant in the front on the left has some really weird growth, but I’m gonna see where it goes... why not?!
________________________________________
Started LST for 2 of the plants on day 17. The other 2 are still a little short but will probably be ready for LST within 3-4 days.
I have now (day 19) started LST on all 4 plants. First I plant started LST on, now has the lower sites starting to fill in.
Wrapping up week 3. There is one plant clearly straggling behind the others. The other 3 (including the mutant!) are responding well to LST. For now I’m sticking to leaf tucking, and have only defoliated the couple leaves sagging into the soil. Over-watering from early in the week definitely slowed growth down temporarily, but seems to be back on track now!


Likes
12
Share
@Jays_Not_Here_Man
Follow
Did some defoliation this week, not much but enough to create some airflow and unblock a few bud sites. Readjusted my DIY “floating” to take up some of the stretch that had gotten out of control, ❤️ that I can do that!
The frost is real for this strain OMG, week 3 and it’s already as frosty as some of the Autoflower’s I have grown. Temps have been climbing here and there, we’re getting a lot of dry heat so that’s the plus at least, not a lot of humidity at the moment. I’m really wishing I had taken clones from these girls because I’m sure they are going to be insane if they look this good at week 3. 🇨🇦👊❤️

Likes
211
Share
@PapaNugs
Follow
Has been a good week for the girls. They really exploded this week. I can't keep up with the ties. They got too big to have a level canopy. Will have to adjust later this week after defoliation and lollipopping. Will be a huge week and the girls will look different next time you see them!