
Likes
Comments
Share


@Roberts
Follow
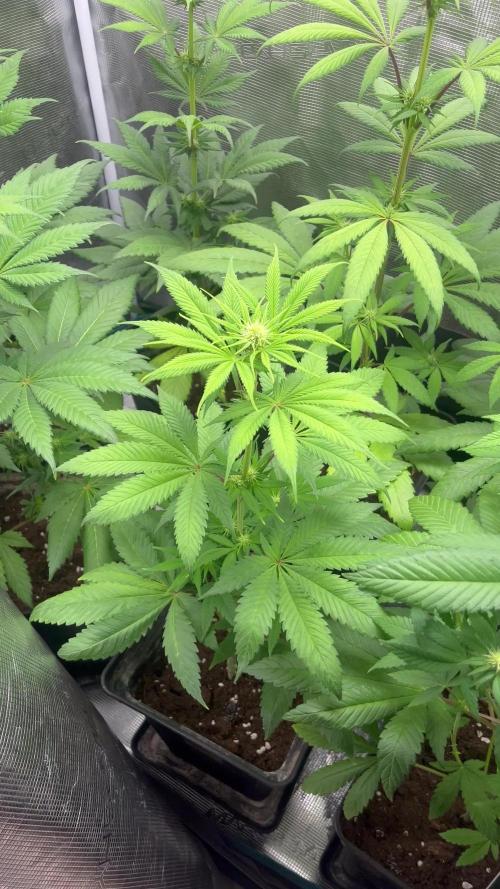
She has a strong sweet floral smell. This was a great grow with the Agrogardens nutrition under the Medic Grow Mini Sun-2. I didn't have any major growing issues during the grow. Everything looks great, and produced great. Thank you Medic Grow, Agrogardens, and Doctor's Choice. 🤜🏻🤛🏻🌱🌱🌱 the harvest video will be on my YouTube channel. 👍🏻🔥
Thank you grow diaries community for the 👇likes👇, follows, comments, and subscriptions on my YouTube channel👇. ❄️🌱🍻
Happy Growing 🌱🌱🌱
https://youtube.com/channel/UCAhN7yRzWLpcaRHhMIQ7X4g

Likes
13
Share

@eldruida_lamota
Follow
Que pasa familia, vamos con la segunda semana de floración de estas Green Gelato feminizadas de RoyalQueenSeeds.
Vamos al lío ,se trasplantaron en macetas de 7 litros definitivamente.
El ph se controla en 6.0 , la temperatura la tenemos entre 24/20 grados y la humedad ronda el 50%.
El ciclo de floración puse 12h de luz, el foco está al 50% de potencia.
De momento van creciendo a buen ritmo y tienen un buen color, estaban muy bien enraizadas al realizarle el trasplante se notaba la abundancia radicular.
Agradecer Agrobeta por el envío del kit gold series en cuestión, unos maestros 🙏
- os dejo por aquí un CÓDIGO: Eldruida
Descuento para la tienda de MARS HYDRO.
https://www.mars-hydro.com
Hasta aquí todo, Buenos humos 💨💨💨


Likes
44
Share


@RakonGrow
Follow
Note :
+ jegliches Zubehör wird in der GermniationsWoche aufgelistet . Zeitraffer Videos folgen immer nachträglich.
+ videos werden so geschnitten das nur ein geschlossenes Zelt erscheint , ergo Fehlen paar reale Minuten (ca 1 Std) .
+ + leider ist die Halterung defekt und die Videos etwas schief . Vielleicht mach ich mich irgendwann mal daran und korrigiere das. Sorry
Day 43:
+ Höhe : 64cm
Es wächst und wächst :))
Day 44:
+ Höhe : 65cm
+ 2 Liter Flaschenwasser , kein Dünger .
+ + PH 6.5
+ Drain : PH 7.0
Höhe ist bei 63cm , das ist 3 cm mehr als die Vorgabe ausweisst :))
Day 45:
+ 66cm höhe.
+ 2 Liter Flaschenwasser
+ + Dünger für Blühte
+ + + Canna Terrar Flores (Achtung wirkt wie PH-)
+ + + Canna Boost
+ + + Cannazym
+ + + Greenhouse Feeding BioEnhancer als PH+
Jetzt säuft sie wie wilde , keine 24h und die 2Liter sind komplett wech . Mehr geht aber nicht in den Topf , ergo muss ich mir langsam mal überlegen ob ich Tropfbewässerung nutze .
Und es treten duch das nur Wasser extreme "Calzium" Probleme auf . Hihi , aber so hab ich mal das ganze auf Startsequenze gesetzt . Ich arbeite also noch daran diese Mischung aus BioBizz Light und Urgesteinmehl nach Schätzung zu meistern :)) Den Fakt ist , da ist viel zu viel Urgesteinmehl drinne , was auch die Vegiphase schon gezeigt hat.
Day 46:
+ 1.5 Liter Flaschenwasser
+ + Dünger für Blühte
+ + + Canna Terrar Flores (Achtung wirkt wie PH-)
+ + + Canna Boost
+ + + Cannazym
+ + + Greenhouse Feeding BioEnhancer als PH+
Day 47:
Draussen zu heiss , drinnen zu feucht ... Ja genau was ich nicht brauch lol ...
GoPro aus der Halterung gefallen :))
Day 48:
+ Höhe : 68cm
+ 2 Liter Flaschenwasser
+ + Dünger für Blühte
+ + + Canna Terrar Flores (Achtung wirkt wie PH-)
+ + + Canna Boost
+ + + Cannazym
+ + + Greenhouse Feeding BioEnhancer als PH+
Draussen zu heiss , drinnen naja ... Der Entfeuchter arbeitet weil ich sonst hier Tropenstimmung bekomme :)) Ein wenig Entlaubung .
Day 49:
+ Höhe : 68cm
+ 2 Liter Flaschenwasser
+ + Dünger für Blühte
+ + + Canna Terrar Flores (Achtung wirkt wie PH-)
+ + + Canna Boost
+ + + Cannazym
+ + + Greenhouse Feeding BioEnhancer als PH+
+ + + PH 5.8
+ + Drain PH 6.5
Läuft bei der Lady , sie trinkt , liebt das Licht (auch wenn die Spitze etwas zuviel bekommt , sie betet halt etwas ) , Mangelerscheinungen sind echt gering . Hat die heissen Tage (27° im Zelt bei 60%-57% ) hat sie super überstanden . Ich werde immer besser im Gießen . 75% von oben , 25% lass ich von unten aufsaugen .
Likes
2
Share


@LittleBigTrees
Follow
Still giving max feed , will stop soon as the trichomes are starting to turn cloudy but the buds are still swelling, maybe another week , I'll keep a close eye on things .
Here's a discount code for zamnesia.com
For anyone wanting to try out their products:
ZAMMIGD2023

Likes
22
Share


@MicrowGrow420
Follow
5 seeds took, now under 600w led veg light no nutes just water until they settle in.
Light Schedule is 18/6

Likes
6
Share


@Black_Widow
Follow
Привет садоводы
цветок еще немного подрос и показал пол
уже готов зацвести
цвет листьев у него хороший

Likes
20
Share


@PAPH_Grow
Follow
Day 51 - Really bushing out and getting wider. Some more hairs are visible, yet no real bud production yet. Roots are long and healthy looking. Still going strong with the same nutrient mixture.
Day 53 - Topped up water today and had a casualty unfortunately. 😕
Day 56 - Switched lights to 12-12 to try and induce the flowering process on day 54. Today they are looking like they have more hairs coming along. Also topped up water again. Plants are still growing very fast. And getting bigger and bigger.

Likes
26
Share


@Highgrade_Harvests
Follow
First week of flower and the girls seem to be doing really well. I haven't been in the tent this much this grow as I've been extremely busy with work and the outdoor garden. I'm feeding flowering nutrients now and I'm starting to get heavier on the feedings. I wish I could trellis but I didn't have the time and the small plant would make it a little difficult. I will defoliate as much as possible for light penetration and hope for sole big buds. All in all this grow is going very well so far. Excited to see the difference in bud shape between the 3 plants of this strain.

Likes
8
Share


@SkunkyDog420
Follow
Hallo zusammen 🤙.
Habe sie heute geerntet.
Sie wird jetzt 3 Wochen trocknen und dann kommt die Beurteilung.
Bis in 3 Wochen

Likes
8
Share


@GeoBeginner
Follow
I'm not going to use stress techniques anymore
Everything is going normally
Just a few more weeks
It's getting very hard to wait 😬
UPDATE !!! ___ Flushed on day 56

Likes
6
Share


@Exoticfarm99
Follow
Se acerca campaña de corte
Las demás las seguimos cada 10 días con tes


Likes
20
Share


@Frank_cultiva
Follow
A pesar de que es una cepa automática, soportó transplante, podas y LST... Ninguna queja con la cepa ni los productos utilizados... Sí hago una autocrítica hacía mi persona, sé que con más atención al cultivo hubiesen sido mejores resultados.
PD: No pude hacer un seguimiento adecuado por problemas con la aplicación en el celu

Likes
7
Share


@Skull
Follow
Has anyone else grown Buddha magnum Auto before I'm 30days in no sign of flower. As far as I can research it's 100 day Auto any thoughts would be appreciated


Likes
8
Share


@HighOhioAn
Follow
She is starting to get her paid. Her buds are nice and dense some of the biggest buds I’ve ever Had on a plant all consistent on all the branches bunch of tops. Gotta love that Fast buds genetics🔥💯
Likes
5
Share

@ViherPeukalo
Follow
W12 started and after few days of wonderin is just one 270w LED panel enough for these two monsters I got 2nd panel installed now there is plenty of light and sides should stop growing taller than the middle.
W12D3 installed 2nd 270w led for total light power of 440w. measured ppfd from accross the tops sc in the pictures.
Girls have adjusted well in their new pots and topside is looking really bushy onse again. Might do another round of topping before flowering to prevent them growing too tall, not shure how much they strech after flipping lights.
Ok I felt the urge to get flowering so trimmed away the tops from LB2. LB1 needs to be mainlined from the back and i think it's ready for flowering.
W12D7
girls are ready for flowering, just need to defoliate boght and LB1 might need little topping tho i might leave it like that to see how long it stretches.
3 months have passed quick and flowering time for this strain is around 10-12weeks so we are around the halfway mark with this diary.
Likes
6
Share


@NANTANLUPAN
Follow
It has very energetic and strong genetics. It seems that the main stem is large and healthy, and the buds are completely covered with colas

Likes
33
Share


@Odissey
Follow
Update week 15: I have been flushing them for a week now. I will let them go an additional week and then I will probably harvest depending on the trichomes. They smell lovely, the DGx3BOG smells like gummy bears and the Tangie smells indeed very citrusy.
Likes
8
Share


@Alien98
Follow
Fat buds and 4 phenotypes. The first two are very similar: indica and very productive. One is a highly sativa phenotype who grows high but have large-indica leaves. At last I found a not so big yielding phenotype but it produced top buds with much resin.

Likes
50
Share


@DogDoctorOfficial
Follow
🌱 Eternity Grow Cup: Week 2 Veg Report – Building the Foundation 🌟
First, I want to extend a heartfelt thank you to Grow Diaries, this amazing community, and all the sponsors making this journey so special: Aptus Holland, Pro-Mix Soil, TrolMaster, ThinkGrow LED, Future of Grow LED, and CannaKan. And a special shoutout to Zamnesia and Plagron for their incredible support with seeds and nutrients for this run. This wouldn’t be possible without all of you—thank you for inspiring us to put our best into this grow! 💚
Growth Update: Small but Mighty
As Week 2 wraps up, the Zamnesia Runtz are still small, but they’re growing beautifully.
• Leaf Development:
• The first true leaves are now fully visible, and the second pair is starting to emerge on the horizon. Seeing those signs of life and progress fills me with hope and excitement.
• Nutrient Introduction:
• This week marked the beginning of feeding, laying the foundation for strong, vigorous growth in the weeks ahead.
Current Setup
• Environment:
• Temps are holding at 20°C, with RH at 60%—a comfortable range for young plants.
• The heat mat under the pots is maintaining an optimal root-zone temperature, keeping them cozy despite cooler room conditions.
• Location:
• Still growing alongside their sisters in the 4x8 tent but will soon transition into the full TrolMaster ecosystem, where precision and control will take things to the next level.
Nutrient Spotlight: Starting Strong with Aptus Holland
I’ve chosen to introduce the Aptus Holland lineup this week. These nutrients are carefully formulated to support plants through every stage of their growth cycle, and here’s what I’m using:
1. Aptus Regulator (0.15ml/L)
• What it is: A silicon-based additive that helps plants regulate stress and environmental challenges.
• Benefits:
• Strengthens cell walls, leading to thicker stems and stronger leaves.
• Increases stress tolerance, particularly against heat, cold, and light fluctuations.
• Improves nutrient uptake, ensuring plants get the most out of their feedings.
• Why now: At this early stage, Regulator gives the plants a strong foundation to handle the cooler temps and build resilience as they grow.
2. RO Water Conditioner (0.8ml/L)
• What it is: A product designed to optimize Reverse Osmosis (RO) water, making it suitable for plant feeding.
• Benefits:
• Balances pH and stabilizes water for nutrient absorption.
• Adds essential elements back into the water, ensuring a balanced feed.
• Why now: Using conditioned RO water prevents imbalances and provides a clean, consistent base for all feedings.
3. All-in-One Liquid (1.25ml/L)
• What it is: A complete macronutrient blend designed for vegging plants.
• Benefits:
• Provides all essential nutrients (N-P-K) in a balanced ratio.
• Easy to use and highly effective, supporting strong vegetative growth.
• Why now: As the plants develop their first leaves and roots, All-in-One Liquid ensures they have the building blocks needed to thrive.
Educational Focus: Why Start Nutrients in Week 2?
1. Natural Reserves:
• During the first week, seeds rely on their own nutrient stores within the seed casing. Introducing nutrients too early can overwhelm or damage delicate roots.
2. Signs of Readiness:
• By Week 2, the emergence of true leaves signals that the plants are ready to transition from relying on reserves to taking in nutrients from the medium.
3. Balanced Start:
• Starting with low doses ensures the plants can adjust gradually, reducing the risk of nutrient burn or stress.
Week 2 Insights: Setting the Stage for Success
1. Managing Environment Challenges:
• Lower temps can slow growth, but maintaining a warm root zone with a heat mat has been key to keeping these seedlings healthy and happy.
2. Patience in Veg:
• Early veg may feel slow, but this phase is all about establishing strong roots and foundational growth. Remember, every strong plant starts with a strong start.
3. Why Pro-Mix Soil:
• This medium provides excellent aeration and drainage, supporting rapid root growth. The added Biofungicide and Mycorrhizae further enhance plant resilience and nutrient uptake.
What’s Next?
As we move into Week 3, I’m excited to see these beauties continue their journey. The next steps include:
• Monitoring the development of new leaves and early structural growth.
• Transitioning to the TrolMaster ecosystem, where environmental precision will allow the Runtz to truly shine.
• Documenting every moment through photos and videos to share the magic with this amazing community.
Community Love & Thanks
Thank you to everyone following along and supporting this grow. To all the participants in the Eternity Grow Cup: best of luck—let’s make this one for the history books!
Stay tuned for Week 3, where we’ll dive even deeper into the evolution of these incredible plants. Until then, keep growing, keep believing, and let’s create something legendary together! 💚✨
Genetics - Runtz https://www.zamnesia.com/6000-zamnesia-seeds-runtz-feminized.html
Nutrients - Plagron https://plagron.com/en/hobby
- Aptus Holland https://aptus-holland.com/
Controls - Trol MAster https://www.trolmaster.eu/
LED - https://www.futureofgrow.com/en
LED - https://www.thinkgrowled.com
Soil - https://www.promixgardening.com/en
Germination - Cannakan https://cannakan.com/?srsltid=AfmBOopXr-inLXajXu3QFgKXCXXos4F1oEvScjMKIB5MR5dk8-GJ-F49
DOGDOCTOR 15% off
As always thank you all for stopping by, for the love and for it all , this journey of mine wold just not be the same without you guys, the love and support is very much appreciloved and i fell honored with you all in my life
With true love comes happiness Always believe in your self and always do things expecting nothing and with an open heart , be a giver and the universe will give back to you in ways you could not even imagine so
As always, this is shared for educational purposes, aiming to spread understanding and appreciation for this plant. The journey with nature is one of discovery, creativity, and respect. Let’s celebrate it responsibly and continue to learn and grow together!
Growers Love To you All 💚