


Likes
14
Share


@SkunkyDog
Follow
Hallo zusammen 🤙
Habe sie am 61 Blütetag geerntet
Wir sehen uns in 3 Wochen mit der Bewertung 😉🤙


Likes
25
Share


@Tidy_THC
Follow
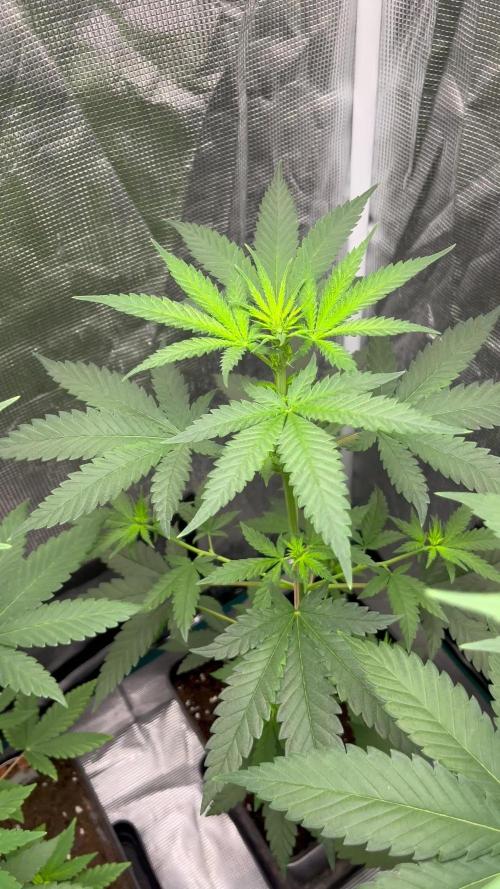
Pollen will be arriving soon, it is pumping lots of sacks out this week, buds are fattening and smell is increasing with sugar on the buds.. not really any issues.

Likes
14
Share


@Rock_n_Roll_Randy
Follow
THE VIDEO INTRO SAYS THE 5X5 GROW TENT BUT I FUCKED UP AND IT SHOULD BE THE 8X8 GROW TENT
FOR EVERYTHING MARS HYDRO VISIT:
www.mars-hydro.com
www.marshydroled.ca
PROMO CODE: rocknroll
VISIT THE ALIEXPRESS STORE:
@marshydro_aliexpress
Instagram: @marshydropenny
https://youtube.com/channel/UChU5ZWwNi-DvnO3oWVU3ceA
(NEW) STRIVE NUTRIENTS 💪
Thanks for taking the time to read and check out my diary🤜🤛
FC-E6500 LED GROW LIGHT:
FC-E6500 grow light with 3978pcs OSRAM BridgeLux Diodes & Moso Driver, market-leading PPF 2.7 µmol/J, Max 2.5g yield/watt with 30% higher Average PPE, more cost-effective when compared to same style type lights. Only consumes 650W, perfectly cover 5x5ft (personal), 4x4ft (commercial) grow space. Innovative Precise Uniform Lighting-Built-in removable bars interval & dimmability enable the exact & dynamic PPFD control over each of the plant growing stages, FC-E6500 detachable bars deliverSuperior Heat Dissipation: Real Aluminum heatsink together with 6 slim profile passive cooled bars (THINNER & LARGER surface) and detachable Meanwell Driver, create less heat. save 50% hydro than other old grow lights! Driver can be mounted remotely on the side of a grow tent/rack or on an adjacent wall to remove heat from grow space. Full Spectrum UV IR LED: With Yield Max spectrum (660nm Osram enhanced Deep Red,2800k-5000k,730-740nm IR,380-410nm UV LEDs), Average PPFD the FC-E6500 LED grow lamp enables cultivators to produce BIG FAT Dense Buds, perfect for full-cycle hydroponic, soil, grow tent/grow room.
Dimmable Commercial Grow Light: Cost-efficient, easy dimming & daisy chain With a max up to 20 lights, IP65 Waterproof, master light easily controls the rest. Perfect for commercial & home horticulture.
FC4800 LED GROW LIGHT:
GET THE MAX FROM MARS👍: Welcome one of the newest members of the Mars Hydro family🤜🤛🤘. The Mars Hydro FC 4800 480W LED Grow Light can accommodate up to a 4' x 4' area for flowering. It has OVER 2000 LED chips consisting of the best selling Samsung LM301B diodes which has a Luminous Efficacy of: 220 lm/W
0.2 W, 3 V mid power,
Osram 660nm Diodes, Infrared light and UV LIGHT👍. It boasts the incredible efficiency of 2.8 µmol/J, maximum 2.5gram yield per watt with 30% higher Average PPFD. This High-intensity spectrum is beneficial for plants at all stages - from veg to bloom, and creates Big dense Buds👍. achieve 50% higher yields & quality compared with the old lights! Only consumes 480W for 4x4ft personal grows, and 3x3ft for commerical grow. It comes with a dimmer and daisy chain function with a maximum of up to 15 lights, the master light controls the rest👍. Wide 6-bar design offers even & wide canopy coverage and can maximizes your grow space. slim 180° FOLDABLE DESIGN... YES I SAID FOLDABLE🤘🤣 , making it compact and easy to install, it's IP65 WATERPROOF and will give you no worries while growing in a humid environment and makes it a flexible high performance commercial grow light for enormous SUPER FROSTY yields.😛😛😛. MARS GETS EM FROSTY BOYS👍
AWESOME HEAT DISSIPATION: The Low energy consumption FC4800 growing light has 6 passive-cooled bars and an aluminum heat-sink a removable driver you can upgrade later or have it outside your tent. with zero noise you can save up to 50% in your electricity bill compared to HID's or HPS lights!
It also has a removable driver so you can upgrade it in the future or have it outside your grow space for better heat control in your growroom👍
UPGRADED FULL SPECTRUM: Yield Max Spectrum with enhanced red (Top-Bin Samsung 3000k-5000knm, Osram 660nm Deep Red), speed up blooming & fruiting, perfectly suited for full-cycle growing. The FC4800 LED grow lamp was born for Big Buds, perfect for commercial, grow tent, grow room, hydroponics, and all soil grows.👍
THE BEST SAMSUNG DIODES: THE FC4800 has Top Bin genuine Samsung Osram Diodes, combined with remarkable 2.8 µmol/J Efficacy, 30% higher Average PPFD, 50% less energy consumption, to maximize your yields. They give you a TRUSTED 3 years warranty 100% Satisfactory guaranteed!!!
TSW2000 LED GROW LIGHT:
INCREASE YIELD AND CROP QUALITY WITH MARS HYDRO LED GROW LIGHTS: NEWEST SMD LED technology provides the highest PAR/LUMEN output (1122umol@18") and can make you get 30% higher yield compared to OLD blurple led lights. Max 2.5g yield per wattage and achieve maximum quality and quantity, much better than traditional HPS grow systems
LOW ENERGY CONSUMPTION LED GROW LIGHT: Consuming only 300W true output with 684 LEDS! It saves up to 50% energy than other led grow lights. Perfect for 3.5x3.5ft bloom stage, 4x4ft veg stage. Over 90% light energy can be absorbed by plants, it will have higher intensity in a MARS HYDRO grow tent with diamond design mylar, or by crossing over using multiple TSW2000
HIGH EFFICIENCY FULL SPECTRUM INDOOR GROW: 3000K 5000K and IR 660nm 760nm RED, makes it close to natural light, highly engineered to provide improved growing performance for plants at all stages of growing, rapid plant response from seed to flower; Uniform and wide-beam light distribution for your plant's optimal growth
8x8 1680D GROW TENT
The MARS HYDRO 8x8 Grow Tent interior is made of a unique diamond design mylar which is highly reflective. (Other companies mylar and reflective rate is as low as 50%, and it won't provide efficient light. They use thick 1680D oxford canvas, and being double stitched, it is tear proof and perfect for locking in the light. Their grow tent keeps 100% of the light inside the tent and helps your plants absorb more light. EXTRA-THICK material means No light leaks or rips at all.👍
Strong Stable metal corner adapters and poles are the trustful supporters of the tent. It's very sturdy, neither rusting or paint flaking off. quick and easy tool-free setup. They use heavy-duty metal zippers, with double layer black lining, by far the best on the market which creates a light-proof seal.
The Easy observation windows are made by double layers of cloth. Observe the growing conditions of your plants without opening the tent and avoid disturbing your plants. The observation windows also serves to dissipate heat and ventilate the air.
The tent includes 2 removable waterproof floor trays to hold soil and water. The removable tray can be taken out to wash easily.
They guarantee the grow tents are easy to install even if you've never done something like this before. Clear Instructions and no tools needed! They also offer 30-day unconditional refunds for quality problems. Just contact their friendly 24 hours customer service 👍
Processing
Likes
4
Share


@Skillgrower
Follow
Semana 6 quinto dia, as mais pequenas um pouco atrasasdas em relação mas nada de grave simplemente atrasou devido ao stress!
Boa semana no geral cheiro forte, muitos tricomas, as mais pequenas estao super frosty!
Ultima semana a levar big bud no inicio da proxima vou intoduzir o over drive na maior para dar um ultimo pump antes do flush!
Ancioso que chegue a hora para sentir os fumos destas meninas 🤤🤪


Likes
16
Share


@Mo_Powers
Follow
i started with LST. unfortunately the plant grew too fast in height, which doesn't make it any easier now. next week i'll try it with twine. maybe i should it just let it grow as it likes.

Likes
2
Share


@CannaIGrow
Follow
She’s growing well and finally starting to grow
out of her lil leaf mutation at the beginning.
Likes
1
Share


@richthegrower
Follow
OG Kush Auto actually was germed on 12.18.22.
The OG Kush ended up being a Triploid.

Processing
Likes
6
Share


@iamdiddy
Follow
weathet is cold and i save my qween zkittles indoor room , wheet 450 vipaspectra led 450.
feels great..31.09.19
pliace comment..
Likes
20
Share


@DeepRootsGrowTrees
Follow
KRITIC AUTO by KANNABIA
Week #12 Overall
Week #9 Flower
This week she's doing great 👍 looking outstanding frosty dense buds she smells great she's almost done a few more weeks. Stay Growing!!
Kannabia.com
KRITIC AUTO

Processing
Likes
21
Share


@RussianGrower
Follow
Hello, friends, I Welcome you again from Russia. Comes week 5 photoperiod Bubblelicious. I planned to make clones of this plant, but unfortunately the whole place is occupied by other projects, and temporarily I have to give up this idea, but I will continue to grow this plant, later on, I still make clones, and while I tear off the vegetative leaves and give free growth.

Likes
1
Share

@DrGL_Thumb
Follow
Dropped the 3 seeds in water bath with a little HESI rooting mix, little mycorrhizae.
On a heat mat, covered for complete darkness. 24 Hr soak -
then seeds moved into own Seed Germinator - Karl’s Bubatz Popper 😂
24 hrs after 22 degrees and 90-95% humidity seeds developed long enough roots to hit the soil. To avoid any chance of damage the cotton pads hit the soil too.
Likes
12
Share


@StonedandSteady
Follow
#AutoBlueberry 3rd-4th W/ Veg breed by #DivineSeeds #DivineSeedsSquad #DivineSeedsBreedingCompany
Origin:Afghani/Thai
Type:50% Indica/ 40% Sativa/ 10% Ruderalis
Flowering:56 days
THC:22%
Harvest:400-550 g/m2
Height:110-150 cm
Thier Growing under the #Growatt600w and in my #TopoLite 24×24×48 Grow Tent! I'm also using #TNBNaturals #TheEnhancer Co2 Despersal Canister and using thier Ph⬆️⬇️ for my Decolinated Tap Water!
Green and Growing Up Great! She's Growing into her 3rd week of Veg! She's Growing in my special blend of ProMix potting mix, a 1/2 bag of Earthworm castings and 2 light handfuls of Diatomaceous Earth mixed Up well for before transplanted! Diatomaceous Earth: Diatomaceous earth is made from the fossilized remains of tiny, aquatic organisms called diatoms. Their skeletons are made of a natural substance called silica. WHAT IS DIATOMACEOUS EARTH?
In a nutshell, DE comes from the fossilised remains of small marine organisms called diatoms. Over a 30 million year period, these hard-shelled algae collected on the bottom of bodies of water, eventually forming into a type of sedimentary rock. Fast forwarding, it wasn’t until around 1836 that a German peasant Peter Kasten discovered the ivory-coloured, powdery substance while drilling a well in northern Germany. Ever since, the usefulness of DE for multiple purposes, including industrial and horticultural applications, has been well-reported. Just sprinkle some diatomaceous earth on top of your soil and watch mother nature's secret weapon work its magic.CONDITIONS THE SOIL
When it comes to growing cannabis, everyone strives to provide the best soil to grow the best plants—but there’s always a way to make it even better. Making the soil a better medium is called soil conditioning, which is exactly what diatomaceous earth does. It works by improving the retention of moisture in your potting soil, holding a large amount of fluid and drying at a rate that’s much slower. This natural soil additive also helps to retain nutrients and allows for better oxygenation of the substrate. NATURALLY CONTROLS PESTS
DE is an all-natural, safe-to-use substance that doesn’t harm the cannabis plant with toxic chemicals. The nature of diatomaceous earth makes it useful against most types of insect infestation you might be experiencing; and unlike chemical insecticides, insects can’t develop a resistance to the effects of DE. So once they’re gone, they’re gone for good. DE is an abrasive. and when used as an insecticide, it gradually scrapes away an insect’s exoskeleton, absorbs the fluids, and dehydrates insects and other critters to eventual death. IMPROVES PLANT STABILITY
When using DE in your soil, it can be especially beneficial as it frees up nutrients so that they are made available to the plants as needed. This works via the silica content of DE being absorbed into the plant tissue, which helps improve the plant’s ability to respond and receive more nutrients as DE activates. This in turn results in greater yields and better stability under small pH fluctuations!
https://divineseeds.net/
https://instagram.com/divine.seeds?igshid=osxe2v7en33v https://divineseeds.net/
Thanks Again to All my Friends, Family's, Teams, Sponsors, Followers and Subscribers!!! Your Genetics are Merry Magnificent, Mega Marvelous and Mighty Medical! Love um!!! I really Can't stress enough how Thankful and Grateful I am of All of you and what you've Shared with Us! Means the World!!! It's definitely a Pleasure being able to Grow with these Phenomenal Grow Lights! Please Enjoy! BudBrothers4-Life! Cheers Famz!!! Much Props and Much Topz!💯🔥 #Osree #GrowStarStore #Growatt #TNBNaturals #TNBTeam #GrowYourOwn #Bliss
https://instagram.com/as420.ca?igshid=1f116alw054wp
The Grow Bags: https://www.as420


Likes
137
Share


@MrJones
Follow
mrjones - Slurricane #7 S1
🌱Slurricane #7 S1
@inhousegenetics_official
👨🌾🏽GD Grower: MrJones
🔹🔹🔹🔹🔹🔹GOALS🔹🔹🔹🔹🔹🔹
🌞Environment - 75/80℉ and 60% Humidity Good Old Mother Nature
💧 Feeding - The Green Sunshine Company - Earth Dust All-Natural Plant Nutrients
⚗️Soil - 35% ProMix MP / 25% Ocean Forest / 20% Tupur Royal Gold / 10% lobster Compost / 10% Additional Perlite
🍃Training / So this girl was 60 Inches and spread her out under a 5x5 Trellis
🕷️ IPM - Will be using Green Cleaner" 1 OZ per Gallon, and CannControl from Mammoth alternating between product each month
🔹🔹🔹🔹🔹🔹🔹🔹🔹🔹🔹🔹🔹🔹🔹
📜 Rambling - Week 1 / So weeks are flying by, sorry for the slow updates, having unusual personal life struggles, but with that said, these outside plants are just doing great, thanks to my partner Mother Nature!!
🔹🔹🔹🔹🔹🔹🔹🔹🔹🔹🔹🔹🔹🔹🔹
▶️ Sunday - 06.06.21 / These plants are on autopilot with Mother Nature at the helm, we have been having gentile summer showers, plenty of sunlight and things are looking great!
▶️ Monday - 06.07.21 / These plants are on autopilot with Mother Nature at the helm, we have been having gentile summer showers, plenty of sunlight and things are looking great!
▶️ Tuesday - 06.08.21 / Finally got to water them today, they are just growing like crazy!
▶️ Wednesday - 06.09.21/ These plants are on autopilot with Mother Nature at the helm, we have been having gentile summer showers, plenty of sunlight and things are looking great!
▶️ Thursday - 06.10.21 / These plants are on autopilot with Mother Nature at the helm, we have been having gentile summer showers, plenty of sunlight and things are looking great!
▶️ Friday - 06.11.21 / These plants are on autopilot with Mother Nature at the helm, we have been having gentile summer showers, plenty of sunlight and things are looking great!
▶️ Saturday - 06.12.21 / These plants are on autopilot with Mother Nature at the helm, we have been having gentile summer showers, plenty of sunlight and things are looking great!
🔹🔹🔹🔹🔹🔹🔹🔹🔹🔹🔹🔹🔹🔹🔹
Earth Dust - DESCRIPTION
🔹Earth Dust is our all-natural plant nutrient designed for indoor and outdoor flowering plant growers. You can grow easily by “just adding water” to your soil for the entire growth cycle. It creates a “living soil” so your plants thrive from seedling all the way through flower and harvest. Earth Dust represents an organic dry amendment method of gardening, it’s made of a natural powder of ingredients.
🔹Because you only need to water your soil with Earth Dust, you can concentrate on caring for your plants and getting a healthy crop “on autopilot”. Now you can grow without spending hours of your life mixing chemical nutrients, and you can do it naturally. What’s more, is you will enjoy the cleanest, most aromatic, and flavorful harvest you’ve ever experienced when a plant grows in a rich, organic web of living soil.
Product Highlights
🔹All-Natural Ingredients – Mostly plant-based – Safe around children and pets.
🔹Packaged in kraft paper bags that are recyclable and compostable.
🔹Easy to Use – Just mix the powder into the soil 3 separate times – then water only.
🔹Packed full of rich microbe food & contains billions of beneficial fungi and bacteria! Creates a resilient, living soil that defends against pests and diseases.
🔹Rich in trace minerals and nutrients for full plant expression. Sourced from rock dust, sea-farmed kelp, and land-grown crops.
🔹Soil Conditioners help balance pH and make nutrients more available in the soil. Achieved with ingredients like bat guano, worm castings, limestone, molasses, and humic acid.
🔹The correct balance of N-P-K nutrients for each stage of growth:
🔹Earth Dust Base (3-1-2) contains key nutrients for sustained vegetative growth. High nitrogen (N), Low Phosphorous (P), and Medium Potassium (K).
🔹Earth Dust Boost (2-3-6) contains accelerated-release nutrients for powerful flowering growth. Low nitrogen (N), Medium Phosphorous (P), and High
Potassium (K).
🔹Re-use soil harvest after harvest by simply adding more Earth Dust Base to begin again. Create your own living soil that gets better every time it’s used.
🔹Go organic, save time, and get predictable, healthy harvests.
🔹🔹🔹🔹🔹🔹🔹🔹🔹🔹🔹🔹🔹🔹🔹
Compost Tea for Vegetative Stage
Water 4 Gallons
3 Cups Composr (Your Favorite Worm)
4 TBL Molasses
4 TBL Seaweed Extract
4 TBL Fish Fertilizer
Use air Stone o the tea for 24/3 hours 70/75F, use at full strength for establishing plants and a half strength for younger plants

Likes
67
Share


@Only4passion
Follow
I was wrong about my clones I thought that I had two clones of mimosa evo and two red hot cookies then I was thinking maybe it’s green pheno, but now with the strong smell I recognize the blue widow from zamnesia🤭
I also think 🤔 that the clone looks the same as the mother plant so it cannot be green phenotype 🤪💪💪💚


Likes
28
Share


@GaiaGreenGiant
Follow
Feeding time! She was starting to show signs of hunger but wanted to time the last feed appropriately. Couldn’t be happier with her development none the less. HLG’s Elite 360 and Gaia Green are just killing the game! Cheers 🍻

Likes
2
Share

@eldruida_lamota
Follow
Vamos familia, actualizamos la primera semana de floración de estas Runtz de MSNL.
La temperatura que estuvo entre los 24-26 grados y humedad dentro de los rangos correctos.
Cambiamos esta semana el ciclo 12 horas luz, 12 oscuridad, estiraron bien y ensancharon bastante también, el color es verde sano.
Se nota que los nutrientes de la marca Agrobeta hacen sus funciones.
También realicé una poda de bajos que yo si las veo necesarias para explotar después la flor.
- os dejo por aquí un CÓDIGO: Eldruida
Descuento para la tienda de MARS HYDRO.
https://www.mars-hydro.com
Hasta aquí todo, Buenos humos 💨💨💨
