
Likes
Comments
Share


@zombikush81
Follow
27/04/19#Friends, a greeting for those who follow me, the two girls start to see all their potential ....! They have a beautiful slim and solid structure, I look a lot

Likes
Comments
Share


Likes
29
Share


@starke
Follow
Week 16 Day 109 and 62 in Flower today 😍 Their Mama went into dark on Day 62 of Flower, so I checked their trichomes today. They all look nearly finished, at least the top buds are all good to go. I will wait another day or two and then they will go into darkness. Next weekend will be a good time to harvest yeay ☀️ They have been fed a little water every two days for the last couple of days. Humidity has dropped quite a bit in the tent but it's still hot. Luckily temperatures are going down a little bit. Can't wait for my little rainbows 🌈 ❤️
Day 111 and 64 in Flower, one last day with light 😍 Added some trich shots of one the clones. Good call to send them into darkness. And guys, the colours aaaaaaaaaaaaah 😍😍😍

Likes
16
Share


@ChewiesGrow420
Follow
They all basically look the same at this point. Plant 4 popped a day later so it’s a little smaller. At day 12 I sprinkled some great white shark around each plant. And added just 1 tsp of green harvest bone meal.
Likes
9
Share


@Jofflepov
Follow
Looking for optimal led height.
RQS' Northern Lights auto and Diesel auto look very sophisticated and detailed. They are standing in the middle. Rest of the plants are auto lemon Hazes and they have may varieties. Two are growing very fast and two are stunted.
At least one more week of indoor growing before going outside in a bigger pot.

Likes
105
Share


@PEAKYPLANTERS
Follow
Hi guys how are you ? welcome back to our enchanted gardens!
We are ready and extremely excited to see these California pearls blossom in my home 😆😋
And you??? Want to know how it will end? What will be the color of their gems, their perfume... their production?... well... stay updated and follow our diaries
Happy growing everyone


Likes
2
Share


@ErrorsSeeds
Follow
Day 40. 8 day of flowering. My plant is flowering. There is a wonderful smell of marijuana. I have a filter to control the smell. The plant is growing great.
Flowering stage!
Day 42. It is growing up. Almost reached the light. I need to cut it or bend the tops down. I will decide later.
Likes
8
Share


@dwotTV
Follow
Starting my first grow in the new tent with my first Night Owl seeds. Grabbed these from seedslocker a few months ago and they've been sitting in my seed vault in the fridge since. Popped them in a glass of water at 8pm on 10/18. Broke out the AC Infinity propagation system and added a bit of RO water to some coco pucks. About 24 hours later they sunk in the glass and had opened up a bit with root peaking out, so into the pucks they went on the evening of 10/19. No real movement on 10/20, turned the heat pad off because they were a little warm. Morning of 10/21 the first Compound V was starting to pop through the soil, 2nd one followed a couple hours after and before noon all 3 were making their way out. Opened vents on the dome to let them breathe a bit more. 10/22 continuing to grow really strongly, looking good. 10/23 some roots out the bottom, time to go into the tent. Transplanted and seem happy, dialing in the temp and humidity and airflow, some odd higher temp days still around this time of year with some heavy fluctuations but it will normalize out.
The tent has been stood up and cooking a bit w/ the lights blazing and a dehumidifier running to dry out our soil a bit. Had issues with fungus gnats last grow and I'm trying to prevent that this time. Ordered some beneficial nematodes as a line of defense and sprayed soil with a good soak of neem oil as a precaution after drying out. Sticky traps show no gnats so far. Soil is Coast Of Maine Stonington Blend Aeration Formula, a 70 / 30 Coco / Perlite blend that I've used before. I have Coast of Maine dry nutrients and Fox Farm liquid nutrients, will likely try to stick to the dry nutrients unless fungus gnats emerge again. Soil is in 5 gallon fabric pots. I added 2/3 cup of Stonington Blend Plant Food and 1/3 cup of Wiscasset Blend Earthworm Castings to each pot along with some Mycorrhizal Fungi spores and worked it in.
I have been using the AC Infinity self watering bases but as I'm running 6 total plants this grow I've ordered the new Vivosun self watering bases to compare them.

Likes
5
Share


@eldruida_lamota
Follow
Que pasa familia, vamos con la novena semana de floración de estas GG4 Sherbet Fast Flowering, de FastBuds.
Agradezco a Agrobeta todos los kits obtenidos de ellos 🙏.
Ya veis que llevan buen ritmo ya tiene un color espectacular.
Vamos al lío, El ph se controla en 6.2 , la temperatura la tenemos entre 21/24 grados y la humedad ronda el 50%, 7 litros de sustrato. Estás creo que ya irán machete esta próxima semana.
Agrobeta:
https://www.agrobeta.com/agrobetatiendaonline/36-abonos-canamo
Hasta aquí todo, Buenos humos 💨💨💨
Likes
2
Share


@pareto
Follow
Everything went well appart from the afids in the end. She looks very pretty and smells awesome!
Yield could be a litle higher... Still shooting for less than 1€/g. I think I will stop topping my plants.
Maybe next time.
--------------------------------------------------------------------------------------------------------------------------------------------------------------------------------
Set up cost (fixed costs)
-Lamp: 40€
-Timer: 3,5€
-Pot: 4€
-Total fixed costs: 47,5€
Given 5 years (or 15 grows) usage time translates to around 3,17€ per grow in materials.
Variable costs:
-Seed: 10€
-Soil: 6€
-Fertilizer: 3,50€
-Power (68 days 20h/day): 19,58€
-Total variable costs: 39,08€
-Total costs per grow: 42,25€
-Cost per Gram: 1,63€

Likes
46
Share


@Rollex420
Follow
- 17-05-21 (Day 1)
// //
- 18-05-21 (Day 2)
three of the girls got out of the soil correctly!😊
while the Runtz sprout is the only one that still remains in its seed despite she already opened it for 2/3 day now..🤔
its root seems to struggle to grow or pierce the soil ..
I'm helping her by keeping the humidity higher since I put this bag, we'll see what happens 🤷♂️🏻
..Any advice will be welcome 🙏🏻
as always have a nice day and happy growing to everyone! 😊☮️💚
19-05-21 (Day 3)
..Unfortunately the Runtz Muffin is dead, was unable to come to life like her little sisters.
After three days, i tried to help her removing her seed husk.. but there was nothing to do 😢
So here is a new start!! 😊
I put this Lemon Tree “Freebie” seed to germinate aaand to replace the poor Runtz Muffin. 😕🙌🏻
We'll see how it goes this time.. 🤞🏻🍀
Sending positive vibes for you and your garden ☮️💚
20-05-21 (Day 4)
All the girls are doing great and continuing their grow.
The Lemon Tree is doing great too with its germination, that in just six hours the seed has opened!
Now I’ll wait that the sprout grow a tiny root of (1,5/2cm) at least, to pass it into the soil.
Happy grow fam. Stay smoky 😙💨
21-05-21 (Day 5)
With today the girls are in their fifth day of growth. 🙌🏻
Bio-heaven (amino-acids) added to the recipe (1ml/1L)
As you know after the death of Runtz Muffin, I have been germinating the Lemon Tree for two days now, today is the third day for her after an excellent germination, I have transferred it from the paper towel to the soil to make it grow.
Let’s see how she will grow, Despite being a week behind, I hope she grows strong, healthy and fast🤞🏻
Have a good weekend, lift up and relax. Peace ☮️ 💚
22-05-21 (Day 6)
The Lemon tree is officially out of the soil, ready to grow! 🙌🏻💚
The other girls are fine, they are on their sixth day of life and they love the environment where they are growing up.
..Plus they are always listening to music (Lo-Fi) 24/7 ☺️
I hope they like it.. 🤷♂️🏻😆
That's all for today. Have a good weekend gromies!! 🧑🏻🌾👩🌾🏻☮️💚
23-05-21 (Day 7)
Today last day of the first week for the girls and first day of life for the Lemon Tree!
The nourishment for them is always the same, except for the Lemon Tree which for the moment I am just spraying water to irrigate it.
..In this round I expect great things!
Happy growing to everyone! ☮️💚

Likes
12
Share


@cheetah844
Follow
This one is going outside. It's a regular photoperiod seed, I'm hoping it's a female for some long awaited & needed flower.
This was the very first strain I ever ran out of several years ago, I'm ready to have this back in stock 💜. I remember it being very relaxing, dissolving my migraine & putting me in a relaxed but great mood.
Likes
6
Share

@JVKdopegrow
Follow
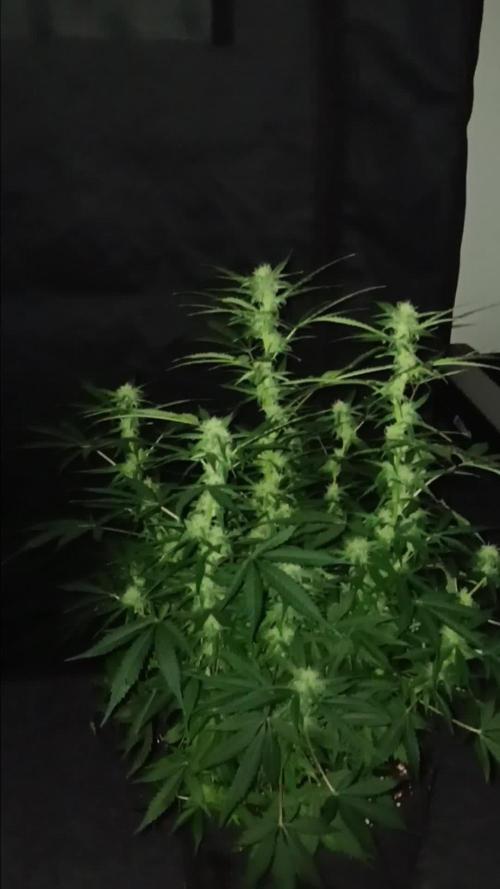
I have become a voyeur of this plant. She is on her own despite my various attempts to cut, trim, and bend. Likely in her final stretch as the bud growth is now on every branch. I really enjoy just looking at her.
Likes
5
Share


@Mr_Puff_N_Stuff
Follow
Getting chubby! They are almost there. The buds are begging to fatten up and they are beginning to smell. They are just rolling alone…


Likes
6
Share

@DogDoctorOfficial
Follow
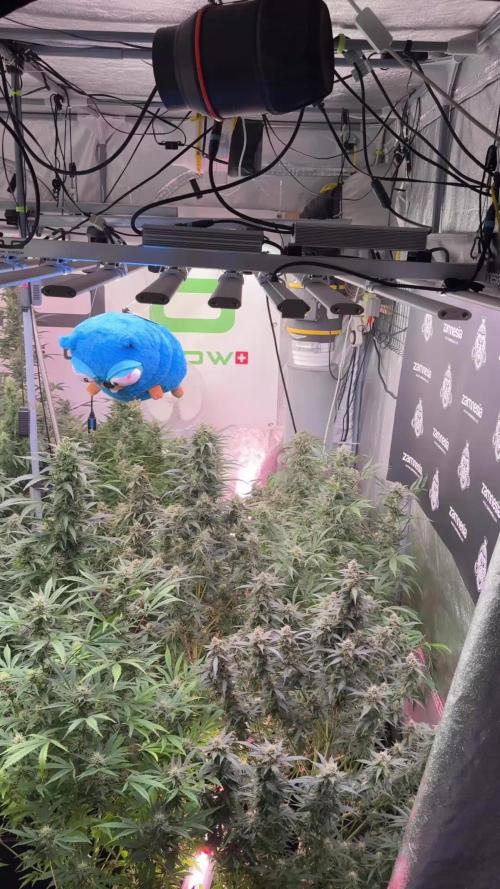
🌱 Week 11 from Seed — Week 7 Flower
LSD — The Observation Phase
We’ve reached that point in the run where the work becomes less visible… but more important than ever.
For anyone just joining us, this run has been built on consistency. From seed to now, we’ve maintained stable environmental conditions — temperatures, humidity, feeding, and watering practices have remained unchanged because the plant has been responding exactly how we want. No need to fix what isn’t broken.
This is key:
progress doesn’t always come from doing more — sometimes it comes from doing less, but doing it right.
⸻
👁️ What This Week Is
This is a monitoring week.
At this stage, the plant is fully focused on flower development. Buds are stacking, structure is defined, and now the priority shifts from pushing growth… to protecting it.
Our role right now:
* Stay consistent
* Stay present
* Stay observant
We’re still hand watering, still giving them that direct attention, still reading the plant daily. Not reacting — interpreting.
⸻
⚠️ What This Week Is NOT
This is not the time for:
* Big changes
* Heavy feeding adjustments
* Unnecessary stress
And most importantly —
this is not the time to “get bored” and start doing things just to feel productive.
Because right now, overdoing is more dangerous than underdoing.
⸻
🔍 The Importance of Observation
Even if it looks like “nothing is happening”… everything is happening.
This is where experience shows.
We’re actively watching for:
* Early signs of mold or bud rot
* Humidity pockets within the canopy
* Powdery mildew risks
* Any late-stage deficiencies or imbalances
Catching something early here makes all the difference. Waiting too long can cost the entire run.
So yes — it might look calm.
But this is one of the most active mental phases of the grow.
⸻
🌿 Presence Over Action
There’s something else here that doesn’t get talked about enough:
Just being there matters.
Walking into the room.
Looking at them closely.
Understanding their rhythm.
You start noticing the small things — the details that don’t show up in charts or numbers.
This is where growing becomes less mechanical… and more intuitive.
⸻
🔮 What to Expect Next Week
We’re moving deeper into flower maturity.
You can expect:
* Continued bud swelling
* Increased density
* More pronounced aromas
* Resin production becoming more visible
What not to expect:
* Explosive vertical growth (that phase is behind us)
* Major structural changes
From here on, it’s refinement.
⸻
🧤 Mr. Baggy Report
Mr. Baggy is still on duty, as always —
making sure everything is exactly where it should be.
Quiet week for him too… but we all know those are the ones where he’s watching the hardest 👀
⸻
🤝 Shoutouts
As always — this doesn’t happen alone.
Shoutout to:
* The Grow Diaries platform
* The community following along week after week
* The OGs who’ve been here since day one
* The new eyes joining the journey
* The supporters, the critics, the silent watchers
* The genetics behind this LSD run
* And everyone who takes a moment to learn, share, or grow alongside us
From grower to growers — respect.
📡 DELETED @ 1K Please stay tuned.we never quit https://www.youtube.com/@TheDogDoctorOfficial NEW 🙏 Thank you for your patience and continued support.
FOR DISCOUNT CODES AND MORE JUST FOLLOW THE LINK https://website.beacons.ai/dogdoctorofficial
📲 Don’t forget to Subscribe and follow me on Instagram and YouTube @DogDoctorOfficial for exclusive content, real-time updates, and behind-the-scenes magic. We’ve got so much more coming, including transplanting and all the amazing techniques that go along with it. You won’t want to miss it.
GrowDiaries Journal: https://growdiaries.com/grower/dogdoctorofficial
Instagram: https://www.instagram.com/dogdoctorofficial/
YouTube: https://www.youtube.com/@dogdoctorofficial Deleted by Youtube - https://www.youtube.com/@TheDogDoctorOfficial NEW
Vimeo : https://vimeo.com/dogdoctorofficial Under construction stay tuned ⸻
Explore the Gear that Powers My Grow
If you’re curious about the tech I’m using, check out these links:
🔆 Lighting & Environmental Control
• Future of Grow — Advanced LED lighting technology
https://www.futureofgrow.com/
DISCOUNT CODE: DOG20
• Lumiflora — Under-canopy LED lighting
https://lumiflorade.com/
• TrollMaster — Environmental controllers and automation gear (past collaboration)
⸻
Genetics
• Zamnesia Seeds — Genetics used in this project
https://www.zamnesia.com/
⸻
🌱 Soil, Substrates, Boosters & Root Support
• Plagron — Substrates, bio mixes, and supportive products
https://plagron.com/en/
⸻
🎒 Storage, Curing & Preservation
• Grove Bags — Curing and storage solutions
https://grovebags.com/
⸻
📸 Photography Equipment & Tools
(Not sponsors, but part of my creative toolkit)
• Sony A6700
• Sony full-frame macro lens + few more
• Stacking photography workflow - learning
• iPhone (for behind-the-scenes shots)
We’ve got much more coming as we move through the grow cycles. Trust me, you won’t want to miss the next steps, let’s push the boundaries of indoor horticulture together!
As always, this is shared for educational purposes, aiming to spread understanding and appreciation for this plant. Let’s celebrate it responsibly and continue to learn and grow together.
With true love comes happiness. Always believe in yourself, and always do things expecting nothing and with an open heart. Be a giver, and the universe will give back in ways you could never imagine.
💚 Growers love to all 💚
📸 P.S. – The Eye Behind the Lens
All photos in this diary (for now — except for the ones showing the camera, which I took with an iPhone) are taken with a Sony A6700 paired with a Sony full-frame macro lens and a few more.
Photography is part of the story — it’s how we share the fine textures, the glow, and the quiet details that words can’t always capture.
I’ve also started experimenting with photo stacking — a technique where multiple images, each taken at a slightly different focus point, are layered together to create one perfectly sharp image from front to back.
It’s not digital enhancement or AI; it’s pure photography — a way to reveal the plant’s beauty in microscopic depth, from trichome to petal.
You’ll even see a few shots of "ghost me" capturing the shots — camera, lens, setup — because every grow deserves not just to be cultivated, but documented like art.
FOR DISCOUNT CODES AND MORE JUST FOLLOW THE LINK https://website.beacons.ai/dogdoctorofficial
NEW DISCORD - Official Server Invite Link : https://discord.gg/ksjAkA5T74

Likes
18
Share


@thenotillwizard
Follow
Harvested at day 76, after 72h of darkness.
Very good yield!
3.3 pounds of dry buds + 1 pound of trim
The 2 keepers yielded 366 and 342g of premium quality smoke.
Very uplifting and energizing high :) Love it!
Likes
4
Share


@nijuana
Follow
I can tell you that it's rare but this variety smell so so so strong my god the odor pass though wall you can smell it from 50 meters around 😯unreal 😂😋

Likes
16
Share


@Tipton
Follow
Let the flower begin! Shut the lights off April 1st so when they wake up at 7am the flower cycle is on!!!! Let's "flipping" GOOOO

Likes
6
Share


@Black_Widow
Follow
Привет садоводы
Кажется цветок вырос отличный, просто красавица
и наверно он уже готов
еще несколько дней после полива и финиш
