
Likes
Comments
Share


@DeadJoke
Follow
i have to give space to veg photo plants ..
so, mac1 have to shrink alittle bit

Likes
30
Share


@WeWantItToGrow
Follow
Did a little outside action this week as I had to clean out the tent and make some ventilation adjustments I’m 9 weeks in on these plants and it kinda has me wondering why I’m not seeing much more vertical growth I’ve decided to pull the light up a bit and decrease the intensity let ‘‘em work for it a little bit.They are healthy tho and as usual the vegetation never fails to impress happy growing yall

Processing
Likes
5
Share


@Cannibalgardens
Follow
What to say they have taken well to the transplant and both seem to be enjoying the bigger pots and tent ... The black sugar seems to be doing better and the cheese gave me three clones three days ago. I'm super excited about these strains here and the work out in will be returned 10 food cheers family ..


Likes
14
Share

@DogDoctorOfficial
Follow
GMO Cookies Served with Extra Curiosity ?🍪
Drying & Trimming Report | Garlic, Gold & Preservation
And once again… yes 😄
We are dividing the reports.
At this point it almost became tradition.
But honestly, there is simply no realistic way to fit:
* harvest,
* drying,
* trimming,
* curing,
* smoke review,
* fresh frozen,
* washing,
* strain review,
* extraction plans,
* terpene analysis,
* and all the small details we love documenting…
into one single update without turning everything into chaos.
So first of all:
thank you for the patience.
Everything from seed until harvest was already documented in the previous reports, but for the people arriving only now, let’s quickly recap how we got here.
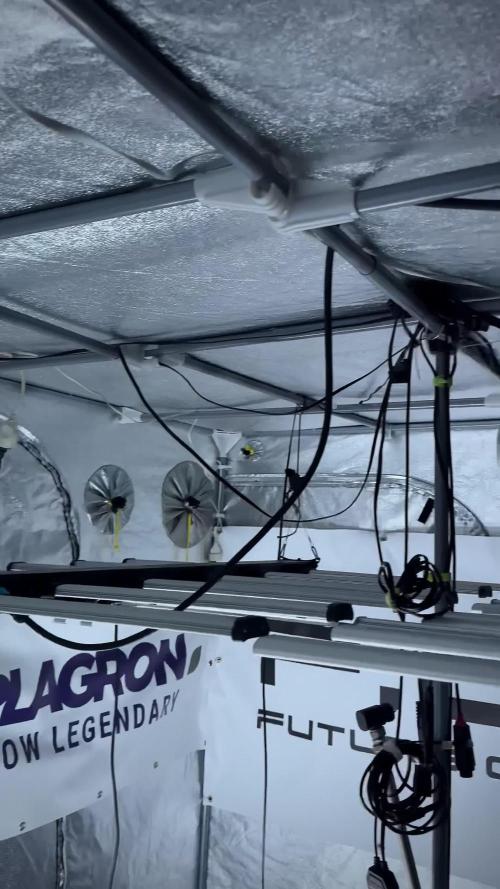
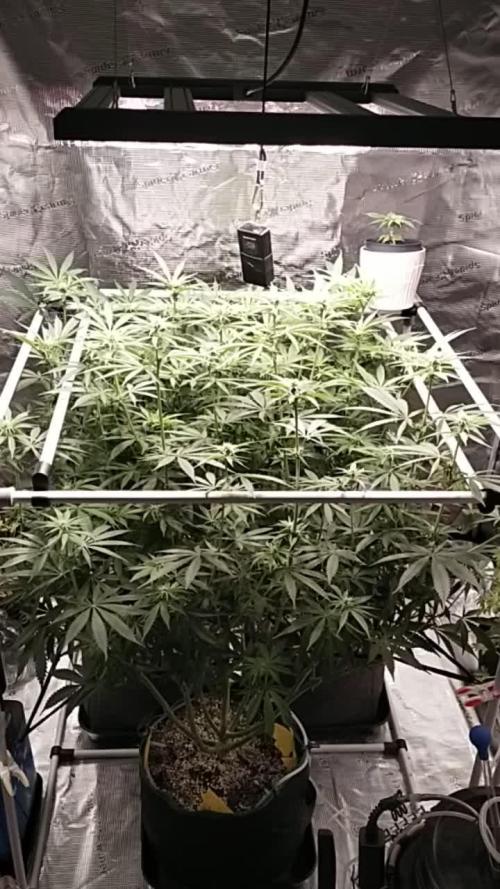
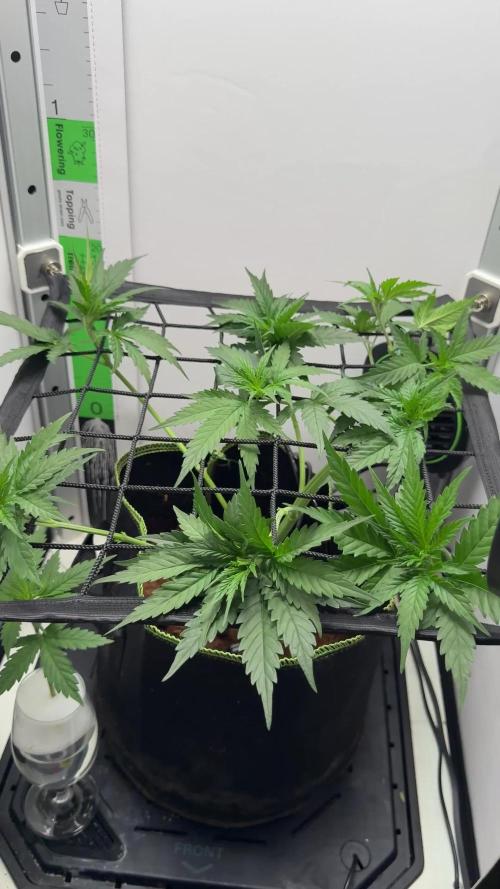
This GMO Cookies run was grown under a 12/12 from seed cycle using the F.O.G. LED setup, with environmental management focused on healthy plant development, airflow, structure, and resin production. Throughout flower the girls received selective defoliation, LST, continuous observation, and careful feeding while expressing one of the loudest terpene profiles we have had in the room in a while.
And now?
Now the plants have moved beyond harvest and entered one of the most important phases of all:
preservation.
Because growing beautiful flowers means very little if drying and trimming are rushed afterward.
So this report belongs to:
* drying,
* trimming,
* handling,
* preserving terpenes,
* collecting resin,
* and slowly preparing the medicine for cure.
The branches that were selected for drying spent approximately:
* 10 days drying,
* around 60% humidity,
* temperatures between 18–20°C,
with the first couple of days running slightly drier in order to help remove excess surface moisture before stabilizing the environment more carefully.
And honestly?
The aromas coming from these flowers during drying were absolutely ridiculous.
Now, to be completely honest and transparent:
these were not the densest flowers from the tent.
Visually they actually looked denser while still wet than they ended up feeling after drying.
But what they lacked slightly in density…
they completely compensated for in aroma, terpene expression, flavor potential, resin behavior, and overall personality.
And honestly, that trade-off is something many growers happily accept.
Because this GMO profile is LOUD.
Like…
walk-into-a-kitchen loud.
Real GMO lovers will understand this instantly.
Every trimming session felt like sitting next to a chef smashing fresh garlic cloves directly beside us.
Savory.
Greasy.
Funky.
Sharp.
Warm.
Almost oily-smelling.
And hidden underneath all that madness:
sweetness,
cookie notes,
earthiness,
and weird creamy undertones slowly revealing themselves as the flowers cured further.
This is not a shy cultivar.
Not even close.
Once the drying process finished, it was finally time to trim.
So:
gloves on.
Trim station ready.
Trim bin prepared.
Scissors cleaned.
Glass jars nearby.
Grove Bags prepared.
And of course…
little self-medication beforehand 😄
Because trimming sessions and cannabis culture somehow always belonged together naturally.
The branches were broken down carefully by hand, one by one, and every flower was trimmed individually with patience instead of speed.
As always, we used pointed curved trimming scissors.
And honestly, they are fantastic for this type of flower structure.
Especially with fluffier or more open flowers, curved pointed scissors allow you to:
* enter tighter spaces,
* remove excess leaf material precisely,
* preserve flower structure,
* avoid crushing calyxes,
* and maintain a more natural-looking final product.
Straight scissors work perfectly fine too of course, but for this type of trimming, curved points genuinely feel more comfortable and surgical.
And with GMO?
You quickly realize precision matters.
Because these flowers become sticky almost immediately.
The scissors start collecting resin.
The gloves become greasy.
Finger hash starts forming naturally.
And suddenly trimming stops being just “work” and starts becoming part of the experience itself.
The first dried branches gave us:
137.1 grams.
After trimming and weighing, the flowers were carefully transferred into Grove Bags, with smaller amounts also resting inside glass jars for comparison and monitoring during cure.
Then we moved onto the flowers dried on the drying rack.
Again:
not the densest plant from the tent.
And honestly, we believe temperatures played a role there.
This cultivar appeared slightly more sensitive to higher temperatures than some of the others around her. Our personal feeling is that she continued pulling significant water during flower development, which likely contributed to the final structure remaining slightly more open once dry weight settled.
But despite that?
The quality remained absolutely beautiful.
Sometimes growers become overly obsessed with density alone.
But density is not everything.
Aromatic expression,
resin quality,
effect,
smoothness,
flavor,
and terpene complexity matter just as much — sometimes even more.
And this GMO absolutely shines there.
The second drying batch landed at:
224.2 grams.
Again carefully bagged for preservation.
And speaking of preservation:
we decided to use Grove Bags for most of the flower storage.
Why?
Because preserving terpenes matters deeply to us.
Especially with a cultivar this expressive.
The idea behind Grove Bags is maintaining stable curing conditions while reducing the constant need to burp jars manually. They help regulate humidity exchange while still allowing the flowers to continue stabilizing naturally over time.
Of course, glass jars still remain legendary and we still use them too.
Honestly?
Both methods have their place.
And later during cure and smoke review, we will probably compare the differences more deeply.
But for now, the priority is simple:
protect the terpenes.
Protect the medicine.
Protect the work.
Now let’s talk about something we personally love a lot:
the “gold.”
Or what many people simply call:
kief.
During trimming, tiny trichome heads naturally separated and fell through the trim bin screen.
And honestly… watching that happen never gets old.
At one point we jokingly started “playing the drums” Moroccan style across the trim bin while working, moving material gently across the screen and collecting the resin heads gathering underneath.
And the result?
Beautiful golden powder.
Tiny greasy trichome heads.
Pure aromatic dust from the plant itself.
Eventually we pressed part of it together gently using finger warmth and pressure, creating a tiny mini temple ball.
Small.
Dark.
Sticky.
Greasy.
Beautiful.
The type of resin that already tells you:
“This plant is going to wash beautifully later.”
And yes…
that curiosity is still alive and stronger than ever.
Because despite everything already documented here, we still have:
more than 700 grams of fresh frozen flower material waiting patiently inside the freezer.
That future report is still coming.
And honestly?
We are incredibly excited for it.
But there is no rush.
That material is preserved safely and waiting for the right moment to become:
* ice water hash,
* solventless resin,
* or whatever expression this GMO decides to offer us later.
For now, this chapter belongs to drying, trimming, preservation, and preparation.
Before ending this report, one more important thing:
cleaning.
Once trimming was finished and the room slowly emptied, it was time to clean everything thoroughly and prepare the environment for future runs.
And honestly, this part matters far more than many growers realize.
Between runs we strongly believe in:
* deep cleaning,
* sanitizing surfaces,
* cleaning fans,
* sterilizing tools,
* removing plant residue,
* using UVC if available,
* using ionizers or environmental tools carefully,
* and resetting the room properly.
Because prevention is always easier than fighting problems later.
A clean room protects future harvests.
And after a run like this?
The room deserved a respectful reset.
Now next week?
Next week we finally move deeper into:
* curing,
* smoke review,
* terpene evolution,
* flavor,
* effects,
* smoothness,
* strain review,
* and our true thoughts about GMO Cookies after spending months with this cultivar from seed until cure.
And honestly…
we cannot wait.
Before ending, as always:
Thank you.
To Zamnesia.
To F.O.G.
To Plagron.
To Lumiflora.
To Grove Bags.
To the platform.
To the community.
To the growers sharing knowledge.
To the hash makers.
To the flower lovers.
To the silent supporters.
To the curious people following this strange garlic-filled adventure 😄
To everyone spending even a few moments here with us.
This GMO Cookies run truly was served with extra curiosity.
And honestly?
That curiosity still hasn’t disappeared yet. 🌱
📲 Don’t forget to Subscribe and follow me on Instagram and YouTube @DogDoctorOfficial for exclusive content, real-time updates, and behind-the-scenes magic.
GrowDiaries Journal: https://growdiaries.com/grower/dogdoctorofficial
Instagram: https://www.instagram.com/dogdoctorofficial/
YouTube: https://www.youtube.com/@dogdoctorofficial Deleted by Youtube - https://www.youtube.com/@TheDogDoctorOfficial NEW
Vimeo : https://vimeo.com/dogdoctorofficial Under construction stay tuned ⸻
Explore the Gear that Powers My Grow
If you’re curious about the tech I’m using, check out these links:
🔆 Lighting & Environmental Control
• Future of Grow — Advanced LED lighting technology
https://www.futureofgrow.com/
DISCOUNT CODE: DOG20
• Lumiflora — Under-canopy LED lighting
https://lumiflorade.com/
• TrollMaster — Environmental controllers and automation gear (past collaboration)
⸻
Genetics
• Zamnesia Seeds — Genetics used in this project
https://www.zamnesia.com/
⸻
🌱 Soil, Substrates, Boosters & Root Support
• Plagron — Substrates, bio mixes, and supportive products
https://plagron.com/en/
⸻
🎒 Storage, Curing & Preservation
• Grove Bags — Curing and storage solutions
https://grovebags.com/
⸻
📸 Photography Equipment & Tools
(Not sponsors, but part of my creative toolkit)
• Sony A6700
• Sony full-frame macro lens + few more
• Stacking photography workflow - learning
• iPhone (for behind-the-scenes shots)
As always, this is shared for educational purposes, aiming to spread understanding and appreciation for this plant. Let’s celebrate it responsibly and continue to learn and grow together.
With true love comes happiness. Always believe in yourself, and always do things expecting nothing and with an open heart. Be a giver, and the universe will give back in ways you could never imagine.
💚 Growers love to all 💚
📸 P.S. – The Eye Behind the Lens
All photos in this diary (for now — except for the ones showing the camera, which I took with an iPhone) are taken with a Sony A6700 paired with a Sony full-frame macro lens and a few more.
Photography is part of the story — it’s how we share the fine textures, the glow, and the quiet details that words can’t always capture.
I’ve also started experimenting with photo stacking — a technique where multiple images, each taken at a slightly different focus point, are layered together to create one perfectly sharp image from front to back.
It’s not digital enhancement or AI; it’s pure photography — a way to reveal the plant’s beauty in microscopic depth, from trichome to petal.
You’ll even see a few shots of "ghost me" capturing the shots — camera, lens, setup — because every grow deserves not just to be cultivated, but documented like art.
FOR DISCOUNT CODES AND MORE JUST FOLLOW THE LINK https://website.beacons.ai/dogdoctorofficial
NEW DISCORD - Official Server Invite Link : https://discord.gg/ksjAkA5T74

Likes
9
Share

@TheGreenfulOne
Follow
At the beginning of the 4th week, the early stages of flower formation are already clearly visible. Plants are strong, healthy green, no visible deficiencies.

Likes
57
Share


@Salokin
Follow
Hi Growmies
Eight weeks into our cultivation journey, Epic Buzz has shown a resilience and robustness that exemplifies the best of indoor growing. The transition from vegetative to flowering is a critical time, and our plant is meeting it with a vitality that bodes well for the coming bloom. Here’s what’s happening:
The root system of Epic Buzz is nothing short of spectacular, having completely filled and begun to overflow the confines of the net pot. Such vigorous root growth is a sure sign of a healthy and thriving plant. Since being topped, the Epic Buzz has recovered admirably, pushing out a lush canopy of large fan leaves and new growth sites. This process is crucial for maximizing yield and ensuring even light distribution across future bud sites. The plant has been moved under the Sanlight Q4V2 and has had its light cycle switched to 12/12 to initiate flowering. This change marks the beginning of a new phase of growth, one that will see the plant mature and start to form buds. The plant has been diligently cared for with a feeding regime tailored for this stage of growth, with a high dosage of Orca and Canna Boost to fortify its vigor as it transitions into flowering. With the Biscotti strain nearing the end of its cycle, Epic Buzz will soon have a dedicated space to expand and flourish. The next move will be into a tent where it can truly shine as it enters the full flowering phase.
The journey with Epic Buzz continues to be a source of pride and excitement. As we move into the flowering stage, each new development brings anticipation for what's to come. The strength and beauty of the plant at this stage—lush, green, and full of life—are the rewards of careful tending and a passion for growing.
Stay tuned for the next update, where I'll share the early flowering developments and the plant's adjustment to its new home.
Stay Lifted
Salokin


Likes
Comments
Share

@HOME_GROWBOOK
Follow
Diese Woche geht es los wir drücken die Pflanze deutlich nach unten hinten in einem Bogen und fächern die Triebe weiter auf um sie gleichmäßig zu verteilen.
Likes
12
Share


@Growing_Spartan
Follow
This week I just watered the plants with PH’d water and dechlorinated it as well. Going to give recharge when they dry up enough but I did notice the Purple Lemonade has gone a bit lighter than expected with its colors, like a light green leaf rather than dark healthy green. I’m thinking it could be a small deficiency of nitrogen since she did have a better stretch than the LSD’s, I’ll be topping her off with a small amount of 444 all purpose from Gaia greens lineup. Other than that the plants seem happy!


Likes
2
Share


@KeemBboomin
Follow
Once again these girls don’t really need much just watering when dry but other than that we are on cruise mode. I have been checking trichomes for about a week now and man is she almost there I should be giving them lights out with in another week or two can’t wait
Likes
1
Share


@CrazySasquatch
Follow
A little yellowing of the top canopy. Keeping PH in line. Did a light defoliation and pulled back a few branches with plant ties.

Likes
75
Share


@Kitties_and_Colas
Follow
~_~_~_~_~_~_~_~_~_~_~_~_~_~_~_~_~_~_~_~_~_~_~_~_~_~_~_~_~_~_~_~_~_~_~_~_~_~_~_~_~_~_~_~_~_~_~_~_~_~_~_~_~_~_~_~_~_~_~_~_~_~_~_~_~_~_~_~_~_~_~_~_~_~_~_~_~_~_~_~_~_~_~_
❤️💡🌱😽💨
First week of flower at last!!! This plant is sooo ready to go lol...we started her flower feeding regiment a whole week before flowering.. we also replaced x2 315watt Philip CMH fixtures for the FC-E6500 by Marshydro..what an awesome move.. this light is so f*cking incredible.. i honestly don't think a better 4x4 option exists, if it does Iv'e never seen it... this plant probably should of been flipped a few weeks back but she should have the room (hopefully)..we'd love to pull over a Lb and this is DEFINITELY the strain to do it.. we pull approx. 3-3.5oz dry on a 6 week veg with ILGM Big Bud, this should smash some records lol...Thanks for dropping by and happy harvests folks!!
⚡Mars Hydro/FC-E6500⚡ Specifications ⚙️:
650 watt, full spectrum design, removable light bars and driver 🔌
Diodes: BridgeLux chips (3978 count!)
Veg Coverage: 6x6 ft 🌱
Flowering Coverage: 5x5 ft 🌼
High-Efficiency
PPFD: 1200umol/m²/s ☢️
-IP65 waterproof ratings, tolerant to high humidity grow environments 💦 ..
-Can be daisy-chained together and all controlled from a single light! 💡~💡~💡~💡~💡
~_~_~_~_~_~_~_~_~_~_~_~_~_~_~_~_~_~_~_~_~_~_~_~_~_~_~_~_~_~_~_~_~_~_~_~_~_~_~_~_~_~_~_~_~_~_~_~_~_~_~_~_~_~_~_~_~_~_~_~_~_~_~_~_~_~_~_~_~_~_~_~_~_~_~_~_~_~_~_~_~_~_~_


Likes
7
Share


@HeavyHead
Follow
Starting to flower this week,
Dropped my lights closer to canopy and started giving full strength nutes + big bud and bud candy from here out :)

Likes
6
Share


@DeepRootsGrowTrees
Follow
Week #10 Gnomo Auto By Kannabia
Week#10 Dec.30th-Jan.6th
Gnomo Auto had stayed true to the indica genetics she has she's a shorter plant that's stocky with tight dense buds that are covered in trichomes. She's been a easy grow due to her genetics No real issues. I highly recommend if you like to grow indica or have limited space!

Processing
Likes
142
Share


@MadeInGermany
Follow
Hey everyone :-)
This week it smells more and more sweet and fruity in the whole room 😍.
There is actually not much to report, everyone is now under 12/12 :-).
This is the last grow that comes in the entire diary.
From now on, each plant will be added to the diary 👍.
I wish you all a lot of fun watching, stay healthy 🙏🏻 and let it grow 😎👌


Likes
8
Share


Likes
11
Share


@420DeepGrow
Follow
Gracias al equipo de MSNL Seeds y XpertNutrients sin ellos esto no sería posible.
💐🍁 CBG SOUL FEMINIZED:
CBG Soul es un híbrido rico en CBG con una proporción Indica/Sativa 50/50, creado por sus efectos calmantes y relajantes. Sus sabores dulces, limón y cítricos se complementan con terpenos limoneno y mirceno, ofreciendo una mezcla única para el alivio y disfrute terapéutico.
🚀🌻 Consigue aqui tus semillas:
https://www.marijuana-seeds.nl/cbg-soul-feminized-seeds
🍣🍦🌴 Xpert Nutrients es una empresa especializada en la producción y comercialización de fertilizantes líquidos y tierras, que garantizan excelentes cosechas y un crecimiento activo para sus plantas durante todas las fases de cultivo.
Consigue aqui tus Nutrientes:
https://xpertnutrients.com/es/shop/
📆 Semana 8:
Todo sigue su ritmo, ella a cogido vigorosidad y creo va a despegar pronto.

Likes
71
Share


@DogDoctorOfficial
Follow
Greetings, fellow cultivators! Week 6 has brought us to a pivotal moment in our Anesia adventure as we witness our green beauties reach new heights of vitality and vigor. Join me as we delve into the latest developments in our thriving veg garden!
Our Anesia girls continue to impress with their robust growth and lush foliage, each plant a testament to the care and dedication poured into their cultivation. From the graceful Future#1 to the energetic Zoomiez, it's a sight to behold and a joy to witness their journey towards maturity.
But the excitement doesn't end there! As we enter the final stretch of veg, anticipation is building for the transition to flower and the promise of bountiful blooms to come. With each passing day, our plants grow stronger and more resilient, ready to face the challenges of the flowering phase head-on.
And speaking of excitement, I'm thrilled to announce that Episode 1 of "Welcome to the Green Oasis" is now available on YouTube! Join me as we embark on this journey of growth and discovery, exploring the wonders of our green sanctuary and celebrating the beauty of nature in all its glory.
So be sure to check out the link in my bio and join us on this epic adventure. Don't forget to like, comment, and subscribe for more green goodness, and stay tuned for the next chapter in our Anesia saga. Until then, happy growing!
https://www.youtube.com/watch?v=8l_e2Jc2Q0E Welcome to the Green Oasis: Episode 1 - Tent Transformation! Direct link with full explanation of whats happening as the video is to big file to upload here
Genetics Red Banana Pudding = RBP
Apricot Oreoz = AO
Zoomiez = Z
Future#1 = F
https://anesiaseeds.com/
Plant nutrition - Aptus Holland - https://aptus-holland.com
LED Photons - Future of Grow - https://www.thefuturofgrow.com/
Controls - Trol Master - https://www.trolmaster.eu/
Watering - Autopot - https://autopot.co.uk/
Tent - Mars Hydro - https://marshydro.eu/
Love and attention - Me, myself and i
As always thank you all for stopping by, for the love and for it all , this journey of mine wold just not be the same without you guys, the love and support is very much appreciated and i fell honored and blessed with you all in my life, With true love comes happiness. Always believe in your self and always do things expecting nothing and with an open heart , be a giver and the universe will give back to you in ways you could not even imagine so
More info, the ocasional give-away and exclusive updates from all my adventures can be found - links in the profile description
Friendly reminder all you see here is pure research and for educational purposes only
Growers Love To you All 💚