The Grow Awards 2026 🏆
Likes
Comments
Share
@Polygus
Follow
A big hello to all the cannabis growing gardeners...and all the other visitors that came across my grow journal. 
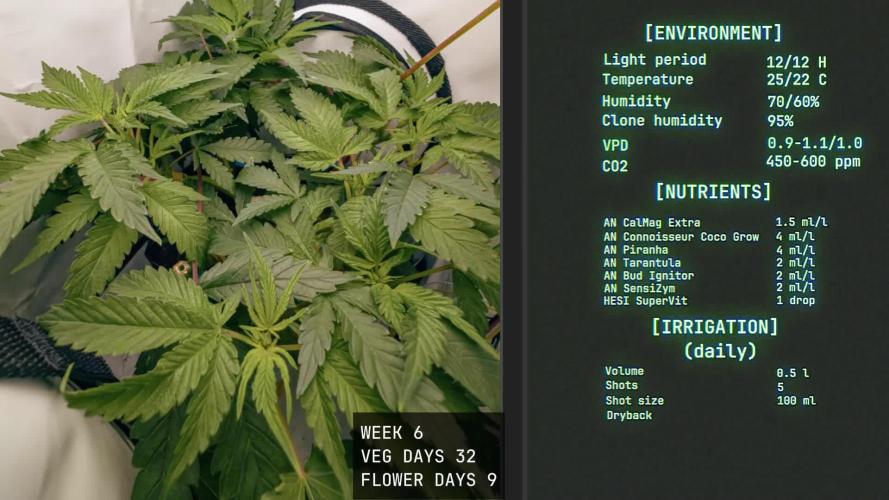
This week i need to change the reservoir again, the plants drink solution just as I add fresh water the EC stays at 2.7 and i need to add PK and Calmag so that's why. The weather outside is very cold this whole week around -18 degree Celsius at night...this made my reservoir water go under 15 degree Celsius. Since i ran the Spider Farmer UV lights i noticed some purples on my cannabis plants i think it's their doing....i run it now for two weeks the UVs ---------------------------------------------------------------------------------- The SE 7000 is hanged at 40 cm. over the canopy and runs at 520W. This whole grow's main sponsor is Spider Farmer. You can easily obtain all the great grow equipment we use at: spider-farmer.com A big thank you to Jessie and the whole Spider Farmer crew for supporting me with the newest technological advancements in horticulture. Thanks to them what i do here is possible. Thank you Zamnesia for giving me the opportunity to try out your stock. zamnesia.com/uk/7686-zamnesia-seeds-do-si-dos.html 20% discount code: ZAMMIGD2023 Plagron did send us their Contest package for the Power Buds competition . Thank you for your visit, please leave a like and hope to see you beck here in about a week.
Likes
12
Share
@GrowGuy97
Follow
I have to say, overall out of all 5 purple Lemonade seeds I’m not very happy with the results so far considering they was a little more pricey & the fact that I know how good these plants can turn out! Not sure if I just got some bad genetics or what’s up but pretty bummed about this run so far😅😅 hopefully things will start to look up! Thanks for following & happy growing friends!✌️🏼🌱 Day 24 - Decided to pull the smallest purple lemonade that wasn’t doing anything so I can go ahead and get something else going in it’s place! Watered the other ladies today. Day 25 - Ladies are still stretching like crazy!
Likes
18
Share
@valiotoro
Follow
As you can see the buds are super sticky make sure to have enough gloves 🧤 Harvest in 2 times the top buds then 7-10 days later the lower buds✂️ No popcorn 🍿 The smell is divine sweet candy with a touch of cardamom 🍭🍬 See you in 2025 for the smoke review Take care 😎
Likes
22
Share
1/11/2024 Vegetation Week 1 Day 1- I have a root almost in the water.. Yay!! Top feeding is almost done. she is looking a little sad as I work the transition Top feeding but once the roots are fully in the water she will start to take off. Ensured my PPFD is set between 250-300 it is set to: 258 1/12/2024 Vegetation Week 1 Day 2- I have a root in the water.... NO TOP FEED TODAY SIR!!! now that a root is touching the water and she looks stable, I am not going to topfeed, I will see how she looks tomorrow and as long as everything looks good I am going to go ahead and do a change and week 1 fill on Nutes.. I know it is a couple of days in but the same Nutes go through Week 2 and get changed at Week 3 So I should be good to go.. I will just ensure I fill to root touching the water when I change tomorrow. 1/13/2024 Vegetation Week 1 Day 3- Water Change Day!! I added 36 Gallons of Water to the system: Silica= .5mil/gal= 18mil CalMag= .75mil/gal = 27mil FloraMicro=3.0mil/gal = 108mil FloraGro=2.0mil/gal = 72mil FloraBloom= 2.0mil/gal = 72mil PH DOWN= 30mil Very important thing with this system is to now wait the 24 hours for the system to adjust.. Do not make any further adjustments to your PH up or Down for 24 hours to allow time for the system to balance. 1/14/2024 Vegetation Week 1 Day 4- Today I just adjusted the PH to ensure that it was right at 6.0 1/15/2024 Vegetation Week 1 Day 5- Today I Cleaned up the lower damaged leaves from the transition from top feeding to roots in the water. She looks good today. 1/16/2024 Vegetation Week 1 Day 6- Today I just took a picture of the beautiful lady for Log. Other than that just normal day to day operations, check the pH, check the Humidifiers and fill as necessary, check level of water in the Res. Everything looks great. onto Tomorrow!! 1/17/2024 Vegetation Week 1 Day 7- Today I filled the humidifers, checked the PH and just let her grow.. Grow baby Grow.....
Likes
48
Share
Info: Unfortunately, I had to find out that my account is used for fake pages in social media. I am only active here on growdiaries. I am not on facebook instagram twitter etc All accounts except this one are fake. Have fun with the update. Hey everyone 😃. Unfortunately it happened again and the pump failed again for the whole day :-(. All the spare parts have finally arrived and I replaced everything right away. I threw away all the cuttings because there were now two complete failures and I want to be on the safe side. Since the mother of the Kosher Tangie Kush is too badly pruned, I have only been able to cut 3 small test cuttings. Should one of them become something I will take it directly. But it can also be that I have to cut some again, which would only be possible in 2-3 weeks because the mother has to grow back first. That shit happened to me the first time :-( but unfortunately it can always happen with electronics :-(. Nevertheless, I wish you a lot of fun with the update. Stay healthy and let it grow 👍 You can buy this Strain at https://www.amsterdamgenetics.com/product/kosher-tangie-kush/ Type: Kosher Tangie Kush ☝️🏼 Genetics: Kosher Kush X Tangie 👍 Vega lamp: 2 x Todogrow LED CXB3590 COB 55 W 1 x Sanlight S2W 62 W 💡 Flower lamp : 2 x Todogrow LED CXB3590 COB 55 W 1 x Sanlight S2W 62 W 💡 ☝️ Grow Aero System : Growtool 0.8 ☝️ Fertilizer: Canna Aqua Vega A + B , Canna Aqua Flores A + B , Rizotonic, Cannazym, CANNA Boost, Pk 13/14, Canna Cal / Mag, Canna Ph - Grow, Canna Ph-Bloom ☝️🌱 Water: Osmosis water mixed with normal water (24 hours stale that the chlorine evaporates) to 0.2 EG. Add Cal / Mag to 0.4 Ec Ph with ph- to 5.2 - 5.8 💦 💧
Processing
Likes
5
Share
Week 6 is done and everything went smoothly, using lst and defoliation will provide maximum light penetration and maximize bud structures, adjusting ph and climate and we are golden. Flowering stage is always a no brainer for me in fact i call this step cruise control. She will do her things and she is now strong so she wont react the same to high nutrients or even ph fluctuations as long as it stays near the range, her roots are strong enough to be completely submerged since she now drinks a lot more. The purple on this strain is beautiful, Not too dark and even, edges of the calix are red like whine and the pistils creamy white with a hint of salmon like pink in there. She is gorgeous and her structure is amazing, she might event yield the same as my previous grows even if she is on the small side because of her genetics. The resin is starting to fill the trichomes but still very low, this being said if i rub the top of a sugar leaf that is coated in trichomes iT will get sticky On my fingers and the smell will start with a very strong chemical/amonia like scent and 2 seconds later welcome to the damn blueberry field my friends . Amazing, that smell is just perfect, it literally make you want to much on that leaf. I’ve had blueberry before, yes it did smell a bit like blueberry But nothing compares to this one ,in my opinion hydroponic set up brings the most out terpenoids and thc production. Next phase we will start to see bud seriously stacking and resin production, after that the buds will get some weight and mature, im expecting it to be done by week 10 if i flush it by week 9 Until then happy growing and take it easy 👊🏻
Likes
8
Share
@Oldwied
Follow
Day 58 The colours of autum are so beautiful. 1 week left to haverst.
Likes
2
Share
The girls are doing well so far. Advanced nutrients in combination with the Lumatek Zeus 600W Pro 3.1 is a killer combo. Also the coco substrate is working well so far. I placed them in bigger pots today . 🌱
Likes
12
Share
Flip mode squad in the house! LSD and Green Crack move to the 4x4 room, under the Samsung strip's. Both plants were topped and defoliated. All four ladies look happy and healthy, I can't wait to see how they grow under this light. Thanks for stopping by growfessors 👽🌳💚
Likes
4
Share
@Bretwalda
Follow
Underfed these girls a bit and they had a late defoliation but they seem to have done okay
Likes
44
Share
**Encontrarás la traducción a español al final de la descripción** From/Desde: 10/05/19 || To/Hasta: 16/05/19 From day/Desde día: 78 || To day/Hasta día: 84 You can find the Money Maker Diary here: ** Podéis encontrar el diario de las Money Maker aquí:** https://growdiaries.com/diaries/25667-gorillamakingmoney-gorilla-vs-money-m -----IMAGES & VIDEOS----- 5 - HomeMade Organic & Cheap CO2 generator (more info in week summary) 9, 10, 11 & 12: The bud on the right is a Gorilla one, the buds in the left or/and in the middle are Money Maker ones. 15 - Same Gorilla plant buds, one affected by CO2 in the roots and the other not. -----WEEK SUMMARY----- The smell is more sweet and intense every day, friends that came home turned them eyes into crystals when they see this little babys. The size isn't awesome, but the high ammount of buds full of crystals plus the strong sweet aroma makes them awesome. Buds are growing and fattenning very very well. This week i added a boost of HomeMade CO2, i never measured the results of this invention so i can't give CO2 measurements. This method is widely used in home aquariums and there is where it comes from. For those interested i'm going to write here more detailed instructions. The 4 liters i've made will last for about 2 weeks. ---NEEDINGS--- - 250 ml Bottle - 6~10 l Bottle - 400 g Sugar / l water - 1 Envelope of organic baker's yeast / l water (CHEMICAL WILL NOT WORK) - 3 mid plastic tubes 40~50 cm - 1 short plastic tube 5~6 cm - 4 tube adapters - Hot glue to seal adapters The process of creating CO2 is simple, mix water, organic yeast and sugar in a bottle, and the sugar will free CO2 in the process of fermenting to alcohol due to the yeast. 1. Make a hole in the center of the big bottle cap, insert an adapter and secure it with hot glue 2. Make 3 holes in the small bottle cap and glue the other 3 adapters 3. Link both caps with one of the mid tubes and insert the other tubes on free adapters 4. Insert a short tube in the bottom of the small cap in the adapter that came from the big cap 5. Watch the Video!! -----WATERING CALENDAR----- Plants are beginning to drain the pots a bit faster so from now on i will raise the water ammount on each watering day 0.25 l. 11/05/19 - 1,5 l with All week nutrients -(Nirvana & Blombastic) also Big Bud half dosed @ PH6.4 & 2 E.C. 14/05/19 - 1,5 l with Bud Candy, Big Bud, Nirvana, B52, Bud Factor-X, Sensizym & Blombastic @ PH6.4 & 1.5 E.C. *****ESPAÑOL***** -----IMÁGENES Y VÍDEOS----- 5: Generador de CO2 casero, barato y orgánico (más info en el sumario semanal) 9, 10, 11 & 12: El cogollo que sale a la derecha es de una Gorila, el de la izquierda y/o el de en medio son de una Money Maker 15: Dos cogollos de la misma planta, uno afectado por CO2 en las raíces y el otro no -----SUMARIO SEMANAL----- El olor es más dulce e intenso día a día, los amigos que vienen a casa a verlas se quedan ojipláticos al verlas. El tamaño no es una maravilla, pero la gran cantidad de cogollos llenos de cristales añadido al aroma que entra por las fosas nasales las hacen increíbles. Los cogollos crecen y engordan de maravilla. Esta semana he añadido un boost de CO2 casero, nunca he hecho mediciones de los resultados por lo que no puedo darlas. Este método es ampliamente usado en peceras caseras y de ahí saqué la idea. Para aquellos interesados dejo aquí instrucciones más detalladas. Con los 4 litros de agua que he preparado yo da para unas 2 semanas. ---NECESITAMOS--- - Botella de 250 ml - Botella de 5 a 10 litros - 400 g de azúcar por litro de agua - 1 sobre de levadura de postre orgánica (LA QUÍMICA NO FUNCIONARÁ) - 3 tubos de plástico de tamaño medio 40~50 cm - 1 tubo de plástico de tamaño pequeño 5~6 cm - 4 adaptadores para los tubos - Cola caliente para pegar y sellar los adaptadores El proceso de generar CO2 es simple, mezcla agua, levadura orgánica y azúcar en una botella, y el azúcar liberará CO2 en el proceso de fermentación a alcohol. 1. Haz un agujero en la tapa de la botella grande, inserta un adaptador y séllalo con cola caliente 2. Haz 3 agujeros en el tapón pequeño y haz lo mismo con los otros 3 adaptadores 3. Conecta los 2 tapones con uno de los tubos y conecta los otros 2 tubos a los adaptadores restantes 4. Conecta el tubo pequeño en la parte libre del adaptador del tapón pequeño que viene del tapón grande 5. Mira el vídeo -----CALENDARIO DE RIEGO----- Las platas comienzan a secar los tiestos un poco más rápido, asi que de ahora en adelante incrementaré 250 ml de agua adicionales en cada riego. 11/05/19 - 1,5 l con todos los nutrientes semanales -(Nirvana & Blombastic) BigBud mitad de dosis @ PH6,4 & 2 E.C. 14/05/19 - 1,5 l con Bud Candy, Big Bud, Nirvana, B52, Bud Factor-X, Sensizym y Blombastic @ PH6,4 & 1,5 E.C.
Likes
13
Share
@WeedM8
Follow
Hello m8 welcome to this journey with me in this diary will have very interesting strains hope u find something useful Persi - [ ] 1st week Veg: germinated in substrate lighting very close so it jets medium high humidity after the 3rd day they started sprouting - [ ] 2nd week Veg: this week my ventilator broke down and as the temperature stayed very warm nothing developed much - [ ] 3rd week Veg:fortunately this week i had fixed the ventilation and the temperature has go down a bit allowing the little plants to develop and reinforce - [ ] 4th week:very good developments in this week I already started feeding a bit two times but i didn’t have to…once was enough - [ ] 5th week Veg:this week they were very strong green i only had to water them good and keep the ventilators going no stop .They have good hight already ,but as i have to strains together. I want to transplant them when the hight of the other one have stretched… I’m thinking to transplant next week if not the next one - [ ] 6th week Veg: this week it went great fortunatly i dont have pests that eat my buds i’ve givven a fed once the substrate is very rich already the plants streached very well i will transplant today so be ready m8 i cant wait to show you the progress - [ ] 1st week Fl:they started stretching and looking very healthy just transplanted - [ ] 2nd week Fl this week I’ve been away i had a friend taking care of them they stretching very well i hope that she starts putting energy into the flo - [ ] 3rd week Fl:they are streaching very well ..getting the light very well - [ ] 4th week Fl:there we aree guys the good stage is heree good high hope dosent effect de prod - [ ] 5th week Fl:pumping very good this week a lot of changes started already being frosty - [ ] 6th week Fl:this diaries its not daily updated this week its going’s so great we are close to harvest between next week and the other one . Ill harvest them at diffrent time just because they are not all at the same point of flowi - [ ] 7th week Fl: im so satisfied from the way that this is going they didnt had any particular stress just that its 29 degrees during light and its going good so farr I haven’t constantly fed like on the peach g and pcr i hope for better taste at the end
Likes
5
Share
@Hix57
Follow
Le 42e jour ce passe très bien. Les plantes sont au milieu de la prefloraison et ne vont pas tarder à arrêter leurs croissance pour se concentrer sur les bourgeons ainsi j'adapte l'alimentation au circonstances. J'ai rattrapé l'erreur de pH même si cela reste précaire les plantes se portent dans l'ensemble très bien 🌱🙏
Likes
21
Share
@NG420
Follow
This week i made a plan for the plants feeding. For start gave a small portion of nutrients like 1/4 from the suggested to see the reaction of the plants. Day 21: fim one plant (the plant referred as cotyledons now is going to be mentioned as fim).In a few days will top the other one.
Likes
42
Share
@DrLaggis
Follow
🌱 Day 29 - First Day of Flowering Phase 🌱 Hey everyone! 🌿 I'm super excited to finally enter the flowering phase of my first grow! I have to admit, I was quite surprised to see that the plant had already been in pre-flower for three days and are developing really well. 🌸 Current Conditions for the Flowering Phase: Watered today with 800ml + 1ml/L BioBizz Bloom 💧🌿 Humidity: 50-55% 💧 Light: 100% intensity, 50cm distance, 16 hours light, 8 hours dark 💡🌙 Current Issues: I'm dealing with a few small yellow spots on the leaves, which seem to be caused by a calcium and magnesium deficiency.
Likes
18
Share
@Dunk_Junk
Follow
Nice flowering growth this week! She is very bushy!! Hopefully she makes plenty of nice buds!
Likes
39
Share
Likes
27
Share
3/4/2023 Week 3- Day 1 of Veg (Day 31 overall) Water Change out Day 36 Gallons in CalMag = .5Mil/Gal = 18Mil FloraMicro = 4.2Mil/Gal = 151Mil FloraGrow = 3.8Mil/Gal = 137Mil FloraBloom = 3.0Mil/Gal = 108Mil PH DOWN = 1.72Mil/Gal = 62Mil PPM = 546 PH = 5.88 This Grow has definitely been an interesting grow I have been playing with Over or Under since the beginning and it all started with me drowning the plants by adding too much water. I will have to make sure I watch that on all my future grows. I prayerful that this week will get me fully back on track, in my previous grows using my chart, I haven't had any issues during this week, so again prayerful that this is the week I am back on point. 3/5/2023 Week 3- Day 2 of Veg (Day 32 overall) ROOT ROT!!! I guess from when I drowned it I caused a lurking issue that really showed it's head today. The roots were looking not slightly bleached but looking black. I cut out what looked dead and I had to run to the local Hydro shop to pick up some items to see if I can fix it and strengthen the plants. I picked up Mammoth Silica, ORCA, and ROOT Drip. I completely drained the system and started it over today as well. 38 Gallons In Mammoth Silica = .5Mil/Gal = 19Mil CalMag= .5Mil/Gal = 19Mil Root Drip = 1Mil/Gal = 38Mil FloraMicro = 4.2Mil/Gal = 160Mil FloraGro = 3.8Mil/Gal = 144Mil FloraBloom = 3.0Mil/Gal = 114Mil Orca = .5Mil/Gal = 19Mil PH Down 60 Mil = PH 5.83 I also had to run by Staples I realized the paper I was using wasn't the right brightness and Lbs for the Photon App. What I needed to have 22Lbs 98 Bright. I recently saw a comparison of the different weight papers against a several hundred dollar Apage PPFD detector and with the right paper it was almost exact readings. With that my PPFD 355. 3/6/2023 Week 3- Day 3 of Veg (Day 33 overall) Still alive!! #2 and #3 are still alive and it looks like no further damage to any of the leaves. #2 needed 1 node topped. I will keep monitoring day to day. 3/7/2023 Week 3- Day 3 of Veg (Day 34 overall) Well Both appear to be doing all right. I cut off the offensive leaves from #3 nothing new on shown on the leaves. I actually needed to top 1 node on #2. PH is stable, Temps are stable.. I will be changing out the water and Nutes on Saturday not waiting the 2 weeks. 3/8/2023 Week 3- Day 4 of Veg (Day 35 overall) Well Both appear to be doing all right. I actually needed to top 1 node on #3 and 2 on #2. PH is stable, Temps are stable.. I will be changing out the water and Nutes on Saturday not waiting the 2 weeks. I think the additives are truly making a difference I think I will be adding them to all my grows from here on out. 3/9/2023 Week 3- Day 5 of Veg (Day 36 overall) Both still appear to be on the mend Still some dark brown on a small part of the roots and I don't know if those are just dead but it doesn't look like it is spreading and I see a bunch of new roots forming. Nothing new on the leaves at all. So I think the trio that I added is helping. The plants also seem to be in raised happy position going towards the light. I still plan to change the water on Saturday and go from there. 3/10/2023 Week 3- Day 6 of Veg (Day 37 overall) Moved the light up to 41 1/2" so 3' 4 1/2" away from the top of the Plants. PPFD= 363 Power on my Light =62.5 Water Temp is holding steady=70.3 PPM= 534 PH= 5.92 Tent Temp= 72.5 Humidity= 50-60% I have 2 humidifiers running on INK Bird controllers monitoring it 24/7. I will be changing out the water tomorrow even though I could let it go an extra week but I am still concerned that the Root Rot is clearing up and I don't want to risk it coming back. I want fresh Nutes/ water in the tanks. I topped 2 nodes on #3 I topped 3 Nodes on #2 I also cleaned out some of the bottom third portion that isn't getting much light and not much growth at all. #2: 8 1/2" tall, 18" Wide #3: 7 1/2" Tall, 15" Wide
Likes
12
Share
Englisch: Now about 7 days have passed since the seeds were planted and all the plants are growing relatively evenly and vigorously. Lights are running on 25% for now. As the main root of all the plants was already growing out of the bottom of the seed pot after 6 days, I decided to repot them into the 2L growing pots earlier than usual. I used Great White Mycorrhizae to further stimulate root growth. Let's see how the ladies cope with being repotted so early. German: Nun sind ca 7 Tage seit dem setzen der Samen vergangen und alle Pflanzen wachsen relativ gleichmäßig und kräftig. Aktuell läuft die LED bei 25%. Da bei allen Pflanzen nach 6 Tagen die Hauptwurzel bereits am Boden des Anzuchttopfes herauswuchs, entschied ich mich dazu, früher als gewöhnlich in die 2L Wuchstöpfe umzutopfen. Dabei verwendete ich Great White Mycorrhizae um den Wurzelwachstum weiter anzuregen. Mal schauen wie die Ladies es vertragen, so früh umgetopft zu werden.