The Grow Awards 2026 🏆 


Likes
Comments
Share
@xmackobox
Follow
Semillas regulares Alioli de Dr. Ganjah
Simplemente alucinante la calidad a pesar del pesimo cultivador xd
Likes
39
Share
@KitaKush
Follow
First plant got a bunch of lockouts from the feed so I did an emergency flush..don't wanna mess with it anymore or cause nutrient burn on plant #2 so just water for the upcoming week. Will probably skip Cha Ching all together...not sure yet. Doesn't seem to me that either plant even needs it.
Growing super frosty thoooo! Buds filling out I doubt they will get much thicker but I don't care...pretty exciting to watch them grow into their final form. I think these will be my best plants grown to date!!! :)
Did a good amount of defoliation to get more light to the lower buds.
Also cracked open my Mother Earth Coco Coir block for my next two grows and topped off these 5 gallon pots..the plants definitely seemed happier with that fresh layer added!
Getting closer to the finish line!!

Likes
12
Share
@CURATI_DA_SOLO
Follow
Purtroppo nessuna vendemmia per colpa di qualche ragazzo che mi ha rubato tutte le mie 9 piante gorilla Zkittlez- gelato- strowberry gorilla- wedding glue- purple punch-strowberry banana-Gorilla cookies- blackberry- mimosa cake....che male al cuore ragazzi quanti sacrifici non potete capire!!!!
Likes
19
Share
@Mikado
Follow
Adding week 4, as I had it in "germination" in the diary a week too long. Brings it in line with it's size/maturity. Messed up my lighting for 48ish hours, left on 24hrs a day, due to flip flopping on going to flower.

Likes
16
Share
@MarcGrows
Follow
Harvest went as well as grow with no issues. Hung plants up to dry after removing fan leaves. Great smell and trichome development is great. Previous harvest sparkles like glitter. Great tasting bud as well! High in THC. Love it!


Likes
46
Share
@Juschiln420
Follow
6/18 added water, ph
6/19
Added 3ml cal mag banana, cookies
Added water
6/20 added water, ph
6/21added water, ph
6/22 added 2ml bloom to banana
6/23 added water, ph
6/24
Added water and nutrients
Runtz and cookies
Bloom(Full strength)(new)
Micro 0.75/L x 11.3=8.5ml
Gro 0.50/L x 11.3=5.65ml
Bloom 1/L x 11.3=11.3ml
Cal mag 1/L x11.3= 11.3ml
Bud candy 2/L × 11.3= 22.6ml
Big bud 2/L x 11.3= 22.6ml
Hydroguard 2/Gal x 3.5=7ml
3 gal = 11.3L
6/25 added water, ph
Records kept here
https://1drv.ms/x/s!AmTQ-7u9iyH6kDFcBT1QhRk7ttv4


Likes
16
Share
@DreamIT
Follow
Sponsored by:
💫PARADISE SEEDS💫-💡VIPARSPECTRA💡-💐GREEN BUZZ LIQUIDS💐-🛠️WEDRYER🛠️
10/7 I hadn't started this diary yet. after the various dead seeds of this run I decided to start another paradise seeds seed, and here we are, already vegetative. A lot of indica in those leaves
12/7 everything is going well, it stretches and expands, already showing the classic indica traits, with large rounded leaves
__________________________________________
Personal advertising (contains affiliate links)
__________________________________________
🦄 winners and holders of the most prestigious awards, since 1994 they offer genetics of the highest quality! Anonymous shipping!
✅https: //bit.ly/Paradiseseeds_
__________________________________________
Did you know that Green Buzz Liquids fertilizers are 100% vegan? A complete line of products ready to give the best to each of your plants! Visit the site and see my journals to see how they work 🦄
🤯 And with the code "dreami t" you will immediately receive a 15% discount on your purchases
✅https: //bit.ly/GreenBuzzLiquidsPro
__________________________________________
👀 Are you looking for a good lamp to start with? 👀
🌞Viparspectra has something more than the others, take a look at their site.
⏩ Use "GDVIP" for an extra discount or "DREMIT3" for an extra 5 %% discount
👀 Search for it on Amazon
✅Amazon USA: https://amzn.to/30xSTVq
✅Amazon Canada: https://amzn.to/38udUVe
✅Viparspectra UE: bit.ly/ViparspectraUE
✅Viparspectra USA: bit.ly/ViparspectraUS
______________________________________________
🌈 Tired of blowing on your weed hoping it dries quickly? Check out the Wedryer website! You will find a well-made accessory that will help your weed dry in just 8-10 days without the annoying risk of finding mold or other annoyances! (no affiliate links)
✅https: //bit.ly/Wedryer_
______________________________________________
📷🥇Follow the best photos on Instagram 🥇📷
https://www.instagram.com/dreamit420/
Backup
https://www.instagram.com/dreamit4200/
🔻🔻Leave a comment with your opinion if you pass by here🔻🔻
🤟🦄💚 Thank you and good growth 💚🦄🤟


Processing
Likes
24
Share
@GrowGuy97
Follow
HUGE shoutout to Paul at New420GuySeeds for sending me these new 3 Run Homer test seeds to try out! I am extremely excited to see how this grow goes & to make it even more interesting there are currently no diary’s with this strain on GD! Everyone go check out their website & get some for yourself! I will be back tomorrow with day 1 pics when I get them planted! Keep watching & happy growing friends!✌️🏼🤙🏼🌱
Day 1 - Everything is going great all 3 seeds popped!👍🏼 Finally got them planted & watered with Fox Farm Big Bloom (6tsp per gallon)
Day 2 - I can see all 3 seeds starting to come up we are off to a great start👍🏼✌️🏼 Gave them a little more water this morning with big bloom, grow babies grow!
Day 3 - Everything is going great!🙏🏼
Day 4 - All 3 are growing strong👍🏼
Day 5 - PH water 6.4
Day 6 - end of week 1, everything is looking good✌️🏼🌱

Likes
12
Share
@Fccfarms
Follow
Start of week 6 day 36 of flowering.
So considering this is a summer grow with high temps most of the time, these girls are still blooming nicely. LIT farms are still continuing to impress as the weeks go by. Very frosty and still 3 weeks to go.
Pk stopped and buddy back in the schedule for this week. Finale next week only and then 1 final week of just water.


Likes
2
Share
@MrLahey
Follow
Day 53 - ripening up! She’s reduced her water intake down to one or less than one liter per day. Smell is phenomenal and strong - like spicy bubblegum almost although I have a post covid sinus infection so my nose is pretty stuffy still.
I’m thinking 2-3 weeks MAX until I chop her. She seems ahead of or right on track for “estimated harvest time” from the breeder. Top colas are primarily cloudy trichomes and some clear and amber. Lower bud sites are cloudy/clear trichs. I think I’ve a tendency to harvest a little early so we will see how long I can push her before I feel it’s chop time. I suspect that will be dependent obviously on the trichomes, pistils and bract size but also overall health of fan and sugar leaves which seem to be fading due to senescence, improper ph maybe and cold night temps.
Ordered an apera gs1 ph pen as I’m pretty sure my current pen hasn’t been accurate the past month or so. Also ordered a blumat watering system for next grow (chicken n waffles from Humboldt seed company).
My vcure arrives this week so I’m really excited for when I chop this plant and dry/cure her in it.

Likes
46
Share
@Rollex420
Follow
Day 18
Transplanted today the plants into their 11L pots.😊
While instead i will let the Lemon Tree grow for another 4/5 days in the same pot because she only got 13 days, so I prefer to have it strengthened a little before the transplant.
Day 24
Mimosa, Meringue, and Kmintz were Topped, Defoliated and also applied a light LST to the main stems of the plants.
I will do the same for the Lemon Tree in the next 2/3 days..
I hope they have a quick recovery 🤞🏻
Day 27
LST also performed on the side branches of all plants except the Kmintz which is too small to bend its branches.
Also Today we got 21 days for the Lemon Tree which has a great shape! Carried out topping, LST and a little defoliation.. 🙌🏻
In the next few days I will let them grow them without further stress.
Have a great weekend gromies!! ☮️💚
Likes
115
Share
@DogDoctorOfficial
Follow
Cherry Cola's Grand Flourish in the Floral Symphony
Greetings, fellow cultivators! Week 4 has unfurled its petals in the mesmerizing floral journey of our beloved Cherry Cola Auto. The tent is now a stage for a grand botanical opera, and our green queen stands as a testament to the wonders of cultivation. Let's dive into the details of this flourishing spectacle!
As we venture deeper into Week 4, the floral elegance of Cherry Cola Auto takes center stage. What was once a lush bush has evolved into a breathtaking beauty, a true testament to the success of our horticultural endeavors. The topping technique and the release from training supports have paved the way for a regal display of colas and buds.
The decision to set our Cherry Cola free from the constraints of training supports continues to be a triumph. The tent is now a realm of bushy brilliance, and our green queen stands tall, a majestic presence commanding attention. It's a living masterpiece in perpetual motion.
The echoes of our topping tales from previous weeks resonate in the structure of Cherry Cola's colas. Each topped branch has evolved into a flourishing bud-laden entity, contributing to the overall grandeur of our green canvas. The decision to embark on this topping journey has truly paid off.
Our nutrient symphony, now joined by the magical touch of Potassium (K), continues to fuel the botanical brilliance. P-Boost and Topbooster, with their orchestration of phosphorus, organic grace, and now potassium magic, create a harmonious dance of blooming processes. The buds are becoming robust, laden with fibers, resins, and sugars, promising a top-tier end product.
Every day, the visual majesty of Cherry Cola unfolds with new growth, showcasing the resilience and vitality she possesses. It's more than a plant; it's a living testament to the artistry of cultivation.
As we conclude Week 4, Cherry Cola Auto stands as a botanical opera in full swing. The tent is alive with the grand flourish of a floral symphony. Stay tuned, fellow enthusiasts, as we eagerly await the next thrilling act in the Cherry Cola Chronicles!
Genetics Cherry Cola Auto @Fast_Buds @fastbuds_genetics_official @fastbuds_official @fastbuds_espana
Nutrition: @aptusholland @aptus_world @aptus_
Love, Care, and Attention: @dogdoctorofficial
As always, thank you all for joining me on this journey, for your love, and for it all. My horticultural odyssey would never be the same without you. Your love and support are cherished, and I feel both honored and blessed to have you in my life
Friendly reminder all you see here is pure research and for educational purposes only
Growers Love To you All 💚 💚 💚


Likes
5
Share
@GoodTimesOrganics
Follow
Welcome Back!💚
Die Sleepy Joe befindet sich nun in der vierten Blütewoche und sie hat nochmal ein bisschen (3cm) an höhe zugelegt.
Das Blattwerk ist bei dieser Pflanze sehr stark ausgeprägt, daher habe ich nochmal viel Laubwerk rausgenommen.
Die Blüte nimmt allmählich an Fahrt auf die Blütenansätze bilden sich allmählich in die Breite aus
Der Geruch hat sich auch nochmal stark geändert. Aktuell kommen starke Nuancen von Chemie, Lösungsmittel oder ähnlichem hervor
Die Umgebungsgegebenheiten sind weiterhin optimal:
—————
🌞 Temp: 23, 2
🌚 Temp: 18°C bis 19°C
💦 RH: 43%
💨 VPD: 1,28 kPa 🧐
😎 PPFD: 830 mqm
—————
Grüne Grüße 🥦

Likes
15
Share
@Dillon1550
Follow
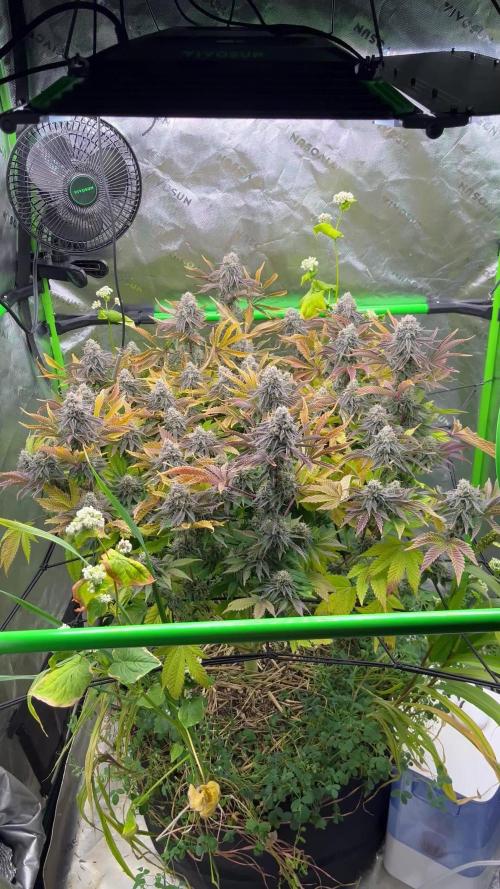
Lots of growing!! Mixed up a molasses based tea. Hitting the girls hard with lots of Gaia green bloom. The purple is nice to see 😍
Just water and bloom, ready for these to finish up so I can start the next batch!!


Likes
19
Share
@Ferenc
Follow
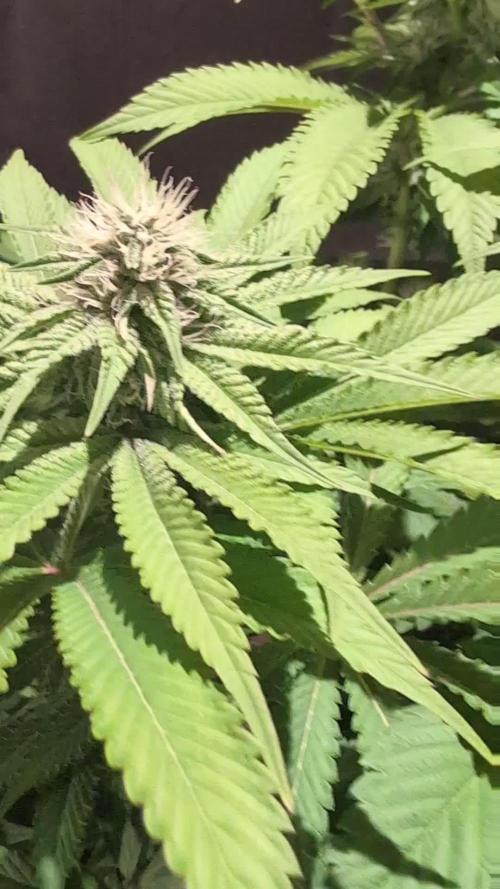
Lovely buds sweet and fruity with citrus smell and the taste of the smoke is the same. She has a potential to have a good yield if you have a good lamp. Nice buds really sticky, with nice trichomes. :)


Likes
2
Share
@Solocultivo
Follow
29 macetas de 20-18 litros aproximadamente
Dia 32 de Floracion Super Suelo
Sin fertilizantes
Apoyado con biortilizantes @bioinsumoschakrana
Melaza
Te de Bokashi
Humato Postasico
Potenciado
@Knactive
Knactive el mejor bioestimulante 100% orgánico para todo tipo de plantas , el cual activa la autodefensa contra el estrés oxidativo y potencia la síntesis interna de todas las fitohormonas.
https://instagram.com/knactive_?igshid=MzRlODBiNWFlZA==
Vital Juice
Es un producto Chileno hecho en base a algas: durvillaea antarctica y ascophyllum nodosum.