The Grow Awards 2026 🏆 


Likes
10
Share
@RandomStreetMerchant
Follow
What’s good everyone, this is the start of week 11 and the first week of flower. Yesterday I let the, sit in darkness for a whole day to jump start them and by the sight of it, they sure did jump a bit.
MXOP is amazing she takes to what every you toss at her, she is hard to stress out. But after growing this cultivar a few times now I can say they don’t require much nitrogen as one would think they CRAVE calcium and possibly a bit of magnesium but from what I have seen they ALWAYS want more calcium weird might be the soil I have been using.
This is the fun part, can’t wait to update you all next week FLOWER TIME BABY WOOOOOOO! Until next time growmies take it easy ✌️ 08/07/23


Likes
8
Share
@Ieiogrow94
Follow
Eccoci di nuovo qui!!!
Super eccitato per questa nuova collab con Exotic Seed, team davvero al top, che mi ha dato l’opportunità di testare questa nuova genetica e di condividere i progressi con tutti voi!!!
Come sempre partiamo nei bicchieri per poi travasare.. Questa volta verrà svolto tutto sotto la Lumatek Zeus 465 ProC, mi aspetto molto da questo ciclo!!
Purtroppo ho perso i file delle scorse settimane e dovrò reiniziare il report da ora scusate per il disagio
Settimana incredibile!!!
Grazie a tutti per il supporto ❤️🍀🔥

Likes
11
Share
@Paradox_1ste1
Follow
Ayahuasca plants looking very good and growing fast. While the Stardog just moved in a different room away From Ayahuaca and it looks very bad even tho its in the 4-5 week.
Likes
2
Share
@Mrs_Larimar
Follow
2025-09-18
Kush´n Cookies had a great Time- she doubled in size and biomass
I gave her some training ( mix of mainline( supercropping and topping)
and i started the Autopot-System
so easy peacy from now on...
Container: 35L Smart Pots
Growing Method: Autopot System with "Water-Only" strategy
🌿 Soil Preparation
Base Mix Recipe:
5g per liter soil - Startrex
5g per liter soil - Silicium Flash
Mixed thoroughly for optimal distribution
5x Fertilizer Tabs - strategically placed near bottom (20cm height) for autopot compatibility
1 tsp Mycotrex - applied directly in planting holes
Bactrex solution - used for initial watering
🏗️ Layer Construction
Bottom Layer (10cm): Drainage material (clay + perlite)
Air Circulation: Airdomes positioned
Growing Medium: Pre-mixed soil with embedded fertilizer tabs
Root Zone: Mycotrex application + seedling placement
Initial Watering: Bactrex solution
⚙️ System Activation
✅ Setup Complete - Autopot system now delivering automated water-only feeding
From this point forward: Pure water automation via Autopot system
🙏 Acknowledgments & Partnerships
Special Thanks:
Biotabs - Premium nutrient solutions
🏭 Puraplants - Autopot system provider
💰 Exclusive Discount Codes
🌐 Puraplants (Hamburg, Germany)
www.puraplants.de
Code: GrowBigger → 10% OFF
Biotabs Webshop
biotabs.nl/en/shop
Code: GDBT420 → 15% OFF


Likes
32
Share
@WhiteWidow
Follow
All good here. Today i did some more defoliation, leaf tucking, and watering, lights were flipped 1.6.
Plants are healthy, growing like maniacs and drinking 3 liters every 3rd day
Countdown begins :)))


Likes
4
Share
@Lazuli
Follow
So this was my third tropicana, so far all different phenos, this was the biggest yielder of them

Processing
Likes
19
Share
@xbabybitchx
Follow
I just transplanted these two into 1L pots from solo cups, fed PH balanced water. Not much to report on, besides growing fast! I'm wondering if these two will grow how the other GB is.. short n bushy.
2019.12.29 still good, just installed a fan into small tent for these girlies, put the auto great white sharks in the tent too- they are thriving.


Likes
11
Share
@All_our_small_plants
Follow
Bewässerung: 500 ml jeden 3 Tag in der Elften Woche
pH-Wert: 5,8
EC-Wert: 0,4 mS/cm
Temperatur: 20ºC
Luftfeuchtigkeit: 65%
Schädlingsbekämpfung: Diese Woche haben wir ihr Wasser mit Nematoden gegeben da sich doch vermehrt Trauermücken im Bereich aufhalten.
PPFD: Direktes Sonnenlicht
DLI: Direktes Sonnenlicht
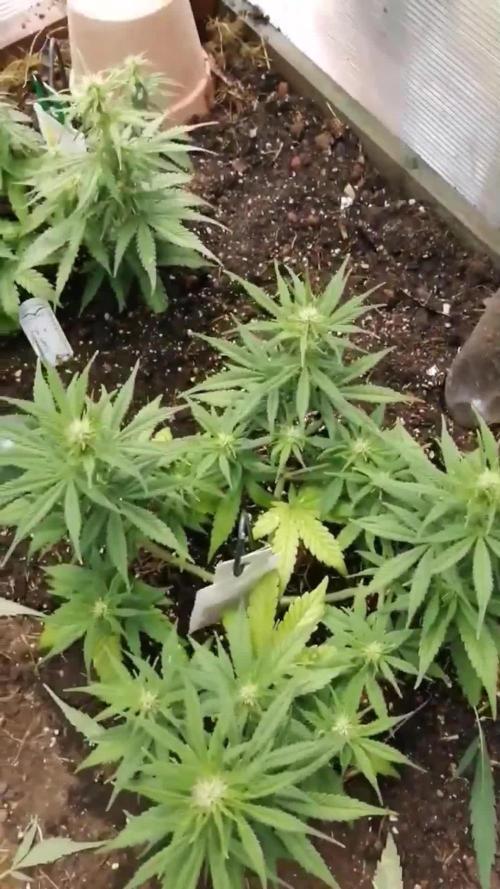
-Tag 65 Heute wieder mal gegossen und wir haben den Zaun entfernt und ein Gestell um sie gemacht so können sie sich anlehnen und gleichzeitig auch die Membrana :)


Likes
2
Share
@KofiCultivates
Follow
Yoo it’s kofi cultivates it’s week 3 veg the growth has been explosive from week 2 to week 3
Thanks for following along with my journey. Keep on growing


Processing
Likes
4
Share
@ReelEyezEnt
Follow
Finally flipped the lights over to flower mode and took the humidifier out of the tent.
So far so good we are gonna keep watching to make sure we didn't over do the nuts. Don't want any Nut burn that can be annoying.
make sure you hit the follow button
Likes
3
Share
@Ninjabuds
Follow
My Northern Lights number 10 plant is the biggest in the tent so far, and it's stacking like crazy. I love the short leaves – they're perfect for fitting a bunch of branches into a small space, even though they're really big.
It's been a challenging week with the constant rain and ridiculously high humidity. Keeping things dry indoors has been a real struggle. Despite the weather, I managed to flip all my feminized photoperiod plants to flower this week. I'm hoping the switch will go smoothly, but with this humidity, it's going to be tough.

Processing
Likes
6
Share
@dyrachok
Follow
Рослинка росте без нарікань. Розмір напевно буде все таки не дуже великим, але побачим що буде далі
Здаєтся, почалося цвітіння (пестики з'явились десь на 22 дні, але сьогодні, 24 дня я можу заявити, що їх стало значно більше, а отже вважаю, що цвітіння почалось)
Знизу з'явилося 2-3 пожовтілих листочка, але чому так сталося - я розумію. Я не давав ніяких добрив 4 тижні, і сьогодні, я почав давати їх вперше, думаю рослинці сподобаєтся
Likes
11
Share
@AntonioBanderas
Follow
W9- Light 20/4
I will apply nutrient for last time. After this week I’ll start flushing. 1-2 weeks to harvest. They smells good same as i bought from my dealer😂 🍀🍀🍀
Likes
5
Share
@HAN_GROWER17
Follow
Una cepa bastante productora, la cual tiene un desarrollo bastante explosivo!
Me gusta BSF seeds tiene muy buenos fenotipos, estables y productores!

Likes
29
Share
@nowayReggie
Follow
Breeder Suggested Harvest Window opens tomorrow at day 65 and continues on for 15 days to Dec 15.
+Will start the flush process on the 5th of December
+ 1ST video on Growdiaries.
Planned on flushing on the 5th
Watered 2.5 gallons.
Life scheduled events and had to cut it short a few days and harvest day -NO MATTER WHAT - would have to be the 10th.
putting us at Day 75 of flower
Flushed with 17.5 gallons
Considering water was filtering through soil, it drained ABSOLUTELY clear by the last emtpying of the container I was using to catch
Buds are fattening up very nicely.
Smells of Lemon/Citrus/Sour
-----------------------------------------------------------------
nowayReggie
