




Likes
4
Share

@Bones_1986
Follow
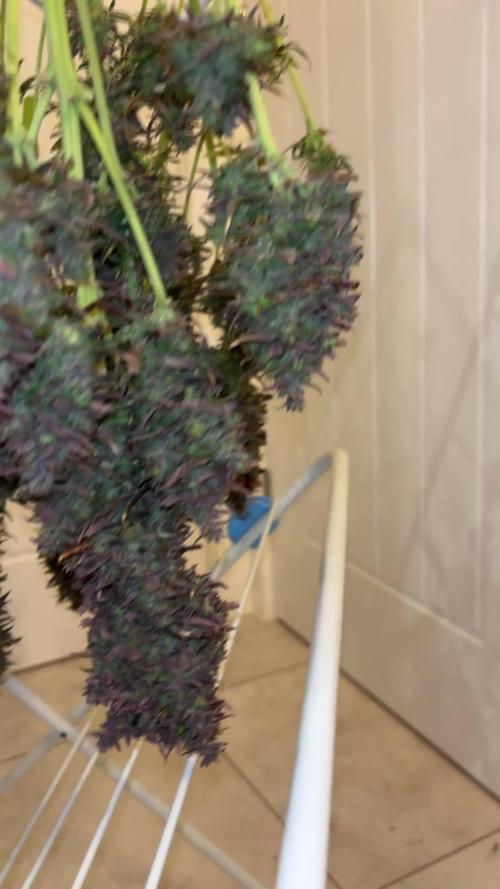
Day 70, 100% cloudy with some ambers.
Shame about the main cola fox tailing, and a nightmare grow really. From heat stress, and cal mag deficiency and nute burn pretty much 6 weeks it’s been one thing after the other. But she kept growing, and with continued efforts it’s looking like I have been rewarded. The smell is strong!! The sticky fingers speaks for themselves. Scissors are ruined 😂. Will hang dry now for at least 5 days before another little trim / tidy up prior to jarring / curing.

Likes
4
Share


@weedsmoker_n1
Follow
From seed to leaf.
27.07.2023 22:00 - drop in glass of water
28.07.2023 13:00 - placed in container
30.07.2023 12:00 - transplanted in soil
31.07.2023 16:00 - first leaves.
It took less than 91 hours from seed to leaf.


Likes
13
Share


@BostonGreenParty
Follow
The 3rd week was a big one all plants finished stretch period and it was becoming a little wild for a second. I moved 4 of the bigger girls into their own room with their own 1000w LED plus a shared 250w HPS in the center. I will be tying down branches to get flat canopy then each of the 4 will be pushed more towards the center for better light coverage do not mind the setup its not fully there but will be finished before the end of the week. In the main grow room there is a single 1000w HPS cool tube running at 100%. To remove the 4 bigger plants I had to cut the entire trellis off the canopy but will be placing a new layer this week as well. As for nutrients feedings well clearly from the size of these girls you can tell they have been eating. In about 2 weeks I will defoliate one last time and then its them vs. the world til havest. Happy Growing!
Likes
7
Share


@Adam22
Follow
Flushed for 3 days so far so good. No yellow tips on the leafs yet but I may just have to pull this plant down today I have just 1 plant in the tent it doesn't seem worth running this just for 1 plant so I will pull down later today I think and upload pics and remember where I went wrong for next time. I have some new seeds just been delivered I think next time I will try to have an additional tent slightly bigger so I can have 2 different strains growing at the same time. Definitely using feminised seeds also as don't have time to waste vegging for 6 weeks a plant to just end up with balls. Next run will be:
4 x cookie dawg
3 x velvet moon
1 x sherbert punch
I will be looking for a decent led light for the next tent also I would like to run the same strain in both tents and see what the difference in the results are using my hps light vs led
Harvested plant 1
5oz budd
14g popcorn buds and leaf trim


Processing
Likes
3
Share


@Ogbangbang2981
Follow
we entered flowering that's so beautiful purple color everywhere but she just started so let's watch her full out . still on bat poo diet

Likes
6
Share

@bkickstand
Follow
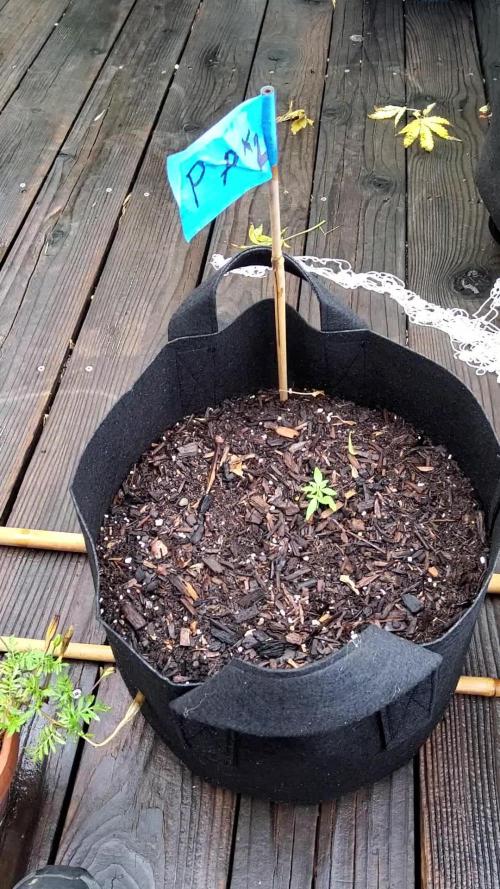
Week 4 Journal Update: New Autoflower Batch (NL1, NL2, & PPX2)
* Overview: The second round of autoflowers—planted directly into 5-gallon fabric bags at the start of July—is hitting week four with distinct variations in growth speed across the trio.
* NL1 (Northern Lights 1): Showing strong, healthy vigor with lush green fan leaves developing nicely and a sturdy stem established in its 5-gallon container.
* NL2 (Northern Lights 2): Sitting under the trellis remnants, this seedling is a bit smaller and taking its time establishing early vegetative growth compared to its sibling.
* PPX2 (Strawberry Nugget x Pink Panama): Marked clearly with its blue flag, this autoflower is showing steady early leaf development and settling into its deck routine.

Likes
7
Share


@agustinnnv
Follow
Buenos dias a todos. Es la primera vez que cultivo, en este caso es una Sour Compassion CBD. Esta planta fue un esqueje que me regaló un amigo. Cuando me lo dio estaba espigado en un vaso de plástico con 1 mes de vida. La pase a una maceta "Mad Rocket" de 16L. La hice vegetar 2 meses y luego la pase a florar el 8 de Marzo. Tuvo 111 días de vida y 71 días de floración. Con respecto a la fertilización que aparece, hace referencia a toda la vida de la planta. Saludos cannabicos
Likes
6
Share


@MmaJunkie420
Follow
Final week papaya was 10/10 frozen biscotti smells even better the zkittlez I picked up was a real old school pheno and we got done heavy colas one of the frozen biscotti is behind a little hoping it tightens up abit before the 12th as they all need chopping together unfortunately but overall been a nice run.


Likes
14
Share


@AndrewC
Follow
So this is the Tear Down week. The timing of it makes it so i will need to the harvest flag in a few days when I can weight and test the plants.
I have included the Cleaning, and Cutting and some Root Porn.
I will make the harvest post in about 4-5 days, when I can trim these plants. There is a lot of Plant here. I got way more than I was expecting. I don't have a scale that measure this amount of plant, without taking like 10 measurements and then adding them together. So I will just be posting the dry weight. I will post the wet weight as dry weight * 1.65.
Autopots: Wow, what a great product. I have been blown away by how well and how easy it was to work with them. They really did solve the watering issues. Excellent product. If you are a beginner, start with Autopots.
-= Lessons Learnt =-
- Overdrive the air to your Autopots. In my control plant, I used a small rectangle air stone (instead of a standard air dome). This lead to root rot and some other issues, it also put significantly less air into the water. The root rot, give the material for the Brown Algae to grow. Using a huge Air-disc-Air-Stone would be an excellent combo to mix in with the air dome itself. Something like this: https://www.amazon.ca/Pawfly-Diffuser-Suction-Hydroponics-Aquarium/dp/B01MY3AQ33 at the bottom and the air-dome on top of it, will be what I do with my next experiment.
- Air stone in the reservoir. I had two instances where algae grew into the res. An air stone would have helped. It would have also helped my control plant get less root rot. Given the amount that the air-domes and air sources got engulfed, having the water have more o2 in it would have only been beneficial.
- Don't grow 6 plants in a 4x4. Since my control plant was about 1/8th the size of the others, I think I could have grown 5 in the shape of a 5 (on a 6 sided dice)⚄ This placement would give a much more spaced canopy for airflow and more importantly light. The sides of some of the plants were lighter green and produced larf due to lack of light penetration.
- This tent was on 19-5 schedule. This worked out very well for this strain. After every lights on, they were in the praying position, so this strain was able to recover in that 5hrs off. If I had more seeds, I would run these again, and try 20-4. I think this strain could handle it. All for all, I think I'm going to 19-5 as my default timing. This kept up a solid DLI.
- Staring at .9EC (really .7 EC cause my water here is .2 EC) Then bumping up at .1 a week, until 1.6EC worked out VERY well. I experimented on this crop all the way up to 1.9EC, which burnt the tips of this plant. I think if I did this strain again, I would do 1.6EC until 3-4 weeks left then crank it to 1.9. It did plump them up when I went to 1.9, however it left them looking rough. Bulk was added though.
- Sticking to 6.0PH for all of veg, and 2 weeks into flower worked great. The plant had solid and consistent color and leaf shape . The plant's did get hurt, due to some issues (as noted on the weeks). I switched to 6.5 PH in the last 3-4 weeks and it helped them recover, and plump up noticeably.
-VPD. The #1 thing I focused on was VPD. I keep it .9kpa range, as best as humanly possible. It was honestly, HUGELY noticeable compared to my other grows. I know truly understand the value of properly dialed in VPD. This is the one lesson that will stick with me forever.
- Super-cropping: On the plants I give the chiropractic treatment too, had much thicker stems as much larger channel internally. I did this treatment to 4 of the 6, and the 4 that had it done has larger buds and recovered from defoliation faster.
TLDR; VPD is king. Super-cropping is worth the time. Keeping PH and EC dialed in were all wins. Autopots kick ass.


Likes
24
Share


@Jays_Not_Here_Man
Follow
Another demanding week for these ladies but they have reached a milestone. Week 8, and my custom fit SCROG has been installed! ❤️
At Day 50 I separated my 7 gallon girls and my 5 gallon girl. Once done, I began the very easy process of adding my “floating” SCROG. I use ratchet straps, just like the ones that come with lights to secure the four corners of the screen to the top of my tent.
This allows me to adjust the screen height as necessary when 1) first installing and 2) once the full stretch of flower has occurred, I can tweak it a bit to balance the canopy as best as possible. It’s not 100%, I still get some over achievers, but I find it useful as another option.
I like to do a major defoliation before I set the ladies in. Typically till this time, I have done almost no defoliation, just LST and some HST techniques. I adjusted the ladies placement to allow growth out all sides of the screen, set the screen height and began tucking and bending. The defoliation and bending allows light to penetrate all those side shoots that would have amounted to nothing, and they become top shoots as they grow up and form an even canopy.
I don’t like to weave, it can damage the new shoots and cause growth problems, but the goal is to get as even a coverage as you can while allowing for plant growth in all directions.
Once complete, I will give the girls about a week to recover and grow those new shoots. I like to have about 80% coverage of the screen, before I change my light cycles to flower 12/12… and if they are healthy and strong. I’ll decide this weekend if it is time ❤️👊🇨🇦😎 Happy Gardening!

Likes
32
Share


@MadeInGermany
Follow
Info:
Unfortunately, I had to find out that my account is used for fake pages in social media.
I am only active here on growdiaries.
I am not on facebook instagram twitter etc All accounts except this one are fake.
Harvest day 71
since the time
change to 12/12 hrs.
Hey guys :-)
Finally the time has come .
The lady was harvested.
After the trichomes have been checked (70% milky 30% amber) as always, it was left in complete darkness for 48 hours before it was neatly trimmed by hand.
After trimming, she was put back in the drying tent on nets.
There they are allowed to dry for the next 8-12 days at 62% humidity before they are put into the jar to ferment with 62% boveda packs.
After about 4-6 weeks in the jar I will swap the 62% boveda pack for a 58% boveda pack where it can be ready for another 4-6 weeks to enjoy :-).
As always, the remains of the leaves are used to make Ice o Lator and oil.
Of course, as always, there is a final update during the fermentation process.
Until then, I wish you all a lot of fun with this update.
Stay healthy 🙏🏻 and let it grow 👍.
You can buy this Strain at :
https://www.zamnesia.com/de/5165-zamnesia-seeds-kalini-asia-feminisiert.html
Type:
Kalini Asia
☝️🏼
Genetics:
Black Domina x Purple Kush
👍
Vega lamp:
2 x Todogrow Led
Quantum Board 100 W
💡
Bloom Lamp :
2 x Todogrow Led
Cxb 3590 COB 3500 K 205W
💡💡☝️🏼
Soil :
Canna Coco Professional +
☝️🏼
Fertilizer:
Green House Powder Feeding
☝️🏼🌱
Water:
Osmosis water mixed with normal water (24 hours stale that the chlorine evaporates) to 0.2 EC. Add Cal / Mag to 0.4 Ec Ph with Organic Ph - to 5.5 - 5.8 .

Likes
14
Share

@Northern_Ent
Follow
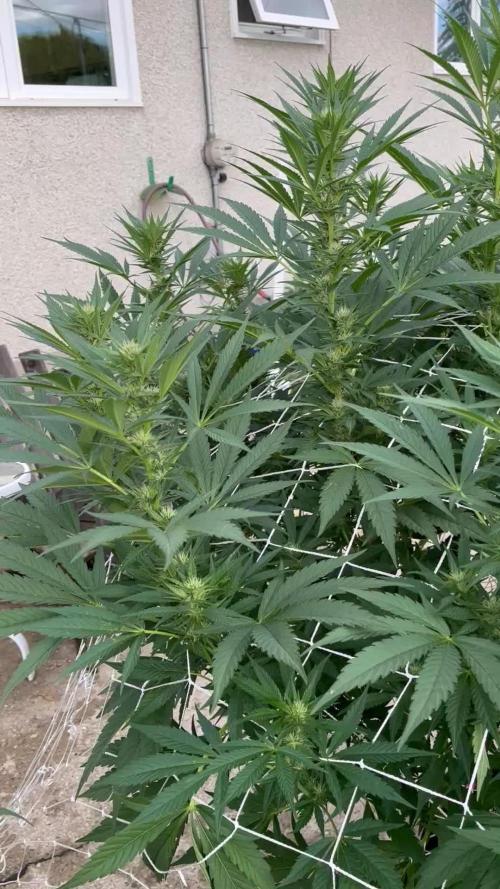
Aug 9: Now done three weeks of flowering for Tropicana Cookies EV. She is the youngest plant but also the tallest and looking quite happy.
Got the UV led lights from AC Infinity going for the first time. Used these last year and they seem to work. UV lights stimulates trichome production and makes up for weak sunlight this far north.
Aug 12: has stretched again but the bud sites are filling nicely. Pistils have started to turn pink. This plant is looking very happy and will likely be a big producer.
Added another top dressing of malted barley and Power Bloom. It has been about two weeks at least since the last round, and this will be the final round.
Stopped using molasses about two weeks ago. Great for growing but I don’t want to be smoking sugar. Use during veg stage but only 2-3 weeks into flowering.
Likes
15
Share


@Siriuz
Follow
Yo guys what's up
I added molasses for the very first time
Take a look, she's doing great
I'm happy for the training we've been giving her and now we are seeing some results
Alright guys let me know what's your advise
I think I'm going to be adding molasses after nutes every two days
********************************
UPDATED 08/03/2021
SHE IS DOING GREAT!
ID SAY SECOND WEEK OF FLOWERING ALREADY
WEEK 11 FROM SEED ' DAY 1 STARTS TOMORROW!
CHECK OUT THE VIDEOS AND PICS FOR BLOOM
TAKE CARE GUYS PEACE OUT!
Likes
44
Share


@Roberts
Follow
So she finally snapped out of her funk. I am not sure what was effecting her. I have the same thing going on with another plant. Regardless she is growing, and growing fast. Everything looks okay now after her nasty start. Thank you Medic Grow, Athena, and Fast Buds. 🤜🏻🤛🏻🌱🌱🌱
Thank you grow diaries community for the 👇likes👇, follows, comments, and subscriptions on my YouTube channel👇. ❄️🌱🍻
Happy Growing 🌱🌱🌱
https://youtube.com/channel/UCAhN7yRzWLpcaRHhMIQ7X4g
If anyone needs to purchase fastbuds here is a link for my affiliate program
https://myfastbuds.com/?a_aid=60910eaff2419
Likes
Comments
Share


@LokalGrenz
Follow
Week one starts today well actually yesterday Feb 9th was first day but who cares imma document it as today top dressed with power bloom days ago and top watered today
Since the bottom watering pan was dry
Likes
5
Share


@Brendanfromtherose
Follow
Hi, it's been about 4 weeks since germination, it's gone from seedling to veg and already signs of preflower and pistil hair appearing from this auto; going to add 2/3 recommend dose of PK 13/14 for this week only and microdose for remainder of grow,
It's my first grow, not sure of strain
Healthy but a little bit of nute burn so flushed for 4 hours looks alot better and have also brought the pH down to 5.8 and for the remainer of the grow
Also PPM increased to 920
