
Likes
Comments
Share


@Ieiogrow94
Follow
Eccoci qui!!!
Tutto procede per il meglio, i pistilli sono usciti e ora si va dritti dritti alla maturazione, NE VEDREMO DELLE BELLE!!!
La piccola cresce molto vigorosa ed in salute, chissà cosa ne verrà fuori intanto possiamo solo ammirare questa bellezza!!
Grazie a tutti per il supporto ❤️🔥🌲

Likes
10
Share


@Easygrower
Follow
Hello growers day 29 with the Tropicana cookies auto she is struggling to get light I think my other plants are to big for her so Iv started the other 2 seeds I got from pev and there looking better already iv got them in a little tent and they are thriving I will add pics of them next week until then be safe and happy growing ✌️🏻


Likes
Comments
Share


@2far4heaven
Follow
Buds start swallen and trichomes start cloudy but not yet amber..
Will let her to get amber 10% trichomes , and then start to flushing straight 2 weeks with ph-ed tap water 5.5.
Hopefully by next week can start the flushing and finish this run.
Cant wait🤞!!

Likes
6
Share


@emeraldlabs
Follow
Love the way these ladies are developing; the tent smells so good.
Nothing to report this week. Spring weather is approaching in the midwest... tent gets a little warmer late afternoon. Will keep monitoring, but as it warms I will turn the AC on and should be good.
Reducing veg nutes, increasing flower nutes.
Pics/vid taken 71 days after breaking the soil.

Likes
24
Share


@Weed_marseille
Follow
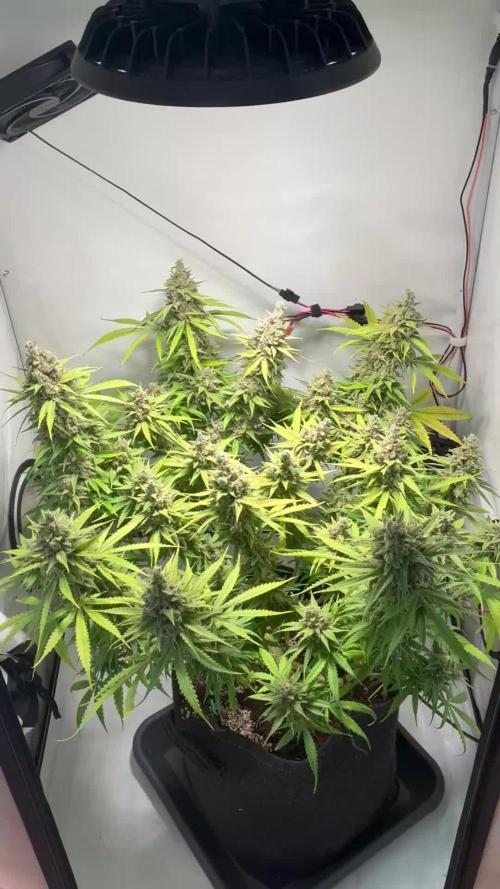
Cette semaine commence en pleine maturation des fleurs. Elles devraient arrêter de grossir pour devenir doucement plus lourde.🌱
Je met le max de produit Bloom ⚗️ P et K pratiquement plus de N.
Une innondation en fin de semaine. 😱
J'ai fait baisser mon EC à 1.6 et j'ai un PH à 6.2, pour amorcer l'avant dernière semaine.

Likes
5
Share


@milton9707
Follow
Se rego el lunes 23/5 con medio litro cada balde.
En totañ 2 litros de agua.
Y por cada litro de agua agregue 1ml de base a, 1 ml de base b y un ml de bloom


Likes
27
Share


@m0use
Follow
SPONSORED DIARY===SPONSORED DIARY===SPONSORED DIARY
Seeds finally popped up and out of the medium, this plant is a bit behind its Granddaddy Purps sibling but it should catch up in no time. giving them 24hr lighting till week 3 then will reduce it down to 18/6. Added in a few pics this week of the tent and light. nothing much else to report.
SPONSORED DIARY===SPONSORED DIARY===SPONSORED DIARY
Big shout out to @SpiderFarmer for supplying the 2x2x5 Grow tent and The SF1000 100w LED light.
I will be uploading all relevant photos of the products in the next week when they arrive, maybe do a little unboxing video. Who knows.
A 2nd big shout out to Dr.Seeds for supplying the 3x5pac of seeds I will only be featuring two of the three strains in two separate diaries.
You the users will get to decide what ones I grow. I have setup a Grow Question on each diary to vote for your strain of choice for that diary.
https://growdiaries.com/grow-questions/47600-drseeds-1-vote-what-i-grow "Diary #1"
https://growdiaries.com/grow-questions/47600-drseeds-1-vote-what-i-grow "Diary #2"
Cast your vote for each diary.
Thought I would add in the relevant links if you wanted to read up on any of the products that will be officially featured in this grow.
https://www.spider-farmer.com/
https://growdiaries.com/grow-lights/spider-farmer (+) https://www.spider-farmer.com/products/sf-1000-led-grow-light/
https://growdiaries.com/grow-tents/spider-farmer (+) https://www.spider-farmer.com/products/sf-2-x2-indoor-grow-tent-hydroponic-home-plant-reflective-aluminum-oxford-cloth/
https://drseeds.net/
https://growdiaries.com/seedbank/dr-seeds
(+)
https://drseeds.net/product/cherry-pie-autoflowering-cannabis-seeds/ (+) [No relevant GD affiliated link]
https://drseeds.net/product/granddaddy-purple-autoflowering-cannabis-seeds/ (+) https://growdiaries.com/seedbank/dr-seeds/granddaddy-purple [Photoperiod not Autoflowering]
https://drseeds.net/product/60-day-wonder-autoflowering-cannabis-seeds/ (+) https://growdiaries.com/seedbank/dr-seeds/60-day-wonder-autoflowering

Likes
18
Share


@Chubbs
Follow
420FASTBUDS
FBT2106 WEEK 6
The two of these are growing very interesting. One is stacking and bushing up quite nicely and the other almost completely opposite. There's alot more stretch on the one and very weird flower formation. I'll let it grow and see what happens but not sure really what to expect. Very pretty color purple on the one but temps have been super cold this past week as we've had a blizzard come through so I put a oil heater in the tent as it was getting way to cold and had me worried. Happy Growing

Likes
22
Share


@herbalistssword
Follow
This plant that I harvested today I've only defoliated and she took well to that. I LST and defoliated the other plant and she is still ripening will harvest her soon.
285gramms of wet bud is quite good for first grow, so i should get about 60g dry, I'll update actual value when dry. She was in the tent with 4 other plants under the Skyline 1000 lights which pull 500w from mains.
She filled the room with some sort of orange/lemon candy smell. Smells really nice.
I'll update when I harvest the other Candy Kush and report on taste/effect once dried.
-------
Day 79 I harvested the other Candy Kush, gave 280g wet, not much of a difference between the trained and untrained plants, although I think she could have gotten fatter had I left her longer. Looking at the buds now that they dried up they got much smaller :D
Really loving the smell, can't wait for them to cure.


Likes
27
Share

@Bunterbiber
Follow
Chop day is officially here! By the end of Week 16, I decided to pull the trigger. The trichomes were mostly cloudy with a few ambers popping up here and there. While I could have let her go another week, my personal schedule made this the perfect time to harvest.
I also had a new toy in the garden today: a Vevor bowl trimmer. I used it for the small and medium-sized buds while hand-trimming the 'top shelf' colas. Honestly? I’m blown away. It’s not as surgical as a manual trim, but the time-saving is a total game-changer.
The Stats:
- Wet weight: 544g
Next step: Into the Dryfermbags for about a week until the limited amount (due to German law) is ready for the jar.
Overall, I couldn't be happier with this grow. No issues, no drama—this strain was an absolute breeze to grow and performed like a champ. Now, I just need to nail the drying and curing phase!
P.S. Need some cleaning advice! Cleaning the Vevor trimmer (especially the grate) is a nightmare. I’ve been using ISO and a cloth, but it’s still a struggle to get all that resin off. If anyone has a pro-tip or a better method for cleaning these machines, please let me know in the comments!"
Likes
2
Share


Likes
142
Share


@MadeInGermany
Follow
Hey everyone :-)
This week it smells more and more sweet and fruity in the whole room 😍.
There is actually not much to report, everyone is now under 12/12 :-).
This is the last grow that comes in the entire diary.
From now on, each plant will be added to the diary 👍.
I wish you all a lot of fun watching, stay healthy 🙏🏻 and let it grow 😎👌


Likes
39
Share


@Silverback_Guerilla
Follow
11/9:
The first Blackberry (Halle Berry) is dry now and beginning to cure....will probably sample it tomorrow.😋
The next 5 that I harvested are drying in a dark room at 75f with 60% RH and minimal airflow.👍
The colas of the remaining 11 plants are now within 9 inches of the QB's....MAXIMUM PAR!
I've increased UVB exposure by an additional hour a day. I've got the portable AC on high and blowing across their tops, which is keeping the temp just below 80f on them...they should be just fine..👌
11/13:
I harvested the purple Wedding Cheesecake and all three Lemon Pies today.
11/15:
I flushed the last two orange sherbets for the second time, but with only a few gallons each...I flushed the last two wedding cheesecakes, and the 3 x gorilla cookies with 8 gallons each.
Likes
3
Share

@RicoGrow
Follow
Hello,
I hope you're all doing well.
I'll consider this week a complete failure.
When I repotted my plants, I added mulch, but it was only 3 cm thick.
As a result, my plants were miserable for four days because it was too thick.
The soil was cold and remained very damp due to watering during repotting.
It smothered the fallen leaves, some of which even turned yellow. It seemed like a magnesium and calcium deficiency and an unbalanced pH. I re-evaluated my approach and, most importantly, added a light layer of mulch.
They've recovered well. It just goes to show that a small mistake can teach you something new every day.
This week, I added:
2 g of Epsom salt:
This powerful mineral is pure magnesium sulfate, one of the main components of chlorophyll produced by plants.
It's a chelating agent: it allows the solubility of other substances (such as molasses, humic and fulvic acids, neem oil, and spirulina) and acts as a heavy metal sequestrant.
5 g of Micronized Wild Horsetail Spray: silica, defense
5 g Fish Hydrolysate: amino acids, proteins
ppm 600
pH 6.5
Wishing you all a successful cannabis grow!
****************************************************
Bonjour,
J'espère que vous allez tous bien.
Cette semaine, je la compterai comme nul.
En fait lors de mon rempotage, j'avais fait un paillis, mais il était de 3 cm.
Du coup mes pieds, on fait la gueule pendants 4 jours, car il était trop épais.
La terre était froide, rester très humide dut à un arrosage lors du rempotage.
Elle étouffait les feuilles tombées, elles ont même jauni pour certaines. Comme un manque de magnésium calcium et un PH non ajusté.
Remise en cause et surtout un paillage léger.
Elles sont bien reparties. Mais comme quoi une petite erreur et on apprend tous les jours.
Dans ma terre cette semaine, j'ai rajouté.
2 g de Sel d Epsom:
Ce puissant minéral est du pur sulfate de magnésium, l'un des principaux composants de la chlorophylle produite par le règne végétal.
C'est un chélateur : il permet la solubilité d'autres matières (comme la mélasse, les acides humiques et fulvique, l'huile de neem, la spiruline) et agit comme un séquestrant de métaux lourds.
5 g de PRÈLE SAUVAGE Micronisée Aspersion : silice, défense
5 g HYDROLYSAT DE POISSON : acides aminés, protéines
ppm 600
PH 6,5
Je vous souhaite à tous une bonne cannabiculture
👍👍👊😁😁😁

Likes
12
Share


@MRTHC
Follow
Coming to the end of this journey. This week was about checking trichomes and waiting till the best opportunity to harvest. Very resinous buds.
F73.. Chop Day.

Processing
Likes
6
Share


@Eggnacious
Follow
Took some time to remove all paperclips from plant and clean up a bit leaving the top fan leaves and removing everything else, from here on out ,im letting the branches where i topped grow upward before switching to 12/12, still dont have confirmation on the sex?
Likes
2
Share


@fabialien
Follow
Semana sel 9 al 14 de septiembre 2024.
Vemos un desarollo bastante vigoroso en todas, esto también se puede adjudicar el hecho de la nutrición que han estádo llevando esta tanda se fem y regulares, la mandarine qué nació con apical va bastante bien.


Likes
5
Share


@Buddo
Follow
It looks like this girl is going to finish in 56 days, very early, maybe it was the Clearex when she was starting to bud, that moved things along? It looks like the second swell has started and drinking has slowed. Getting sticky and frosty, I think I'm going have to try a early sample.


