
Likes
Comments
Share


@SlickCityOrganics
Follow
I wished that I could've done things a little different but the end result was fiiire! Taste like Peaches when you give it a nice 4 week cure. Wish that I could've yielded more. But experience will overcome all my flaws. But it will only get better.


Likes
Comments
Share


Likes
Comments
Share


@KannaGrowing
Follow
Estamos en la semana de transición del periodo vegetativo al periodo de floración.
Nuestras plantas ya tienen un tamaño correcto para poder pasar de 18h de luz a 12h... De esta forma iniciamos dicho periodo.
Hemos conectado tres equipos led LazerLite Pro 720w ajustados al 50% de su potencia.
Repartimos bien todas las plantas para que reciban luz de forma homogénea.
Regamos, esta vez solo con agua, para no tener exceso de fertilización, ya que nuestro sustrato es muy rico en nutrientes.
Likes
15
Share

@Radagast_
Follow
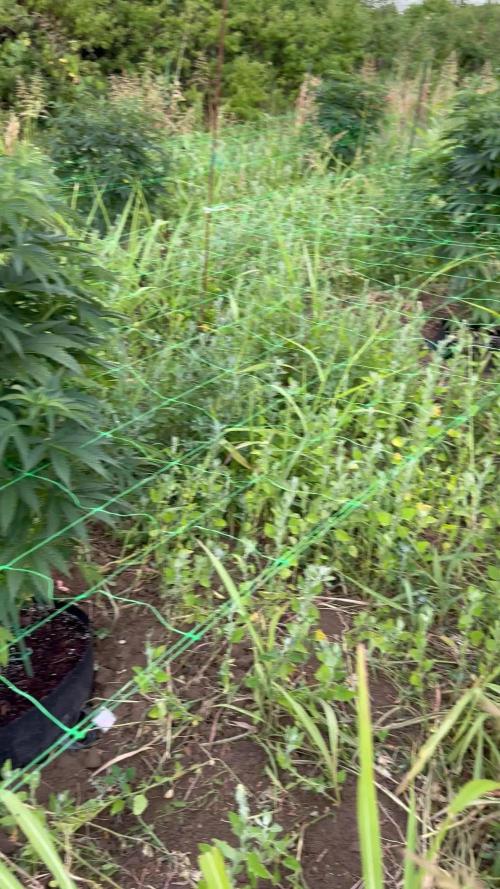
08.07.
White Runtz
Day 70#
Today is the end of the tenth week for the plant, it has made excellent progress since the last update.
Yesterday there was a storm, the wind dried the soil, so this morning I watered them with clean water.
Today there was a storm again, and it also rained, so I will feed them as soon as the ground dries.
Tomorrow and the day after tomorrow there will also be storms, but even stronger, with the fact that tomorrow it will rain all day and the temperature will not exceed 18 C.
This was good for them except for those storms, it cooled down a bit and in the next week the temperatures will be much better and more normal.
Yesterday morning before the storm, I secured them,I buried the plants in the ground,stuck the fittings in the ground, hung a vegetable net on them and pulled the plants through the net, mostly it does the job, I've done it like this before, but not quite in this way... in a few days I'll add another layer of netting a little higher and let them grow through it, and I'll also put a shade net above them so that they have protection on very hot days.


Likes
46
Share


@DogDoctorOfficial
Follow
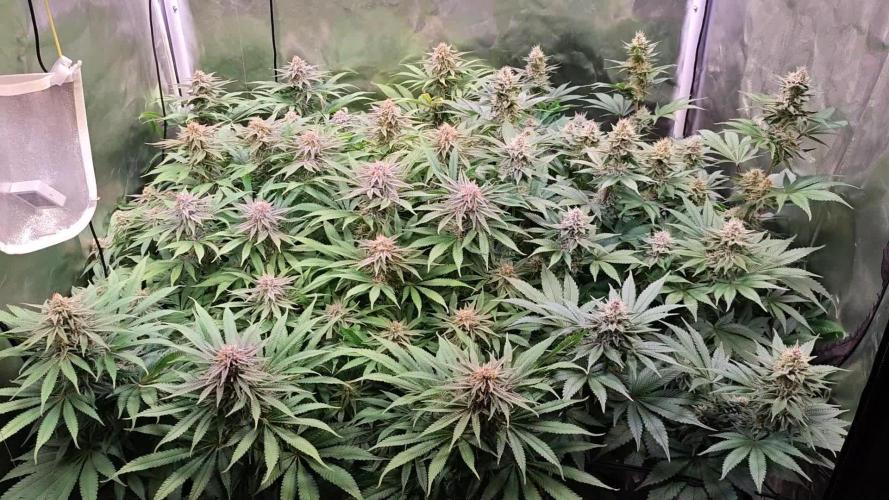
Hey, cannabis enthusiasts and connoisseurs! 🌿🔥 The journey with our Runtz F1 has been nothing short of legendary, and now we’re at the stage that every grower eagerly awaits—the trim and smoke report. This Runtz F1 has delivered beyond expectations, and I can’t wait to share the details with you. Let’s dive in!
The Trim Process 🌾✂️
The trimming process was an experience in itself, filled with care and attention to detail. Here’s how it all went down:
• Breaking Down the Branches 🌿:
• First, we carefully broke down the plant into manageable branches, making sure to preserve the integrity of each bud. The structure of the Runtz F1 made this easy, with its dense, compact colas ready for precision trimming.
• Trim Bin Magic ✂️:
• Using a Trim Bin, we meticulously trimmed away the sugar leaves, leaving behind only the most beautiful, resin-coated buds. The Trim Bin isn’t just a tool; it’s a game-changer, allowing us to catch every last bit of precious kief that falls during the process. This extra kief is like a bonus for those special moments when you want to add a little something extra to your smoke.
• Preserving Terpenes with Grove Bags 🛍️:
• Once trimmed, the buds were placed into Grove Bags for curing. These bags are revolutionary in the cannabis world, designed to lock in terpenes and keep your buds fresh for the long haul. Unlike traditional jars, Grove Bags use a special TerpLoc technology that creates a perfect microclimate within the bag, balancing out oxygen and moisture levels. This means your buds cure evenly without the need for burping, preserving that incredible citrus terpene profile we’ve come to love from the Runtz F1.
The Legendary Smoke 🌬️🔥
Now, let’s talk about the smoke—because this is where the Runtz F1 truly shines.
• Flavor Explosion 🍊🍋:
• The moment you take your first inhale, you’re hit with a symphony of citrus flavors. It’s like walking through a citrus grove with the sun shining down—notes of oranges, tangerines, and lemons come through strong, each one distinct yet harmoniously blended. But the magic doesn’t stop there; an underlying hint of vanilla sneaks in on the exhale, rounding out the flavor with a creamy, smooth finish. It’s an experience that dances on your palate, leaving you craving more.
• Aroma 🌿🌸:
• The smell is just as captivating as the flavor. As soon as you open the Grove Bag, the room fills with that zesty citrus aroma, complemented by a subtle sweetness from the vanilla undertone. It’s the kind of smell that makes you pause and appreciate the craft that went into growing this plant.
• The Effects 🌟:
• The effects of the Runtz F1 are as balanced as its flavor profile. Expect an initial wave of uplifting energy—perfect for daytime use or when you need a creative boost. As the high settles in, it mellows into a relaxed, yet focused state. It’s the best of both worlds: energizing without being overwhelming, and calming without knocking you out. This makes it an ideal strain for those who want to stay productive while still enjoying a potent, flavorful smoke.
Final Thoughts and Invitation 🎥✨
The Runtz F1 has proven itself to be a true connoisseur’s strain—a perfect blend of flavor, aroma, and effects that’s both complex and satisfying. This was a journey that showcased the importance of patience, precision, and care, from germination all the way to the final cure.
If you want to dive deeper into the entire process, from the first week of veg to the final trim, I’ve documented it all on my YouTube channel. Join me there for a closer look at how this incredible strain came to life, and learn more about the tips and techniques I used to bring out the best in these plants.
Thank you to everyone who’s been part of this journey, from the community to the amazing brands like Gro Diaries, TrolMaster, Aptus Holland, Kannabia, and more. Your support and tools have been invaluable.
Remember, the magic is in the details—so never stop learning, growing, and enjoying the fruits of your labor. Stay positive, stay curious, and keep spreading the love! 🌿💚
#RuntzF1 #LegendarySmoke #CannabisConnoisseur #GroveBags #TrimMagic #StayPositive #GreenMagic #YouTubeJourney
Germination method 🌱 @thecannakan
Genetics Runtz F1 @zam.nesia Runtz auto @kannabiaglobal
Nutrition
@aptusholland 🌿
@aptus_world 🌎
@aptus_es 🌍
@aptusbrasil 🌱
@aptus_thailand 🌿
@aptus_portugal 🌳
@aptususa_official 🍀
@aptusplanttechnz 🌺
@aptusplanttechaus 🍃
Ambient controls🎮
@trolmaster.eu @trolmaster.eu.support @trolmaster.support @trolmaster.agro
Soil @promix_growers_eur @promix_cannabis
LED - @lumatekeu
Watering- @autopot_usa @autopot_global
Love and attention- @dogdoctorofficial
#aptus #aptusplanttech #aptusgang #aptusfamily #aptustrueplantscience #inbalancewithnature #trolmaster #trolmastereurope #trolmastersecrets #Autopots #RuntzBattle #KannabiaVsZamnesia #GreenJoy
As always thank you all for stopping by, for the love and for it all , this journey of mine wold just not be the same without you guys, the love and support is very much appreciated and i fell honored and so joyful with you all in my life 🙏
With true love comes happiness 💚🙏 Always believe in your self and always do things expecting nothing and with an open heart , be a giver and the universe will give back to you in ways you could not even imagine so 💚
More info and complete updates from all my adventures can be found ⬆️ link in the profile description ⬆️
Friendly reminder all you see here is pure research and for educational purposes only
💚Growers Love To you All 💚


Likes
34
Share


@MindFlowers68
Follow
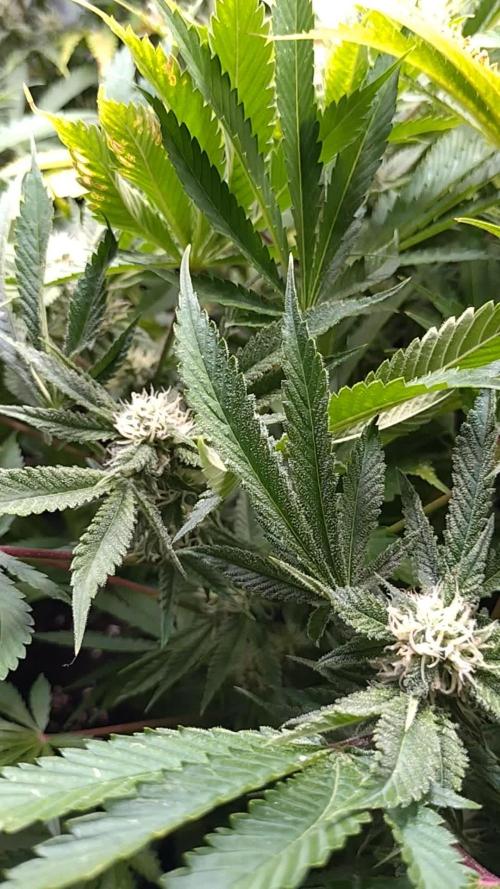
Top dressed with some more soil. The top was looking depleted and just want to keep it from completely taking all the nutrients from the soil. Added a mix of power bloom with azomite and glacial rock dust. I watered in with some pure protein dissolved into hot water then added to the water I was using at diluted levels. The second watering they got this week was with molasses. which also does a good job of dropping the ph of my water to the perfect level and a little bit of Epsom salt because I ran out of my cal mag and also want the plant to have plenty of sulfur.
The plant ties are working great and glad it tied the buds up. They are all getting chunkier and frostier by the day. Found a few smaller ones on the side that i missed and got those standing up. they are sticky as a glue trap and reek hard!! diesel and fuel are most prevalent but not sure if it was my mind tricking me but got a hint of blueberry/friut. So far very excited with this plant, and living up to what i thought it would be. The way it covers itself in trichomes top and bottom of the leaves and the structure of the buds and leaf pattern make for a real beautiful plant.

Likes
4
Share


@Thomas12477
Follow
The plants are doing beautifully after two waves of bug attacks. The first wave was spider mites that I located in my greenhouse before they had a chance to spread to my canibus.I had to spray two days in a row to kill them all. Than 5 days layer I see thrips, so I gave it another spray. I foiler fead my nutrients.


Likes
9
Share

@Gnrlymsntrp81
Follow
Hi Growmies,
The Ladies are growing good. Runtz Muffin looks to ripen a bit faster, but i think Tropicanna Banana will put on more weight. Trychoms starting to get milky.
They smell amazing. So far not running into any proplems. Have a nice easter everybody.
Likes
29
Share


@Smokwiri
Follow
Welcome to week 8 of my Zamnesia seeds - Wedding cake diary
Plant looks great, buds are fattening up a bit now, steep development.
Running towards finish....
10% discount on Zamnesia seeds with code GROWITGD
Likes
11
Share


@adam_pawloski87
Follow
Such an amazing flower, really great especially a phenomenal hash producer yall will be super satisfied with this one!! She’s a shorty but Make sure you top 4 to 6 times or even more to have all them gooey bud producing heads , Dirtyblonde is absolutely an amazing plant!!

Processing
Likes
45
Share


@AsNoriu
Follow
Day 127. Oh boy it will be my longest grown plant indoors.
This bean is from bagweed, just wanted to show, that from shitty weed found seed you can produce good result, but i screw up with this girl by having no space for her, by giving her to wrong guy ... And now again, i checked temps during my holidays and lowest was 13 , highiest 33 ... Very bad, she is from leafy pheno and that didnt helped for buds and leafy i dont like already, hate triming .... ;)
Will do last hard training apart from everyday lst here and there , she will loose a bit of leaves tomorrow before watering just phed water. I never feed after training.
Tomorrow she will go to new tent and i start new diary, hands full ;)
Happy growing !
Day 128. Girl got small defoliation , up to 50 leaves, now more buds get light, have to prepare her for smaller , where i will fit only one light, otherwise its too hot inside ....
All movement postponed for a bit, have to leave town so only phed water for her after new look. She drinks now like 5 liters every 3 days.
Day 131 . She is stinky sticky b**ch ;)) Amazing plant, my mini bonza, would want to flaten her up, but in new tent fan has to have space aswel ;)
Her new fan is delayed an i quess it will take a week to be redelivered ...
Fingers crossed.
Heavy feed - done. ;)
Day 132. She starts to pack up a bit, maybe it will be something desent again.
Girl is under two lights ( quantum boards 2x240) and in a week will stay just under 240 , but in new tight house with better reflection from walls, hope it will even pars , despite power loss ....
I think i will smoke first joint on day 160, its almost half of the year, crazy adventure ...
Her leaves are too green, so no silica and red leaves stemps doesnt show up, so no cal mag .
Think she'll have like 2-3 feeds max in two weeks and then final strech ;)


Likes
11
Share


@JaysBuds
Follow
Day 21 in the flower tent and I think the stretch is now complete. The girls are 12" tall above the screen and I'll probably put up a 2nd layer of trellis just to be safe. Will definitely only run 4 of these next time, or maybe 2 with the same veg time to keep the canopy lower, but I don't think the Photontek x465wPro will have any trouble penetrating down into this!
Also time for another big strip! These girls just keep putting out the fans, so we'll just keep stripping them off, keeping tabs on airflow and budsites. We're still not setting bud yet - seriously, four full weeks of stretch so far here...

Likes
7
Share


@ChitownCannaChica
Follow
Going to chop this little nug next week. It’s just one littl nug that matches the vessel it’s in! 80ml grow.
Likes
3
Share


@JackTheSparrow
Follow
I lollipop them today!!!!!😁😁😁😁😁😁
It's their 37 day and they just started getting into Flower and getting taller
so I Lollipoped them and did a little bit of defoliation
so the light will get to the bit lower buds sites
since I did some LST in a bit later stage which went incredible.
But it meant some buds sites are big but still a bit lower in comparison so I didn't take them out of course.
And i did some SCroG but took it out the day before the lollipop and we'll see if the girls are fine I will put it back in 2 days or so depending on the plant growth

Likes
4
Share


@shwable
Follow
Hello and welcome to week 5, everything looks fine so far...
I almost topped the CP1 a second time by accident. When I tried to bend the stem a little more it just snapped clean and I applied tape and stabilized the branch. I hope it recovers and it's looking quite good ;)
Likes
17
Share

@PhinolaGreen
Follow
10. Woche
Sieht bis auf paar Probleme eigentlich gar nicht schlecht aus. Ich habe auch so langsam die Balance raus für den Dünger und weiß jetzt, wie ich den in Zukunft richtig anwenden kann 😄
Likes
6
Share
@ChitownCannaChica
Follow
One plant is 2 weeks into flower and the rest just started. Everything looking good so far. Not stretching. Upped the Plagron green sensation feed.