
Likes
Comments
Share


@Santi_nf
Follow
Ya está empezando a verse diferente poco a poco muchacho

Tutti Candy · Zmoothiez

Critical Widow · Pev Seeds

Sweet Skunk Fast Version · Sweet Seeds
Skywalker OG Runtz XL Auto · Sweet Seeds

Cheese Berry · 00seeds

Hard Diesel · Gea Seeds

Scrambler Haze · Blimburn Seeds
AK · Gea Seeds
Cachalote · Gea Seeds
Gealato Kush · Gea Seeds
Gorilla Glue #4 · Gea Seeds
Somango · Gea Seeds
Likes
10
Share


@TherealNICOGREEN
Follow
Seriøst ér @KANNABIA BARE MIT NYE MÆRKE UDOVER @ZAMNISIA SÅ TROR JEG HAR FUNDET 2ud af de 3 frøbanker jeg HAR LYST TIL AT ARBEJDE MERE MED (hvis det er de ville 🖤🧡💙🛐☮️🧡🖤💙💚🔥😇👌

Likes
23
Share


@eldruidamx
Follow
Day 106. Skipped
Day 107. Skipped
Day 108. Fertilizers
Day 109. Skipped
Day 110. Clean water
Day 111. Skipped
Day 112. Fertilizers
Likes
27
Share


@LSchnabel
Follow
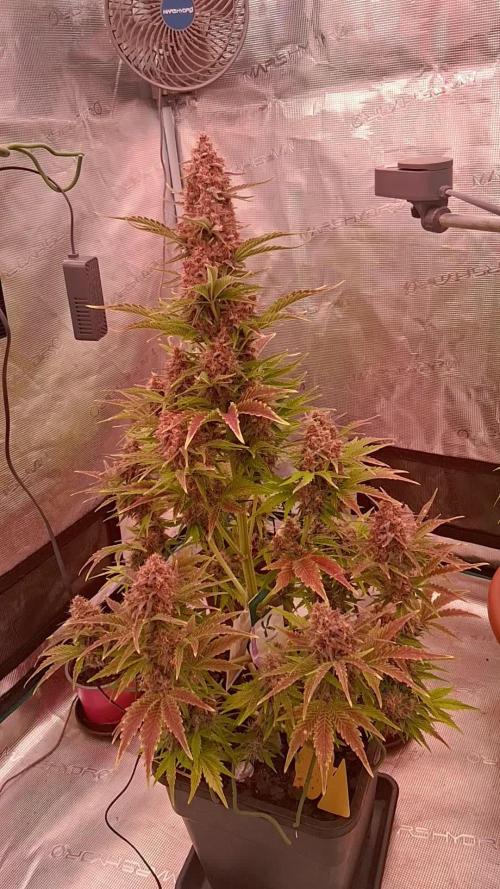
9 weeks into this grow. Packing on the mass for sure. Main buds are the size of my hand. The smell hits you hard and is very very strong now.
Very happy with the ease of this plant. Still have had no issues whatsoever.
I think the plan is to harvest this weekend at 10 weeks total.

Likes
18
Share

@BlaKX
Follow
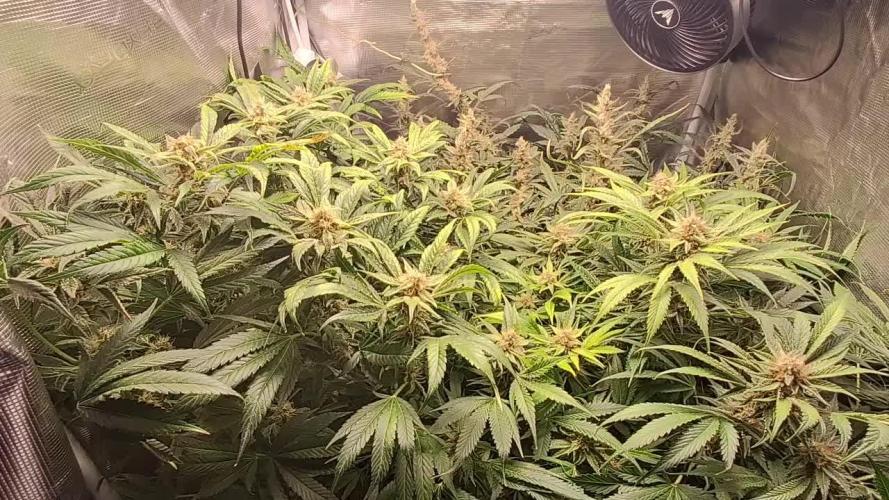
High Growmies, die BPP hat in der Woche nochmal ordentlich an Masse und Harz zugenommen! Auch die Terpene kommen jetzt voll zur Geltung.
Habe mit meinem neuen Smartphone Mikroskop 300x die Trichomen gecheckt und festgestellt dass fast alle Milichig geworden sind auch vereinzelt Bernsteine aber noch hier und da durchsichtige.
Da ihr Durst noch nicht abgenommen hat werde ich ihr noch eine Woche mehr geben um die Trichomen Reifen zu lassen und Festigkeit zu steigern.


Likes
8
Share


@Grow_for_Happiness
Follow
End of week 6 and the girls are looking great! Gave them a good defoliation first day of the week (day 41 from seed) because I couldn't get the humidity below 65%. Glad I did, they were so bushy and lots of little branches in the middle, now so much cleaner and much much more airflow. Not sure if because of trimming but they barely grew this week. Blueberry is typically a bit shorter though so may just be the strain. Three plants look very similar with one plant looking 5-7 days behind. Starting to see colour starting already might be some beauties coming!
Watering 3 liters a day per plant, just chugging along as the buds come in.
Light up to 90% at 18" hitting 700umol/s.
UV running 1 hour per day mid cycle
4" intake running around 60%
6" exhaust running 40%
Upper oscillating fan 40%
Lower oscillating fan on Low

Likes
13
Share

@Thomas86
Follow
Raised up the Banana punch at the Back to keep the canopy even, had to raise the reservoir to maintain the gravity feeding, Humidity is still a little high, and stopped ising Pk 13/14 this week, getting close to the end, il start checking trichomes this week with a microscope, The charcoal filter is a bit old now and isnt dampening the smell great, Its stinking up the hallways in our apartment building, hope the neighbors don't mind a few more weeks of some dank nugs smell before i can bag it up in some terplock bags, gonna be a bunch of trimming to do in the next couple of weeks but the buds look nice and crystaly, reducing the Ec slightly this week to 1.6 and maintaining ph at 5.5 swinging up to 5.7, The airdomes are blowing some bubbles at the valves so I turned down the Air supply to the roots below 1 liter per min, hoping humidity drops further but nearly at the finish line, I need a better tool to cut the trunks soon because theyre quite thick, Possibly one more update before harvest, Thanks for checking out my grow guys😀


Likes
71
Share


@DogDoctorOfficial
Follow
Hello, Grow Diaries family! 🎉🍌
I’m beyond excited to share the harvest report for my incredible Red Banana Pudding! This journey has been nothing short of amazing, and I can’t wait to dive into the details. Let’s get into it! 🚀
🌿 The Harvest
After a wonderful flowering period, it’s time to celebrate the fruits of our labor. The Red Banana Pudding has reached its peak, and I’m thrilled with the results! 🌈🍑
Visuals: The buds have developed beautifully, showcasing an array of stunning colors and a perfect density. The aroma is incredibly sweet and fruity, promising a delightful smoke. 😍
🌟 Harvesting Process
• Timing: Harvested at the perfect moment to ensure maximum flavor and potency. The trichomes were checked and showed an ideal mix of cloudy and amber for peak effects. ⏳✨
• Technique: I followed a meticulous process, ensuring each branch was trimmed with care. The process was smooth, and the final product is a testament to the love and effort put into this grow. ✂️💪
Fun Fact: Did you know that Red Banana Pudding is renowned for its unique banana-like flavor with a hint of creaminess? It’s a true treat for the taste buds! 🍌🍰
🌿 Post-Harvest
• Curing: After trimming, the buds were carefully hung to dry in a controlled environment, maintaining optimal humidity and temperature. The curing process will enhance the flavor and potency, making for a truly exceptional smoke. 🌬️💨
• Batches: The buds are being sorted into batches to ensure even curing and to preserve the quality of each nugget. The anticipation is building as we wait for this next phase! 🎉
Pro Tip: Proper curing can significantly impact the final taste and smoothness of your buds. Make sure to store them in airtight jars and burp them regularly! 🍁
🌱 Looking Ahead
The Red Banana Pudding has set the bar high, and I’m excited to see how it turns out after curing. This has been an incredible experience, and I’m grateful for the support and engagement from the Grow Diaries community! 💚
Sneak Peek: Stay tuned for upcoming content, including taste tests and smoke reports! You won’t want to miss out. 😉👀
🎥 Catch the Full Journey
For a detailed look at the entire grow process, including the harvest, be sure to check out my YouTube channel, where I share in-depth updates and tips. Dive into the full experience and see how it all came together! 🌟🎥
Thank you for following along with this amazing journey. Your support means the world to me! 🌍💚
Happy growing and see you in the next update! ✨🌿

Likes
13
Share


@IQuSX
Follow
Hi, topman!
This week report is add-the next week, and this happened, because between 10 and 11 weeks, i didn’t can reloading media-content!
System KiT 1:
Delivering Efficiency To Growers Everywhere.
Compatible with all 8" rockwool cubes; also used with smartpots and fabric pots.
26 flower-designed louvers.
Stakes on the bottom add extra stability.
Holes in all four corners allow for leftover water drainage.
Made from BPA and lead-free plastic.
Dishwasher safe, stackable and reusable.(c)
KiT2 System:
With the FloraFlex Matrix System water and nutrients travel into the Circulator, hit the slope of the Matrix and are pushed outward into eight maze sections that have individual holes dripping the water and nutrients onto the Wicking Pad. The Circulator has two barbed nozzles to attach 1/4" OD FloraTubing that allows you to automate the Matrix System.
Place the Matrix Pad on the surface of your plant, the Matrix Unit on top of it, press down, fit the Circulator into the center holes, and connect your 1/4" OD tubing to the Circulator.
(C)
Check next week now, because there are will be continuous!


Likes
17
Share


@BLAZED
Follow
Week 14 (1-5 to 7-5)
1-5
Temperature: 28.2 degrees (lights on) 22 degrees (lights off)
Humidity: 62% (highest) 46% (lowest)
No pictures.
2-5
Temperature: 29.2 degrees (lights on) 20 degrees (lights off)
Humidity: 61% (highest) 48% (lowest)
Removed the net, and tied down some branches to the pot with some gardening wire.
This way i can easily move the pots in and out the tent to weigh them.
I also moved the oscilating fan from underneath the canopy to above the canopy.
This is because the leaves gets hotter as i increase the light's power output.
The Gorilla Kush #2 and the Chemdog #2 are showing some heat stress.
Before i watered them i weigh the pots.
Dry weight:
Chemdog #1: 4.2 kg
Chemdog #2: 5.0 kg
Added 10L to the reservoir.
Opened the reservoir for a couple of minutes.
3-5
Temperature: 26.2 degrees (lights on) 19.9 degrees (lights off)
Humidity: 61% (highest) 47% (lowest)
No pictures.
Increased the light's power output to 75%
LUX: 16.000 / 20.000
4-5
Temperature: 26.9 degrees (lights on) 21.2 degrees (lights off)
Humidity: 59% (highest) 41% (lowest)
Opened the reservoir for a couple of minutes.
5-5
Temperature: 27.6 degrees (lights on) 21.2 degrees (lights off)
Humidity: 60% (highest) 47% (lowest)
No pictures.
6-5
Temperature: 27.6 degrees (lights on) 20.4 degrees (lights off)
Humidity: 60% (highest) 42% (lowest)
Dry weight:
Chemdog #1: 3.9 kg
Chemdog #2: 4.7 kg
Added 10L to the reservoir, there was still 2850 ml left in the reservoir so now its almost 13L.
Opened the reservoir for a couple of minutes.
7-5
Temperature: 27 degrees (lights on) 19.8 degrees (lights off)
Humidity: 57% (highest) 44% (lowest
The buds are looking good!
Sadly i dont have a timelapse for this week.
Likes
4
Share


Likes
11
Share


@samuraifroggig
Follow
Might be experiencing some nute lockout I'll dial back the nutes even more to flush, flush, feed. Watering daily, the medium drys out almost completely every 26hrs and then she wilts. Lots of air flow in this setup with a fiber pot so just trying to keep it wet really. 1000w HPS is amazing in this small of space I could get 2 or three plants in here next time.


Likes
6
Share


@Mackorodoo
Follow
Day-1 put 41 blue dream seeds which i beleive are non gendered autos into pellets to grow as backups, I am primarily trying to grow a white widow autoflower from crop seed kings and 3 of a peyote strain unspecified gender and flowering style.
Day-2 humidity and temperature are sitting at 98up to +100 and 23-31 degress celsius will be leaving top more open after about 6 today to lower humidity just wanted it cranked up for a day or so
Day-3 things are looking good many seeds are starting to show taproots between a quarter inch and five eights of an inch popping through the bottom of the seeds.
Day-4

Likes
4
Share


@SlickCityOrganics
Follow
Gave her some preflower food and more mycorrhizae. She's stretching like crazy 🤣 I'm loving the smell all ready. Smelling lemon and fruits. Gave her some low stress training and at the end of the week.
Likes
1
Share


@AMNESIA1100
Follow
Not sure if these 2 are auto plants? The blackberry are flowering quiet obviously, but these 2 are either really slow or I accidentally bought non autos. Anybody help? Cheers

Likes
119
Share

@DogDoctorOfficial
Follow
Time to give this P2000 a secont run, and in it i will run a single clone that i took from my previous run, i took one from each phenotype and from them i chose the one i like the most in terms of plant structure , terpene profile and in the end smoke test also, that one is the most important one lol and the one with the most value on my decision, saying this dont judge me on this hahahaha i kind a forget it in the corner and now its time to bring her up to her full potential.
I started by transplanting her from her tinny pot to a 25 L one , had to the soil 100g of All in one Pellets, a touch of microbial life and some Mycor to the roots and ready she is, gave them a foliar feeding with APTUS HOLLAND nutrispray and gave them a full feeding with the on the water sine the pallets will take a couple days minimum to start breaking and becoming available for the plants to take, i will let her adapt to it all for now and then i will star training her to became a tiny ginormous beautiful lady best, covered in trichomes and smelling like pines falling out of pine trees in the middle of the woods.
As for the PAR department for now i am giving them 600 PPFD and running my VIPARSPECTRA P2000 @ 69%
Looking at them an i decided that it was a good idea to start some training going on in this girl, so i gave her a new look and lets see how she goes from here, i spray them again with APTUS HOLLAND Nutrispray to help thing move faster .
And they are coming back to life , in just a couple of days i can notice that they love the fact that im giving them my love and attention
Is it just me or they are bouncing back fast af ? Not complaining at all hehehe , did some more training today, if they keep evolving like this i will be able soon to start taking leafs and selecting what to keep and what have to go.
Just recently started collaborating with APTUS HOLAND and i have to give a big shoutout to them ,Thank you Aptus Holland for believing in my love for growing , fells amazing wen you already believe and buy a product and they come and start supporting your love for it all 🙏🙏🙏💚💚💚🙌🙌🙌✊✊✊
As always thank you guys for your love , your time, your support and it all, i fell blessed and i am truly thankful 💚💚💚🙏🙏🙏🙌🙌🙌
Let the games begin hihihihi
All i grow is medicine for myself, for me and for my best friend with is me 😆 nothing to sell, so don’t even ask 😅💚💚💚
All info and full product details can be find in can find @
https://viparspectra.eu/collections/grow-lights DISCOUNT CODE 5% - DOGDOCTOR ( all store )
https://www.zamnesia.com DISCOUNT CODE 10% - GROWITGD ( just for seeds )
https://aptus-holland.com/
#aptus #aptusplantteck #aptusgang #aptusfamily #aptustrueplantscience #inbalancewithnature #trueplantscience #viparspectra #zamnesiaseeds #growerslove
With true love comes happiness 💚🙏 Always believe in your self and always do things expecting nothing and with an open heart , be a giver and the universe will give back to you in ways you could not even imagine so 💚💚💚
More info and updates @
https://growdiaries.com/grower/dogdoctor
https://instagram.com/dogdoctorofficial
https://youtube.com/channel/UCR7ta4DKLFMg2xxTMr2cpIg
💚💚💚Growers love to you all 💚💚💚

Likes
144
Share


@roro_204
Follow
I pumped up the bloom nutrients a little. As it’s my last week before I go into the flower stage. My lights will go 12/ 12 shortly.
I added a wooden support system because the plant was slanted a little bit.
I also removed clones yesterday. And the plant is healing very very well and fast. Lots of new baby nodes growing!
took out the strongest two plants to keep as mother plants. And I continued LST as the plant keeps growing steadily!