The Grow Awards 2026 🏆 


Likes
Comments
Share
@Ieiogrow94
Follow
Eccoci qui...
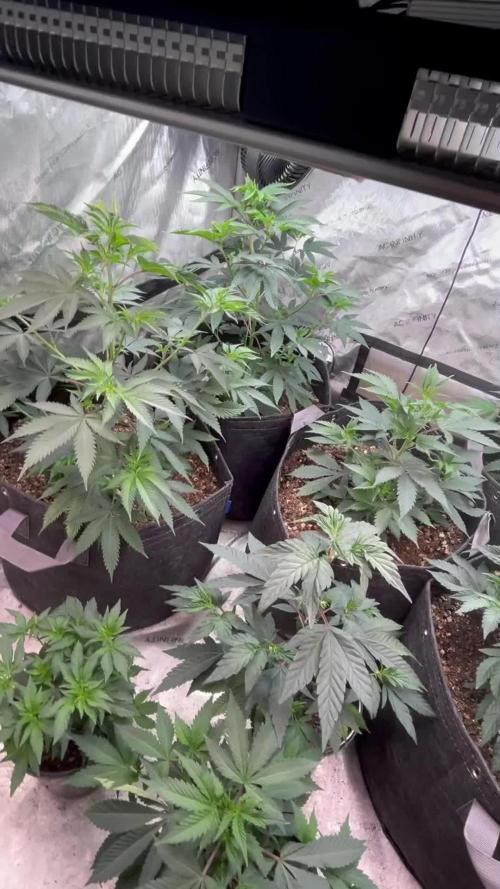
Tutto va per il meglio, questa settimana ho eseguito Lollipopping e Defoliation per far si che le cime principali sprigionino al meglio il loro vigore.
Siamo verso la fine del progetto ora bisogna solo aspettare la fine...
Grazie a tutti per il supporto🔥🌲❤️

Likes
62
Share
@OwlGang_Uk
Follow
The Girls Are Looking Healthy. There’s A Bit Of Deficiency In The Stardawg Leaves But That’s Because Of An Experiment I Was Doing With The Great White Mycorrhizae Where I Sprinkle Some On The Plant Saucer Because There’s So Much Roots Poking Out Under The Smart Pots. The Root System On These Girls Are Massive, I’ve Come To The Conclusion That I Will Try 7 Gallon Smart Pots My Next Grow.
3 Of The Girls Have Done Start To Bud But I’ve Still Been Giving Them The Grow Nutrients Rather Than The Bloom. I Was Waiting Till I Reach Week 5 And Now That I’ve Reach I Will Be Feeding Them The Bloom.
Height:
Gorilla Glu: 17 inches
Stardawg: 28 1/2 inches
Girls Scout Cookie: 25 inches
Purple Power: 27 inches
Lemon OG: 22 inches
Girls Scout Cookie: 25 inches (3 Gallon)


Likes
13
Share
@TiRobotProds
Follow
Arrosage avec engrais début semaine, j'ai mis une bonne dose de CalMag pour atténuer le manque.


Likes
6
Share
@eldruida_lamota
Follow
Esa familia , estamos otra vez actualizando una semana más estas Original de GB , obsequio en todos sus pedidos.
Vaya ritmo que llevan, y qué color, tengo que intentar igualarlas de tamaño, a ver si jugando con las cantidades podemos solucionarlo antes de pasarlas a floración.
Agrobeta:
https://www.agrobeta.com/agrobetatiendaonline/36-abonos-canamo
Mars hydro:
Code discount: EL420
https://www.mars-hydro.com/
Bueno las maximas de temperatura no superan los 25 grados y las mínimas no bajan 19, así que no me puedo quejar.
Los niveles de humedad también son los correctos van entre 50%/60% de humedad relativa.
Por supuesto el Ph lo estamos dejando alrededor de 6.
Hasta aquí es todo poco más la verdad ya con ganas de empezar la floración , buenos humos 💨💨💨


Likes
9
Share
@Budzalot
Follow
Day 56 of flower. Kept all the same. Thinking should be done with in ten days


Likes
8
Share
@CookiesAndCake
Follow
Day 100 | 03/04/2022:💧
I am back from my holiday today but I will only be able to harvest them at the end of the week, so I watered them today. but with a reduced 1L each because I still want them to be more on the dry side when I am taking them off
Day 105 | 08/04/2022:
Today was harvest day and the girls look sooooo dry and yellow omg.. 😅 Maybe that 1L was not enough, but still it's better that they are on the dry side. They just all went so yellow in the last few weeks, obviously they werent getting any nutrients but also I harvested them a bit late
Likes
5
Share
@jony5
Follow
17,11,2023.
Пустил корень. Закинули в рассадочный горшок, 1л. После пророста переедет основной горшок.
- Температура 26,4
- Влажность 50%
- Верхний Свет 16вт
- Полив - 6 ph/180 ppm
- На данный момент нет питательных веществ
- график освещения 24/0.
4-й День. 21.11.
Скинули каску, Кайфуем.
- Верхний свет 24Вт
- Температура 27
- Влажность 49%
5-й День.
Похоже растюха тянется вверх, что не есть хорошо. Увеличил верхний свет.
- Верхний свет 30Вт + боковой красный на минимум.
- 110 ppfd 4700 lux
- Температура 27
- Влажность 45%
7-й День.
Вход - 0,2л (647/6.2) Выход - 0,1л (480/6.4)
убрал боковой досвет, увеличил верхний свет
- Верхний свет - 50Вт 20000 lux
9-й День.
Вход - 0,5л (680/5,9) Выход - 0,4 (550/6.4)
У растюхи листья светло зеленые, нехватка витаминов.
Буферизировал кокос в основном горшке 12L (Perfect Bloom/micro/grow/vj/b52 - 1/1/1/2/2 ml/l)
Вход - 2л (700/5.8) Выход - 0.75 (550/6.2)
13-День.
Пересадил в основной.
- Температура 26
- Влажность 60%
- Кольцевал
Likes
11
Share
@Bluntblazer66
Follow
Mar 10th
Week 13
Plant is doing great filling out nicely with with bud
Mar 13th
Fresh nutrients today
A little bit more defoliation
Plant is healthy happy filling out nicely

Likes
25
Share
@GODSGIFT_2005_JM
Follow
🍼Greenhouse Feeding BioGrow
⛺️MARSHYDRO
The ⛺️ has a small door 🚪 on the sides which is useful for mid section groom room work. 🤩
☀️ by VIPARSPECTRA (models: P2000 & XS 2000)

Likes
422
Share
@Crashoverite
Follow
Hi all 🧑🌾
Welcome to my 🍌💜👊 week update.
Hope everyone keeping well and having a good week.
Thank you so much for your support on this bananas journey 💜💚💜💚
I am so happy to see how girls are developing in recent days. It's seems that Athena finally stopped her stretch and hoping that Xena will follow her sister very soon. Buds are gaining weight and size rapidly. Lots of nice colours and tonnes of trichomes on those buds already.
Week 10
Dec 18-24
Dec 18-19
Mainly observation. Xena is still stretching like crazy. both girls are developing beautifully.
Dec 20
First watering for this week. 7.5 ltr beetwen both. Runoffs PH's Athena 6.2 Xena 6.3.
Dec 21
Due to lack of light at lower parts of conopy decided for another selective defoliation, lowered a bit tallest branches with colas dangerously close to light by tieing them to netting. Couple cm will make a huge difference here. Could not clear well at the back wall of the cabinet due to limited access.I'm very happy with final result.
Dec 22-23
Joyful observation of my 🍌💜👊girls development 🧑🌾
Dec 24
All is looking great. It's seems that stretch is finally stopped. Girls looking healthy and happy.
Second watering for this week. 8 ltr beetwen both. Both runoffs PH 6.2.
It's the end of this week.
Happy Xmas everyone 🤶🎄❄️🎁☃️✌️💚🌲🎅🎄
Stay tuned for new week update ✨🍀✨✌️💚
Likes
3
Share
@Mimbra
Follow
Parece que tienen una deficiencia de potasio ,hoy he regado con Monster bloom y floración de boom nutrients y Candy boom ,el problema ha sido que en la segunda semana se me pusieron las hojas amarillas y pensaba que era nitrógeno ,añadí nitrógeno y era potasio la cagué !! Ahora no se si es falta de potasio o la he torrado con nitrógeno y tengo que lavar raíces ,que opinais


Likes
9
Share
@HUMO_Cultiva
Follow
We start week 3 of bloom!! Goofiez 2 amor compound genetics it’s the champions!!
Likes
13
Share
@NanoLeaf
Follow
Seeds have sprouted and starting to gain momentum!
Humidity and Temps in Check
Added Mycelium CO2 Generator


Likes
98
Share
@420DeepGrow
Follow
💐 🍁: Zkittlez es una de las más famosas y potentes genéticas de la costa oeste estadounidense. Sweet Zenzation (SWS84) es el resultado del cruce entre un clon élite seleccionado de Zkittlez, con un clon seleccionado de Grape Ape, una de las genéticas que intervienen en el desarrollo de la Zkittlez original.
Se trata de una genética híbrida con dominancia índica. Produce abundantes flores cubiertas de abundante resina. Efecto relajante y antiestrés pero que, a su vez, produce un efecto estimulante de la imaginación y la conversación, más propio de variedades sativas.
Flores muy ricas en terpenos, de exquisito aroma y sabor dulce, con tonos de caramelos de frutas, un fondo de maderas nobles, y pinceladas cítricas de limón, de ciprés, y una sutil sensación de pimientas aromáticas.
Consigue aquí tus semillas:
https://sweetseeds.es/es/semillas-fotodependientes/3070-sweet-zenzation.html
💡: Mars Hydro TS 3000, como la lámpara de cultivo LED más grande de la serie TS, ofrece suficiente cobertura para un área de 4 × 4 pies con un precio asequible y rendimientos de calidad; a cambio, se puede aplicar tanto al cultivo doméstico como al cultivo comercial.
Potencia - 450w
Cobertura Vegetal – 5×5 pies
Cobertura de flores - 4 × 4 pies
La opción abrumadora para la mayoría de los productores que la aplican en tiendas de campaña.
Consigue aqui tu lámpara:
https://marshydro.eu/products/mars-hydro-ts-3000-led-grow-light/
📆 Semana 9:
Se pueden apreciar dos fenotipos,uno de ellos muy sativo.
Entramos en etapa de maduracion, esto va que vuela 😍, la resina esta cada vez mas presente ❄️ , los cogollos comienzan a madurar
Esta semana estará el TS-3000 de MarshHydro al 100% y 30cm de distancia.
Se estan desarrollando mejor que nunca, con una floracion mucho mas rapida, noto una gran mejoria gracias al Marshydro TS-3000.
Continuo con defoliaciones
Aplico una solución con nutrientes EC 1500 y otra con agua del grifo reposada y PH 6.6
Likes
1
Share
@Growjrim
Follow
Lets see how she develops in flower 😊
If u can criticice some things I'm doing, I'd be happy and up for conversations and tips.
Likes
7
Share
@OutdoorRebelGenetics
Follow
Had to highjack this old diary sick hope this all goes well done this 3 times now lol with a degree of success lol well I would like to thank greenhouse seed co and Andy for the chance of growing these new genetics and there very own feeding line more pics due ignore next 5 weeks until I'm there lol


Likes
8
Share
@fungiiiiiii
Follow
20/04/2023 I neglected the girls this week, I've been lazy but they did ok without attention. Watered today since two girls were droppy, 0.8L per pot with Bioenhancer and Biobizz line.
Likes
15
Share
@I_Identify_As_A_Dan
Follow
Week 15 for Gelato 41 by seedstockers
She got a MASSIVE defoliation... session done to her. She looks a little naked as of now but she will bounce back nicely by next week😇 She really needed it, it was so bushy before you couldn't even put your arm into the plant to figure out what was what😂
Oddly enough 30% of the plant seems to be in pre-flower when the rest doesn't... She does get shaded the quickest in the garden but wouldn't expect her to be flowering already...
Still hasn't been watered since the rain last week but i may have to give water once this week as we have 40+ degrees incoming 😰
