


Likes
35
Share


@SmokingTiki
Follow
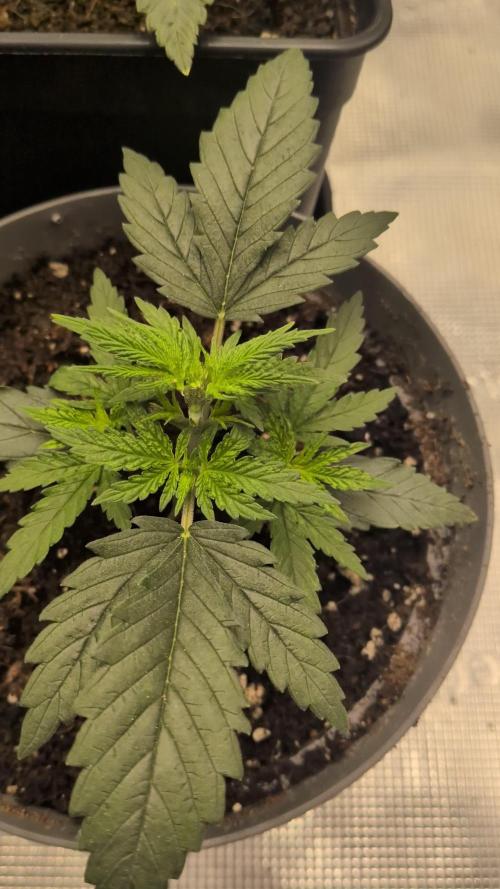
In general, the plants grow well. They maybe received too much light or having too much Nitrogen or both, I don't know. I didn't use any fertilizer so far but my soil already contains some, maybe it's too strong.
I switched to 18h of light/day instead of 23h. I also changed the light mode from VEG to VEG&BLOOM (see pictures for more info).
The two Mandarin Punch Auto have been transfered into their final pots. #1 in 26l pot and #2 in 10l pot. #2 is in a smaller pot because it's a bonus. I wanted to grow only 3 plants but my "safety seed" germinated and it would have break my heart to throw it away haha.


Likes
10
Share


@RFarm21
Follow
Semana 23 junho - 29 Junho
Dia 23 - alimentada
Dia 25 - alimentada:
Calmag 1ml; bio bloom 2,25ml; topmax 1.5ml; bio heaven 2ml; alg a mic 2ml; bio grow 1ml
Dia 29 - alimentada
Dia 27 - alimentada

Likes
40
Share


@Krisis
Follow
01/24/25. Start week 8 veg
I messed around with these a lot the past week. I could see they had plenty of branching and bud sites but most of them were hiding. I used some lst clips to move things around and get more exposed.
They were watered yesterday with calmag and next watering will be with a feeding. Theyre drinking about a gallon every 3 days each currently.
They’ve exploded with branching now. They like to keep hiding under the big ol leaves though.
They’ll be getting flipped soon. Would have already done it but one of the friends had been a straggler and trying to get her right.
That about covers it.
Update: forgot to add the pictures of lst. They’re at the end now. Whoops
02/27/25- did some more last minute training and cleaned up around their nether regions and got rid of lower growth.
Also added video.
Thanks for lookin. ✌️✌️

Likes
13
Share


@CURATI_DA_SOLO
Follow
Questa e la terza settimana e le ha subito 3 topping avendo così 8 rami apicali .....mi piace tantissimo e si è ripresa veramente bene pur essendo una autofiorente...ho scelto di usare i fertilizzanti BAC che mi sono arrivati direttamente dalla Spagna grazie al mio amico frits che ringrazio infinitamente per avermi dato fiducia per testare i suoi prodotti vincitori di numerosi premi! Da molto tempo che volevo usarli e sono rimasto veramente sorpreso , semplici e concentrati ! Ottimo anche le bottigliette molto molto resistenti...se ci sono delle bocce deformate e per via del prodotto pregato all interno 💪🏼....questa varietà di fast buds penso che sarà una delle mie preferite! Ho questo senso senso...al momento lascio stare tutto come sta e la lascierò rimprendersi per bene! E la farò entrare in fioritura così! Ringrazio anche Enzo e tutto lo staff di FAST BUDS per questa splendida genetica che mi hanno dato sotto stretto consiglio !!!! È una roccia! Staremo a vedere le prossime settimane! Nel frattempo sono felicissimo di tutto grazie anche a tutto il pubblico di growdiaries che mi dà la carica di continuare a fare tutto questo! Grazie mille a tutti ragazzi!!!!

Likes
10
Share


@Audi_grows98
Follow
Cherry cola is becoming an absolute chunk! She smells great,looks great and is just overall a great plant. I can’t wait to run her in the 5x5 with no room restrictions.
Gorilla cookies is becoming one of the bigger plants in the tent right now! She’s getting height,smell,frost and chunk! I can’t wait to see her come late flower🔥
Likes
6
Share


@BestBudz131
Follow
Made a few mistakes with this first grow. To much light and under watering but she’s growing nicely today!
Likes
1
Share

@Thedibber
Follow
Its been 17days since planting all the seedlings and they are happy except 2 which took a beating yesterday when the humidifer ran out of water but 1 has recovered overnight im sure the other will be fine soon 🙏


Processing
Likes
20
Share


@Cannibalgardens
Follow
She is doing a lot better this week I had to install a heater unit outside tent to keep levels better for the plants . The leaves are doing better and tomorrow she gets a feeding again and will be doing producing more leaves and getting healthier . She isn't flowering yet or any pre flowers but it will soon and she is gonna be a short one this go around .
Cheers canna family....


Processing
Likes
42
Share


@xs8
Follow
Week 5 starts with recover from the previous FIMing.
I'm surprised 😍
------
Day 30:
Found a better way to LST, the branches are growing much faster now :D
Day 34:
Sex clearly visible 😁 (female)

Likes
8
Share


@Chubbs
Follow
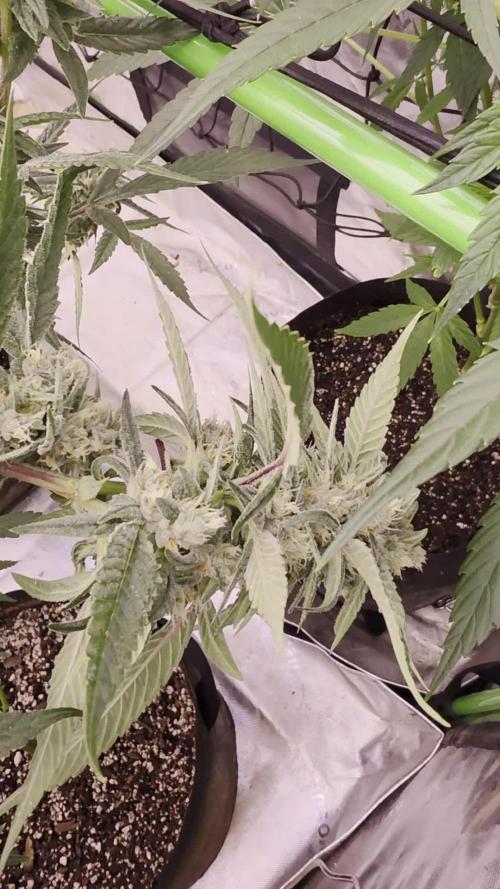
Week 7 update on these big girls. The uniformity on this strain is wild. All the plants look very similar and have stacked great. Still early into flower but the sweet smell followed by the pungent smell of OG. Excited to see how the next couple weeks do. All in all Happy
Likes
12
Share

@Growbody
Follow
Herzlich willkommen zu meinem neuen Grow mit der Orange Sherbet Auto von 2Fast4Buds. Die Eltern sind Cookies Auto F5 x Tangie´matic, der Typ ist F3 Feminized Polyhybrid Autoflower. Der Strain war Winner of the American Autoflower Cup 2025, Kategorie Best Auto Hash. Die Aussicht auf frischen Orangensaftgeschmack macht mich wunderfizzig.
Wieder verwendet wurde für diesen Grow die 15Liter Stofftöpfe von ROOTiES, die Sonnenerde Bio Hanferde, BioBizz Wurmhumus, BIONOVA + zamnesias MonsterBud Mix Living Soil, zamnesias Smart Start Plugs und Plagrons Seedbooster Plus. Hat sich alles bestens bewährt.
Tag 37: Die Orange Sherbet Auto von 2Fast4Buds bekam 1,5 Liter Wasser und das war etwas zu viel. Der Stofftopf war unten 'rum nass.
Tag 39: 0,5 Liter Wasser.
Tag 41: 1,0 Liter Wasser. Der Stofftopf ist wieder trocken.
Schön, dass du dich für meinen Grow interessierst. Schau gerne wieder rein. 👋😎
Processing
Likes
20
Share


@xbabybitchx
Follow
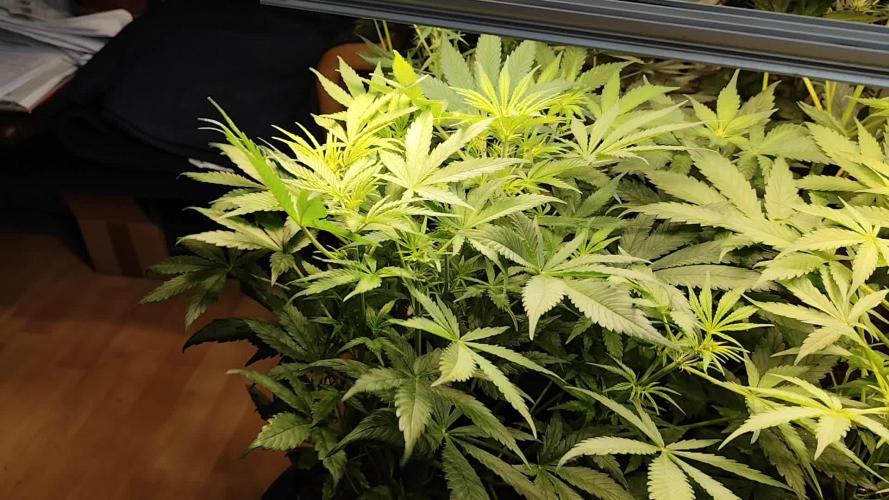
Weird week, Nitrogen toxicity. As of 3 days ago I started on nutes. My soil only has nitrogen in it, so it makes sense. She does look better today but eh. Leaves are dry as heck, humidity is about 50% ish she is feeding good, good runoff and PH.
She is a chronie and thats all she is going to be. I'm mostly just seeing what she can do.
I can smell weed when I go down in my basement but when I open the tent I have no smell/ or mine sucks cause I smoke too much upstairs lol. I notice a few amber hairs today but they look a bit bigger and fluffy.
Not much to update. BIG shout out to @jinks101 for helping me out and answering all my questions!! Have a great week everyone and happy growing! 👽


Likes
Comments
Share


@GarciaGerardo
Follow
En 2do video se encuentran, MPK #1 #2 y Og cream x gg #1 y Og cream Feno seleccionado.
1/03/24

Likes
23
Share


@Lapolda
Follow
Hello to all growers and friends.
The week was basically nice. I still don't fertilize, the flower looks fantastic. I'm just worried about maturing. It looks like another 3 weeks. Hold my fists.
Good luck friends
Likes
207
Share


Likes
22
Share


@Basementganja
Follow
I will be growing her again, as I feel like I let her down, by letting her PH drift so low..
Other than that, she grew beautifully, and fumes of potency as you gaze at her!
She yielded more than I expected! She's not that far below my previously lowest yielding plant! :)