


Likes
Comments
Share


@LonelyStonerz
Follow
This week we are seeing the girls starting to flower, mixed in a gaia green topdress and chopped it up into the sand, then adding another layer. The sand really does a number on the fungas gnats. Going to do some lollipopping and lots of defolation. Trying to pick and chose which colas to bring to the end. I cant wait to see what this looks like when its filled with bud. After I train tonight its going to be hands off completely besides watering.



Likes
28
Share


@gottagrowsometime
Follow
Very easy to harvest. Dried and was very fruity, no bush whack smell. Wasn't expecting it. As the dry time was long. And the buds super huge and in abundance.
Was a very early addition to my crop (50 odd plants) this was done in my 1st phase of 10-15 plants.
And I still have a good amount of it. And really looking forward to adding a smoke review next month with bud shots.
Update
3 months later. My mate back sent me back 22ml of D9 Distillate, about 95-100% THC 0-5% CBD, I fill carts and use 15-20% resin or natural flavours.
Flavours THC BOMB (ORANGE+LEMONS 10%-90% D9) 3 carts
Super lemon haze 15-20% SLH rosin 60-70 D9 resin 6 carts. + 5-10% of 1000mg 30% CBD SUPER LEMON HAZE cbd oil. As I couldn't get the burn right on the 1st attempt. D9 was too thick and a nightmare to mix. Bubbles did build up to fast while vaping and wouldnt settle. It's a really great way to make strong vape juice from strong but, not your favourite weed. There's no flavour to it until you add rosin or natural flavours or ratio of good CBD oil.
D9 is hard to make. It's much easier to source and then if you grow weed. You can press some to get rosin & add flavours that way or buy flavours. (Need to be potent and D9 mix friendly, works a lot easier) vaping is a huge part of my intake. And I was sick of buying shit carts & D vapes. So, I'm making my own. (With help on the D9 process)


Likes
10
Share


@Cannibalgardens
Follow
There was a whole lot of buds off this plant and they are dense . Totaling around a pound dry I lost a good sized chunk to pm in the bottom of the canopy due to weather . Even with ipm I still had problems . Besides that there was nothing wrong with her it was a quick germinating plant that had a solid start indoor early in the season . Once she went outdoors into a 5-7 gallon pot the final place saw it in a 7 gallon to the garden box . That have the roots room to grow . I gave the plant miicrobialmass since day one and was in pro mixbx soil . The nutrients were synthetics and organic bit I finished her off with the organic line up dutch science nutrients . The flush lasted about a week mostly because it was grown outdoors with minimal nutrients added as is .. the end results were great smoke which yielded strong medical buds and lots of sugar leaves for edibles .. thx dinafem for the chance to run your gear. I've never been disappointed with the genetics or their customer service .The next one I'm running will be Remo chemo and possibly the ocean grown too the choice is always hard

Likes
57
Share

@squalino
Follow
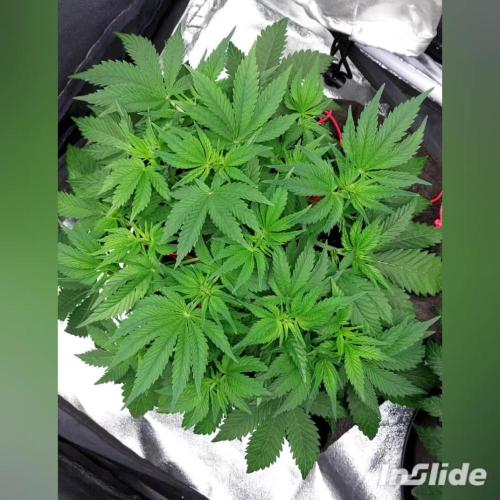
🌿 Journal de Culture : Cherry Cola (Auto)
Date : 25/03/2026
Âge : 62 jours (Semaine 9)
Phase : Maturation (Gonflement et sénescence précoce)
📊 Paramètres de mon espace
Température : 24,5°C (Jour) / 20°C (Nuit).
Humidité : 50%.
Éclairage : Pure LED 240W réglée à 75% d'intensité, maintenue à 75 cm de distance.
💧 Nutrition & Arrosage
J'ai ajusté le dosage pour accompagner la fin de floraison :
Apport : 4 ml de PK 5-8 (BioTabs).
Le phosphore et le potassium sont essentiels maintenant pour durcir les têtes et maximiser le poids final.
📏 Suivi des Plantes & Évolution
Plante #1 (Celle aux pistils orangés)
Taille : 41 cm (+1 cm depuis le 18/03).
État : Elle est la plus avancée dans son cycle. Presque tous ses pistils sont devenus orangés/bruns, ce qui est un signe clair que la plante approche de la fin de sa production de nouvelles calices. Ses feuilles commencent à montrer des signes de sénescence (jaunissement naturel), ce qui signifie qu'elle puise ses dernières réserves pour finir les fleurs.
Plante #2 (La Petite)
Taille : 33 cm (+3 cm depuis le 18/03).
État : Bien que plus compacte, elle est extrêmement dense. Ses pistils sont encore majoritairement blancs et longs, ce qui indique qu'elle a encore un peu de temps pour gonfler par rapport à sa voisine.
🔍 Mes observations
Le filet de SCROG est maintenant totalement rempli. La production de résine est impressionnante, les têtes sont littéralement givrées et la couche de trichomes descend jusque sur les grandes feuilles.
L'odeur sucrée de bonbon devient plus complexe et lourde. La Plante #1 semble prête à entamer sa phase de rinçage très bientôt, tandis que la Plante #2 profite encore pleinement du PK pour épaissir sa structure. On sent que la récolte approche à grands pas .
Likes
15
Share


@Bread_n_Buds
Follow
Now we've reached day 25.
We are in the transition phase, pre-flowering if you want, when the seedlings reveal their sex by showing the white fluff or the boyish balls. Here and in all F1 Hybrids you can be SURE, SURE as death that you will never see any balls.
If you have underestimated this aspect of the F1 Hybrid, go back and think about how many times you found the balls on the paint, full of pollen that fertilized your ladies.
Do you like having young ladies impregnate you? Absolutely not for me and this is a very valid reason why you can choose the F1 Hybrid. Really guys the seeds suck and the genetics of the various breeders if they don't do a job like this it means that they are super hybrid poles with genetic traces scattered here and there. Inglourious bastards.
Here we don't want to be Aryan but to cultivate healthy plants with safe results.
Our Wurlz F1 per mea culpa mea culèa mea grandissima culpa shows some signs of overfeeding, the famous yellow tips of the leaves. Let's be clear, this is minor and is due to the fact that these genetics are so good that they need very little or no fertilizer in the vegetative phase. Then if you already have fertilized soil, forget about growing guys, another pro!
I gave the recommended doses even a little less to tell the truth of both Aptus and Plagron and the plants more or less all have these small signs of over. LITTLE guys, wait until the end to save if you feel like it, or at least I recommend it.
To fix this little thing we go to flush with pH 6.2 and only give Aptus Regulator which should rebalance the plant and soil before delicately moving on to fertilizers for flowering.
Site Description
ZAMNESIA SEEDS - WURLZ F1 HYBRID AUTOMATIC: EFFECTS TO LEAVE YOUR HEAD IN A WHIRL!
As the end product of combining Runtz with Watermelon Candy, Wurlz F1 hybrid Automatic showcases a reliable, uniform, and, above all, easy growing experience. The resulting buds offer mind-blowing flavors and soothing effects, making Wurlz F1 Automatic more than worthy of being on your radar.
GROWING WURLZ F1 HYBRID AUTOMATIC
As an autoflowering strain, it takes just 9–10 weeks for Wurlz F1 Automatic to move from germination to harvest. Fortunately, there's very little required other than a bit of maintenance along the way. This is partly due to the F1 genetics that make this strain robust and uniform, resulting in plants that reach a similar height and provide a similar (large) yield. Moreover, Wurlz F1 Automatic is highly resistant to disease, pests, and other ailments.
Reaching heights of about 65–80cm, Wurlz F1 Automatic is not an overbearing plant and can fit into smaller spaces with zero fuss. Once ready to yield, growers have the potential to see a return in the region of 450–500g/m² indoors and 50–150g/plant outdoors.
AROMAS, FLAVORS, AND EFFECTS OF WURLZ F1 HYBRID AUTOMATIC
After Wurlz F1 Hybrid Automatic wows you with its easygoing growing experience, the best is yet to come: the smoke test. Teeming with terpenes, this cultivar offers a fruity and candy-like flavor tinged with just a little bit of pine for good measure. In terms of effects, Wurlz F1 Automatic is bolstered by 24% THC and a finely tuned array of cannabinoids, making for a soothing, physically relaxing, and, in larger amounts, couch-locking high. So settle in with some of your favorite friends, snacks, and movies; this is relaxation at its finest.
As for fertilizers, I'm doing a small comparison experiment to finish off the fertilizers I had at home, it's not 100% indicative, it's only on two specimens but given the stable genetics I decided to try to compare the results of Plagron Vs Aptus , both excellent brands which they will certainly produce beautiful plants which are already of excellent stable genetics. In the next few weeks the comparison will be more evident now the seedlings are still very small and just potted.
So seeds of all brands, in addition to these great F1 Hybrids and the entire Zamnesia line, fertilizers and everything related to the world of cannabis, you should buy them from the best online store in the sector www.zamnesia.io

Processing
Likes
77
Share


@BipolarHellas
Follow
Hello world,
🇬🇷
the previous week was very good, the girls are growing outdoors in the sun and the weather has been perfect...Michelle is in flowering but this diary will be following the other two girls that are still in vegetative mode and will be for a long time...I don't know if I will be on time for the contest...anyway I love growing these girls so no worries...
======================================
WEEK 9: "PHOBIA"
☠️Day 57...💧watering day...every girl drunk 3 L of pure water, ph 6,3...Michelle has stopped stretching and her size is perfect for the closet in which she spends her dark hours...Angie has reached 85 cm and Lucy 78 cm...A problem that I see coming is them to become root bound...I can see tons of roots through the transparent pots already...I don't have the space and the pots to transplant them once more...So they will have to stay there...hope they will be fine with that...
☠️Day 58...Summer Solstice 🌞🌞🌞🌞
☠️Day 59...💧thirsty again...the weather will be rainy for a couple of days...I should be cautious and put them somewhere safe...meanwhile it's one of these days that I wanna destroy everything,burn the plants...that's my bipolar disorder...hopefully I will not do it,but it's kind of weird these days....I watch them,think they will never finish up and want to kill them...😤🤣
☠️Day 60...yesterday it rained a lot...the girls had a shower but they liked it...meanwhile I got a new job and I will be missing till late...have to ask my wife to put Michelle in the closet every afternoon...and that is tough...for my wife...
☠️Day 61...new job stopped...I will be home for now and take care of them...Angie is 95 cm tall and Lucy 93...
☠️Day 62...💧watering day...3 L of ph 6,3 water...they were thirsty...pots were very light weighed...
🌸🌸🌸🌸Today Michelle completes 3 weeks since light flip...she is flowering nicely...
Day 63...the week is over...I have Lucy and Angie who are like beasts on the balcony and Michelle who is in flowering...thanx for watching see u next week...☠️

Likes
1
Share


@Daris_Growmance
Follow
🇩🇪RS11C – Update 🍃
Die RS11C zeigt aktuell einen deutlich offeneren und freieren Wuchs als die B-Variante und wirkt insgesamt sehr vital.
Beim Training ist mir leider ein Trieb abgebrochen, aber die Pflanze hat extrem schnell reagiert und die Energie direkt in andere Triebe umverteilt. Das Wachstum läuft ohne Einbruch weiter.
Im Vergleich zur B-Variante wirkt die C insgesamt stärker und etwas größer, während die B kompakter bleibt. Zwei klar unterschiedliche Phänotypen.
Sehr spannend zu beobachten, wie unterschiedlich sich beide entwickeln.
🇬🇧RS11C – Update 🍃
RS11C is showing a much more open and free growth structure compared to the B-variant and appears overall very vigorous.
I accidentally snapped a branch during training, but the plant responded quickly and redirected its energy into other shoots without slowing down.
Compared to the B-variant, the C appears stronger and slightly larger, while the B stays more compact. Two clearly different phenotypes.
Really interesting to see how differently they develop.


Likes
47
Share


@MadeInGermany
Follow
Info:
Unfortunately, I had to find out that my account is used for fake pages in social media.
I am only active here on growdiaries.
I am not on facebook instagram twitter etc All accounts except this one are fake.
Flowering day 58
since the time
change to 12/12 h.
Hi everyone :-) .
The lady will be harvested in the next 7-14 days ;-).
It smells very tasty and I'm really looking forward to it.
She will be flushed in the coming days.
Until then, have fun and stay healthy 🙏🏻
You can buy this Strain at :
https://www.exoticseed.eu/
Type:
Herz Og
☝️🏼
Genetics:
Larry OG X Kosher Kush
Indica 60 % / Sativa 40 %
👍
Vega lamp:
2 x Todogrow Led
Quantum Board 100 W
💡
Bloom Lamp :
2 x Todogrow Led
Cxb 3590 COB 3500 K 205W
💡💡☝️🏼
Soil :
Canna Coco Professional +
☝️🏼
Fertilizer:
Green House Powder Feeding
☝️🏼🌱
Water:
Osmosis water mixed with normal water (24 hours stale that the chlorine evaporates) to 0.2 EC. Add Cal / Mag to 0.4 Ec Ph with Organic Ph - to 5.5 - 5.8 .

Processing
Likes
8
Share


Likes
3
Share


@drewnagy0510
Follow
Very well growth and very fast very strong Indica great taste around 11 oz yield four and a half months total good cannabinoids drying was a lot longer than normal

Likes
21
Share


@Siriuz
Follow
To the community I want to say thanks
Since they helped me out so many times
Thanks a lot for your time and support
Thank you kindly grow diaries for keeping up to date with so many articles and growers around showing their cool stuff, thanks for the opportunity to grow and to share knowledge, also appreciate the contest and I'm hoping to participate soon with this diary in some more, I think it is a pretty cool way to give motivation to the cannabis community, let's keep making great things with weed so the world gets to know our way, one day they'll understand its love we put on here, love and good vibes
So good so far this strain was bomb
One of my best, grew 110cm
Had many colas and buds
Was really strong at diseases
Liked nutes a lot and water
High was more cerebral but still good high tho very narcotic when u smoke too much
If I have to say what is the score to me it will be 8 out of 10, since it didn't taste like cream and the high is more cerebral to my like
Other than that she's pretty good
Very creative must say
Tons of friends enjoyed her as well

Likes
5
Share


@Ensign420
Follow
Greetings fellow growers 🖖 and welcome to my first grow ever. This adventure actually started several months ago when I decided to stop buying flower from dispensaries and just grow my own bud. How hard can it be!?
This is actually my second seed of this strain. The first bean sadly died due to over watering (sorry girl, RIP). I was literally watering the cube to the point where water was dripping from the bottom, then heavily sprayed the humidity dome and tray with the vents completely closed. Everyday. Multiple times. I never let the dome or try dry out. So after about 8 days of not sprouting, there was a funky smell of rot. So that was that.
Later I learned that rockwool retains a lot of water and can easily drown seeds. So a wet/dry cycle is best for rockwool germination.
So even after hours of researching and digging through forums and tutorial videos, I was still under prepared for this journey. Did not consider how delicate the germination phase is. Oh well. Lesson learned. Reset and try again!
I hope everyone is safe and stoned during this corona crisis. Just like everyone else in the world, I want this pandemic to be over with. But in the meantime, let's grow some weed! 🖖
[START OF WEEK 01]
Day 01 - Monday - 08/03/20 - Total Days: 001
-----------------------------------
- [0830]: Light Schedule: 24Hrs/0
--- Soaked cube in 5.5 PH water for 10 min. Did not shake water out.
--- NO NUTES! Only PH'd down to control the PH levels.
--- Did not use the default hole (way too deep).
--- Flipped cube upside down and made a shallow hole for the seed (less than 0.25" deep).
--- Placed seed in and pinched hole close. No additional water added.
--- Sprayed the tray and dome with straight water (5.5 PH).
--- Vents are cracked opened a for ventilation (about 1/4 opened each).
--- Distance between the light and tray was 53"
--- AC was set to 80 °F
--- Exhaust fan was set to 86 °F
--- Room average temp was at 85 °F
--- Dome humidity was at 85-99% when sprayed.
--- Allowing to completely dry before respraying.
- [2200]: Dome and tray were completely dry! Sprayed only tray and dome with more water.
Day 02 - Tuesday - 08/04/20 - Total Days: 002
-----------------------------------
- [0845]: Sprayed dome and tray in the morning. Everything was dry.
--- Hoping for the best!
- [2130]: Everything was dry again, so sprayed dome and tray at night along with a light spray on the cube.
Day 03 - Wednesday - 08/05/20 - Total Days: 003
-----------------------------------
- [0830]: Everything was dry again. Resprayed dome and tray. Slightly sprayed cube.
- [2125]: Hooo damn!! She popped! Am little stub is visible! Resprayed dome and tray again.
--- Still going 24/0 for lights.
- [+0033]: Just checked up on her and I swear she grew a bit taller! Getting excited!
Day 04 - Thursday - 08/06/20 - Total Days: 004
-----------------------------------
- [0845]: Wow! Went from a little stub to fully sprouted overnight! Everything was pretty dry again so resprayed dome and tray.
- [2200]: Tap root is visible! Over 1" long too! Just resprayed dome and tray again.
-- Going to prep for hydroton transplant tomorrow!
Day 05 - Friday - 08/07/20 - Total Days: 005
-----------------------------------
- [0930]: She keeps growing!
-- Added a bit of CalMag to the spray bottle (8 drops to 650ml of distilled water). Resprayed dome and tray. Water was at a 5.4 PH with 141 PPM.
- [1045]: Prepped the bubble bucket with 4.5gal of water. Water is high enough to reach about 0.25" above the bottom of the net pot.
--- Added 3 drops of Superthrive
--- Added 3.5ml of CaliMagic
--- Added 2ml Hydroguard
--- Then PH'd down to 5.6
--- Solution Strengh: 120 PPM
--- Water chiller is set to 20 °C
- [1100]: Transplant time!
--- Filled the net basket 1/3 with hydroton. When placed in the bucket, air bubbles are not visible, but are slightly below the surface (slight digging will reveal the water/bubbles below).
--- Removed plastic on rockwool cube and placed in basket, then filled around and covered with hydroton. Making sure to block any light from passing through the net pot and into the nutrient solution.
--- Covered with a half-bottle dome sprayed with the CalMag water from earlier.
--- Hoping for the best!
- [1300]: Raised Bucket 5" higher. Now light distance is 48" to top of bucket.
- [1820]: Lowered tent exhaust temp to 76 °F
--- Lowered AC to 75 °F
--- Raised bucket even higher so light distance is 30" to top of bucket.
- [2300]: Looking good!
--- Sprayed dome and surrounding hydroton with more CalMag water.
--- Attached timer to light! So new 18 Hrs On/6 Hrs Off light schedule.
--- Lights On: [1600] (4pm)
--- Lights Off: [+1000] (10am the next day)
--- Decided to go with lights on during the evening/night and off during the later mornings/afternoon (the hottest part of the day) to see if temps can be controlled better.
--- Please survive girl!
Day 06 - Saturday - 08/08/20 - Total Days: 006
-----------------------------------
- [0800]: Everything was dry. Resprayed hydroton and dome.
- [2000]: Here first night cycle seemed to go well! Get'n taller!
--- Dry again. Removed the dome.
--- PH went up to 6.5 so PH'd down to 5.7
--- Ran the top feed drip ring for a bout a minute to wet the hydroton and rockwool with the nutient solution.
---Too scared to leave the top feed on 24hrs (I don't want over water her and cause dampening-off). Will let dry before re-watering.
- [2100]: After closer inspection, I think she's looking a bit yellow.
--- Decided to add a bit of grow nutes to the bubbler solution.
--- Added 2ml of Sensi Grow A
--- Added 2ml of Sensi Grow B
--- Solution strength after adding more nutes: 176 PPM
--- PH went up to 6
--- I hope that the extra chelating properties of the 'PH Perfect' solution is enough of a buffer for proper nutrient uptake.
Day 07 - Sunday - 08/09/20 - Total Days: 007
-----------------------------------
- [0800]: Water dropped a bit (mostly due to evaporation) so solution strength was at 190.
--- Checked PH again. Was still at 6, so PH'd down to 5.4
--- Ran the top feed for a minute to wet the hydroton a bit.
- [0915]: Since she's looking perky but still a bit yellow. So decided to up the nutrient concentration even more before lights out.
--- Added 2ml more of Sensi Grow A
--- Added 2ml more of Sensi Grow B
--- Solution strength after adding more nutes: 199 PPM
--- PH went up to 5.8
- [1700]: Checked nutrients.
--- PH: 5.9
--- Solution strength: 202 PPM
--- Added 4ml of Voodoo Juice
--- Added 4ml of B-52
--- PH after adding more nutes: 5.9
--- Solution strength after adding more nutes: 238 PPM
- [2130]: Decided to make a new foliar spray to address the continued yellowing.
--- Started with 500ml of distilled water.
--- Added 3 drops of CaliMagic
--- Added 3 drops of Sensi Grow A
--- Added 3 drops of Sensi Grow B
--- Added 3 drops of B-52
--- Added 1 drop of Superthrive
--- Solution strength: 164 PPM
--- PH was at 5.9 and did not adjust.
--- Gave her one spray.
--- Also sprayed the surrounding hydroton.
[END OF WEEK 01]

Likes
9
Share


@GYOweed
Follow
Gave it extra week and 2 days dark ending 9 hours day cycle. Very slight pine, kush, and delicious limonene flavor. No skunk or harsh earthyness at all. Will post more pics. Very potent!

Likes
5
Share


@TheDutchGrower
Follow
I moved everything into a corner en but up some foil walls and installed a second light. Now 2 x
vs1000 vivosun.
Going on 75 % but actually i think i put them tomorrow to 100 %, and move them like 50 cm from the plants. Maybe 53.
They are going good i guess? Little small but the new lamp should help out and show a little results.
Enter the 5th week!

Likes
3
Share


@Menzee420
Follow
So, I ended up harvesting this earlier than I wanted, and not under ideal circumstances. My plan was 1 more week of full nutes, then 2 weeks flushing, then harvest. Nature had other plans. Despite being quite meticulous with the insecticide I had to deal with a pretty nasty aphid infestation which messed up a few branches - but worse was the caterpillars I discovered over the weekend. I started the flush then & began to cut off all of the leaves that had the worst pests (as opposed to continuing the insecticide). I wanted to continue to flush for as long as I could until the bugs were getting out of control. I felt today was that day as I noticed caterpillar droppings in several locations. My last harvest was ravaged by caterpillars so I decided to just chop her down for damage limitation. She might not taste as good as she could have, but oh well.
Likes
27
Share


@RDWCGrowing
Follow
3/4/2023
Week 3- Day 1 of Veg (Day 31 overall)
Water Change out Day
36 Gallons in
CalMag = .5Mil/Gal = 18Mil
FloraMicro = 4.2Mil/Gal = 151Mil
FloraGrow = 3.8Mil/Gal = 137Mil
FloraBloom = 3.0Mil/Gal = 108Mil
PH DOWN = 1.72Mil/Gal = 62Mil
PPM = 546
PH = 5.88
This Grow has definitely been an interesting grow I have been playing with Over or Under since the beginning and it all started with me drowning the plants by adding too much water. I will have to make sure I watch that on all my future grows. I prayerful that this week will get me fully back on track, in my previous grows using my chart, I haven't had any issues during this week, so again prayerful that this is the week I am back on point.
3/5/2023
Week 3- Day 2 of Veg (Day 32 overall)
ROOT ROT!!!
I guess from when I drowned it I caused a lurking issue that really showed it's head today. The roots were looking not slightly bleached but looking black. I cut out what looked dead and I had to run to the local Hydro shop to pick up some items to see if I can fix it and strengthen the plants.
I picked up Mammoth Silica, ORCA, and ROOT Drip.
I completely drained the system and started it over today as well.
38 Gallons In
Mammoth Silica = .5Mil/Gal = 19Mil
CalMag= .5Mil/Gal = 19Mil
Root Drip = 1Mil/Gal = 38Mil
FloraMicro = 4.2Mil/Gal = 160Mil
FloraGro = 3.8Mil/Gal = 144Mil
FloraBloom = 3.0Mil/Gal = 114Mil
Orca = .5Mil/Gal = 19Mil
PH Down 60 Mil = PH 5.83
I also had to run by Staples I realized the paper I was using wasn't the right brightness and Lbs for the Photon App. What I needed to have 22Lbs 98 Bright. I recently saw a comparison of the different weight papers against a several hundred dollar Apage PPFD detector and with the right paper it was almost exact readings. With that my PPFD 355.
3/6/2023
Week 3- Day 3 of Veg (Day 33 overall)
Still alive!! #2 and #3 are still alive and it looks like no further damage to any of the leaves.
#2 needed 1 node topped. I will keep monitoring day to day.
3/7/2023
Week 3- Day 3 of Veg (Day 34 overall)
Well Both appear to be doing all right. I cut off the offensive leaves from #3 nothing new on shown on the leaves. I actually needed to top 1 node on #2. PH is stable, Temps are stable.. I will be changing out the water and Nutes on Saturday not waiting the 2 weeks.
3/8/2023
Week 3- Day 4 of Veg (Day 35 overall)
Well Both appear to be doing all right. I actually needed to top 1 node on #3 and 2 on #2. PH is stable, Temps are stable.. I will be changing out the water and Nutes on Saturday not waiting the 2 weeks. I think the additives are truly making a difference I think I will be adding them to all my grows from here on out.
3/9/2023
Week 3- Day 5 of Veg (Day 36 overall)
Both still appear to be on the mend Still some dark brown on a small part of the roots and I don't know if those are just dead but it doesn't look like it is spreading and I see a bunch of new roots forming. Nothing new on the leaves at all. So I think the trio that I added is helping. The plants also seem to be in raised happy position going towards the light. I still plan to change the water on Saturday and go from there.
3/10/2023
Week 3- Day 6 of Veg (Day 37 overall)
Moved the light up to 41 1/2" so 3' 4 1/2" away from the top of the Plants.
PPFD= 363
Power on my Light =62.5
Water Temp is holding steady=70.3
PPM= 534
PH= 5.92
Tent Temp= 72.5
Humidity= 50-60% I have 2 humidifiers running on INK Bird controllers monitoring it 24/7.
I will be changing out the water tomorrow even though I could let it go an extra week but I am still concerned that the Root Rot is clearing up and I don't want to risk it coming back. I want fresh Nutes/ water in the tanks.
I topped 2 nodes on #3
I topped 3 Nodes on #2
I also cleaned out some of the bottom third portion that isn't getting much light and not much growth at all.
#2: 8 1/2" tall, 18" Wide
#3: 7 1/2" Tall, 15" Wide

Likes
1
Share


@Randomjcb
Follow
Stoped the pk its done its job and the strech on the flower sites has gone well


