
Likes
Comments
Share


@DimJesus
Follow
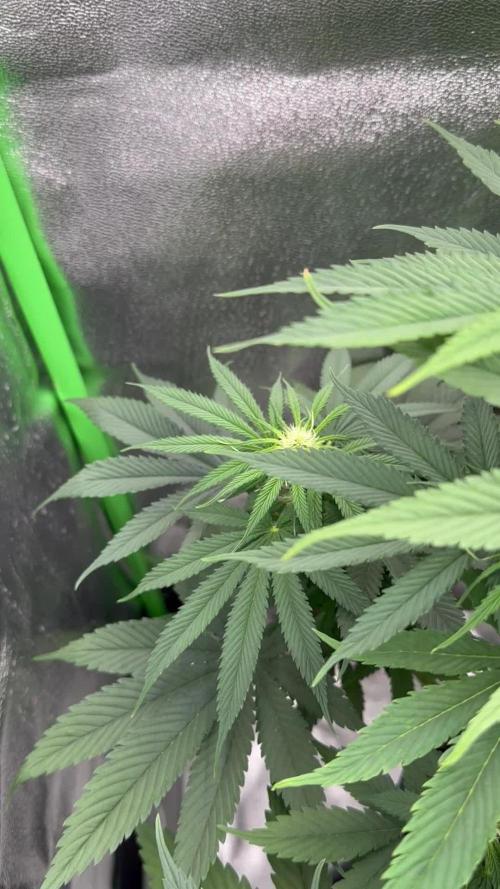
Hola a todos! Creciendo felices la segunda semana, comencé a fertilizar.
No puedo estimar la altura porque le adiciono substrato poco a poco pues bajó unos centímetros después de humedecido.
Pensando en utilizar LST para aprovechar mejor el espacio, estufa pequeña.
Me parece que se está desenvolviendo bien.
Acepto recomendaciones 🙌

Likes
5
Share

@Skynets_Growing
Follow
Tessa her second flower week is Impressiv. I cant remember that I saw that before in my Grows… she look so fantastic in her more and more getting green 🙂… hope you enjoy it like me and we will see what she do in her Next week. Stay tuned.😉🤗


Likes
5
Share


@GrowFunMD
Follow
What a world of difference a week can make when growing auto-flowers. I did a lot of maintenance on these girls the last couple of days. See pics and videos. Two of the plants have stretched out nicely. The other three are falling behind, but looking very nice. There is a strong citrus smell happening right now. Smells like I have a tent full of fresh lemons. Started using Big Bud and Bud Candy this past week. Tent 2as getting quite crowded, so I also moved the water reservoir on the outside of the tent. It was very hard to cut a lot of those beautiful buds off the plants, but I think it will pay off. I also got the new Vivosun Grow Cams, so far I like them, but I do have some feed back.

Likes
10
Share

@InsideAz
Follow
This is my 1st of 4 Banana Purple Punches that was green all the way through, I think the chances of a green plant on that strain about 20% so I hit that almost head on. Also this is the last BPP seed I had, grew 4 and gave 1 away to a friend, which also grew amazing and flavorful. Gotta spread the love (:
Loved growing this strain for the last few years one plant at a time. Always a good strain to throw in the mix with some autos. They were free seeds that I will be buying in the future when I run out of buds and begin to miss her distinct effects.
Likes
22
Share


@Jwjoh
Follow
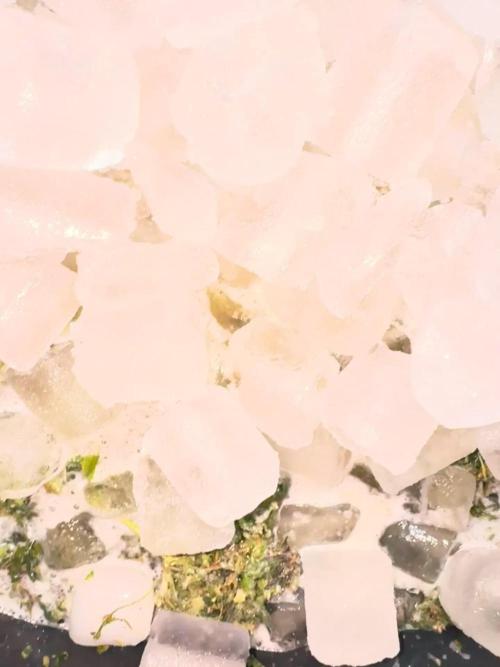
This was an interesting harvest. Everything was going great and the buds/trichomes were still piling on, when suddenly almost overnight plant "C" shifted to about 20% amber trichomes. So I harvested it, and because the other plant wasn't ready yet I decided to try water curing the first one for 7 days. Then at the end of the 7 days, I figured I'd hack down plant "D" and dry them both on the racks in the tent at the same time before moving into jars.
The water curing was a huge success! After the first day, the water was cloudy with a slight green tinge. Second day was about the same. Then the water was just a little cloudy each change, no green tinge. Compare it to the diary I just opened around water re-curing some cannabis I bought from the government store, where the water is diarrhea brown :O On day 7 of my water cure, the water was perfectly clear so I decided to hack down plant "D" and get them both drying on racks in the tent together.
While water-curing plant "C", I had its trim sitting in a bowl in the freezer. When I hacked down plant "D", I put its trim in the same bowl. After my typical wet-trimming, I hung up Plant "C"'s water-cured buds on the top rack, plant "D"'s buds on the 2nd rack for an old fashioned cure, and random trim from both plants spread out on the bottom 2 racks.
The water-cured buds dried within about 24 hours and went into a jar with a 58% humidipack. The buds are SUPER dense and potent! Nice clean high, doesn't kill my throat. The downside is that the taste is really weak and not that great. But everything has pros and cons. Almost no trichome loss in the bucket during the water curing as well -- I was really worried about that!
The other buds dried in about 36 hours and went into a jar with a 58% humidipack, where I burped it many times a day for a week. The smell and flavour are much more potent than the water-cured bud and it's a little harsher on my throat, but otherwise I'm not sure there's a detectable difference.
However, you can SEE there's a sharp visual difference between the water-cured buds and the jar-cured :) Of course the jar-cured will mature more with time as well.
Once the trim was completely dry, I put it in a bag in the deep freezer and dropped it to about -20. I didn't need to use a grinder this way -- I could just mash it all up in the bag with extreme ease! Sifted it through the kief screen, and pressed down 17 grams of lazy-man's hash!
After processing the trim through the kief screen, I decarbed in the oven at 200F for 1 hour (this converts THC-A into THC or something to that effect -- if you don't do this, the edibles won't get you very high). I put the trim into a big mason jar and back into the freezer along with my bottle of Everclear. Once they dropped somewhere down around -20, I poured in the Everclear, put the lid on, and shook as hard as I could, as often as I could, for 5 minutes or so. I noticed that as I shook it around, the contents inside would alternate between solid and liquid which was kinda cool :) Shake it one way and it freezes, shake it the other way and it thaws... or something to that effect, anyway. I was able to use a double-coffee-filter to extract about 2 cups of dragon tincture!
I threw everything in the coffee filter out -- next time I'm going to do a better job of it as there's a little pile of trichomes that forms at the bottom of the filter which I could put to use. Once I get that down next harvest, I'll have around 99% efficiency milking every last drop out of my harvests!
White chocolate is so yummy, as are candy canes... I wanted to combine the two to make some edibles. Looking around for candy cane crush, I decided to check out Amazon. They had the same candy cane crush I was looking at from popular stores, for only a couple dollars more, so I figured sure why not have it delivered. I was planning to get some white Baker's chocolate, but on checkout of the candy cane crush I got a deal for adding on white chocolate Lindt bars for $1.25 a piece LOL! So I bought 10 of those.
When the Amazon package arrived, I slowly boiled down 1/2 cup of my dragon tincture in a pot, then used a double-boiler setup to melt down 4 of the Lindt bars in the same pot. Once it was mixed well with the hash oil, I set it aside to cool for about 3 minutes before stirring in 1/8 cup of candy cane crush (plus I ended up adding maybe like a tablespoon more), pouring into a pan lined with parchment paper, and putting in the freezer for 30 minutes.
So now I have a nice big chunk of white chocolate candy cane crunch stuff where a piece the size of my thumb gets me super high for like 8+ hours; 17 grams of lazy-man's hash; and 88 grams of bud :) And still enough dragon tincture left over to make 3 more rounds of edibles -- not sure what I'll make next!
From now on I'm going to water cure a large portion of all my buds -- not just the ones I grow myself, but ones I buy from the Gummint too!

Likes
8
Share


@RakonGrow
Follow
+
Day 14:
2.5 Liter Water and Rhizotonic 2ml/L , Final PH 6.8 . Air : 75% at 26°C . She looks really small , really lol .
Day 13:
next full 3 finger leaves
Day 12:
ongoing 3 finger leaves
Day 10:
good progress !!!
Day 9:
growing
Day 8:
growing
+

Likes
17
Share


@Gorrilla420
Follow
This week the diesel has shown great growth on the bud production, where as the cheese not gonna be much on her but thought that when she hit flower being so small. Took few fan leaves off to open up for more light. Both starting to smell abit now, plenty crystals forming. Hoping for some lovely buds, let’s keep that rain away and more of that sun!
Happy growing 🌱

Likes
4
Share


@GrowingGiant
Follow
Day 30. Worried about running out of space. I have been tying the plant down perform LST which is helping. Only change in feeding schedule is I have reduced call mag from 5.0 Ml to 3.0 ML and have added big swell by aurora nutrient lines 2.0 ml


Likes
10
Share


@thevalar007
Follow
Clones looking surprisingly good. The mother plant they spawned from was destroyed in veg due to gnat infestation from poor conditions on my part, however clones were taken while she was healthy and thriving. Sorry for the pic quality, the tent is getting crowded during the stretch and it's hard to get single shots of 1 plant because of the trellis. Lesson learned for me personally, stick with 1-2 different strains per tent up to a 4x4.

Likes
6
Share


@DrShotzUK
Follow
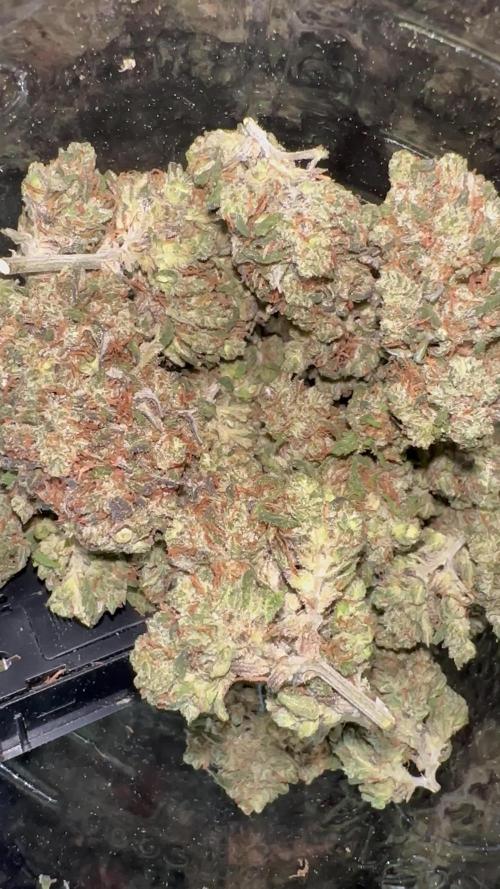
BANANA PURPLE PUNCH - 420 fast buds - week 7
Wow what a strain. Got this a freebie with an order I placed and it’s turnt out to be the star of the show. The buds are super dense like Cali strains, super smelly like berries and gas’s and also super purple and pink. WHAT A STRAIN BRO LOL
already flushing for 2 weeks as she’s more than mature and ready to go.
Haven’t even tasted her yet and defo buying this strain next grow.
DRSHOTZUK
Likes
18
Share


@growbville
Follow
Just potted... Plants are a bit in shock. curled down leaves on some. After Day 1 new growth is praying.
Removed Damaged Leaves 😀
9/18/2020
had a problem that looked like Cal-Mag issues & overwatering... Was using the tank labels for water marks to tell how much water was in the tank. Discovered that the marks from the factory are wrong. Measured back in exactly 100 Gallons of water and re-nuted the tank.
It didn't solve my issue. So I changed the water flood schedule to see if I was overwatering or underwatering. no response from the plants except it was getting worse.
After trying things for two days, I "Phoned a friend"... and they suggested to turn the lights down to 25%. BAM! after 20 min or so, there was a positive response and lifting of the leaves...
Moral of the story is to start your clones at a lower light setting and gradually bring them up over time.
Pics included...
Likes
9
Share


@Cortez_The_Konqueror
Follow
Got 2306 into her final home in a 3 gallon pot, I used grow dots at 1 table per gallon of medium and made the bottom 3rd of the soil a little hot with fresh ocean Forrest soil, and purple cow non manure compost.. and moved her to my new ac infinity 3x3 tent.. she's the strongest cultivar out of the testers so far so I rewarded her by putting her in a tall 5 gallon pot and directly into my main flower room under the Mars hydro fce6500!
Likes
20
Share

@valiotoro
Follow
If you’ve got a bit of time and some ice, it’s really a fun thing to do. It’s also a great way to make use of every part of the plant


Likes
44
Share


@Saint
Follow
Welcome to the first flowering week
Day 29
Growth is promising.
Day 30
Started with a bad news. Main stem, center, got broken due to lst. Lower rope got released, and it made upper one to snap quickly... I noticed quite late sadly. I gotta admit, it's like tradition that main stem breaks whenever I grow 😂 I still tried to fix it back. I don't know if it's gonna work or not, but Jeffrey was through A LOT, and hopefully she will get through it aswell. I will update photos later today
What's most important, hopefully it won't stunt my plant.
Update.
She seems okay.
Day 31
Reviving center top is not working as I see. If it gets worse I will remove the tape and check it out, if no luck, it will be removed.
Added 5 liters of fresh water, balanced out pH and added nutrients.
Something is telling me I will see difference by tomorrow.
Day 32
Added brick under the pot, so when I need to completely drain reservoir, it's gonna be on higher level, which will make the cycle easier.
Did some defoliation, and took photos 2-3 hrs later.
Center did not survive, so completely removed it. Duct taped the snapped open top.
Day 33
All good. She's drinking almost 2 liters +- a day
Day 35
So final day of this week. She is bushy. She is drinking like 2.5 liters a day.
Quite appetite she got with those PPM-s 😀
I didn't defoliate much this week, but I will make a good one next week.
I have no idea if this lights I am using gonna be enough or not.
Let's see, maybe I can get her additional 240 watts?
Let's see ❤️☘️

Likes
92
Share


@SwissKush
Follow
Day 64
really finishing up nicely, she is very thick
The ripening blend is doing its job, the leafs are starting their fade a bit
This strain loves DWC, super fast growth and development, thanks @Fast_Buds
Day 65
smooth and steady, she is up to drinking 6L a day now
buds are covered in trichomes
Day 66
trichomes are looking 90% white all over the side buds
continues to amaze me daily, with the 6L drinking
the buds are swelling up, i see a few pistils tips starting to turn pink
keeping the temps and the humidity low, 40% humidity
Day 67
temps low, 21, 40% humidity is causing massive terpene development, the buds are pouring out resin
captured a photo while lights were off
Day 68
She is finishing up nicely, changed the DWC for fresh ripening blend, this will be the last pool for the lady
The pistils are about 30% brown, trichomes are all white all over. Maybe 2-3 days left.
Day 69
The buds are maturing fast, we are in the harvest window. The colas are rock solid, and they are the most sticky ive ever grown from autoflower.
Pistils are about 50% pink/orange/brown - trichomes are all white, not seeing any clear.
adjusting to lights on 24x7, temperature is low, 20 degrees and ive got the humidity about 45% - time to overdrive and preserve terpenes with the low temps. easy for low temps here, its already -4 outside, my metal air intake hose is very cold drawing in air from outside.
Will likely chop the plant tomorrow or the next day, looking to be about perfect - these are next level genetics
Uploaded a video
Day 70
Finishing another week strong, she will likely be cut tomorrow, pistils about 50% pink orange brown
she is enjoying the 24/7 light and cold temps, the buds are getting more covered in resin glands/trichomes
Likes
24
Share


@Frank_cultiva
Follow
He tenido poco tiempo para cuidarlas como se merecen pero ahí vamos

Likes
3
Share


@centralflpheno
Follow
They both look great , trying to control the stretch of #2, idk if #3 is just being over taken by the big one (#2) or if it’s just a different phenotype?
Likes
12
Share


@sunshinegroww
Follow
This ladie looking nice and short and buds starting ti fattened up nicely ,she smells insane really gassy ,she is rather thirsty thou,so far no major troubles with her shell get some defoliation during this week as really bushy,very sticky and good amount of resin so far