The Grow Awards 2026 šŸ†
Likes
Comments
Share
@coldweave
Follow
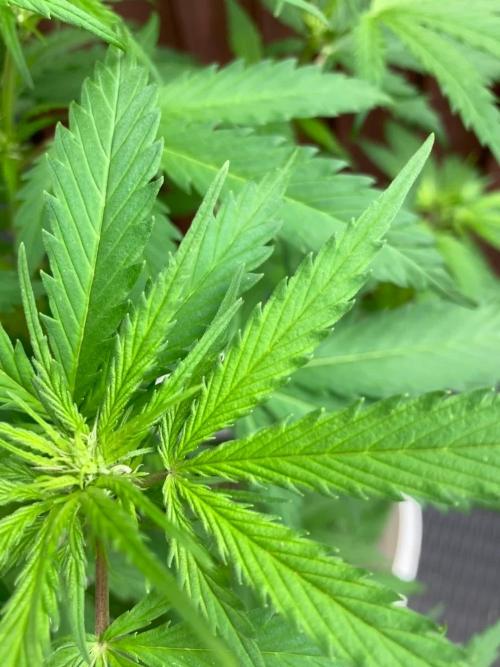
Hey all sorry for the late update. Got really busy with work and just wasnt uploading. I had to cull phat Gary cause she was a genetic herm, I’m talking pollen sacks all the way up the main stem. I’ve seen a few stress sacks here and there on the lowers but nothing like this. I added a video of it so you might know what to look out for. It’s my first experience with exotic genetix and while I have heard of them having herm issues before, I have never had anything quite like phat Gary. But, on the other hand, this Gary Poppins #2 is the best smelling plant I’ve ever had. She smells like a straight strawberry soda, just this very fizzy strawberry scent. It’s unreal. Gary Poppins #1 has a similar terp profile, but not as loud and she’s frosty as ever. Both the perm marker s1’s are identical. Both look exactly like the perm marker flower I’ve bought from seed junky in the past. Very lime green buds with light oranges hairs. Smells just like a permanent marker. Couldn’t be happier with how this run is going, well except Phat Gary. Still haven’t decided on Exotic Genetix yet. I guess we will wait and see how Blueberry Gary comes out, she’s currently in week 6 veg. Shout out to the mad scientist Jbeezy though, this perm marker is unreal. When I saw he was releasing s1’s I couldn’t believe it. Gonna wash this entire run for some fresh frozen. I would absolutely love to get this Gary Poppins #2 smell to transfer to some live rosin. Will update this when we finish and I’ll make a diary for blueberry Gary and Gastro pop from compound genetics when I get a chance. Until then, happy growing all Day: 52F - Week 8 šŸŒ”ļø:79 Fahrenheit šŸ’¦:50% šŸ’”:75% @ 14 inches
Processing
Likes
12
Share
Checkout my Instagram @smallbudz to see the Small budget grow setup for indoor use, low watt, low heat, low noise, step by step. 04/01/2020 - Did the last defoliation, removed about 1/4 of plant material. 06/01/2020 - Fed her 1.5l of 6.5PH water with 0,3ml Cal Mag (Atami) 0,25ml of Grow, 0,6ml of Bloom and 0,5ml Max, and 1ml of each: Heaven, Alga-mic and Vera, noticed some run off, I use about 1/3 of the nutrient dosage on the chart, to achieve about 200/300PPM (500 scale).
Likes
37
Share
8/19 Rained again last night. No damage but medium is drenched. The 9lb kush I've been struggling with seems to be improving. I spent a lot of time on her yesterday and at least an hour this morning defoliating and pruning her. New growth and flowers look promising. I'm cautiously optimistic. I defoliated what needed it. I needcto qpplyvorganocide again. I can see random signs of septoria leaf spot. I really have been off my fame lately. I'm back on it now. This week the garden will be rearranged and I'll pull that big GDP back and better support the blueberry for flower. That NYCSA is a beast. It's resilient as all hell and just continues getting bigger and fuller. Despite pr9blems in the garden this girl seems absolutely fine. At least I don't have that defeated feeling anymore. I've got flowers on a few different plants. I'll try to get a couple pictures. I may take rapacaps advice and add a cheap plastic roof for later flower. I'm not sure if the explosive flower growth is due to the liquid kool bloom but I think I'm going to switch back to tiger bloom as it works better with the other nutes. I'll jeep this updated but I've got work to do. 8/20 Well it Rained again last night. This is getting discouraging. Now my other 9lb kush has the bottom branch all droopy like there's a borer or something. Realistically with the temp swings and the weather I think it's a firm of root rot or pythiym damage which isn't good. I posted pictures of the stalks and would be grateful if anyone has any advice. I'm go8ng back down to look again for a borer hole but i didn't see one. What it looks like to me is that the petroleum jelly I put on the stalks (to battle ear wigs) seems to keep them moist or something inviting mold or fungus. I'm kind of at a loss. I don't really know where to go from here. I don't know if I should just replant the severely damaged plant away from the rest of the grow, bag it and get rid of it or leave it be and hope for the best. I certainly don't want anything spreading. I'm getting tigerbloom today as my plants still need to eat and I'm nervous about the liquid kool bloom. It's probably fine but still. I'll update after I put in more work and research more today. Any advice helps. UPDATE: No borer holes. The stalk looks fucking horrible. It's supposed to rain today. I'm going to give it one more day then I'll amputate that branch and get rid of the other plant if I don't see an improvement. Perhaps I'll plant it in the ground. Don't really know what to do. Family bar b que today so my options are limited. 8/21 FED TWO GALLONS TO THE GARDEN. ONLY USED .5TSP/GAL OF LIQUID KOOL BLOOM. Did not feed dieing plant. Back to super hot weather 80° at 9am. Did a lot of research last night. I also went to several commercial growers and asked advice. What I came up with was a fusarium infection of pythiym infection (Crown rot). I looked at all my stalks and they all have bark and are darker where I applied the petroleum jelly. I'm also NEVER using DE again. It fucking ridiculous amounts of water. Everyone swears by it bit it's not going in my garden again. Since use I can just watch water sit right on the GD soil. I tried to get some examples of what I'm talking about with the stems. I amputated that lowest bottom branch I trained (which was huge). I didn't have time to dispose of the other plant before my wife's doctor's appointment. I'll update when I go back over. I'm sure this won't help and may hurt but I used Bee Safe 3 in 1 on the wound and around the stalks of the plants I saw discoloration on. I didn't touch the NYCSA even though I see some discoloration. I may just be seeing things. That plant I'd super healthy and I don't want to risk losing it. It doesn't seem to have the stem rot like the others. At least I'm not the only one having problems. I hears some pretty bad stories. Still. I'm heart broken. I'll keep this updated after I go back over. FUCK. I MAY just go back to indoor. UPDATE: Got back from the appointment and the rest of the plant was all droopy just like the other 9lb kush (and the branch amputated). I wondered about that because other branches looked worse. I got the totally dead 9lb kush out and found some root rot. AFTER wheeling the bag out I found earwigs and other insects where the bag had been. Awesome. I used h202 to try to wipe down anything that looked Fingal in the stem. It sucks because it seems like that liquid kool bloom pushed them over the edge into flower. Cotton balls where there was nothing. So that's both my 9lb kush plants and the largest plant of the year the GDP that have all bit the dust. If you grow cannabis you know how I'm feeling. I KEEP TRY8NGVTO UPLOAD THE MINUTE VIDEO I TOOK BUT I CLICK ON SOMETHING ELSE AND IT DISAPPEARS. WIFI SLOW. HAVE TO WAIT FOR 5G 8/22 What do I say? Fusarium? Pythium? Stem rot? I'm going to have to get a tent to do some indoor to get the medicine I need for me and my wife. I took the last 9lb kush out and disposed of it. Well it's still in the bag. I'm hoping maybe it might come out of it (beyond hope and far away from the others (but I'm going to toss it today). This blows so hard. Flowers are just starting to develop. I like the liquid kool bloom. It seems to make flowers explode when there was none before. At least on the plants I have left. Actually even the dieing ones started flowering. I'm really concerned considering that one plant (at least) has septoria and every plant has that petroleum jelly on it. Cautio to people that use that. It seems thats where the rot started or is. In spots I spread the petroleum jelly. Anyway my NYCSA has the smallest amount of "funky looking stuff on the stem" so I'm hoping it will make it. Cotton balls starting to appear. If I lose the whole fucking crop I'm gonna go ape shit. UPDATE: Spoke with a few others and did more research. I removed my braces on the bottom of all the plants. It looks like the pjelly and the brace allowed for some type of contaminate. Other growers think I'm being too bleak. They think things will turn out okay. They are more knowledgeable about cannabis than me but I'm with these particular plants everyday. They're probably right and my anxiety is just getting g to me. It's scary seeing a healthy plant completely die in such a short time. After removing the other 9lb kush I could easily see extreme rootbound roots still too the size of the 1 gallon they came in. The bag was PACKED FULL of tight roots so they definitely made it down. The plant however just fell over when I pushed it. I had roughed it up a big before. Anyway I'm praying to the cannabis gods to not take what I have left. 8/23 Fucking pouring again. This sucks. I've gotten loads of advice and made another friend on here. I forgot my phone so I couldn't take pictures this morning. My spirits are up a little seeing that others are at least attempting to help. I'm headed to the grow shop after a night of research to grab supplies to battle this. I'll update later. EDIT: I picked up plant doctor at the grow shop. It was 50% off and I couldn't find anything with trichodermia. However, I've heard good things about this plant doctor. It's systemic and can be used as a root drench and a foliar spray. BIGGEST selling point for me is that it SPECIFICALLY lists fusarium, grey mold. Pythiym crown rot, black mold and all kinds of other shit. The thing that sucks is it's raining and it's not supposed to stop for a few days. That's going to make application more difficult. Oh well. I think I may do a root drench on the one plant that has a wilted bottom branch. I'll keep this updated. Thank you everyone who reached out. Especially growing grannies and my commercial buddy who is always here for me. However he has no experience with this so I'm kinda on my own here. EDIT: I couldn't find trichodermia and I don't have time to wait around and order. I found plant doctor which literally lists it treats all the possibly pathogens my issue could be. Even has a section for medical Marijuana. I did a root drench on the plant up front in the middle AND I did a foliar spray. Might as well get the septoria too. It's systemic but it gets in faster through the leaves I guess. It started sprinkling and I want to test this stuff out before I go ham with it. I did give some to the to other plants bit left my best AND THE TWO SMALLER ONES alone for now. I'm not seeing those issues on the NYCSA and I don't want to risk damaging it. I chose tge root drench as it's raining and the instructions for fusarium WAS a root drench. Thank you all for your help. I will close out tge question once I know it's figured out. Wish me luck. DID A SHORT VIDEO BUT WIFI IS SUPER SLOW SO I NEED TO WAIT TO UPLOAD IT. Went back over. Finished foliar spraying the other two and left the NYCSA and two Littles alone. Hopefully this works. I did I short video. Who knows if it uploads. UPDATE: Went back over and finished foliar spraying. Took a bunch of pictures and did a video but it didn't upload. I'm hoping this will do it. Plants actually look good. And they're flowering nicely! It's too bad I had to do a foliar bug this us supposed to combat PM and septoria as well. 8/24 It Rained last night but hasn't Rained today yet. It's supposed to and uts overcast. I'm really considering putting a roof on my grow (like rapacap suggested) for flower to decrease mold chances. Plants looked happy. I saw no negative effects from the Plant Doctor. I even sprayed a branch of the NYCSA and the stem and a little around tge roots. I finally feel like I can take a breath. I've been working so hard and worrying about losing g everything. I may have been able to save that 9lbkush but I don't think bit was worth taking the chance. The sun is peaking out now. My buddy at the grow shop called and set a side general hydroponics armor si 0-0-4 silica supplement cause it was 90% off. I pad like a buck sixty lol. I'll incorporate that next feed or water. Whatever comes first but it will be good to get it in the regimen. I was worried plant doctor might hurt but the girls seemed to kike it and I went ham on the worst plant. I mixed according to medical Marijuana guidelines on the label (Theres another label on the internet, it's not on this one, it's at the very bottom and just recommdations from commercial growers. I hope this stuff works. Things look better already though. That liquid kool bloom is the bees knees. That's making flowers pop up like crazy! I think I'll stick with it. I was going to use beastie bloom and cha ching later on (and still might) but I hate the lockout bullshit. I've done a bunch of videos but most don't get uploaded as i forget to upload when I leave and wifi is slow here. Anyway at least I've got a few good ones left and pleating the words of my commercial poll buddy, "barring anything catastrophic you should be fine. I know your anxiety gets the better of you sometimes." Couldn't be a truer statement. I'm still getting a tent and doing indoor though. I'm going to need to. 8/25 Did some slight defoliation. I think today I'm going to reorganize my grow space. Things are looking better though. Plants look healthier. Flower is on and they are going to beat hell. I'm glad I took a cutting from NY 9lb kush. I also took one from the NYCSA. THose are tge little ones. The 9lb kush is flowering pretty good. Too bad it's just on a 3 gal. The NYCSA us in a 10 gal grow bag though and is doing amazing. I still see septoria on the leaves. I'm sure I'll need to reapply plant doctor but thus far I'm impressed. Things LOOK better. I don't even remember the last time I watered. It Rained last night. Looks sunny today. I'm going to feed tomorrow. I want the soil to dry out though. We usually don't get consistent rain like this. It's a first for me. I'll update later if I get stuff done.still wondering if I should amputate that wilted branch or give it a bit. It's still attached right now. I'll get some sealant and do some more research.
Likes
8
Share
03/01 Wow, I’m honestly blown away by how this grow is progressing! In the last 24 hours alone, they’ve guzzled an incredible 45 liters of water. 😲 I mean, seriously, that’s insane! The stretch is probably just about wrapping up, so I’m keeping busy tying them down for now. Once the stretch is over, I’ll be going in for some selective pruning—there are just so many new shoots popping up. I’ve got to say, I’ve never seen growth like this before. It’s exhausting, though, and I’ve already run out of zip ties again! šŸ˜‚ So, tomorrow’s mission: stock up on more. I’ve noticed a few slightly discolored leaf tips here and there, but it’s really minimal. That’s exactly what I’m aiming for—pushing them right to the edge without overfeeding. šŸŽÆ Also, I just realized it’s been over a week since I added any CO2. Maybe that’s why I’m seeing these tiny signs? šŸ¤” Something to experiment with moving forward. Honestly, I’m so curious to see where this grow takes me—there’s so much potential in these plants! Stay tuned, folks. šŸŒæšŸ’Ŗ 06/01: Last night, I started defoliating, and I really went at it with a ruthless approach. I didn’t worry about branches snapping while scrogging—my philosophy is simple: the strongest will survive, and the weakest will wither away. Survival of the fittest in action! I also noticed that one plant seems to be either too wet or too dry. I’ll need to keep an eye on this one because there’s quite a bit of dying foliage at the bottom. My gut tells me it’s slightly overwatered, although that shouldn’t really be an issue with coco. Still, better safe than sorry! šŸŒ±šŸ’Ŗ
Likes
83
Share
Gracias al equipo de Fast Buds 420 por la donación de las semillas y poder inscribirme en el concurso del aƱo. Creada a partir de la genĆ©tica de la Girl Scout Cookies y la Gorilla Glue #4, seleccionadas a mano y en combinación con nuestra famosa Gorilla Cookies Auto, esta variedad lleva todos los mejores atributos de sus padres al mĆ”s alto nivel. Este hĆ­brido maravillosamente equilibrado prospera en el interior y en el exterior, y en todo tipo de climas, a la vez que es superresistente a los bichos y las plagas. Es una productora masiva que ofrece a los cultivadores de todos los niveles rendimientos de hasta 650 g/m² de cogollos de primera calidad que no decepcionan en absoluto. Siendo una de las versiones mĆ”s potentes de esta genĆ©tica, la Gorilla Cookies FF (Fastflowering) presume de un enorme porcentaje de 29 % de THC que se traduce en montones de resina y terps sabrosos que hacen las mejores extracciones. Es la elección perfecta para los cultivadores de hachĆ­s que buscan cepas de gran potencia que produzcan sabores y aromas excepcionales. Consigue aquĆ­ tus semillas šŸ˜šŸŒ»šŸš€: https://2fast4buds.com/es/seeds/gorilla-cookies-fast-flowering šŸ“† Semana 10 de floración: Es la planta mas grande y con mas resina de todas las que tengo, esta aceptando muy bien los nutrientes. Los cogollos continuan engordando y cargandose de resina. Riego una vez con nutrientes ec 1850 ph 6.2 y dos veces con agua reposada 2 dias ec 150
Likes
21
Share
@NONSENSE
Follow
Hello everyone, my friends! Here is a new grow, sponsored by the guys from the RQS company. Thanks for the seeds and organic fertilizers. This time I growing just a genius strain that has excited the minds of multiplying cannabis lovers over the past years - Royal Gorilla . Auto version. Like always I am using coco coir. For the first two weeks, I add light fertilizers with PPM around 350-400. I always keep the PH solution in the range of 6.2-6.5 I keep the coconut always moist to prevent salting. It's really important. The plant is already about 3 cm. In a few days I will move it in a large pot.
Likes
12
Share
If you ever read the grow description. Its true in every aspect. Very very resilient. Had ph issues humidity issue. Even gnat issues and she faught it šŸ˜‚. Just expect the growth spurs she grows fast and tall if not lst
Likes
5
Share
She's showing signs of a phosphorus deficiency. will feed the plant fox farm big bloom to correct the issue.
Likes
22
Share
@Selkot
Follow
I'm launching the GoGro system this week! I prepared 10L, with demineralised water, to which I added 2ml A + 2ml B. I first watered manually one last time with 50cl per plant and 0.25ml of power roots. Not the slightest leakage noted, first small victory. 😊 the valves distribute the water slowly, the coco soaks progressively; after a few hours, the substrate is wet but not soggy, a good sign. considering the difference in development between my 2 plants, i topped one of them. i'll do it only once, i'll give up the mainlining with automatics. this next week will be crucial: will the plants develop well, will they suffer from deficiencies or burnts? we'll know soon!
Likes
4
Share
@Ensign420
Follow
|»» LOG DISCLAIMER: Not intended as a grow guide. Grow log entries are usually posted 3 weeks later and are for my learning reference. ««| Introduction - Week 15 Summary - Ensign's log, stardate 17541.8, Wow what an epic grow week! First week within a 12/12 light cycle and lots of training got done! Ca-Caw! Heady OG is blowing up with tops and been tucking to spread the canopy out a bit in the front left quadrant. But also started to let the right side grow through the netting. As for TKO, been training growth upwards as she stretches through the scrog netting. Towards the end of the week, her top soil sensor started to cut out and had to swap it out with a new one. Both the Heady OG and TKO clones have been transplanted into solo cups, but Heady OG is clearly struggling. To prevent the potential loss of the genetics, decided to take two more Heady OG cuttings. Started my first batch of lactobacillus (LAB) serum and am waiting for the water to activate. Also been researching about tissue culture and think this can be the solution to preserving genetics when space is limited. Anyways, Onwards Ensign! [START OF WEEK 15] ========================================================== ---------- [ 4x4 MAIN TENT ] ---------- Heady OG BX1 #1 [Round4 ~Wk8] - WEEK 15 - Pre-Bloom [Stretch Wk1] TKO [Round2 ~Wk13] - WEEK 15 - Pre-Bloom [Stretch Wk1] ----------- [ 3x3 VEG TENT ] ------------ Garlic Budder OG#1 - WEEK 07 - Full Veg Garlic Budder OG#2 - WEEK 07 - Full Veg Gorilla Goat #1 - WEEK 07 - Full Veg Gorilla Goat #2 - WEEK 07 - Full Veg 07/28/25 → 08/03/25 This Week's Estimated Goals ---------------------------------------------------------------------------------------------- DLI: ~13 mol/m²/d PPFD: ~300 μmol/m²/s VPD: ~1.0 kPa This Week's Meter Readings & Averages ---------------------------------------------------------------------------------------------- Light On/Off: 19:00 - 07:00 | Wattage: ~326.5W [LV04] Distance From Canopy: ~31ā€, 27ā€ DLI: ~15.60 mol/m²/d PPFD: ~361 μmol/m²/s VPD: ~0.71 kPa Soil %: [49.6, 36.1, 49.0, 47.1, 42.6, 43.0, 43.0, 44.6] ========================================================== Day 01 - Monday - 07/28/25 - Total Days: 106 ----------------------------------- Daily Averages ~[+01:00] - Temps: 83.6°F [28.7°C] - Humidity: 82.0% - VPD: 0.72 kPa - Soil %: [50, 36, 49, 47, 43, 43, 43, 45] ----------------------------------- - [+04:07]: Ca-Caw!! Let’s get this flower cycle started! --- Time to switch the clocks from 18/6 to 12/12 which will begin the stretch to flower! Let’s go! --- Within the AC Infinity App, --- For the Main Tent [4x4] controller, --- Changed the schedule from 'Vegetative [18/6]' to 'Flower [12/12]' --- Also made sure to sync the settings for each device. The current settings are: ------ GROW LIGHT (MARS HYDRO FC-6500): --------- The Mode is set to ā€˜ON MODE’ --------- The START/END times are set to 07:00PM/07:00AM --------- The SUNRISE/SUNSET Duration value is set to 20Min --------- The MAX value is set to 4 ------ EXHAUST FAN (AC INFINITY CLOUDLINE T6): --------- The Mode is set to ā€˜CONTINUOUS AUTO’ --------- The Temperature HIGH/LOW trigger’s value are set to 85°F/OFF --------- The Humidity HIGH/LOW trigger’s value are set to 87%/OFF --------- The MIN/MAX values are set to 1/8 --------- The Temperature Dynamic Transition buffer value is set to 2°F --------- The Humidity Dynamic Transition buffer value is set to 2% ------ HUMIDIFIER (AC INFINITY CLOUDFORGE T7): --------- The Mode is set to ā€˜CONTINUOUS TARGET’ --------- The VPD target value is set to 1.0kPa --------- The MIN/MAX values are set to 0/8 --------- The VPD Dynamic Transition buffer value is set to 0.2kPa ------ HEATER (AC INFINITY THERMOFORGE T3): --------- The Mode is set to ā€˜CONTINUOUS TARGET’ --------- The Temperature target value is set to 78°F --------- The MIN/MAX values are set to 0/8 --------- The Temperature Dynamic Transition buffer value is set to 2°F --- The only difference is the ON/OFF times for the grow light. Now lights will be on from 7pm to 7am (19:00 – 07:00). --- Everything else is identical to the previous veg schedule. --- Anyways, --- LET THE TWO-WEEK STRETCH TO FLOWER BEGIN!! - [+00:55]: Night check on the 4x4 tent. --- Ca-Caw! Looking great my ladies! --- Heady OG (BX1 #1) is continuing to blow up with more tops! The canopy is looking incredible! --- TKO is also looking great with tops everywhere! She has taken over this grow and hyped that - [+01:54]: Trained and tucked the top growth under the netting. --- Canopy is flat and even again. Great! --- Day one into the 12/12 flip and growth is looking great! - [+01:56]: Checked the Ecowitt soil moisture sensor data: ------------------ [ 4x4 MAIN TENT ] --------------- ------ 46% - [CH01 FT Ā» G30 - Heady OG BX1 #1] ------ 36% - [CH02 FB Ā» G30 - Heady OG BX1 #1] ------ 50% - [CH03 BT Ā» G20 - TKO] ------ 47% - [CH04 BB Ā» G20 - TKO] ------------------ [ 3x3 VEG TENT ] ---------------- ------ 40% - [CH05 BL Ā» GR7 - Garlic Budder OG#1] ------ 41% - [CH06 BR Ā» GR7 - Garlic Budder OG#2] ------ 40% - [CH07 FL Ā» GR7 - Gorilla Goat #1] ------ 44% - [CH08 FR Ā» GR7 - Gorilla Goat #2] --------- Veg: 38% - 45% | Flower: 45% - 55% --------- General: 30% [Dry] Ā«| 45 - 60% [Moist] |Ā» 70% [Wet] - [+01:59]: Checked the 3x3 veg tent. --- Mothers are all vegging along and the canopy is bushy and beautiful! --- Pots also look good too. No gnats! - [+02:01]: Checked on the propagation dome (in the 3x3), --- To refresh the air, lifted the top off for a bit. --- Clone growth looks great for the most part and getting curious on root growth. --- Heady OG looks green, but she has been very droopy the entire time. Not sure if this cutting will root, but there is no yellowing. May have messed up something in cloning. --- The TKO clone looks beautiful. incredible! --- Using a spray bottle, misted the top growth with RO water. - [+02:05]: Checked the humidifiers. --- Tanks are still full and no leaks found. --- Over the past week or so, been research about Lactobacillus and the organic benefits. Plan to give it a try and will start the process tomorrow. --- Shout out to Jeremy at BuildASoil for the YT videos and the Lacto recipe! --- LOYAL TO THE SOIL FOR LIFE! --- Anyways, Onwards Ensign! Day 02 - Tuesday - 07/29/25 - Total Days: 107 ----------------------------------- Daily Averages ~[+01:00] - Temps: 83.3°F [28.5°C] - Humidity: 80.4% - VPD: 0.78 kPa - Soil %: [50, 36, 49, 47, 43, 43, 43, 44] ----------------------------------- - [14:24]: Okay! Time to start some Lacto Serum! --- This lactobacillus serum is used to improve soil health and nutrient availability. This LAB serum can also be used to create fermented plant or fruit juices (FPJ/FFJ). --- Anyways, --- First need to make the rice wash solution! --- Filled a mini wide-mouth mason jar with 1 cup of White Rice. ------ Added 1 cup of RO Water --- Mixed the rice and water for a bit. --- Covered the jar with a paper towel and rubber-band. ------ [ ~10 MINUTES LATER ] - [14:38]: Great! --- Mixed the rice and water again before pouring a little over 1/4 cup into a mini wide-mouth mason jar. --- Covered the jar with a paper towel and rubber-band. --- The current room temps are around 80°F --- To start the microbial activation, going to let this rice water solution sit for a few days. - [14:45]: Smelled the solution through the paper towel. --- The solution smells like flour. Nothing foul. --- From what I understand the process is pretty simple: ------ Create the rice wash solution and let it sit for a few days to activate (white or brown rice). ------ Mix 1 part activated rice wash solution to 10 parts whole or raw milk. Then let it sit for a few more days for the lacto cultures to proliferate. ------ Once the milk separates into essentially curds and whey, strain out the curds and the extracted whey is the finished Lacto Serum. ------ This serum should remain shelf stable in the fridge for several months. ------ Alternatively, black strap unsulfured molasses can be added to the serum at 1 part molasses to 4 parts serum. This will make the product stable enough for non-refrigerated storage (lasts several months). ------ As for application, the serum can be used as a soil drench or foliar feed at 4mL (~1tsp) per gallon of water. --- Anyways, --- Will check on this in a day or so and am waiting until the solution turns from a flour odor to more of a sweet aroma. - [19:35]: Night check on the 4x4 tent. --- Ca-Caw!! Looking great my ladies! --- Both Heady OG and TKO are raging with more tops! -- [20:37]: Trained the top growth. --- Now starting to tuck mainly tucked Heady OG to spread growth out under the netting. --- Letting TKO stretch through the netting and only tucked the taller tops. Mainly trained the back area (won’t be able to train this once growth starts to ramp upwards) and made sure each square has at least one apical top. --- Also plucked and defoliated the Heady OG’s lower growth. Cleaned her legs and now she’s nice and smooth! --- Wow TKO’s main stalks are huge! Can really reach back area now so going to let her grow. - [20:47]: Checked the Ecowitt soil moisture sensor data: ------------------ [ 4x4 MAIN TENT ] --------------- ------ 45% - [CH01 FT Ā» G30 - Heady OG BX1 #1] ------ 36% - [CH02 FB Ā» G30 - Heady OG BX1 #1] ------ 45% - [CH03 BT Ā» G20 - TKO] ------ 46% - [CH04 BB Ā» G20 - TKO] ------------------ [ 3x3 VEG TENT ] ---------------- ------ 42% - [CH05 BL Ā» GR7 - Garlic Budder OG#1] ------ 40% - [CH06 BR Ā» GR7 - Garlic Budder OG#2] ------ 47% - [CH07 FL Ā» GR7 - Gorilla Goat #1] ------ 41% - [CH08 FR Ā» GR7 - Gorilla Goat #2] --------- Veg: 38% - 45% | Flower: 45% - 55% --------- General: 30% [Dry] Ā«| 45 - 60% [Moist] |Ā» 70% [Wet] - [21:34]: Checked the 3x3 veg tent. --- Ooo yea! All veg mama’s are thriving and bushy! --- Getting close to the grow light again so time for more training! - [21:53]: Super-cropped and trained the top growth. --- Pinched and bent the taller branches and lowered the canopy by 5-6 inches. - [21:58]: Checked on the propagation dome, --- To refresh the air, lifted the top off for a bit. --- Clones are growing along and hopefully rooting. --- Heady seems to be struggling, but she is still green. --- TKO is looking great and she is starting to get taller! --- Plan to check for roots in a couple days. --- Using a spray bottle, misted the top growth with RO water. - [23:07]: Time for a mini upgrade! Got a set of magnetic levels. --- Attached two levels to both the main tent and veg tent’s grow lights. --- Not really necessary, but the added levels will be useful during height adjustments. - [23:23]: Checked the humidifiers. --- Tanks are still full and no leaks found. Day 03 - Wednesday - 07/30/25 - Total Days: 108 ----------------------------------- Daily Averages ~[+01:00] - Temps: 83.6°F [28.7°C] - Humidity: 82.1% - VPD: 0.72 kPa - Soil %: [49, 36, 48, 46, 43, 43, 43, 44] ----------------------------------- - [23:36]: Night check on the 4x4 tent. --- Ca-Caw!! Looking beautiful my ladies! Wow! This is why we grow! --- Both Heady OG and TKO are looking healthy and tops are bursting through the netting! - [23:54]: Trained the top growth. --- Mainly tucked and continued to spread Heady OG out to fill in more squares in the front left quadrant. --- Did minimal training on TKO. Just letting her grow through the netting and wow growth is raging! --- Wow! The canopy is looking beautiful! - [23:59]: Checked the Ecowitt soil moisture sensor data: ------------------ [ 4x4 MAIN TENT ] --------------- ------ 55% - [CH01 FT Ā» G30 - Heady OG BX1 #1] ------ 36% - [CH02 FB Ā» G30 - Heady OG BX1 #1] ------ 49% - [CH03 BT Ā» G20 - TKO] ------ 46% - [CH04 BB Ā» G20 - TKO] ------------------ [ 3x3 VEG TENT ] ---------------- ------ 42% - [CH05 BL Ā» GR7 - Garlic Budder OG#1] ------ 47% - [CH06 BR Ā» GR7 - Garlic Budder OG#2] ------ 47% - [CH07 FL Ā» GR7 - Gorilla Goat #1] ------ 40% - [CH08 FR Ā» GR7 - Gorilla Goat #2] --------- Veg: 38% - 45% | Flower: 45% - 55% --------- General: 30% [Dry] Ā«| 45 - 60% [Moist] |Ā» 70% [Wet] - [+00:03]: Checked the 3x3 veg tent. --- Wow mother growth is raging again! --- Really wish I can flip these ladies to flower, but don’t have the space. --- Plan to start another round of mother cycling soon. Will probably super-crop tomorrow. - [+00:04]: Checked on the propagation dome (in the 3x3), --- To refresh the air, lifted the top off for a bit. --- Wow clones are growing! --- Heady OG is definitely going through some sort or rooting issue, but growth is still green. She is now starting to show signs of yellowing, so there may be roots, but not sure. --- On the flipside, TKO is crushing it! She looks healthy and perky! The yellowing of the lower growth along with the healthy and perky top growth means there’s successful rooting and the clone is translocating nutrients to produce root growth. I think. --- Using a spray bottle, misted the top growth with RO water. --- Oh! Also continuing to research tissue culture (TC) and have decided to give it a potential go. --- Shout out to Laur and ā€˜Plants In Jars!’ Her incredible YT videos have been a huge game changer and a highly recommend free resource for anyone trying to get into DIY tissue culture! --- Pretty much now I think tissue culture is the solution to my mother plant issue. --- From the little I understand, tissue culture is basically an advanced form of plant cloning and can be done quite safely at home. --- If done properly, plants suspended in tissue culture can be propagated and maintained indefinitely until needed. --- Each TC sample is basically a mini self-contained mother plant pod. --- Once needed, a TC sample can be brought back to a clone-like state for planting into solo cups. --- Aside from the technical process (which is going to be fun to learn), the largest challenge is maintaining a sterile environment during propagation. --- Anyways! - [+00:10]: Checked the humidifiers. --- Tanks are still full and no leaks found. Day 04 - Thursday - 07/31/25 - Total Days: 109 ----------------------------------- Daily Averages ~[+01:00] - Temps: 83.5°F [28.6°C] - Humidity: 81.2% - VPD: 0.75 kPa - Soil %: [49, 36, 49, 46, 43, 43, 43, 44] ----------------------------------- - [08:42]: Checked on the 3x3 veg tent. --- Both growth and pots are looking great! - [08:43]: Checked on the propagation dome, --- Clones both look bad and good. --- Concerned about Heady OG, but TKO has been healthy and perky the whole way. - [08:45]: Time to check for roots. --- Heady OG had one tiny root. Not ideal, but was actually surprised to find any root growth. Nice! --- Woah! Nice! TKO is bursting with roots! She’s definitely ready to be transplanted! --- Decided to plant both clones. Hoping that Heady OG will do better in the soil. --- Time to transplant the rooted cuttings! - [09:13]: Took 2 used solo cups (has bottom corners cut for drainage) and labeled each cup (Heady OG BX1, TKO). --- Partially filled each with some fresh (dry) BuildASoil 3.0 potting soil. --- Made sure that the soil was well packed. --- Inoculated each cup with Great White mycorrhizae along with a bit of Beauveria Bassiana. --- Misted the dry soil with a bit of RO water (~3 sprays each). ------ Sprinkled 1/64tsp of Beauveria Bassiana Plus ------ Sprinkled 1/16tsp of Great White - [09:26]: Time to plant! One clone at a time, --- Placed each clone into solo cups (also removed the clone tag). --- Made sure each solo cup had enough room for more soil. - [09:32]: Inoculated each Coco Coin with Great White mycorrhizae. ------ Sprinkled about an 1/16tsp of Great White onto each Coco Coin. --- Made sure to get the top and sides evenly. - [09:35]: Gently filled each solo cup with more soil. --- Completely covered the top of each Coco Coin and made sure to tuck the sides fairly snug with soil. --- Evened out the top soil. Each Coco Coin is about 1/4-1/2 inch below the top soil. - [09:44]: Added some BuildASoil Organic Straw Mulch to the top. --- Using the small straw bits at the bottom of the bag is great for solo cups. --- Time to water! - [09:51]: Filled a measuring cup with 2 cups of RO water. ------ Added 1/64tsp of Quillaja Saponaria Extract [60] ------ Added 1/16tsp of Horticultural Coconut ------ Added 1/16tsp of Horticultural Aloe ------ Added 1/8tsp of Mycrobe Complete --- Mixed and poured the solution straight into a spray bottle. - [09:54]: Took the dry soil weight of each pheno before watering, ------ Heady OG (BX1) weighed 261.4g ------ TKO weighed 240.9g --- Marked the starting weight on the back of each cup. --- While on a scale, --- Gently misted the straw mulch of each cup. --- Focused on the straw and sprayed as evenly as possible. --- Misted 5-10 sprays. Waited a few seconds, then misted again. --- Repeated this process until both cups weighed at least 300g --- There was no runoff. --- Oops! --- Had to slightly extend the day period (Lights usually turn off at 10:00). - [10:04]: Took the weight of both phenos after watering, ------ Heady OG (BX1) weighed 301.2g ------ TKO weighed 301.4g --- Marked the saturated wet weight on each cup. - [10:12]: Placed both cups into the propagation dome. --- Removed the side extensions along with the plug tray and have the cups resting in the main drip tray. --- Have the lid and lights suspended above the tray (~00 inches). --- Also increased the propagation dome’s bar lights. ------ Increased the intensity from 1 to 5 - [10:13]: Took general PPFD readings. ------ Clones were around 109 μmol/m²/s which gives a DLI of 7.06 mol/m²/d under an 18/6 light cycle. --- Turned the lights off and made sure that both were back to an 18/6 cycle (on from 16:00 to 10:00). --- Ca-Caw!! Done! --- Not worried about TKO, but getting concerned about Heady OG. Not sure if she is going to make it. - [14:23]: Checked on the Lacto Serum. --- The solution has been resting for 2 days. --- Smelled the rice wash solution through the paper towel. --- The odor has changed from the original flour odor but has not become sweet. However, the smell is getting there. I think. --- Will continue to check and still waiting until the solution changes into a sweet aroma. - [19:24]: Night check on the 4x4 tent. --- Ooo yea! Growth is looking beautiful and raging along! --- Both Heady OG and TKO are thriving with growth! The stretch is definitely ramping up! - [20:08]: Trained and tucked the top growth. --- Mainly focused on the Heady OG and spread her out a bit more evenly to fill in more squares. --- Wow TKO by far going to be the largest plant I’ve grown in a 4x4 tent. She’s extremely dense with healthy tops shooting up everywhere! --- Since I’m not tucking TKO anymore and she is getting taller, need to take readings and measurements. - [20:38]: Took the weekly general PPFD readings. ------ Heady OG (BX1 #1) was still around 361 μmol/m²/s which gives a DLI of 15.60 mol/m²/d under a 12/12 light cycle (at ~326.5W). ------ TKO was around 365 μmol/m²/s which gives a DLI of 15.77 mol/m²/d under a 12/12 light cycle. - [20:40]: Took the weekly height and light distance measurements. ------ Heady OG (BX1 #1) was still about 21.5" tall. ------ TKO was about 26" tall. ------ Heady OG (BX1 #1) was about 31" away from the grow light. ------ TKO was about 27" away from the grow light. --- Since Heady OG is clearly struggling to root, going to take a few more lower cuttings to make sure the genetics survives. - [20:52]: Filled a measuring cup with 1.5 cups of RO water. ------ Added 1/8tsp of Horticultural Aloe --- Mixed the solution and poured it straight into a solo cup. - [20:56]: Time to take the cuttings! --- Using a pair of trimmers (AC Infinity), --- Gently cut 2 small cuttings from Heady OG (BX1 #1). Took lower branches that did not reach the top canopy level. --- Trimmed and cleaned most of the nodes leaving the top node or two. --- Did not cut any leaf fingers. --- Made sure the tip of the stalk had a slanted cut (about 45-degree). - [21:02]: Placed both cuttings into the cup of aloe solution. --- Also made sure the cuttings were tagged. Not really necessary, but why not. - [21:05]: Placed the cup into the 3x3 veg tent. --- Have the cup resting in the propagation dome next to the planted clones. --- Going to let these cuttings soak for a day before refreshing with straight RO water. --- Let the two-day soak begin! - [21:06]: Checked the Ecowitt soil moisture sensor data: ------------------ [ 4x4 MAIN TENT ] --------------- ------ 47% - [CH01 FT Ā» G30 - Heady OG BX1 #1] ------ 36% - [CH02 FB Ā» G30 - Heady OG BX1 #1] ------ 50% - [CH03 BT Ā» G20 - TKO] ------ 46% - [CH04 BB Ā» G20 - TKO] ------------------ [ 3x3 VEG TENT ] ---------------- ------ 44% - [CH05 BL Ā» GR7 - Garlic Budder OG#1] ------ 41% - [CH06 BR Ā» GR7 - Garlic Budder OG#2] ------ 43% - [CH07 FL Ā» GR7 - Gorilla Goat #1] ------ 46% - [CH08 FR Ā» GR7 - Gorilla Goat #2] --------- Veg: 38% - 45% | Flower: 45% - 55% --------- General: 30% [Dry] Ā«| 45 - 60% [Moist] |Ā» 70% [Wet] - [21:08]: Checked the 3x3 veg tent. --- Looking great in the mother tent! --- Was planning on defoliating and taking new veg cuttings, but since Heady OG is struggling, going to wait a bit longer to start the mother cycling process. - [21:18]: Super-cropped and trained the top growth. --- Lowered the canopy a good 4-5inches. - [21:19]: Checked on the clones, --- Looking great! --- Heady is still struggling, but hoping she’ll perk up soon. --- TKO is looking perfect! She’s perky and I have no doubt that she’ll root just fine. --- More worried about Heady OG. - [22:08]: Checked the humidifiers. --- Tanks are still full and no leaks found. Day 05 - Friday - 08/01/25 - Total Days: 110 ----------------------------------- Daily Averages ~[+01:00] - Temps: 83.4°F [28.6°C] - Humidity: 83.0% - VPD: 0.68 kPa - Soil %: [51, 36, 49, 46, 42, 43, 43, 45] ----------------------------------- - [22:10]: Night check on the 4x4 tent. --- Ca-Caw! Let’s go ladies! Wow the garden is packed and looking incredible! --- Heady OG and TKO are looking perky and stretching through the netting with nodal growth everywhere! --- By far my healthiest grow cycle yet! - [22:21]: Did a bit of training. --- Slightly tucked and spread Heady OG a bit more to fill in the front left quadrant. --- Just going to let the rest grow! - [22:25]: Checked the Ecowitt soil moisture sensor data: ------------------ [ 4x4 MAIN TENT ] --------------- ------ 52% - [CH01 FT Ā» G30 - Heady OG BX1 #1] ------ 36% - [CH02 FB Ā» G30 - Heady OG BX1 #1] ------ 54% - [CH03 BT Ā» G20 - TKO] ------ 46% - [CH04 BB Ā» G20 - TKO] ------------------ [ 3x3 VEG TENT ] ---------------- ------ 44% - [CH05 BL Ā» GR7 - Garlic Budder OG#1] ------ 41% - [CH06 BR Ā» GR7 - Garlic Budder OG#2] ------ 46% - [CH07 FL Ā» GR7 - Gorilla Goat #1] ------ 48% - [CH08 FR Ā» GR7 - Gorilla Goat #2] --------- Veg: 38% - 45% | Flower: 45% - 55% --------- General: 30% [Dry] Ā«| 45 - 60% [Moist] |Ā» 70% [Wet] - [22:34]: Checked the 3x3 veg tent. --- Ooo yea! The veg garden is beautiful and wow growth is raging! --- Wow! The canopy is already stretching upwards and will probably need to train again tomorrow. --- Checked on the clones, --- Nice!! Growth is all around healthy and looking great! --- Heady OG looks less droopy. I think. --- TKO is looking perfectly healthy and already getting taller! Wow! --- Nice! Both Heady cuttings are looking healthy and not droopy. - [22:38]: Time to swap the aloe water out! --- Replaced the solo cup with a clean one filled with fresh RO water (1.5cups). --- Going to let this soak for another day before transplanting into Coco Coins for rooting. - [22:44]: Checked the humidifiers. --- Tanks are still full and no leaks found. Day 06 - Saturday - 08/02/25 - Total Days: 111 ----------------------------------- Daily Averages ~[+01:00] - Temps: 82.6°F [28.1°C] - Humidity: 83.2% - VPD: 0.66 kPa - Soil %: [50, 36, 50, 47, 42, 43, 43, 45] ----------------------------------- - [07:59]: Quick morning check on the propagation dome (in the 3x3 veg tent). --- Ooo yea! The clones and cuttings are looking healthy and green! --- Heady OG (BX1 #1) is droopy and seems to be recovering. I think? --- TKO is looking healthy and looking beautiful! --- Nice! Both Heady OG (BX1 #2 and #3) cuttings are looking good! These cuttings are quite a bit smaller than the last round, but they are healthy and green! - [20:06]: Night check on the 4x4 tent. --- Ca-Caw! Wow the canopy is thriving! --- Heady OG is looking healthy and perky! --- Wow! TKO is stacking up with nodal branching and crowning is everywhere with perky tops! - [20:13]: Did a bit of tucking on the front left quadrant. --- Could have trained Heady OG another week in veg before flipping to flower, but oh well. TKO needed to be flipped. - [20:32]: Checked the Ecowitt soil moisture sensor data: ------------------ [ 4x4 MAIN TENT ] --------------- ------ 45% - [CH01 FT Ā» G30 - Heady OG BX1 #1] ------ 36% - [CH02 FB Ā» G30 - Heady OG BX1 #1] ------ 66% - [CH03 BT Ā» G20 - TKO] ------ 47% - [CH04 BB Ā» G20 - TKO] ------------------ [ 3x3 VEG TENT ] ---------------- ------ 47% - [CH05 BL Ā» GR7 - Garlic Budder OG#1] ------ 44% - [CH06 BR Ā» GR7 - Garlic Budder OG#2] ------ 42% - [CH07 FL Ā» GR7 - Gorilla Goat #1] ------ 43% - [CH08 FR Ā» GR7 - Gorilla Goat #2] --------- Veg: 38% - 45% | Flower: 45% - 55% --------- General: 30% [Dry] Ā«| 45 - 60% [Moist] |Ā» 70% [Wet] --- Needed to swap out the batteries for TKO’s top soil sensor (CH03). --- Apparently there is a slight flaw with the programing on the WittFlows. Since the watering function is based on the channel and not the sensor, when TKO’s top sensor cuts out, the new CH03 (which is TKO’s bottom sensor) takes over. --- Anyways, - [20:38]: Checked the 3x3 veg tent. --- Veg garden is looking beautiful and wow top growth needs more training! - [20:53]: Super-cropped the top growth a bit. --- Lowered the canopy a few inches. --- Growth is getting out of control! Wow! Need to take cuttings soon to start the cycling process. --- Anyways! - [20:54]: Checked on the clones, --- Wow clone growth is looking very good! --- Heady OG seems to be recovering nicely in the soil and I’m getting more confident that she’s going to make it. Nice! --- TKO is looking great! She’s going to root and will be ready for transplant in a week or so. --- Both Heady OG cuttings are looking healthy and ready to be rooted! --- Time to plant the second round of Heady OG (BX1) cuttings! - [21:13]: Filled a measuring cup with 1.5 cups of RO water. ------ Added a pinch of Quillaja Saponaria Extract [60] ------ Added 1/64tsp of Horticultural Aloe ------ Added 1/32tsp of Mycrobe Complete --- Mixed the solution thoroughly. - [21:17]: Dropped 2 Coco Coins into the measuring cup. --- The coins immediately started to expand. ------ [ ~10 MINUTES LATER ] --- Took each fully saturated Coco Coin and temporarily placed them in half-cut solo cups. --- Using a squeeze bottle filled with Clonex, - [21:38]: Gently filled each pre-made hole with Clonex rooting gel. --- Time to plant the cuttings! - [21:43]: Using a pair of clean trimmers, made a final 45° cut. --- Also stripped and scrapped some of the stem’s outer membrane. --- To help with planting, gave each Coco Coin a squeeze to loosen the coco. --- Made sure to insert each stem straight and snug with the tip about a 1/4 inch from the bottom of the Coco Coin. --- Also secured the stem by pinching and pressing in the sides of the Coco Coin. --- After both cuttings were planted, --- Temporarily took the clones out of the propagation tray. Also placed the plug tray back in. - [21:53]: Placed both Coco Coins into the propagation dome’s tray. --- Since these cuttings are both identical cultivars, no need to really name. --- Added 1/2 cup of RO water to the bottom of the tray. --- Since I’m not using the dome lid (which is currently hanging above the tray), misted a couple of clear cups with RO water. - [21:55]: Covered both cuttings. --- Will need to mist the cups for the first few days in the tray. --- While rooting the cuttings, noticed that both clones (Heady OG BX1 and TKO) need to be watered already. --- Let’s go! - [22:02]: Took the initial starting weight range of both clones before watering, ------ Heady OG BX1 #1 Ā» 261.4g → 301.2g ------ TKO Ā» 240.9g → 301.4g --- General Solo Range: [Dry] Ā«| [Initial Cup Weight] + ~55-100g |Ā» [Wet] --- All phenos were last watered 2 days ago. --- Took the starting weight of both clones before watering, ------ Heady OG BX1 weighed 278.2g ------ TKO weighed 253.5g --- While on a scale, --- Gently misted the straw mulch of both cups with RO water. --- Focused on the straw and sprayed as evenly as possible. --- Misted 10-20 sprays. Waited a moment, then misted again. --- Repeated this process for both cups. --- There was no runoff. - [22:18]: Took the saturated weight of both clones after watering, ------ Heady OG BX1 weighed 278.2g ------ TKO weighed 253.5g --- Marked the final wet weight on the back of each cup. Also marked the watering date on the front. - [22:27]: Placed both phenos back into the tent. --- Done! Grow strong little ones! - [22:33]: Checked the humidifiers. --- Tanks are still full and no leaks found. Day 07 - Sunday - 08/03/25 - Total Days: 112 ----------------------------------- Daily Averages ~[+01:00] - Temps: 83.1°F [28.4°C] - Humidity: 83.0% - VPD: 0.68 kPa - Soil %: [48, 37, 49, 51, 42, 43, 43, 45] ----------------------------------- - [08:13]: Quickly checked on the propagation dome (in the 3x3 veg tent). --- Wow the clones are looking incredible! --- Heady OG is looking better and she’s still recovering. --- TKO is looking healthy and getting bigger. Nice! --- Both Heady OG cuttings are also looking healthy and look better than the first attempt (the recovering clone). --- Misted both cups with RO water. - [19:06]: Night check on the 4x4 tent. --- Ca-Caw!! Woah these ladies are definitely in full stretch! These girls are getting taller by the hour! Wow! --- Heady OG is looking beautiful and she is exploding with upwards growth! The middle of the canopy is basically at the same height as TKO. Incredible! --- Ooo yea! TKO is crushing it! Wow! She’s a good 7 inches above the scrog netting! --- The canopy is getting stacked with nodal growth! This garden is ramping up to be my best grow cycle yet! - [19:14]: Checked the Ecowitt soil moisture sensor data: ------------------ [ 4x4 MAIN TENT ] --------------- ------ 54% - [CH01 FT Ā» G30 - Heady OG BX1 #1] ------ 37% - [CH02 FB Ā» G30 - Heady OG BX1 #1] ------ 50% - [CH03 BT Ā» G20 - TKO] ------ 41% - [CH04 BB Ā» G20 - TKO] ------------------ [ 3x3 VEG TENT ] ---------------- ------ 41% - [CH05 BL Ā» GR7 - Garlic Budder OG#1] ------ 47% - [CH06 BR Ā» GR7 - Garlic Budder OG#2] ------ 47% - [CH07 FL Ā» GR7 - Gorilla Goat #1] ------ 49% - [CH08 FR Ā» GR7 - Gorilla Goat #2] --------- Veg: 38% - 45% | Flower: 45% - 55% --------- General: 30% [Dry] Ā«| 45 - 60% [Moist] |Ā» 70% [Wet] - [19:16]: Checked the 3x3 veg tent. --- Wow veg growth is raging with health and vigor! --- Mothers are looking beautiful and canopy is bushy! --- Nice! Clones and cuttings are looking healthy! --- Misted the cutting’s cups with RO water. - [19:46]: Back in the 4x4 main tent, --- Decided to tuck Heady OG a bit more and tried to spread the growth in the front left quadrant. --- Growth is going to be uneven but I think the left side will eventually even out. I think. - [19:54]: Quickly checked on the auto-watering system. --- System is still charged and no leaks or kinks found in the tubing. - [19:58]: Checked the humidifiers. --- Tanks are still full and no leaks found. --- Another week done and the garden is vibing and thriving! --- Next week will be the end of the stretch phase and as growth slows down, will hopefully see signs of budding. --- Ca-Caw! Stoked for this grow and can’t wait until these girls start to flower. - [+02:20]: TKO’s soil sensor cut out again.. --- Swapped out the unit with a new one and re-synced the channel to correct sensor ID. --- The old sensor got water damage. Going to try to dry it out, but really glad I have a couple spare units. --- Also glad that TKO seems to be taking the extra watering without any issue! May try to increase the soil moisture average next week for both pots. --- Anyways! Onwards Ensign! [END OF WEEK 15]
Likes
6
Share
@Chubbs
Follow
What up family. Weekly update on these gorgeous girls, the leafs are humongous on a couple. They're showing no signs of issues and dam near Growing a foot a week. All I all Happy Growing
Likes
22
Share
@Naujas
Follow
the girl is starting to grow faster :) in a suitcase, there is not much fresh air, so I think she doesn't like it, we'll see what happens next:)
Likes
162
Share
🌿 GrowDiaries Harvest Review Runtz by Zamnesia Seeds 🌿 Participating in this contest has been an incredible journey! A massive shoutout to Plagron and Zamnesia for making this possible. Growing Runtz in a 1-liter pot was an experiment that exceeded all expectations yielding a whopping 2 ounces! 😱 Aroma & Flavor: The scent is absolutely intoxicating: fruity candy haze with a gassy undertone that fills the room. Each puff delivers a smooth smoke, leaving behind a clean white ash, a testament to its quality. Bud Structure: The buds are dense and chunky, resembling big, oily nuggets. Their vibrant colors and resin coated appearance make them a visual delight. Effects: This strain hits hard with a potent and euphoric high, perfect for evening relaxation. The balance between indica and sativa effects provides a creative uplift followed by a soothing body relaxation. Final Thoughts: From seed to harvest, this grow was a rewarding experience. The combination of top-tier genetics and quality nutrients from Plagron made all the difference. I'm thrilled with the results and proud of what I've achieved in such a compact setup. Thank you once again to the GrowDiaries community, Plagron, and Zamnesia for this opportunity. Here's to more successful grows ahead! šŸŒ±šŸ”„ DIARY COMPLETE
Likes
96
Share
Greetings, fellow cultivators! Today, I'm thrilled to share the grand finale of our journey with the remarkable Big Cheese Auto from Seeds Mafia. At day 81 from seed, she reached the pinnacle of her splendor, and the harvest was nothing short of spectacular. As I gently snipped each ripe bud, I couldn't help but marvel at the beauty and resilience of our Big Cheese Auto. From the moment she emerged as a seedling, she embodied strength, vigor, and an unwavering determination to flourish. Now, as she hangs upside down to dry for the next two weeks, I'm filled with a profound sense of gratitude for the privilege of witnessing her growth. Our journey with the Big Cheese Auto has been nothing short of extraordinary. From the excitement of germination to the meticulous care during vegetative growth, from the anticipation of flowering to the aromatic crescendo of the harvest, each phase has been a testament to the plant's resilience and the joy of cultivation. The journey began with a tiny seed, a promise of potential waiting to be fulfilled. With the nurturing support of the Autopot system and the guidance of Aptus Holland's nutrients, our Big Cheese Auto thrived, transforming into a botanical marvel with each passing week. From the emergence of her first true leaves to the explosion of trichome-rich buds, she captivated us at every turn. A heartfelt thank you to Seeds Mafia for providing the genetics that sparked this incredible journey. Your seeds have not only produced exceptional plants but have also inspired a community of passionate cultivators. Your dedication to quality and innovation is truly commendable, and I am grateful for the opportunity to cultivate such remarkable genetics. Before the trimming and curing process begins, I took the time to capture the beauty of our Big Cheese Auto in a special photo shoot. Each snapshot is a testament to her magnificence, a visual ode to the journey we've shared together. To the entire community, both near and far, thank you for accompanying me on this horticultural odyssey. Your support, encouragement, and shared passion for cultivation have made this journey all the more rewarding. Let's continue to cultivate greatness together! Thank you for being a part of this incredible journey! Wishing you all abundant harvests and joyful cultivation endeavors ahead! Genetics -Seeds Mafia Big Cheese Automatic Light - LUMATEK ZEUS 465 COMPACT PRO 
Food - APTUS HOLLAND 
 
All info and full product details can be find in can find @ https://seedsmafia.com 

https://aptus-holland.com/
 

https://lumatek-lighting.com/ As always, thank you all for joining me on this journey, for your love, and for it all. My horticultural odyssey would never be the same without you. Your love and support are cherished, and I feel both honored and blessed to have you in my life
Likes
1
Share
Muy caros los productos, efectivos pero me sigen pareciendo caros, probarƩ nuevas gamas! Un saludo
Likes
24
Share
GORILLA COOKIES šŸŖ FF / FASTBUDS WEEK #11 OVERALL WEEK #3 FLOWER She's doing good this week no issues to report looking good and bud are starting to trichomes on them!! Stay Growing!! Thank you for taking a look it's much appreciated!! Thank you FASTBUDS!! FASTBUDS GORILLA COOKIES šŸŖ FF
Likes
1
Share
Trying to dial their veg in. Nutes may be too old or too high. Changed with 4ml CaMg per gallon of RO water. The rest is MaxiGrow. Ever since adding rockwool to the grow, I have struggled. I don't have the dry back timed right yet. I moved my fan to dry the top of the pot surface instead of in the root zone or at the canopy height. After about 10 days I dumped out the rockwool and have replaced with hydroton. My initial though on using rockwool was to give the roots more space during late life stages. My experience has been with hydroton and I notice that the roots eventually get bound because the hydroton is a durable material and will not crush or compact. Rockwool on the other hand will compress when squeezed so I was hoping that in the late life stages the roots would compress the rockwool and make more room in the pots. The issue was dryback. If I used chunks instead of croutons, this may help but the other reason I used them was because I had them here already. If anyone is trying to slow their dryback down, they should consider adding 10% volume of croutons to hold moisture in the medium a bit longer. Notice anything different? They are starting to adapt to their new media. Hopefully by next week I can get them to perk up. One plant has looked better than the other three. I have no idea what these plants need to ā€œperk upā€. Possibly a different grower. If a grape terpine wasn’t in the end results I would have culled these long ago. Hopefully they perk up when we get to flower. 3 look ,,,, meh, the fourth is descent. Trimmed all four back down to 12ā€ tall. Flower next week.
Likes
12
Share
Checkout my Instagram @smallbudz to see the Small budget grow setup for indoor use, low watt, low heat, low noise, step by step. 13/12/2019 - Change the light schedule to 12-12h after 8 weeks of no signs of flowering I think is a photo not and auto. 16/12/2019 - Fed her 1.5l of 6.5PH water with 0,5ml of each: Grow, Bloom and Max, and 1ml of each: Heaven, Alga-mic and Vera, noticed about 10% run off, I use about 1/3 of the nutrient dosage on the chart, to achieve about 200/300PPM (500 scale). 17/12/2019 - Did some defoliation on the lower branches mainly.
Likes
6
Share
Its that time of week again for our weekly update. Starting week 7 and im really impressed with this grow. The bud sites are started to form nicely any previous problems I had with her with a PH issue has now gone thankfully. Smells wonderful growing big and strong just trying to work out how much I may get from this plant. Any guesses out there as to what you may think ? šŸ¤” 🌱
Likes
8
Share
Day 140 decided to water everyone one more time with nutrients. Added some Overdrive to the mix for all my outdoor gals. Some probably need it more than others as I think come next week I might be able to harvest a few of my plants. Plus it is like super hot the past few days and have a little breeze pushing a lovely weed scented breeze out front of the house. Hopefully I don’t attract the wrong type of people to visiting my backyard 😱 Day 141 wow on the overdrive kicking in on everyone outside. Noticeable plumping of my buds when I went to take today’s pictures. Also added a few more doweling into the ground to help support her as she gets plumber, and because it was a little breezy last night Day 144 they just got huge and fat overnight. Plus a first for me, a little walk around my beauty