The Grow Awards 2026 🏆 


Likes
Comments
Share
@TheGreenGroomer
Follow
🌱 Week 3, Day 7 Update: Buds Are Blooming! 🌿
Hey Grow Fam,
We're cruising through Week 3, and my girl is really coming on—buds are starting to form, and it's a sight to behold!
The girl is growing so fast now, drinking 4.5L a day. She could even do with in-between waterings, in my opinion. She's aiming for the stars and shooting for the moon, getting bigger every day and stinking out my room. I had to tie my light higher up with some rope as it wouldn't go any higher, and shoots were getting way too close! I did SCROG when flipping, and I should've been a bit more strict on it (did it longer), but now I realize why SCROG is used. Imagine if I never used it—she would be way too tall. Overall, I'm so happy with how she is growing and can't wait to see the final product. :)
But, as with any journey, we've hit a little bump in the road. Despite keeping our feeding consistent at 850ppm, the runoff readings have been creeping up. Last check-in showed a runoff of 1400ppm. It's got me thinking we might be dealing with a salt buildup in the root zone.
To address this, I'm sticking with our feeding routine at 800-850ppm. If the runoff ppm keeps climbing or if our plants start showing signs of nutrient burn, I will adjust accordingly, but as of right now, I'm sticking to the same feed as she looks great! (
If I do begin to notice signs of nutrient burn (excess), I will try to water with a lower EC/PPM, like 700ppms, to bring it down. But if I don't get the results I'm hoping for, I will just flush the plant with 3x the media size of water (just plain pH water) to wash out any old salts and reset the medium. You don't really want to do this with coco depending on what stage your at in flower, veg on the other hand flush.? Sure!, if you really need to reset that medium go for it, (i do see tiny signs of burn but thats fine if it gets worse then i have a problem)
Let's stay focused and keep our eyes on the prize—beautiful healthy buds. We've got this!
#GrowUpdate #Week3 #BudsBlooming #KeepGrowing 🌱🌿

Likes
74
Share
@Ferenc
Follow
Day 71, 29th of November 2021:
Here we gonthe first day of the week 5th of flowering!
Nice group like the different "personalities" and "styles".
Hopefully not much left I guess 3 weeks and we will be very close to the end :)
Let's go then Happy Growing Guys!
The only changes I made is the ventilation and the extraction fan is off at the same time with the lamp so only switches on when the lamp does.
So this is the set up and and operation schedule now:
ViparSpectra XS2000 is on full power which is 240W so 100% capacity.
Ventilation: As I mentioned it is off when the lamp is off so 12 hours. When the lamp is on it switches on in every hour and off for one hour.
The extraction fan is on 12 hours when the lamp is, and then it takes a rest with the lap together lol ;)
Watering pretty much remains the same. Humidity quite is approx 50%, temperature as well approx 26-27 Celsius.
Fertilization remains the same since last week, the BioBizz family raised up to be 2ml/L each so it is like 2ml/L of BioGrow, 2ml/L of BioBloom, 2ml/L of TopMax... see the ratio above.
The schedule of the fertilization has not changed happnes 2x a week except epsom salt just 1x a week.


Likes
13
Share
@Popothamio
Follow
Fue como la semana anterior sigo alternando riegos con abono si abono no y esta semana uno de los días se me quedó la luz encendida y tuvieron 36 horas seguidas de luz, espero no les pase nada grave. Por lo demás todo bien


Likes
47
Share
@Ultraviolet
Follow
Gave her a cocktail to help with stress. Added 1st net for lateral support, not so much now, but for later. Blue light is absorbed by photoreceptor proteins called phototropins, which trigger a hormonal response that causes cells on the shaded side to elongate, making the plant bend toward the light. Try and fill this side a little. She is quite big already, just needs to find her stride again after the undue torture.
The mind is constantly working and producing, just like a factory. It's not just a passive recipient of information but an active producer of ideas, attitudes, and beliefs. The "ingredients" in this factory are the information you consume, such as books, conversations, and the media you engage with. The "products" are your thoughts, beliefs, and actions. The quality of the ingredients directly influences the quality of the output.
5 apex stems with 20-30 mini cola, let them develop a little, with the apical dominance shattered, all those 20-30 will all compete with each other as soon as that stretch is initiated. Key to a good stretch is making sure the plant is cycling efficiently, with large ATP conversions occurring lights out.
For now, keeping light intensity high. A plant will slow its vertical growth in very high light intensities, leading to a more compact form with thicker stems and leaves. This response is a protective mechanism against light stress, which can damage the photosynthetic apparatus and lead to symptoms like leaf scorching, yellowing, and brittleness. Instead of growing taller, the plant invests its energy into creating a more robust, stress-tolerant structure.
Providing plants with necessary antioxidants helps protect the photosynthetic apparatus by scavenging reactive oxygen species (ROS) that cause damage from excess light.
UV light exposure can impact the xanthophyll cycle by either enhancing its photoprotective role or causing damage, depending on the intensity and type of UV radiation. UV exposure can trigger the synthesis of more xanthophyll cycle pigments to increase the plant's capacity to dissipate excess energy, but it can also cause direct damage, particularly to Photosystem II, and may lead to a decrease in the de-epoxidation state (DEPS ratio) which indicates a reduced capacity to dissipate excess energy.
Plants can respond to UV stress by increasing the synthesis of xanthophyll cycle pigments, such as violaxanthin and zeaxanthin, to improve their photoprotective capacity. UV-induced changes in xanthophyll cycle pigments can be linked to a plant's overall tolerance to high radiation stress. The xanthophyll cycle helps protect against photoinhibition, which is especially important when the plant is exposed to high levels of both UV and visible light. High doses of UV radiation can directly damage photosynthetic components, including the proteins, lipids, and pigments in the thylakoid membranes. Exposure to UV radiation can have a mixed effect on the de-epoxidation state (DEPS ratio) of the xanthophyll cycle pigments. In some cases, UV can inhibit the conversion of violaxanthin to zeaxanthin, resulting in a lower DEPS ratio and a reduced capacity for energy dissipation. However, the total pool of xanthophyll cycle pigments may increase, and this enhanced pool size could provide a greater potential for photoprotection despite a lower DEPS ratio.
The xanthophyll cycle works alongside other mechanisms, such as the accumulation of flavonoids (UV screens), to protect the plant from UV-induced damage.
Blue light repairs 100% UV-induced damage in plants through a process called photoreactivation, which uses a light-dependent enzyme called photolyase. This enzyme uses energy from blue and UV-A light to directly reverse the damaging pyrimidine dimers in the DNA caused by UV-B radiation, a key mechanism for maintaining the plant's genetic integrity.
After carbon, light, water, temperature, and nutrients, the limiting factor of a plant's growth is often its own internal factors or the amount of a key ingredient. Chlorophyll concentration is one such factor, as the amount of this pigment limits how much light can be captured for photosynthesis. Other factors include chloroplast number, respiration rate, and the concentration of carbon dioxide in the atmosphere, as plants are often in a CO2-deficient condition.
60x60x18=64800seconds x 700 = 45,360,000moles. 45DLI
Exposure to 165 µW/cm² of ultraviolet-B (UV-B) light for 3600 seconds = 1 hour, a extremely high, acute dose triggering stress responses and protective mechanisms.
.
The plant's photoreceptor protein, UVR8, senses the UV-B radiation. This triggers a signaling cascade that activates specific genes to protect the plant from damage. In response to the UV-B signal, the plant ramps up the biosynthesis of protective compounds like flavonoids, phenolic acids, and anthocyanins. These compounds absorb UV radiation and accumulate in the epidermal layers of leaves to shield inner photosynthetic tissues. The plant may increase leaf thickness or deposit more cuticular wax, creating a physical barrier to the radiation. The plant will produce more enzymatic and non-enzymatic antioxidants to neutralize the reactive oxygen species (ROS) produced by the UV-B radiation. The plant activates enzymes, including photolyases, to repair DNA damage caused by the UV-B. These repair mechanisms are critical for preventing permanent genetic mutations.
While protective measures are activated, a high dose delivered over a short period can cause stress that overwhelms the plant's defenses.
Photosynthesis is highly sensitive to UV-B. A high dose can inactivate Photosystem II (PSII), damage thylakoid membranes within the chloroplasts, and reduce chlorophyll content, which lowers the plant's overall photosynthetic capacity. Despite repair mechanisms, high UV-B doses can inflict persistent damage on the plant's DNA. The overproduction of reactive oxygen species can cause oxidative stress, leading to the oxidation of lipids and proteins and disrupting cellular function.
I am playing in the enchanted forest. A shift in perspective is what changes perception over time. By deliberately considering a situation from another point of view (perspective), you can challenge your initial, knee-jerk interpretation (perception). This is a valuable skill in both personal and professional life for fostering empathy, improving problem-solving, and making more informed decisions.
Move the mind off perception into perspective.
Thank you.


Likes
10
Share
@Chubbs
Follow
Weekly update on these big girls. I decided to take out some of the lower branches, giving more airflow at the top of the pot level. Overall they've exploded with growth this week. I'd say they're getting close to 4ft tall. I sprayed some BT spray for ipm this week since I don't want catapillers showing up unannounced. All in all Happy


Likes
18
Share
@ZombieKushAddicted
Follow
we will carry out this cultivation under the sponsorship of Mars Hydro with an FC-E 4800 lamp ,
to view this lamp or any other marshydro product go to: https://instagram.com/marshydro_aliexpress?igshid=YmMyMTA2M2Y=


Likes
5
Share
@Ninjabuds
Follow
Hey there it’s been really cold lately it’s been hard to keep the humidity and temps at a decent range. A lot of the plants are showing stress from the environment.
The pound cake auto is doing pretty well it has gotten a lot larger. This morning I finally saw some small pre flower hairs coming from the main stem. Also the stems in the plant seem to be starting to stench. So 90% sure buy the end of the week the plant will really be showing signs of flowering. Well just saying it’s flowing now. From what I see online this strain takes along time to switch to flower compared to lots of auto flower strains. This would be a perfect strain if you wanted to main line
Likes
57
Share
@Kitties_and_Colas
Follow
~_~_~_~_~_~_~_~_~_~_~_~_~_~_~_~_~_~_~_~_~_~_~_~_~_~_~_~_~_~_~_~_~_~_~_~_~_~_~_~_~_~_~_~_~_~_~_~_~_~_~_~_~_~_~_~_~_~_~_~_~_~_~_~_~_~_~_~_~_~_~_~_~_~_~_~_~_~_~_~_~_~_
❤️💡🌱😽💨
2nd week of flower!! This strain is the best looking in the tent, color is perfectly uniform top to bottom. We stripped all plants heavy on the first day of flower because they were so large. We were hoping that this would control stretching some but these tower over the rest. Their node spacing looks prime for fat, intact main buds which always makes me happy. GSC used to be my favorite strain so I'm super eager to try this version 🐱🌱
~_~_~_~_~_~_~_~_~_~_~_~_~_~_~_~_~_~_~_~_~_~_~_~_~_~_~_~_~_~_~_~_~_~_~_~_~_~_~_~_~_~_~_~_~_~_~_~_~_~_~_~_~_~_~_~_~_~_~_~_~_~_~_~_~_~_~_~_~_~_~_~_~_~_~_~_~_~_~_~_~_~_

Likes
9
Share
@Vet4weed
Follow
Well, I've confirmed through sources that we officially entered the flowering stage as of last week. Time for some adjustments. Just prior to confirming flowering, I did one last trim, removing the larger fan leaves at the top to allow more light to the bottom. Good thing I did this now, as any later I've been told will shock them too much. With confirmed flowering, I switched over from both blue and red lights to just red. I also lowered the lights closer to about 9 inches after being assured that they won't burn the leaves any. With the transition, I gave the plants one last watering with the N-P-P mixture.

Likes
19
Share
@adam_pawloski87
Follow
What a fun run this was ! These Ogreberrys finished up from 81 days to 102 days with nice hints of gassy , sour purple , sweetness and glistening with frost! These ladies will cure up for a month an will be ready to test out ! So much fun , I highly recommend this strain if your looking for some oooy gooohy resiny grape smelling nugs !

Likes
18
Share
@Chubbs
Follow
Weekly update on these absolutely gorgeous girls. I was gone for the beginning of the week and came back today and I swear the flowers have doubled in size. They're smelling super strong and gassy. The flowers are dense as rocks so I hope with the summer heats they'll stay that way and not become airy. All in all Happy Growing.


Likes
29
Share
@SalocinSpecial
Follow
***Note that I started to count the days when I placed the seeds between paper towels. The seeds were planted 3 days later and sprouted from the ground 2 days after being planted.
D80 (13/05/2021): I'm looking at the trichomes every other days. Glue Gelato is starting to show amber on top buds. No amber for Banana Kush and Gelato. This time I will chop them all at the same time so the one I will rely on is the Glue Gelato. As soon as she is ready, I will harvest them all. Banana Kush and Gelato would probably need more, but in term of logistic, I need to harvest all my plants at the same time.
D83 (16/05/2021): Not ready yet. I'm checking trichomes closely! 😬
- Light: the lights are at 100% and at 12 inch form the plants.
- Temperature: during the day: 24-25C ; during the night: 20C.
- Humidity: the humidity is maintain around 46-48% all the time.
- Air circulation: There is an oscillating fan on the ground, one fixed fan pointing on top of the canopy and one fixed fan to help cool the lights.
- Water: I gave water every other day or when the ground feel dry or the pots feels light.
- ***IPM: I never mention it but I'm using nematodes pouch as an integrated pest management. I had trouble with pest in my first grow and I learned from it. That's the only thing I do for pest and of course watching closely and regularly at my plants 😊

Likes
168
Share
@Tropicannibis_Todd
Follow
💩Holy Crap Growmies , we are outdoors and in the Ground and there Doing Great💩
👉It's been another full week 42 days from seed and she's doing great , very nice Growth, considering shes been up against the wind and rain 👈
No problems 😊 so far so good 👍And she's now in full on flowering 😁👈 DO TO THE AMOUNT OF RAIN , IVE ONLY BEEN ABLE TO TOP DRESS HER😎
I GOT MULTIPLE DIARIES ON THE GO 😱 please check them out 😎
👉THANKS FOR TAKING THE TIME TO GO OVER MY DIARIES 👈
👉NutriNPK NUTRIENTS USED FOR FEEDING 👈rain water to be used entire growth👈
👉www.nutrinpk.com right now get 10% off using SPRING2022 as the coupon code👈


Likes
15
Share
@I_Identify_As_A_Dan
Follow
Week 18 for Gelato 41 by seedstockers
She's just becoming a monster... i know i went through a period of barely feeding her... well this week she's been fed 5-7L of water plus heavy heavy sprays every night😂 so a bit of a change up she doesn't seem phased either way. Im a little worried when it comes to flowering because she barely/never gets wind & her branches aren't very strong. Which is one of the reasons I spray them heavy every evening to build some strength. She also needs a nice defoliation again to keep PM away + also need to start thinking about giving her flower dry amendments top feed because i think she's partly going into flower because of the shade.
Likes
4
Share
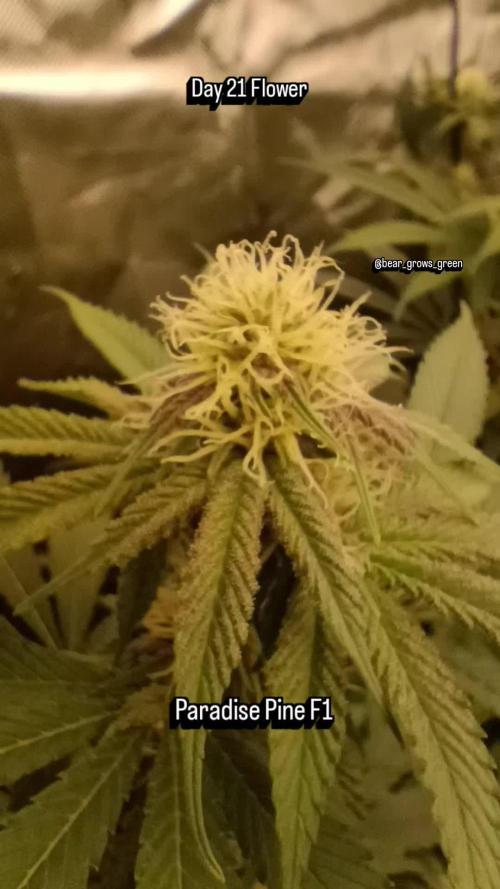
@Bear_Grows_Green
Follow
01/22 day 15 start of week 3. Everything going great. Tomorrow is a feed day. This week is a team week also.
01/23 supplemental feed day gave 10.5 gallons total
01/24 heavy defoliation should be done til harvest
01/27 got 7 gallons water 4 gallons compost tea tea instructions in videos