The Grow Awards 2026 🏆 


Likes
Comments
Share
@GanjaGecko
Follow
Die ersten Tage an der frischen Luft haben die Ladys gut überstanden. Die einzige Nacht die mir zu denken gab war die Nacht von Tag 6 auf Tag 7. Die Nacht wurde mit 7°C vorhergesagt. Ich hab die Ladys über Nacht reingeholt, damit sie in dem frühen Stadium nicht allzu sehr herausgefordert werden. Sie wurden dann nächsten am nächsten Morgen zurück nach draußen in die Sonne gestellt. Die Nächte sollen jetzt nicht mehr unter 10°C. Damit bleiben sie jetzt Tag und Nacht draußen. Diese Woche haben sie in einem kleinen Gewächshaus verbracht. Damit es nicht zu heiß wird, bleibt eine Seite offen und die Luft kann auch besser zirkulieren. Die Ladys bleiben vermutlich noch ca 1 woche in dem Gewächshaus und wenn sie dann etwas kräftiger sind, stehen sie unter freiem Himmel.
Jede Lady kam an Tag3 in ihren Endtopf und auch ins Freie.
Die StrawberryBanana steht in einem 11l Topf und die GorillaAuto und die GorillaZkittlez stehen jeweils in einem 8l Topf. Bei jedem Topf ist ca 1l weniger an Substrat im Topf. Der letzte Liter Substrat kommt mit dem Blütebeginn in die Töpfe.
Jede Lady steht in einem Substratgemisch.
Die Basis bildet Biobizz LightMix.
Es wurden ca 5l BioBizz LightMix mit 2l Cocos/Perlite(70/30) gemischt.
Jeder Topf bekam 5 gehäufte Esslöffel Megaworm, 1 gehäuften Esslöffel Batguano in die untere Hälfte des Topfes. Beim einsetzen der Ladys gab es ein wenig Great White Mykorrhiza an die jungen "Wurzeln" und auch ein wenig in dem Bereich wo sie eingesetzt wurden. Der Rest wurde mit dem Substartgemisch aufgefüllt. Auf die Oberfläche wurde ca 15g BioGrow von GreenHouseFeeding mit eingemischt. Da die Ladys vermutlich nach ca 3-4 in die Blüte gehen und generell nicht allzu viel Dünger brauchen, sollte das mit dem Megaworm und Batguano die unten mit eingemischt sind, bis zu Blüte reichen.
Zu Beginn der Blüte wird der letzte Liter Substrat mit 20g BioBloom von GreenHouseFeeding, 2 gehäufte Teelöffel Batguano und 4 gehäufte Teelöffel Megaworm von Plagron gemischt und in die Töpfe gegeben.
Angegossen wurde mit 1ml/L PowerRoots von Plagron und 1g/L BioEnhancer von GreenHouseFeeding. Jede Lady hat ca 500ml mit einem ph-Wert von 6.5 bekommen. Vorher wurde die Oberfläche anständig angefeuchtet damit das Wasser beim gießen nicht einfach durchläuft.
An Tag7 war es erst nötig das zweite mal zu gießen. Auch hier gab es ca 500ml mit einem ph-Wert von 6.5.
Vielen Dank fürs reinschauen liebe Growmies 💚

Likes
42
Share
@Gabarram
Follow
03/12/2019 Day 81 The Dr seems to be concentrating in forming buds but I think she's grown some half centimeter, is she going to touch the ceiling? She has to know that is is confined and the sky is not the limit, at least in her condition.
Day 82 (04-12-2019) The shoot at the rear left is almost touching the celiling of the grow tent😨 and i keep on tying other shoots and keeping them the farthest from the burning lights (many leaves' tips are scorched, but fortunately it's just the tip and the bud is still far from that hot point. Other leaves that are close to the lights, well, I took scissors and there's no need to speak further. Look the hard work I'm having with this plant height's issue. Goddammit why can't I have a normal grow like everyone?
Day 83 just looking the video and the pics is self explanatory. No further comments 😒
Day 84 Ithe tallest shoot has reached the ceiling and seems to try to keep on growing so she needed to start bending at the very top because she wouldn't get past the tent fabric.
Regarding EC, I am using a fertigation solution about 1,3 mS/cm and the runoff EC at 1.5 mS/cm. EC has been kept controlled since I raised fertigation volume to 6 L per fertigation event (1/day), unfortunately this solution containing nutrients goes to waste :(
Day 85 07/12 I'lllst the tops that get to touch the ceiling and keep observing and acting as needed. I fear she'll stilll keep going up for a while. Fertigations as usual, got runoff EC 650 ppm today (1.3 ms/cm) which I think it's very good of a value.
Day 86 (08/12/2019) Following advice I defoliated and even cut some thin and improductive shoots. Removed a lot of foliage and even supercropped a long tall shoot, I want to see how this high stress technique affects her. Because I plan to keep it doing if other shoots decided to continue growing.
I wonder why do shoots continue growing vertical after having passed the light's level. Is it the glow coming from the reflective walls perhaps? Many questions.
I decided to take down some tall shoots by suspending little weights near the tip, it seems to work more or less fine.
Day 87 luckily the HST seems to have worked fine, the shoots are recovering and point upwards again. The main tip is quite unruly, today I supercropped that tip. Runoff EC is 650 ppm, perfect.
Day 92 /14-12-2019) I think that despite her exaggerate growth she's managing to thrive fine with some limitations, buds seems going well. Shoots are still growing vertical but supercropping and resistance seems to have hampered her a while, but now I see she engaged on growing some centimeters more :/
Day 93 two days from starting the 14th week, despite the lights and the heat of this season (added to the lights I had to keep the tent door open for there was 32 ºC inside) the Dr is taking it well, I see the buds foxtailing as I expected, and I'm positive this grow will get to a good end. I'll work day by day to achieve that. Regarding fertigation, I gave her a solution half concentrated (relative to the solutions that I had given her the preceding days) because I noticed salt build-up by the EC measurements. I left run off EC at 800 ppm which is still a bit high for my liking but not excessively. For the amount of runoff I collected today, I see she seems to be drinking a little more.


Processing
Likes
66
Share
@Teamdirtbag3
Follow
This update is dedicated to @greenmachine.
Slurricane blast with Butane.
Dimonds and sauce.
Is there anything more to say?
It came out BEAUTIFUL. 🔥💎🔥💎🔥💎😁


Likes
1
Share
@StonerSimpson
Follow
will maybe add more pictures soon. one more week and i'll start thinking about the chop
Likes
12
Share
@MadeInGermany
Follow
Hey guys :-)
This week the lady was watered 3 times with 1 l each time. ( Nutrients see table above )
It is developing well and will soon be in bloom 😃.
Apart from that, everything was cleaned in a controlled manner and osmosis water was treated.
Stay healthy 💚🙏🏻
👇🏼👇🏼👇🏼👇🏼👇🏼👇🏼👇🏼👇🏼👇🏼👇🏼👇🏼👇🏼
You can buy this Nutrients at :
https://greenbuzzliquids.com/en/shop/
With the discount code: Made_in_Germany you get a discount of 15% on all products from an order value of 100 euros.
👇🏼👇🏼👇🏼👇🏼👇🏼👇🏼👇🏼👇🏼👇🏼👇🏼👇🏼👇🏼
You can buy this strain at :
https://www.ripperseeds.com/en/feminized/kmintz-feminized-cannabis-seeds
Water 💧 💧💧
Osmosis water mixed with normal water (24 hours stale that the chlorine evaporates) to 0.2 EC. Add Cal / Mag to 0.4 Ec Ph with Organic Ph - to 5.8 - 6.5
MadeInGermany


Likes
3
Share
@cmstacker01
Follow
Good yielder, give them least 9 week flowering.
Can take a good feed, i suggest to cut of N last 2 weeks.
Had 2 pheno. 1 is very bubblegum type of smell and the other is just slight fruity.
Harvested 3 plants.
1 was 56.20 dry at 52%RH
2 was 52.33 grams dry at 52%RH
3 was 80.23
grams dry at 55%rh
Total=188.76 grams for
3 plants
All the plants Peyote critical Orange SHerbert Candy Dawg where flowered under 300W Led
Organic way.
Total sum of grams for all plants 401.32 grams
= 1.3333gram per watt
Will i be growing this for the future? Nope, i'm looking for something more unique for my taste.
Imo pretty generic kind of weed.
Will update later for taste after 4 week cure

Likes
1
Share
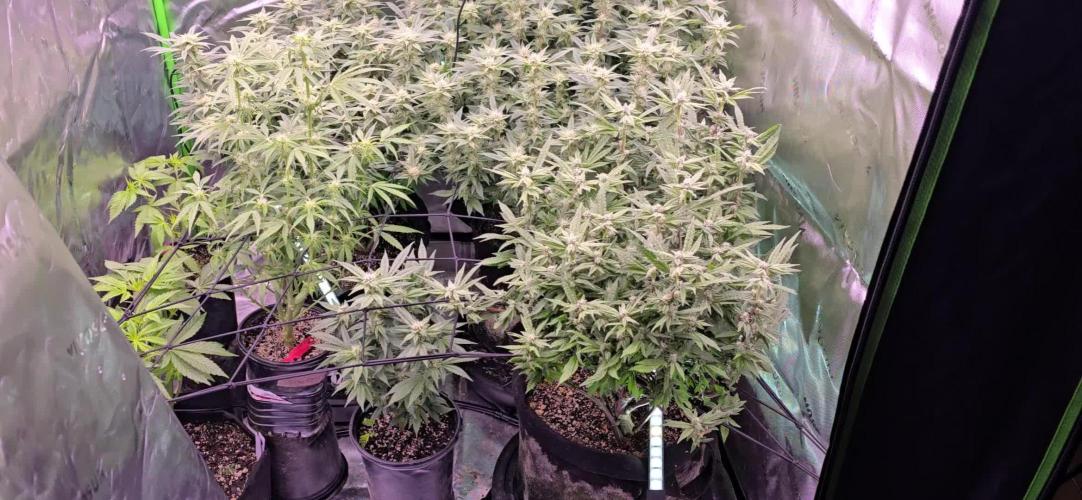
@Growing_Spartan
Follow
May 27th-29th
Trellis net is getting full and plants looked good, could’ve flipped to 12/12 but my smart self completely forgot about that flowering stretch so I vegged them till I saw a “good height” lmao I know but it’s my first grow leave me alone lol


Likes
9
Share
@PlumpPelican
Follow
Beginning of second week flowering and plants are shooting up.
Added a second ScrOG net and directed all the branches to get more of an even canopy and so the branches aren’t growing on top of each other.
I did one last defoliation to remove any shoots/stems/leaves that are struggling for light.
Likes
28
Share
@Bongman
Follow
Hi Guys,
Week 9 of flowering. I've harvested usually in week 8 but I am holding back this time and really let her do her thing until I see more Amber Tris. Right now it's mostly milky and maybe 5% amber only so a few more days to go.
***Mid-week update***
Day 3 of Week 9 of flower - I think they are ready to be cut down very soon. So I went in today and did a quick defoliage. Am waiting for the new moon to come in a day 6 of wk 9 so 3 more days then they are coming down. Am going to flush on the 5th day wk9.
That's all for now.
Happy Growing.
BM
4TweentY

Likes
150
Share
@RussianGrower
Follow
I welcome you from Russia my friends from different parts of the world. The end of 16 weeks has come. Plants already fully show their ripeness, and buds SAG from their weight. Soon I will be harvesting, as soon as I get the final dry product I will make the last update of this diary.


Likes
7
Share
@stinkynuggsack
Follow
Co2 order never came in but better late then never I grabbed a bottle of tnb from my local grow shop and let it goto work.
This week went great
The purple buds are very rewarding 😁
Excited to see what next the week has for my babies


Likes
19
Share
@CannabisAprendiz
Follow
Bueno , este es el segundo cultivo que realizó del la cepa "Waka" , el anterior lo tengo igualmente documentado en otro diario .
en esta ocasión cultivamos los clones que habíamos recolectado del cultivo pasado , guardando los fenotipos que nos gustaron más y los clones restantes los pasamos a floración que fueron los que se le hizo seguimiento en este diario.
El crecimiento fue bastante explosivo y reaccionaron muy bien a cada trasplante realizado .
pude observar que los clones de cada fenotipo seleccionado se desarrolló con mucha similitud al de sus madres .
El olor en vegetación es bastante discreto y en floración se pone un más intenso
El desarrollo en floración fue explosivo generando bastante resina y se vieron muy hambientras .
Al fumar se puede sentir un rico toque cítrico en las N° 4 se siente un fuerte sabor a limón en algunas flores mucho mas marcado que en otras,
N° 3 y 13 un agradable toque a naranjas muy rico de sentir en el paladar , La N° 8 con pizcas dulces bastante interesantes.
El humo al fumar es muy suave lo que permite sentir mejor el sabor de cada fenotipo.-
saludos y buenos humos😉
Al momento de cosechar se cortaron los clone y se dejo secando en oscuridad a temperatura ambiente por cerca de 16 días posterior a eso se pasó a curar en frascos

Likes
13
Share
@gr3g4l
Follow
Una vez pasados los dias huele bién, sabe bién y buen efecto.
Matices y aromas Terrosos , café y a cítricos.
Fácil de cultivar.


Likes
58
Share
@MadeInGermany
Follow
Flowering day 37
since time change
to 12/12 h.
Hey everyone ☺️.
It gets more beautiful from week to week 😍👍.
As usual from this phenotype, everything is black / purple again on this beautiful Pheno 😊.
The buds are getting thicker and thicker and already smell extremely tasty 😍.
Next week I'll go up a bit with the Ec and add some Pk 13/14.
Like every 12-15 days, the water was completely replaced and all electronic devices checked for safety 👍.
The Ph / Ec measuring device was also recalibrated.
Otherwise there is nothing to report for this week and we'll see you again with the next update ☺️👍.
I wish you and your families a Merry Christmas 😊.
Stay healthy and let it grow 🍀
You can buy this Strain at :
www.Zamnesia.com
☝️🏼☝️🏼☝️🏼☝️🏼☝️🏼☝️🏼
Strain
Gelato clone from mother (Zamnesia )
☝️
Genetics: Wedding Cake x Gelato x Gelato 33
👍
Vega lamp: 2 x Todogrow LED CXB3590 COB 55 W
1 x Sanlight S2W 62 W
💡
Flower lamp : 2 x Todogrow LED CXB3590 COB 55 W
1 x Sanlight S2W 62 W
💡 ☝️
Grow Aero System : Growtool 0.8
☝️
Fertilizer:
Canna Aqua Vega A + B , Canna Aqua Flores A + B , Rizotonic, Cannazym, CANNA Boost, Pk 13/14, Canna Cal / Mag, Canna Ph - Grow, Canna Ph-Bloom
☝️🌱
Water:
Osmosis water mixed with normal water (24 hours stale that the chlorine evaporates) to 0.2 EG. Add Cal / Mag to 0.4 Ec Ph with ph- to 5.2 - 5.8
💦 💧
Likes
35
Share
@bypado_farm
Follow
Plants are healthy and growing well.
0.5L of water each plant every 2/3 days