


Likes
Comments
Share


@Mrs_Larimar
Follow
2024-05-09
Directly after the Photoshoot, i topped them.
they had a super progress and you can watch them growing
big steps every day.
All will started Indoors under SANlight Flex 25, and move Outdoors.
Only one Plant stays indoors, to see the performance under best Conditions
because my Outdoor Garden is hard^^
So i started with letting them soak, and then the seeds will move under a humid Kitchensponge
unil i see a sweet Taproot.
then they will go into the Final Pot, filled with lovely TerraPreta mj mix
the grow will be supported with Biotabs fertiliser
Breeder Information
Fatso GMO F1 Auto is a feminised hybrid strain that is the result of crossing two autoflowering strains,
viz. Fatso Auto and Cotton Candy Auto. This Cali-derived, slightly sativa-leaning,
easy to cultivate strain will please growers with its big yield, solid THC content and its sweet, candy and fuel palate.
Fatso GMO F1 Auto will grow well both indoors and outdoors. It has an above-average resistance
to mould but will still benefit from good ventilation, especially where humidity levels are quite high.
Resistance to plant pests and other pathogens is excellent. While plants will remain quite short at around 100cm
or less indoors, they can grow a little taller, reaching a height of 130cm, outdoors in open ground.
The entire cycle is completed in a maximum of 75 days from germination through to harvest
and although yields are said to be average this is still pretty impressive for an autoflowering strain.
The combination of high resin production and high terpene levels make Fatso GMO F1 Auto a very good strain from which to make cannabis extracts.
The terpene profile is sweet and funky with savoury scents of Skunk with pine and floral notes.
The taste is like sweet candy with hints of fuel. THC production is high, reaching 24% while CBD is low. The effect is uplifting and well-balanced.

Likes
5
Share


@Ensign420
Follow
Greetings fellow growers 🖖 and welcome to my first grow ever. This adventure actually started several months ago when I decided to stop buying flower from dispensaries and just grow my own bud. How hard can it be!?
This is actually my second seed of this strain. The first bean sadly died due to over watering (sorry girl, RIP). I was literally watering the cube to the point where water was dripping from the bottom, then heavily sprayed the humidity dome and tray with the vents completely closed. Everyday. Multiple times. I never let the dome or try dry out. So after about 8 days of not sprouting, there was a funky smell of rot. So that was that.
Later I learned that rockwool retains a lot of water and can easily drown seeds. So a wet/dry cycle is best for rockwool germination.
So even after hours of researching and digging through forums and tutorial videos, I was still under prepared for this journey. Did not consider how delicate the germination phase is. Oh well. Lesson learned. Reset and try again!
I hope everyone is safe and stoned during this corona crisis. Just like everyone else in the world, I want this pandemic to be over with. But in the meantime, let's grow some weed! 🖖
[START OF WEEK 01]
Day 01 - Monday - 08/03/20 - Total Days: 001
-----------------------------------
- [0830]: Light Schedule: 24Hrs/0
--- Soaked cube in 5.5 PH water for 10 min. Did not shake water out.
--- NO NUTES! Only PH'd down to control the PH levels.
--- Did not use the default hole (way too deep).
--- Flipped cube upside down and made a shallow hole for the seed (less than 0.25" deep).
--- Placed seed in and pinched hole close. No additional water added.
--- Sprayed the tray and dome with straight water (5.5 PH).
--- Vents are cracked opened a for ventilation (about 1/4 opened each).
--- Distance between the light and tray was 53"
--- AC was set to 80 °F
--- Exhaust fan was set to 86 °F
--- Room average temp was at 85 °F
--- Dome humidity was at 85-99% when sprayed.
--- Allowing to completely dry before respraying.
- [2200]: Dome and tray were completely dry! Sprayed only tray and dome with more water.
Day 02 - Tuesday - 08/04/20 - Total Days: 002
-----------------------------------
- [0845]: Sprayed dome and tray in the morning. Everything was dry.
--- Hoping for the best!
- [2130]: Everything was dry again, so sprayed dome and tray at night along with a light spray on the cube.
Day 03 - Wednesday - 08/05/20 - Total Days: 003
-----------------------------------
- [0830]: Everything was dry again. Resprayed dome and tray. Slightly sprayed cube.
- [2125]: Hooo damn!! She popped! Am little stub is visible! Resprayed dome and tray again.
--- Still going 24/0 for lights.
- [+0033]: Just checked up on her and I swear she grew a bit taller! Getting excited!
Day 04 - Thursday - 08/06/20 - Total Days: 004
-----------------------------------
- [0845]: Wow! Went from a little stub to fully sprouted overnight! Everything was pretty dry again so resprayed dome and tray.
- [2200]: Tap root is visible! Over 1" long too! Just resprayed dome and tray again.
-- Going to prep for hydroton transplant tomorrow!
Day 05 - Friday - 08/07/20 - Total Days: 005
-----------------------------------
- [0930]: She keeps growing!
-- Added a bit of CalMag to the spray bottle (8 drops to 650ml of distilled water). Resprayed dome and tray. Water was at a 5.4 PH with 141 PPM.
- [1045]: Prepped the bubble bucket with 4.5gal of water. Water is high enough to reach about 0.25" above the bottom of the net pot.
--- Added 3 drops of Superthrive
--- Added 3.5ml of CaliMagic
--- Added 2ml Hydroguard
--- Then PH'd down to 5.6
--- Solution Strengh: 120 PPM
--- Water chiller is set to 20 °C
- [1100]: Transplant time!
--- Filled the net basket 1/3 with hydroton. When placed in the bucket, air bubbles are not visible, but are slightly below the surface (slight digging will reveal the water/bubbles below).
--- Removed plastic on rockwool cube and placed in basket, then filled around and covered with hydroton. Making sure to block any light from passing through the net pot and into the nutrient solution.
--- Covered with a half-bottle dome sprayed with the CalMag water from earlier.
--- Hoping for the best!
- [1300]: Raised Bucket 5" higher. Now light distance is 48" to top of bucket.
- [1820]: Lowered tent exhaust temp to 76 °F
--- Lowered AC to 75 °F
--- Raised bucket even higher so light distance is 30" to top of bucket.
- [2300]: Looking good!
--- Sprayed dome and surrounding hydroton with more CalMag water.
--- Attached timer to light! So new 18 Hrs On/6 Hrs Off light schedule.
--- Lights On: [1600] (4pm)
--- Lights Off: [+1000] (10am the next day)
--- Decided to go with lights on during the evening/night and off during the later mornings/afternoon (the hottest part of the day) to see if temps can be controlled better.
--- Please survive girl!
Day 06 - Saturday - 08/08/20 - Total Days: 006
-----------------------------------
- [0800]: Everything was dry. Resprayed hydroton and dome.
- [2000]: Here first night cycle seemed to go well! Get'n taller!
--- Dry again. Removed the dome.
--- PH went up to 6.5 so PH'd down to 5.7
--- Ran the top feed drip ring for a bout a minute to wet the hydroton and rockwool with the nutient solution.
---Too scared to leave the top feed on 24hrs (I don't want over water her and cause dampening-off). Will let dry before re-watering.
- [2100]: After closer inspection, I think she's looking a bit yellow.
--- Decided to add a bit of grow nutes to the bubbler solution.
--- Added 2ml of Sensi Grow A
--- Added 2ml of Sensi Grow B
--- Solution strength after adding more nutes: 176 PPM
--- PH went up to 6
--- I hope that the extra chelating properties of the 'PH Perfect' solution is enough of a buffer for proper nutrient uptake.
Day 07 - Sunday - 08/09/20 - Total Days: 007
-----------------------------------
- [0800]: Water dropped a bit (mostly due to evaporation) so solution strength was at 190.
--- Checked PH again. Was still at 6, so PH'd down to 5.4
--- Ran the top feed for a minute to wet the hydroton a bit.
- [0915]: Since she's looking perky but still a bit yellow. So decided to up the nutrient concentration even more before lights out.
--- Added 2ml more of Sensi Grow A
--- Added 2ml more of Sensi Grow B
--- Solution strength after adding more nutes: 199 PPM
--- PH went up to 5.8
- [1700]: Checked nutrients.
--- PH: 5.9
--- Solution strength: 202 PPM
--- Added 4ml of Voodoo Juice
--- Added 4ml of B-52
--- PH after adding more nutes: 5.9
--- Solution strength after adding more nutes: 238 PPM
- [2130]: Decided to make a new foliar spray to address the continued yellowing.
--- Started with 500ml of distilled water.
--- Added 3 drops of CaliMagic
--- Added 3 drops of Sensi Grow A
--- Added 3 drops of Sensi Grow B
--- Added 3 drops of B-52
--- Added 1 drop of Superthrive
--- Solution strength: 164 PPM
--- PH was at 5.9 and did not adjust.
--- Gave her one spray.
--- Also sprayed the surrounding hydroton.
[END OF WEEK 01]

Likes
71
Share


@DogDoctorOfficial
Follow
Hey, everyone! Welcome back to another week of our Anesia pheno hunt journey! We're now in Week 4 of the flowering stage, and things are looking incredible.
Our Anesia ladies are thriving beautifully. Each strain is showcasing its unique characteristics, and the buds are starting to swell up nicely. The trichome production is in full swing, and the aroma in the garden is becoming more pronounced and delightful.
This week, we've made some adjustments to our nutrient regimen to ensure our plants get everything they need for optimal flower development. Here’s the current mix:
Regulator: Ensures strong and healthy growth.
CaMg-Boost: Provides essential calcium and magnesium.
Top Booster: Enhances bud development and density.
P-Boost: Provides phosphorus for strong flowers.
K-Boost: Added this week to support potassium needs for flowering.
TDS: Raised to 500 ppm.
pH: Maintained at 6.0.
Temperature: Steady at 21°C.
The combination of these nutrients is giving our plants exactly what they need to flourish during this critical phase.
Our garden is a vibrant display of life and growth. The canopy is filling out beautifully, and the light penetration is perfect, thanks to the awesome setup from Future of Grow LED. The plants are healthy, with strong stems and lush leaves, thanks to our meticulous care and the excellent products from Aptus Holland.
Exciting News!
We're thrilled to invite you all to check out our YouTube series, Welcome to the Green Oasis! Dive deep into our garden adventures, see the plants up close, and learn all the tips and tricks we use to achieve these results. Your support means the world to us, and we can't wait to share more of this journey with you!
Watch Episode 1 on YouTube and follow along for more updates!
Shout Outs:
Anesia Seeds: Thank you for the incredible genetics.
Aptus Holland: The best in organic and mineral-based nutrients.
Future of Grow: Your LED lights are making our garden shine.
Grow Diaries: The best place to document and share our progress.
Community: You all are amazing! Your support keeps us going.
Stay tuned, stay positive, and let's keep growing together!
Apricot Oreoz = AO
Zoomiez = Z
Future#1 = F
https://anesiaseeds.com/
Plant nutrition - Aptus Holland - https://aptus-holland.com
LED Photons - Future of Grow - https://www.thefuturofgrow.com/
Controls - Trol Master - https://www.trolmaster.eu/
Watering - Autopot - https://autopot.co.uk/
Tent - Mars Hydro - https://marshydro.eu/
Love and attention - Me, myself and i
As always thank you all for stopping by, for the love and for it all , this journey of mine wold just not be the same without you guys, the love and support is very much appreciated and i fell honored and blessed with you all in my life, With true love comes happiness. Always believe in your self and always do things expecting nothing and with an open heart , be a giver and the universe will give back to you in ways you could not even imagine so
More info, the ocasional give-away and exclusive updates from all my adventures can be found - links in the profile description
Friendly reminder all you see here is pure research and for educational purposes only
Growers Love To you All

Likes
31
Share

@Splashy
Follow
24.04.2026
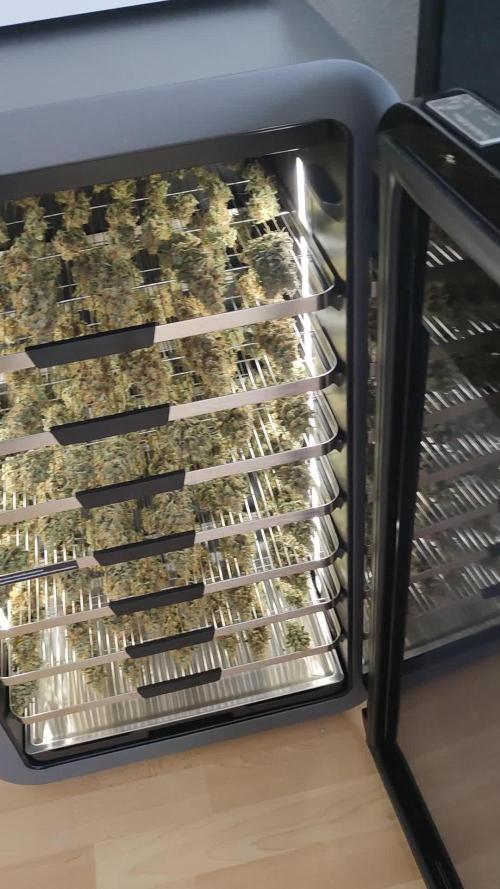
Heute habe ich mich dazu entschlossen die Damen zu ernten. der Hauptpunkt welcher mich jetzt dazu gebracht hat zu ernten waren die trichome, es sind jetzt auf jeder Pflanze Bernstein farben zu erkennen. sie trinken auch nicht mehr all zu viel und ich musste am Ende nur noch alle 3 tage gießen anstatt alle 2 Tagen.
sie sind jetzt grob getrimmt und trocknen und curen jetzt in der vcure von vivosun. ich werde noch mehr Bilder machen, sobald sie fertig sind. freue mich schon auf das Ergebnis. die buds werden jetzt 5 Tage getrocknet und dann 9 Tage gecured, also gibt es in 14 Tagen neue Bilder.
ich wünsche allen die bei dem Contest mit machen viel glück und einen guten grow, am Ende sind wir alle Gewinner eines guten grows.
danke an zamnesia und plagron für das bereitstellen der Samen und des düngers.
es gab mir Mal die Chance einen Strain von zamnesia zu testen und in den dünger von plagron rein zu schnuppern. hat mir beides gefallen und ich werde drauf zurück greifen in Zukunft, ganz sicher.
Update:
08.05.2026
Heute habe ich die Ernte aus der vcure geholt und habe mich echt gefreut. Sehr gut getrocknet und noch nicht crispy außen. Es gab nochmal eine kleine Beschneidung um die schönheiten von buds zu Geltung kommen zu lassen. Die vcure macht einen super Job und ich muss mich nicht um die ganzen Werte kümmern, das macht alles die vcure.
Da ich in Deutschland lebe, muss ich leider alles bis auf 50g vernichten. Ich habe mir die schönsten headbuds aufgehoben und den Rest mit Katzenstreu von meiner Katze vermischt. Mir hat es im Herzen weh getan das machen zu müssen, jedoch will ich zu meiner eigenen Ruhe und Sicherheit im gesetzlichen Rahmen bleiben.
Ergebnis:
Es kamen getrocknet 481g raus, was ein ordentliches Ergebnis war bei einer 300w LED. Behalten darf ich mir 50g laut des deutschen Gesetzes.

Likes
8
Share
@Crop_Top
Follow
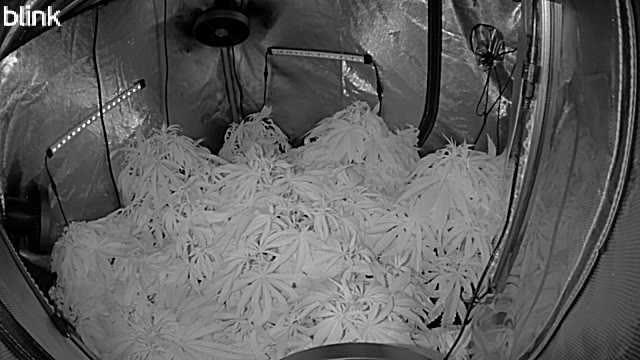
This past week was a busy one. Put a lot of work into the grow space and prepping them to switch. Moved over to the 5x5 tent and set up the netting. Went through a lot of defoliating spread out through the week to make sure it went as stress free for the plants as possible and then lollipopped the plant before changing over to
Flower (remember this is my first time growing so didn’t want to overdue it). Me and the girl spent some time and Cleaned out the tent completely and finally got around to cleaning up some of the wiring throughout.
I flushed all the plants with RO water (only pH) and then 3 days later i mixed in and topped all pots with fresh soil mix (FFOH, worm castings, and perlite).
Drained and cleaned all pots and the tank, added in new water with a mix of cal mag, big grow, and tiger bloom (half amounts of everything) with PPM just over 1000.
Switched over to flower just before this post so fingers crossed and hoping the next few weeks go smooth 🤞🏽
**Side Note** - Got a steal on some tents/lighting so decided to get things setup for my next grow. Got a handful of seeds I’ve had my eyes on and getting ready to order some more equipment and even a Centurion Hybrid Trimmer. So be on the lookout for my future grows!


Processing
Likes
18
Share


@Manic
Follow
This week the girls have stretched for the last time then the fun will really begin with the buds blowing up. Alaskan purple has the frosty sugar leafs which tells me she will be more potent at this point of the grow cycle. Both of the girls are in good health but Alaskan purple has 2 leafs that look like nutes burn from the feeding last week of the ff nutes, so only distilled water this week to kinda flush her then back to nutes feeding, which will be perfect timing for buds to start coming in. Overall it's rained a lot where I live which has made humidity a problem so I got another dehumidifier for my room to help with that problem other than that this grow is on track for a nice harvest.
Likes
10
Share


@Ultraviolet
Follow
18 hours of light = 64,800 seconds
624 μmol/m2/s from the PAR meter
Micromole μmol/s (micromole) is the unit in which P.A.R (Photosynthetic Active Radiation) is expressed. This unit indicates how many micromoles per second a light source emits. μmol/s is one-millionth of a mol (10−6 mol).
624x64,800=40,435,200


Likes
7
Share

@all_about_420
Follow
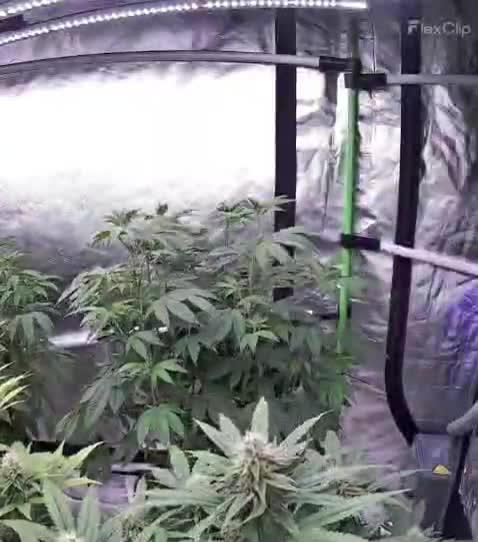
Momentan fokussiert sich die Naughty Dawg vollständig auf die Endreife ihrer Fruchtstände. Die Triebspitzen sind mittlerweile so schwer, dass sie ohne mechanische Hilfe kaum noch aufrecht stehen würden. Ein Blick auf die Details zeigt eine beeindruckende Harzentwicklung: Die Trichome überziehen die Kelchblätter in einer dichten, klebrigen Schicht, während die Buds stetig an Umfang gewinnen. Das tiefe Chlorophyll-Grün des Blattwerks bleibt stabil und versorgt die schweren Köpfe optimal. Geruchlich wird es jetzt richtig ernst – die scharfen Gas-Noten paaren sich mit einem schweren Moschus-Aroma zu einem intensiven Bouquet. Es ist faszinierend zu sehen, wie dieser unbändige Teil meines Gartens nun die Zielgerade ansteuert.
Likes
34
Share


@PapaNugs
Follow
This was the best smelling girl out of the crew. Happy with that. The size of the buds are good considering the plant size and total time of the plant. Will dry for 10-14 days then cure for a month before trying them out.
Likes
5
Share


@Godsgrace
Follow
💫The week went great. After the first stress, growth seemed to slow down, but it worked out, the plant began to expand.
I water it every 3 days.
I continue to bend the stem along the axis of the pot.
I bend the branch that will pass through the fastest.
💚I started giving supplements late. Only on the 33rd day I gave him fish and everything else.
🍀 Week showed good growth, but it could have been better, let's see what happens with the additives. I continue to twist the stem in a circle (I don't know where to twist it). And I also cut off the leaves a little bit, about once a week, as they block the light (a friend says not to overdo it with defoliation, let's see what happens).🍀

Likes
Comments
Share


@Royalty420
Follow
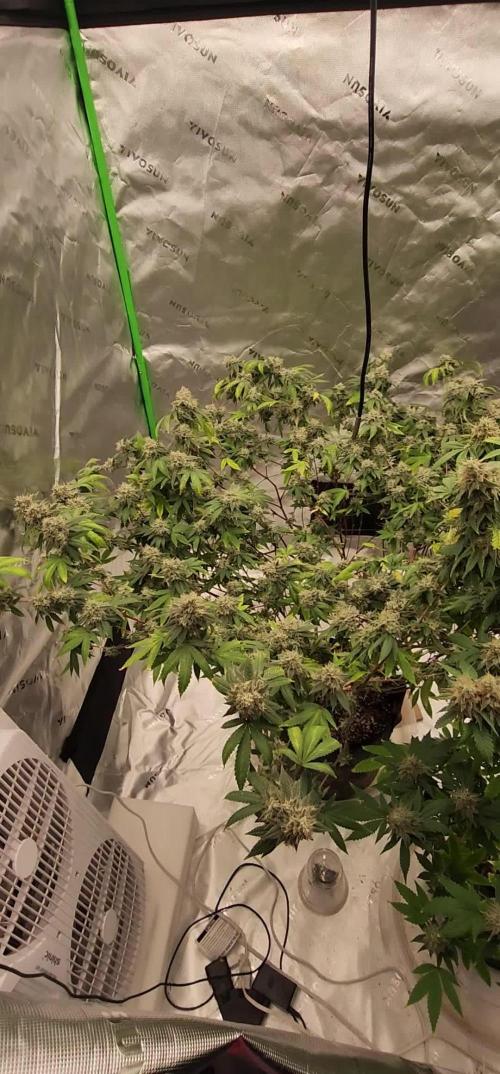
Done with drying, I cut her bud sites and placed them into a mason jar. I bought the boveda packs that are 62% RH. Now time to sit and wait 2-3 weeks and see what the finished product is like. Again everyone thank you for watching the grow up! 🙌🏾🔥🌱 I do have another diary with 5 auto berry’s, if anyone would like to continue watching the grow up. 🙌🏾🔥🌱 I have a lot more confidence in the autos just because this grow was my first time grow. Now I know the basics and everything else on what to do, so better and bigger buds on my next grow. ✊🏾😎



Likes
21
Share


@FrostRailz
Follow
All three doing extremely well, a little wind burn from wall fans, other than that crushing it eating everything on there pots, and producing dense, sticky, pungent Nugs. All is well!

Likes
17
Share


@Eddjack
Follow
Arrivato fresco fresco dalla Spagna si pianta subito.
12/01 12 h in acqua
13/01 l'ho messo in un tovagliolo di carta umido ed è è uscita la prima parte di radice ed è stato trapiantato in un vasetto.
14/01 e uscito dalla terra sfogliando le prime 2 foglioline tonde. Questa è una super partenza 72 h e già cerca la luce.
Likes
2
Share


@EtnoGrow
Follow
this is the beginning of the 4th week along with the publication of the end of the 3rd week, this is how the fourth week is received, another intensive pruning that has no choice but to do it due to the size of the indoor, which is working great for us and we believe that I will always work like this, I am happy, here then the pruning of its results a little before and after and how it is receiving this fourth week, with the threads I touch a little bit of hair I hope it does not affect much but all in favor of opening the field to all the branch buds alike.WE CHANGE THE MESH FOR A BETTER ONE AND OF THE IDEAL SIZE AND AGAIN WE USE THREADS THAT HELP US VERY WELL, WONDERFULLY
Likes
13
Share


@TheHighNews
Follow
Day 30 toady, i switched to 12/12 3 days ago e the babies are already stretching hard and some are showing preflowers i'm pretty happy i'm watering with no nutrients as i'm using Canna Pro Plus soil and it should have enough nutrients for the first 3/4 weeks of flower. I cleaned the bottom of the plants from lowers branches and leaves and i will continua till day 14 of flower and i fixed it with a bamboo stick i got gifted from @AlpineGoat i will fix the other branches in the next weeks i'm pretty stocked with this grow this genetics are really solid growing strong and fast! Good job @Exotic_Seed!!🙌👍


Processing
Likes
12
Share


Likes
45
Share

@Hempface86
Follow
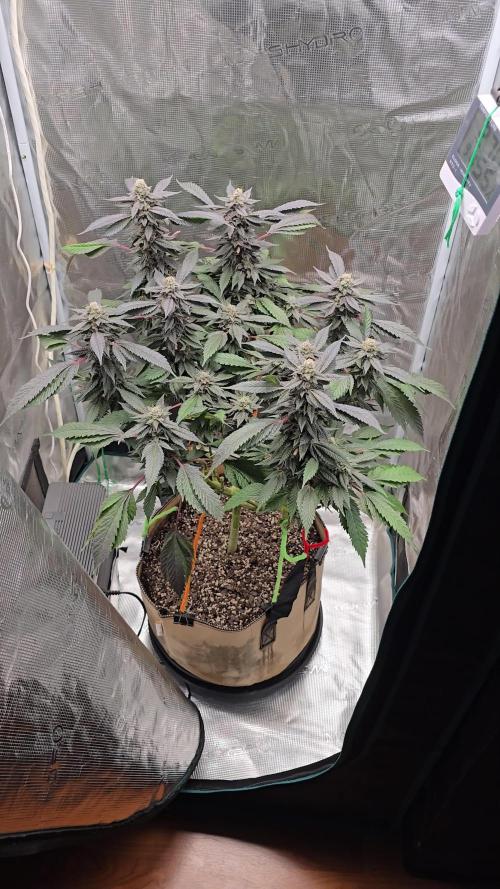
Just water from here on out .. she is super frosty ... the yield will not be the most, but I think the quality will be top notch.. shout out to the homie @Grow4releaf..God bless 🙌 and happy growing ✌️

Likes
29
Share


@Grow420pice
Follow
21.01.2022
Läuft sehr gut.
Was ein Dungel!!!
Futter erhöht.
Hier mal ein dickes fettes Lob an Biobizz.
Ich liebe die Produkte!!!
Ich werd nichts anderes mehr verwenden. Geschmacklich sowieso immer top, es kitzelt alle Terpene aus den Pflanzen heraus. Und man hat selten Probleme, die Pflanzen sehen immer sehr gesund aus...
BioHeaven 👍👍👍
Was denkt ihr, kann ich Ende Februar ernten???
22.01.2022
Einige haben kleine leichte rost braune Flecken auf den tops bekommen. Ich werd Phosphor und Kalium nochmal ein wenig erhöhen. Werd auch topmax erhöhen und etwas Alg a mic.
Bis dann growmies
🌱💪😎
