The Grow Awards 2026 🏆 


Likes
8
Share
@Zucca
Follow
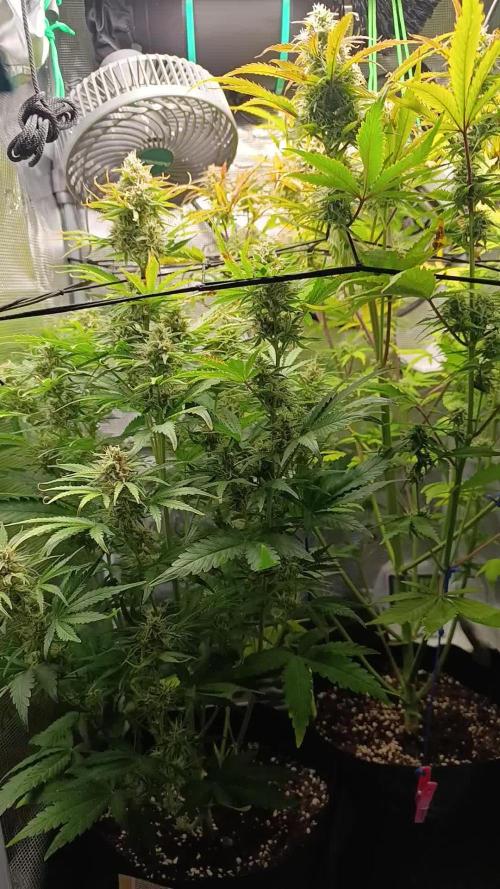
All plants are in good health and after the initial stretching during the first weeks of flowering stage they finally stop growing in high.
I began to feed the girls once a week with molasses but it's too early to evaluate results. What I can say about molasses is that it's very sticky, super dense and quite tricky to mix with water.
Plant #5 looks drinking less water the the other sisters, in fact the soil is less dry the the other and the pot is heavier. Apart from that plant is growing happily.


Likes
3
Share
@Grower_Resina
Follow
A gorila passou e só deixou os caroços
Aqui estão elas, pesadas e intermináveis.
Água em abundância.

Likes
28
Share
@MadeInGermany
Follow
Flowering day 12
since time change
to 12/12 h.
Hey everyone ☺️.
Once again a wonderful week goes by 😀.
It has developed so far and is now slowly starting to develop its flowers :-).
As soon as the first forms of buds can be seen (I think in 5-10 days) 2 g GHSC Powder Feeding Bio Bloom per liter of substrate are added.
In the third week, 1 g per liter of substrate is added so that it lasts through to the end :-).
This week it was poured 3 times with 1 liter each 👍.
The entire tent was also cleaned and the electronics checked for functionality.
The humidifier was refilled every day and fresh osmosis water was drained into the tank for the coming week ☺️.
The plants have all been checked for health and pests 👍.
Next week the bamboo sticks are inserted towards the end for support and the lowest shoots are removed so that at the end the energy is not wasted in the lower area 👍.
Otherwise there is nothing more to report this week :-).
I wish you a lot of fun with the update 😎.
Stay healthy and let it grow 🍀.
You can buy this Strain at :
https://www.royalqueenseeds.de/feminisierte-hanfsamen/115-amnesia-haze.html
Type:
Amnesia Haze
☝️🏼
Genetics:
Original Amnesia Haze
👍
Vega lamp:
2 x Todogrow Led
Quantum Board 100 W
💡
Bloom Lamp :
2 x Todogrow Led
Cxb 3590 COB 3500 K 205W
💡💡☝️🏼
Soil :
Canna Coco Professional +
☝️🏼
Fertilizer:
Green House Powder Feeding
☝️🏼🌱
Water:
Osmosis water mixed with normal water (24 hours stale that the chlorine evaporates) to 0.2 EC. Add Cal / Mag to 0.4 Ec Ph with Organic Ph - to 5.5 - 5.8 .
Likes
78
Share
@Basementganja
Follow
This is my second time growing a Girl Scout Cookies autoflower! She turned out amazing! She showed signs of high potency, from early on in flower!


Likes
7
Share
@weedrevolution
Follow
An important event marked this week: plants were indeed heavily defoliated.
This was possible also due to their strong (and positive) reaction to the tea (Organic Compost Tea by Soil With Attitude) received last week. All plants are literally exploding with life. 💪
Processing
Likes
15
Share

Likes
17
Share
@Hashy
Follow
Week 3
Light cycle=18/6
Light Power=120w 50%
Extractor controller settings
High temp= 24c
Low temp= c
Temp step=0c
High Rh= 65%
Low Rh= %
Rh step=0%
Speed max=5
Speed min=1
Smart controller settings (during lights on).
Lights on=06.00am
Radiator on= below 19c
Radiator off= above 20c
Humidifier on= below 60%, above 23c
Humidifier off= above 63%
Dehumidifier on= not in use
Dehumidifier off= not in use
Smart controller settings (during lights off).
Lights off=00.00am
Radiator on= below 17c
Radiator off= above 18c
Humidifier on= not in use
Humidifier off= not in use
Dehumidifier on= not in use
Dehumidifier off= not in use
VPD aim=0.6-1.0
DLI aim=18-22
EC aim=0.8
PH aim=6.2
Fri 5/1/24
#1 (Day 15)
📋 Needed watering, looking sad for herself.
💧💧💧💧💧💧💧💧💧💧💧💧💧💧💧💧
Method= manual
Neutralise=0.1ml/L
Roots=5ml/L
Feed=nutes
Volume=200ml
Easy Ph down=0 drops/L
Ec=0.27 PH=5.9/6.2
Time=2.30pm
Runoff.
Total runoff=55ml
Ec=1.17 PH=6.1/6.2
💧💧💧💧💧💧💧💧💧💧💧💧💧💧💧💧
Sat 6/1/24
#1 (Day 16)
📋 Looks better then yesterday.
Sun 7/1/24
#1 (Day 17)
📋 Looks bad again. Needs transplanting.
Potted up to 8L pot with biobizz light-mix.
💧💧💧💧💧💧💧💧💧💧💧💧💧💧💧💧
Method= manual
Neutralise=0.1ml/L
Roots=5ml/L
Feed=nutes
Volume=3L
Easy Ph down=0 drops/L
Ec=0.27 PH=6.0/6.3
Time=1.30pm
Runoff.
Total runoff=600ml
Ec=6.0 PH=5.3
💧💧💧💧💧💧💧💧💧💧💧💧💧💧💧💧
Removed humidifier.
Adjusted light height.
Light Power=100w 42%
H=11cm D=61cm DLI=19.3
Mon 8/1/24
#1 (Day 18)
📋 Looks terrible, she is either recovering from the topping still, or from being in the small pot for to long, or the transplant.
10.00pm have foliar sprayed (cal-mag 5ml/L)
Tue 9/1/24
#1 (Day 19)
📋 She is looking miles better today, foliar spray did its job.
Having a cold spell at the moment so I'm adjusting the smart settings to compensate.
Smart controller settings (during lights on).
Lights on=06.00am
Radiator on= below 20c
Radiator off= above 21c
Humidifier on= not in use
Humidifier off= not in use
Dehumidifier on= not in use
Dehumidifier off= not in use
Smart controller settings (during lights off).
Lights off=00.00am
Radiator on= below 18c
Radiator off= above19c
Humidifier on= not in use
Humidifier off= not in use
Dehumidifier on= not in use
Dehumidifier off= not in use
Wed 10/1/24
#1 (Day 20)
📋 Starting to look a little better.
Thur 11/1/24
#1 (Day 21)
📋 H=15cm D=57cm DLI=21.0
She has started to recover now and I'm sure will really kick into gear over the next few days. I'm just about keeping on top of the conditions at the moment. We are due a cold spell over the next week, and that means the radiator will be on more.
Back soon.
Take it easy.
Likes
3
Share
@CreoWeed
Follow
I'm satisfied from tbe overall yield, 65 grams dry is good, but I would have expected more.
The smell and taste are awesome and it's very strong, it gives you good appetite and the high last long.
Buds are a little bit airy but this must be that the light source is not enough.
That's all lads, have been a pleasure updating this diary, and now I'll focus on the other one running that is coming up really nice. It's not a very cultivated phenotype on the site, so come and check it out!
Stay tuned and stay high nice people!!

Processing
Likes
20
Share
@Mr_nugs_lover_David
Follow
This lady is a beast, such a big bush full of flowers, very sweet aroma, I can't find the cherry notes yet but it's very very sweet, I love this strain, all of them have the same smell, and this pheno is just amazing, very strong and for what I can see very productive too 😍🌱❄️🍪

Likes
33
Share
@FlavoursUk
Follow
Day 78 - pheno 1 was cut down, id normally hang dry the whole plant but decided to do it in branches instead. Second pheno has been left in darkness as i haven't had the time to cut.
Pheno one is hung up and drying.. Room Humidity 60/60. As soon as she's dry enough I'll finish trimming her up. Then put them into jars. Might use boveda 60% packs but I'll see. Smells strong! Will post a harvest when both plants have been dried fully an in jars. Hope you enjoy the videos and pictures.
Stay tuned.

Likes
Comments
Share
@BruWeed
Follow
10/03 - La semilla de estuvo hidratando por 24hs en agua.
11/03 - La semilla se encuentra germinando en papel húmedo.
14/03 - Germino y aprox la raíz media 3cm. Fue directo a un vaso de plástico chico con sustrato.
18/03 - Brotó.
Desde su germinación hasta ahora pasaron 17 días en total.
Por el momento viene bien, ya en su segunda semana de vida comencé a regar poco con los fertilizantes. Solo agregue 0.5ml por 1L de agua. No agregue toda la mezcla a la planta.

Likes
1
Share
@Ycegrows
Follow
I was pretty busy these periods, whith the holidays and work I barely had time to be online. The plants had made good progress, they are in late flower. I hade a PH problem so the plants suffered a bit but nothing serious. They have great buds and great smell. I'm so excited to finish this and test the end result.


Likes
12
Share
@CoqueSousVide19
Follow
Started LST on the plant. Found a 6w LED light tube meant for an aquarium/terrarium and have started using that in a 24 hour light schedule.
Also giving it nutes with BioBizz Fish Mix and seaweed that I use on my vegetables, but I'm using small amounts to avoid any problems.

Likes
66
Share
@GODSGIFT_2005_JM
Follow
🍼 Greenhouse BIO Feeding Line which are ORGANIC
For LIQUIDS ******GREEN BUZZ LIQUIDS***** also ORGANIC
MARSHYDRO ⛺️ has large openings on the sides which is useful for mid section groom room work. 🤩
☀️ MARSHYDRO FC 3000 LED 300W
☀️Also special thanks to VIPERSPECTRA P2000 (200W) & XS2000(240w) LED growlights


Likes
5
Share
@NoProbation4Weed
Follow
Bending down the main stemp with garden wire.
Temperatures are finally rising and summer is coming.
Good growth, healthy looking plant.
Direct sunlight for 13hrs a day.

Likes
37
Share
@Roberts
Follow
Sorry I missed a lot of updates. I was recovering from hand surgery then gd was not working right. She has a sweet earthy brown sugar smell. She did well for the limitrd care I could provide while I recovered. Was a good grow and I am excited to get to try her soon. Thank you Divine Seeds, Athena, and Spider Farmer. 🤜🏻🤛🏻🌱🌱🌱
Thank you grow diaries community for the 👇likes👇, follows, comments, and subscriptions on my YouTube channel👇.
❄️🌱🍻 Happy Growing 🌱🌱🌱
https://youtube.com/channel/UCAhN7yRzWLpcaRHhMIQ7X4g.
