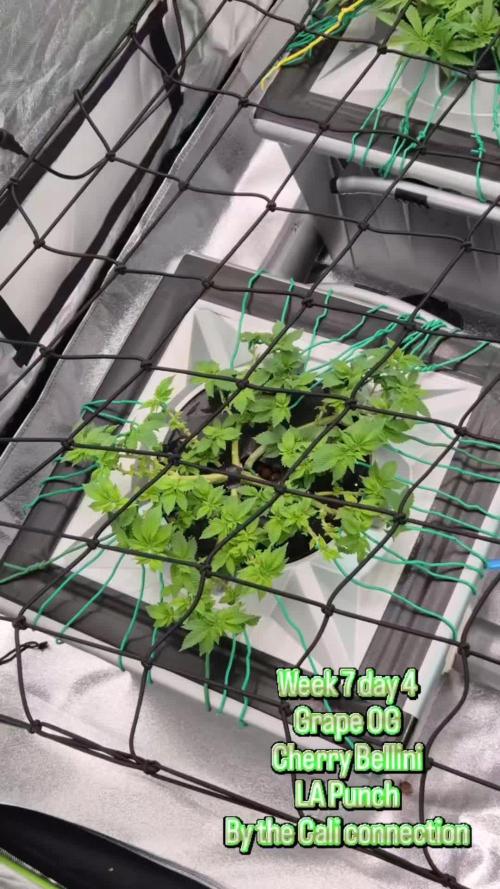
The Grow Awards 2026 🏆 


Likes
Comments
Share
@RICK_and_GROWTY
Follow
Hello friends and welcome to my first report and my very first grow! 🍁
Please follow me so you don’t miss any of my other grows.
Thanks buddy! 🙏🏼
And also don’t miss my introducing to see more information about me and my entire collected knowledge! (https://growdiaries.com/diaries/209900-the-best-grow-journal-by-rick-and-growty)
________________________________________
My weeks always start on a Sunday. So today I define 19.05.2024 as the first day of the 3rd week.
Because I got the plants as cuttings and they already had a certain size, I can’t determine an exact age at the beginning, unlike when growing them from seeds.
________________________________________
19.05.2024
Today is the first day of the 3rd week so I decided to plant the girls in their final 18l pots and gave them 2l water with 0.25g/l of BioEnhancer and also a pinch of Great White Premium Mycorrhizae - [to get] “Killer Roots for Killer Plants” 🦈
I will give them 2 days to recover before adding the BioGrow growth fertilizer with a concentration of 3g/l pot volume.

Likes
3
Share
@Piernaslocas
Follow
Ellas van fuerte , espero que no se vaya de las manos.
Les he dado micro vita de top crop un riego antes de pasar a floracion, pues el día de pasar a floracion ,toca riego foliar con Big one, me daba un poco respeto una posible sobrefertilizacion. 0'4g/L


Likes
7
Share
@Ieiogrow94
Follow
Eccoci qui...
Tutto va per il meglio, questa settimana non ho applicato stress alla piccola, ma ho guardato l'evoluzione che ha avuto dando i nutrienti.
Ora ha un odore davvero intenso ed uno strato di resina pauroso, vediamo come si riprende dalla defogliazione che ho fatto settimana scorsa.
Seguiranno aggiornamenti, grazie a tutti per il supporto🔥🌲❤️

Likes
176
Share
@NuggetPawn
Follow
So, another diary and another grow!
I have made quite a few changes this time to try and mitigate some of the issues I ran into on the last grow as follows:
🌱 Changed my extraction to an 8 inch Sytemair Vector EC fan, it is 3 times more powerful than the previous fan, but will nearly never be turned up much past 50% and only uses 23w at 55%.
🌱 Reduced plants back down to 4 from 6, am hoping this will help me get in there a little easier later on in the grow.
🌱 Installed an under canopy Honeywell fan to help circulate lower canopy during the entire grow.
🌱 Currently waiting for my preorder of 3 x Migro Array 240w lights, best in class efficacy and buys me an extra 1.5ft in vertical grow space as they only need to be hung 6 inches from canopy.
🌱 DWC now has the brain bucket outside the grow room to allow me to make amendments during lights out.
🌱 After last Botrytis outbreak everything has been thoroughly cleaned with bleach followed by 70/30 ISO.
🌱 Various Hygrometers dotted around the room now with 24hr high low displays
That’s about all I can think of for now, happy growing all! 😎

Likes
5
Share
@Bread_n_Buds
Follow
Zamnesia's newly harvested Tropicana Cookies #1 has given us a lot of satisfaction, starting with a huge main cola and ending with a very good resin build and a good production and composition of beautiful, hard buds.
The aroma it releases is sweet, delicious, and intoxicating. The plant has grown a lot and is a nice, large plant, although the side branches are a bit too long, which needed support.
It's a plant with medium-wide internodal spacing, so it grows tall, with the main cola standing out from the lower buds, and it's very virile, if that concept can be applied to plants.
This strain is much-loved; there are many good and famous versions, but ours here at Zamnesia is the best of them all.
Look at my plant arriving soon, look at the work of my brother MontyDiabalero, master of giant plants.
The resin content is excellent; really, the videos and photos speak for themselves.
We grew in a standard 11-liter plastic pot.
Maturity - The pistils have been looking super ripe for a long time, especially the upper ones, which are very red, and we're still over 90%.
The trichomes are about 20% amber, 50% cloudy/milky, and 30% clear, more or less naturally, but I think that's fine. Remember, my friends, the harvest window for amber trichomes is 15%-30%; THEY DON'T HAVE TO BE ALL AMBER. Amber is a sign of maturity but also of THC oxidation, which transforms the plant's effect into a relaxing "indica," even if the plant is used for daytime use. So my advice is to harvest based on the plant's characteristics if you want to maintain the described effect and according to your needs. If you need to make weed for sleep, let it ripen very, very much, and then you'll need a more pronounced amber. For sativas, or better yet, to maintain daily effects, I recommend around 15% to 20% amber and mostly milky.
The flowers are all excellent quality and the yield is excellent, I believe 50-70 grams, cleaned and trimmed, not a full-sized plant.
The overall shape of the plant is very good, a tall girl, no techniques used. I have another in a 20-liter pot that is exceptionally large and full of flowers.
It's probably very suitable for scrog; it responded excellently to topping.
It has a particular characteristic of strong and powerful roots.
We chose a 100% organic soil, 1000% Plagron, as always.
The soil we chose is the recently launched Plagron Bio LightMix, which will allow us to start with more gradual and consistent watering, without the sudden changes that liquid fertilizers can cause. A week of soil is enough, so don't overdo it.
Choose your favorite style and calculate your results on the website:
www.plagron.com
Visit the new Growshop area on the Zamnesia website:
Z - https://www.zamnesia.io/it/531-growshop
Our Tropicana Cookies is now in great shape, give it a try!
Z - https://www.zamnesia.io/en/10921-zamnesia-tropicana-cookies-semi.html
Z - The award-winning Girl Scout Cookies is a cannabis strain that lends itself very well to breeding projects. That's why we boldly experimented by combining its genetics with a fruity Tangie. The result is Tropicana Cookies, a fast and potent hybrid with 22% THC. This strain is highly productive, and its buds are not only rich in sweet and spicy terpenes but also covered in a layer of sticky trichomes (which facilitate the extraction of high-potency concentrates). Tropicana Cookies' genetic makeup is 60% sativa and 40% indica, a blend that produces a balanced and euphoric effect.
Although easy to grow both indoors and outdoors, Tropicana Cookies thrives outdoors in warm climates. If you have enough space and good sunlight, the plants can reach heights of 180 cm. Wait until mid-October and, in optimal conditions, you can harvest a whopping 700 g/plant. A result well worth the effort. This strain also impresses indoors, reaching heights of 150 cm and producing 500 g/m². Tropicana Cookies also stands out for its rapid flowering. After just 7-8 weeks of indoor flowering, it will be ready for harvest.
You know it, but I recommend it: here you can find so many beautiful things, essentially "the best that nature has to offer."
Z - www.zamnesia.com
Music // Tropical Playlist
www.radionula.com
+ Feng Shui Music
+ 432 Hz Frequencies

Likes
13
Share
@Elpicor
Follow
Day 98 😇 10% amber thricomes, bubble hash with lower side of the plants, I will show you also buds pics in harvest week. Time to dismantle the two growboxes and enjoy spring and summer 👋😎🌞

Likes
4
Share
@Mrgreenthump68
Follow
Scrog baby
Test läuft gut.
Die Marshydro hat 10 Watt mehr deshalb wird sie aber nicht gedimmt.
Da die SANlight bessere Ausleuchtungen haben für die Pflanzen.
Likes
8
Share
@Mon_monde_onirique
Follow
Purple shine a bien repris son développement, niveau racines il va être temps de la rempoter une bonne masse racinaire commence à sortir du air pot.
Le 25/04 seconde taille des branches principales, de 2 apex cela va passer à quatre😉,
apport de solution nutritive pour réduire le stress de la taille(terragrow 1,5ml, katanaroot 0,2ml, silicon 1ml, calmag 0,5ml). Maintenant repos pour cette demoiselle avant la prochaine taille😉
Purple shine semble reprendre assez vite sa végétation après une taille. Ses branches sont bien épaisse ajout de silice et a participé.
Likes
19
Share
@GoldenWeedGrower
Follow
07/05: made LST and Defolation
New res
EC: 1,13
PH: 5,8
I'm only adding PH- for now..
PH usally raise and EC remain constant
Installed carbon filter and an additional air extractor
Likes
5
Share
@Krissci
Follow
This week I have separated the plants into 2 tent, to allow for wider canopy per plant.
Day 5 - LST and defoliation needed


Likes
218
Share
@ClubRiot
Follow
Start week 5 , Bio Grow 2 ml/L + Bio Bloom 1 ml/L + Sensi Cal-Mag Xtra 1 ml/L + CarboLoad 1 ml/L (Ph 6.7).
Likes
60
Share
@Mtmtc
Follow
Time to harvest this beautiful tester strain! I will be drying in a 60% humidity!


Likes
12
Share
@Rodamis_Prime
Follow
Was a busy week in this tent . Needed my 2x4 tent for some tutankhamon that I have coming up so this big girl got a roommate . Starting to have to feed her every day and a half and she's drinking 1.75 gallon each time . Also had some leaves higher up taco and the tips of the edges go brown and figured out that I sm pretty much over driving the plant with the light . So dropped it down to 70% for now to see how it reacts .
Likes
7
Share
@RBG
Follow
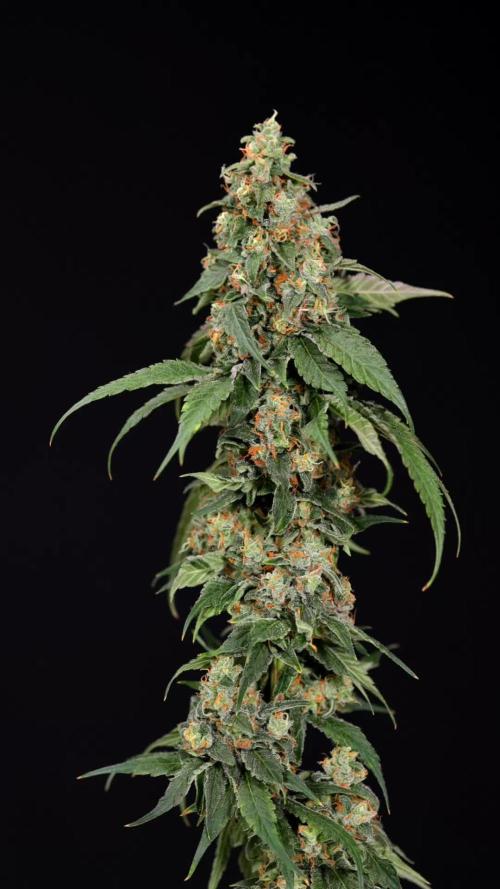
🌿 LA Punch by The Cali Connection 🌿
Week 7
Flower-day 2
16/10/2025
Nutrient change
Floramax veg 1: 1L
Floramax flowering enhancer: 400ml
Floramax organabud:400ml
Floramax rezin: 100ml ( around 1/4 dose)
Floramax cal mag: 100ml
Gp3 pro cal: 100ml ( unfortunately ran out and won't have any until next week )
Gp3 massive bloom: 100ml
Cyco platinum series silica: 200ml
Sleeps with the fishez: 400ml ( half dose system shock testing to see of this minimises/prevents problems per nutrients change like i was having )
Ph 5.9-6 - EC 2.2-2.3 ( Floramax wants e.c of 2.4, so I'm doing .1-.2 under for now to see how she responds
LST and Defoilation is finally done on her, LA punch might get another LST tweak and a couple more Defoils. Unsure yet she's staying very tight so its a little harder to gauge how she'll respond
I thought I should add, with the way I lst, I like to get as much defoilation out the way before flipping to flower that way all she does in flower is just get fat and lovely. Seemed to work well coming from only doing Autoflowers so just using that knowledge and implementing to my photo grows and tweaking it
Likes
28
Share
@GodZilla_Owner
Follow
The Red Pure develops extremely quickly. I have therefore not been able to keep up with the fertilisation scheme in time to switch to the flowering fertiliser and also adjust the CalMag ratio.
You can recognise a slight lack of potassium and magnesium.
Nevertheless, it continues to develop very well and you can see how the flowers and leaves are slowly turning purple.


Likes
49
Share
@PEAKYPLANTERS
Follow
Hello, fellow growers
I thank you for having dedicated your attention to my garden.
I greet and thank all of you passionate growers who like me make this site a source of inspiration for others...for those who already grow and for those who have never grown
Sometimes I still wonder if we are the ones growing our beloved plants or they are the ones growing us, teaching us something about nature... with every growth... with every failure... with every harvest. Every time... she will know how to surprise you 🤗
Likes
1
Share
@Herbangardener671
Follow
Vaped some lower buds and the taste is as advertised like tropical fruit or fruity pebbles


