


Likes
333
Share


@Terp1
Follow
18.01.2024
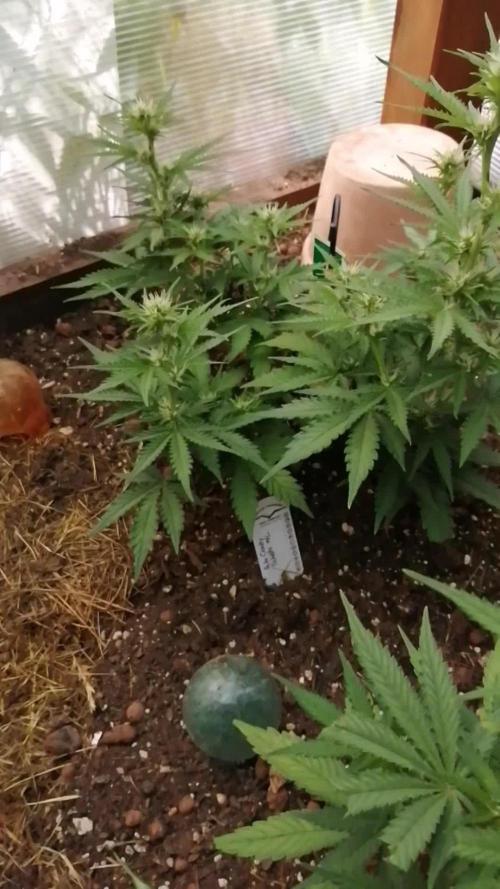
Tag 79 - Woche 12 / Tag 2
Licht: 40cm – 90%
Lichtzyklus: 12/12
Luftfeuchte: 55%
Temperatur: 26°C
VPD: 1,5 kPa
Höhe:
Apple Fritter - 45cm
Purple Punch - 65cm
Gelato - 75cm
Bemerkungen:
Miss Purple Punch wird jetzt unten ziemlich gelb. Ansonsten sieht sie hervorragend aus. Ich weiß noch nicht, ob es einfach nur Nature oder ein tatsächlicher Mangel ist. Ich beobachte noch und gieße am Wochenende einen Komposttee. Wir werden sehen und es bleibt spannend.
Lady Apple Fritter: absolut herausragend die Dame. Die hat einfach keine Probleme und macht ihr Ding großartig! Ich weiß jetzt schon: die werde ich wieder growen.
Madame Gelato: unverändert. Steht da wie eine Diva und lässt sich nicht locken. Sie ist nach wie vor weit hinter den Anderen zurück oder braucht einfach nur länger. Kann nur für die Qualität der Buds sprechen… denn das werden definitiv die Größten und Dicksten von den Dreien. Wir werden sehen, wie sie sich weiterentwickelt.
##############################################################################################################################################################
20.01.2024
Tag 81 - Woche 12 / Tag 4
Licht: 40cm – 90%
Lichtzyklus: 12/12
Luftfeuchte: 55%
Temperatur: 26°C
VPD: 1,5 kPa
Ich hab die letzten 24 Stunden einen Komposttee, vor allem für die Gelato und Purple Punch, gebraut.
- 5 Liter chlorfreies Wasser
- 100g Wurm Kompost
- etwas Great White Mykorrhiza
- das Ganze 24 Stunden lang aktiv belüften (siehe Video)
Ich verspreche mir davon, dass einige Nährstoffdefizite an der Purple Punch noch ausgeglichen werden können, vor allem aber, dass es die Gelato nochmal richtig pusht.
Der Komposttee wird 1:1 verdünnt mit chlorfreiem Wasser gegossen.
Terp 💪😎

Likes
5
Share


@Nvchods3
Follow
ultimas semanas de las nenas,en un par de dias se le realizara lavadl de raiz.


Likes
10
Share


@Azazel420
Follow
Le piante crescono velocemente, hanno avuto un calo di cal-mag ma ora stanno recuperando. Ho fatto un lollipopping e a breve avvio la fioritura cambiando programma di luce in 12/12.


Likes
3
Share


@UrbanBoer
Follow
The craziest strain, this one ever since she started flowering all she has been doing is going in and out of reveggin and flowering, she has even out grown everyone, and the craziest part, is that she uses less grow medium than all the other ladies, I should expect late January harvest, my fear is her not been able to support her buds, as tall as she is, I think I should waiting and see.
Likes
4
Share


@AlpAge_Cino
Follow
Not so much to say this week : everything looks OK. OAH #7 is still struggling to live and will be replaced by feminized Runtz from Pevgrow soon (mother plant for a futur run).
I put back the FC-E3000 driver in tent in order to warm up inside day air to 28-30°C range and let plants manage high RH and CO2 (still between 700-900 ppm, so no CO2 supplement for now) : no problem for Amnesia as it enjoy this kind of temp.
2023/06/13 : another (and last) round of Boom Boom Spray, 5 days after first one, during vegetation grow.
2023/06/16 : as planed, I removed dying plants (#1 and #7) and added one Runtz feminized from PEVseeds for next run with clones. From 10 seeds, 1 never popped and 3 died as root could'nt get out of the Jiffy, so it will be a poor 60% rate!😪
And I almost forgot, pistils are out!

Likes
9
Share


@SamDo
Follow
Week twenty-two is officially done on the Pineapple Upside Down Cake.
This week is a turning point, marking the end of vegetative growth and the start of the flowering transition.
I decided to switch the light cycle to twelve-twelve.
Initially, the plan was to wait for a stronger recovery, but the reality is simple: it wasn’t happening.
The plant was given roughly three full weeks to acclimate after stress, and the response stayed limited.
Rather than staying stuck in an endless waiting phase, I chose to move forward.
This means accepting that flowering may not be extremely vigorous or high-energy.
That’s fine. This run is also about observation, learning, and adapting.
Flowering was initiated gently, at around three hundred PPFD, to avoid adding more stress.
At the same time, I switched the nutrient program to Athena bloom and adjusted the recipe accordingly.
The plant has now been under flowering conditions for about twenty-four to forty-eight hours.
Over the coming week, I expect to see the first signs of stretch.
It’s a bit frustrating, because structurally the plant was doing really well.
The LST work created a clean, balanced canopy, and the potential was clearly there.
Now the focus is simple.
No rushing.
No over-correction.
Just letting the plant transition naturally into flower and observing how she reacts.
Next week will officially mark the first true week of flowering.
From there, we’ll reassess posture, stretch, and overall vitality.
For now, the plant is left alone to settle into its new rhythm.
That’s it for week twenty-two.
See you next week.


Likes
6
Share


@lOlympusl
Follow
I added a second light yesterday. I’m not sure if it’s overkill and if it’ll work well with the other one. They are both VIVOSUN 300w LEDs, the one I already had has a veg and bloom switch, but the new one doesn’t. But hey it was cheap on Black Friday for $63. But having the new one in there quickly increased the heat in there from 75 to 85. I’m waiting for an oscillating fan to throw in there also which will help. Any advice on the light situation? More light spectrum the better?
Update: did my first LsT on all three girls on 12/1. Within 3 hours all the leaves were facing the lights again I was impressed


Likes
11
Share

@All_our_small_plants
Follow
Bewässerung: 5000 ml jeden 3 Tag in der Elften Woche
pH-Wert: 5,8
EC-Wert: 0,4 mS/cm
Temperatur: 20ºC
Luftfeuchtigkeit: 65%
Schädlingsbekämpfung: Diese Woche haben wir ihr Wasser mit Nematoden gegeben da sich doch vermehrt Trauermücken im Bereich aufhalten.
PPFD: Direktes Sonnenlicht
DLI: Direktes Sonnenlicht
-Tag 65 Heute wieder mal gegossen und wir haben den Zaun entfernt und ein Gestell um sie gemacht so können sie sich anlehnen und gleichzeitig auch die Membrana :)
-Tag 69 Heute haben wir die gegossen mir ca. 5l Wasser und 500ml Brenneseljauche

Likes
20
Share


@Bread_n_Buds
Follow
Dear friends, Please consider this week as Harvest, I divide the two plants below the explanation.
We have arrived at the time of harvest for our two Runtz I divide them respectively in the last two weeks to help you distinguish them and because having shot a lot I would like you to look carefully at what we are talking about and please deepen the vision of the trichomes that characterize each plant. They seem similar but you can notice differences and in the macros also look at other details such as the surface of the leaves, really very beautiful.
The plants are not giants by definition, this is a very stable strain with not very high heights, the yield is always medium high but the strong point is certainly the quality of the flower: density, hardness and above all scary resin combined with a super romantic purple shade arrived with the cold in the final.
Beautiful plant, beautiful main cola. Mature very red pistils resin overflowing for real. The purple color is really super beautiful I prepare a nice video where I show it to you.
The trichomes are multicolored due to the presence of purple, here too we have stuff from pink to fuchsia to dark purple plus the classic colors, the maturation is at a point that I don't mind at all.
In weight we will be around 30 - 40 grams but of excellent quality, let's wait for the dry sla and see.
Perfect strain compliments to Zamnesia breeder.
Most likely nowadays those who give the impression of doing Cannabis Industry manage to provide a product of extreme quality much more than the small breeders who are all stealing strains from California and crossing them with their little experiments. It is no longer the era of the flower children although we have to thank them for the anarchic work they did in the 60s and 70s now it's time to work well, cannabis is spreading all over the world and you can compete with the Americans only by working well, like they do in Zamnesia.
How can I prove it to you? In the years in which I was a tester the breeders made me try a lot of good stuff but often, very often, too often I found hermaphrodites. Now always bringing up good luck, touching wood, where the sun don't shine, doing all the appropriate spells of the case we are at
ZERO HERMAPHRODITES.
No seeds, no balls, nothing at all and after all the years that I have heard the "expert freaks" of breeding talk now I feel like recommending the seeds of the industries much more than the small houses.
I thank all the good operators of small houses and I apologize to them but I will never grow their stuff again there is an exaggerated percentage of hermaphrodites. The industries whether you like it or not guarantee success rates much much better. Especially for the wave of beginners arriving.
Zamnesia Strain Description // Guys, we have really reached a turning point! Our breeders have recreated one of the most sought-after strains by Californians: the very powerful and exquisitely delicious Runtz. This cross between Gelato and Zkittlez is everything you could want from a cannabis strain: tasty, powerful, balanced, productive and fast flowering. Buy the seeds and try it yourself!
- Get a seed of this fantastic strain --- https://www.zamnesia.io/it/6000-zamnesia-seeds-runtz-femminizzato.html
The plant has eaten the 100% Organic feeding of Plagron: Alga Grow and Alga Bloom as basic nutrients, the rooting Power Roots, the amino acids of Sugar Royal, the Enzymes of Pure Zym that eat the dead parts in the soil, Power Buds that always gives us immense satisfaction with rapidity of start of flowering and composition of the buds, the legendary Green Sensation that now needs no introduction, a name a guarantee. Also the foliar Vita Race used for the first time with success.
The fertilizer kits that you can find on the Zamnesia website are perfect
for this purpose, there is everything. Choose them based on their mineral/organic composition and the soil you have chosen.
at the link --- https://www.zamnesia.io/it/11457-plagron-easy-pack-natural.html
The quantity was measured using the sheet prepared on purpose on the Plagron website based on the soil chosen: Plagron Pro Mix + Perlite.
at the link --- https://plagron.com/en
The growbox is the DS120w by Secret Jardin as well as the DF16 ventilation system and all the fans
at the link --- https://www.secretjardin.com/it/
The light was supplied in the past by Viparspectra and it went crazy but it came back to me to produce very well too...
at the link --- https://www.viparspectra.com
A fantastic selection of seeds, a headshop and a selection of exceptional accessories on the world of cannabis, many other things about mushrooms, health, well-being and all the beautiful things that nature offers only on the Zamnesia website
at the link --- www.zamnesia.com
Instagram ----
@zam.nesia - @zamnesiawebshop - @zamnesia_usa - @bread_n_buds
Likes
17
Share


@Silky_smooth
Follow
She is doing lovely
She has been grown under the amazing powerfull xs2000 by viparspectra and if you decide to order at viparspectra feel free to use the code SILKY and get Some discount
https://www.viparspectra.com/?aff=435&utm_source=affiliate
Likes
6
Share


@Susquihanna
Follow
We had a lot of rain last week and unfortunately Do-si-dos wasn't dancing to new heights like her counterparts. This week will be full of sunshine so hopefully she will start her growing dance. I read information on the Royal Queen Seeds website concerning her growth this week and it said that DoSiDos is a plant that reaches heights of 40 inches to 55 inches for an outdoor grow. Royal Queen says it is a very "compact" plant that is easy to grow.
The website also says Do-Si-Dos should be ready to harvest 9-10 weeks after sprouting. I think about the end of July or the beginning of August we should be able to harvest.
Comments are welcome and dancing is allowed.


Likes
24
Share


@Bncgrower
Follow
Harvested last night, truly strong smell, cultivation was absolutely perfect from start to finish. Very happy with the result, anxious for the drying and curing process! Thank you for following along.. 🤜🤛🌱🌿🌲
Processing
Likes
4
Share


@GaliforniaWeeds
Follow
Día 21/9/20 día 15 de floración
Buenas hermanos, hoy añadimos un nuevo producto de la gama Cyco. Cyco kleanse que se encargará de eliminar exceso de sales en el sustrato si los hubiera. Una nueva ayuda para lograr una gran floración en estas nenas.
Día 23 /9/20 día 17 de floración
Buenas. Todo avanza correctamente, las temperaturas siguen bajando y ya están entre 22 y 24 grados,casi lo ideal. Por otro lado seguíos manteniendo la ec a 1,3 aprox aunque en breve la aumentaremos y el ph sigue entre 6 y 6,2. Las nenas se están portando como campeonas y afrontan muy bien la floración aunque tb ayuda tener las luminarias trabajando al 100%, 1030w en total.deja tu like y síguenos si te gusta el diario!!
Día 25/9/20 día 19 de floración
Amanece un nuevo día y las peques estas radiantes. Las hojas se multiplican día a día por lo que en breve habré que hacer una nueva defoliación. Sus pequeñas flores crecen día a día a un ritmo muy rápido y al mismo tiempo su aroma se multiplica. Es cuanto a la alimentación seguimos sin cambios y la temperatura y humedad se mantienen como en los días anteriores.
Día 27/9/20 día 21 de floración
Hoy nos ha tocado hacer una nueva defoliación para permitir El Paso de la luz. También aprovechamos para vaciar el tanque de nutrientes y hacer una limpieza, después volvemos a preparar la solución con 1.45 de ec y 6 de ph. Las temperaturas se mantienen entre 22 y 24 grados. Si todo sigue así en breve veremos un buen engorde de nuestras flores, no te lo pierdas!

Likes
7
Share


@green_impression
Follow
The Ladys are now in their last week and only going to be flushed without nutrients till harvest