The Grow Awards 2026 🏆 


Likes
3
Share
@dwotTV
Follow
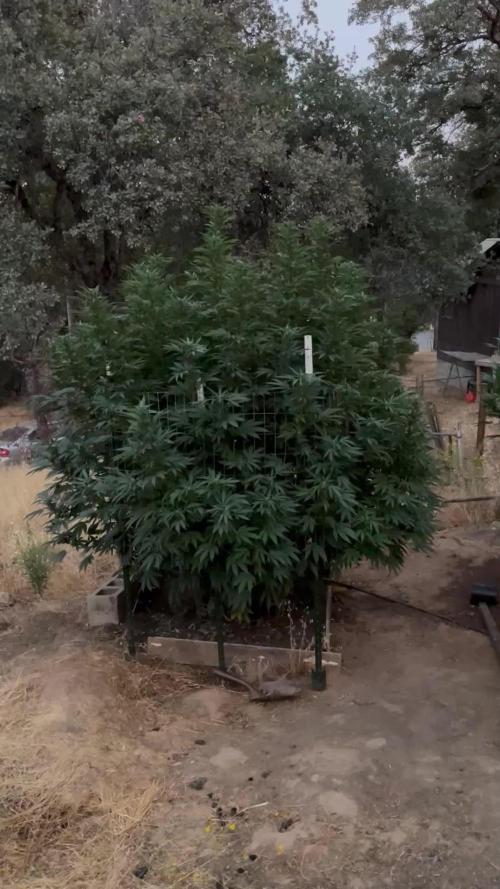
8/30 - Week 4 ends and we are heading into flowering. Fed the first dose of 1/2 strength Fox Farms Soil schedule for week 5 today. 3rd feeding overall, all half strength.
8/29 - Alright, heading into flower, had some moisture / airflow issues with how damn bushy she'd gotten so had to chop some more on 8/28 evening. Rebounded nicely 8/29 and we've got a good amount of tops coming up now w/ some preflower starting. Looks like we're heading into flower properly now and should be stretching soon. Fed another round of Fox Farms soil week 4 last on 8/27.
8/26 - Been tying it down and adjusting daily, getting some good spread w/ a good # of bud sites coming up. Some stretch would be welcome to fill out the space a bit and get some room to work with. Don't want to chop too much leaf off as it's flipping to flower but it's crowded. Fed Fox Farm Soil Feed at half strength on 8/24.

Likes
11
Share
@Hickhhdgk
Follow
All looks good with this freak, starting to get big. Has more than doubled in size in 10 days, think I might have upped the feed a bit soon and got a bit of nute burn so back down a bit and seems to be fine. Gonna have to thin her out a bit as she is hella bushy. 🔥🔥🔥🔥🔥🔥🔥🔥🔥

Likes
74
Share
@Mr_Maes
Follow
We are officially in full bloom. The have been enjoying 6-7 hours of sun light per day for about 4 days now, then brought back in under the cobs. The girls are all exploding with growth and stacking what I expect to be huge buds.


Processing
Likes
41
Share
@Wicked_Stix
Follow
Been wanting to try out this auto ghost og from original sensible seeds for a while and finally got the opportunity to get one wet.
I originally started this setup to compete in the solo cup challenge, but I needed something that will be minimal maintainence and doesn't require hand watering. So this is what I ended up with. I will not be entering since I know it will bring controversy, but I am going to follow the rules and treat this grow as if I am competing.
I didn't want to use regular solo cups because last time I had a lot of algae growing in the root zone when I harvested. I opted to use a black light proof cup. These cups were 27 oz originally so I filled them with 16 oz of water, marked the level, then cut them down to 16 oz. I set the drain pipes about an inch from the bottom so they have a little reserve if I have pump or power issues. I know people will see the drains as a way for roots to grow out of the cup but in reality I have to keep the entire pipe free of roots or it will clog and overflow. So I am actually losing a little volume due to this.
I filled the bottom inch or so of the cups with river gravel to stop the perlite from washing into the reservoir.
I am running a 5 gallon reservoir with a small air pump and the plants will be getting irritated 24 hours a day from an aquarium power head pump. I set the system up to be totally self contained and easily portable. It was all built from things I had laying around other than 97¢ for the cups. I will be keeping the feed simple as always feeding maxigro and maxibloom with a couple flower boosters.

Likes
14
Share
@JamieKnolliver
Follow
Endlich bereit für Blüte, stelle das Licht auf 12/12 Zyklus und lasse die Lampe nun mit voller Stärke auf 500watt laufen.
Habe einen Mangel festgestellt, der wahrscheinlich auf das fehlen von CalMag zurück zuführen ist.
Außerdem ist es Zeit die Pflanze großzügig zu entlauben.

Likes
1
Share
@Thedankflorist
Follow
So we're here again. Seem to have got the worst of the slug and s ail problem under control. Just hoping they haven't done too much damage. She's looking really healthy and really taken well to biobizz nutrients. I'm tying her down every couple days and have started tying out some of the branches. Hopefully we'll start to see some preflowers soon. Thanks for checking in. See you next time.

Likes
15
Share
@Antony_mow
Follow
Нам уже мало места, много новых стволов после lst, жду на днях новый гроубокс и лампу, так же через 2 дня начну вводить GHE nutriens

Likes
4
Share
@Big0zGrower420
Follow
Learned a lot from this grow and am very happy with the results. Pulled 2.8 Oz and 1.1 Oz of trim/popcorn buds in a one gallon pot. Definitely wont be doing that again, but had a lot of fun throughout the entire process. Going to be starting another grow soon! Very excited for that.

Likes
5
Share
@rackstacked
Follow
Plants are going great, top dressed and been watering with 1 gallon for all plants. No problems flowering great, couldn’t be easier.


Likes
5
Share
@LittleBigTrees
Follow
I've defoliated a few leaves, they are starting to show viable trichomes now.

Likes
47
Share
@Northern_Ent
Follow
Aug 24: starting the sixth week of flowering and this Blueberry Pie F1 Fast is amazing. The development of the flowers has been very fast and they are nice and big and thickening quickly.
Thanks to Mrs.Larimar and I totally agree that these F1 hybrids are amazing.
Did a watering round with potassium silicate, and likely the last one but we’ll see.
Probably three weeks at most to go, so no more molasses and now mostly just pHed water to the finish line.
Did a final light application of malted barley and Power Bloom and watered in. Removed fan leaves that were growing inward and shading buds.
Aug 25: Flash pics are only okay when using a far red light after. Don’t take flash pics of plants unless you also have a red light. Having said that, I love taking flash pics of my plants.
Aug 26: sunny again but not too hot and had the UV lights going. To spread the UV around I rotate the plant 90 degrees three times. This seems to be okay. This plant is the furthest along in flowering so I’m giving it most of the UV light and the slower ones can wait until they’re closer to harvest.
Aug 27: she’s doing great. Up to 12 h of rain tonight with the potential for a pretty intense thunder or hail storm in middle of the night. All plants are in the garage tonight to ride it out.
Aug 28: spent last night in the garage to stay out of the all night rain that was forecast. Turned out to just be light rain. Overcast all day and no UV light today.
Aug 29: this plant is amazing, but I’ve said that before. The other day I noticed that some branches on the side are heavy enough that they are now slumping against the SCROG net. Fun to see that.
The flowers are noticeably bigger each day and she still looks very happy. She is also becoming quite top heavy but the water bottle weights and five gallon pails of water hold it stable in the winds.

Likes
14
Share
@Northfork
Follow
8-24-25
All of the girls continue to do well they’re no longer stretching. I believe they’ve reached just about their full height starting to stack pretty well with buds Dosie Dough 33 is the farthest along with the runt’s layer cake being the least farthest along. I’m going to add a photo of some really good amendments that I have been using. I would encourage individuals to look into these nutrients, if interested in a large harvest of organic buds.
Likes
22
Share
@RDWCGrowing
Follow
1/11/2024 Vegetation Week 1 Day 1- I have a root almost in the water.. Yay!! Top feeding is almost done. she is looking a little sad as I work the transition Top feeding but once the roots are fully in the water she will start to take off. Ensured my PPFD is set between 250-300 it is set to: 258
1/12/2024 Vegetation Week 1 Day 2- I have a root in the water.... NO TOP FEED TODAY SIR!!! now that a root is touching the water and she looks stable, I am not going to topfeed, I will see how she looks tomorrow and as long as everything looks good I am going to go ahead and do a change and week 1 fill on Nutes.. I know it is a couple of days in but the same Nutes go through Week 2 and get changed at Week 3 So I should be good to go.. I will just ensure I fill to root touching the water when I change tomorrow.
1/13/2024 Vegetation Week 1 Day 3- Water Change Day!!
I added 36 Gallons of Water to the system:
Silica= .5mil/gal= 18mil
CalMag= .75mil/gal = 27mil
FloraMicro=3.0mil/gal = 108mil
FloraGro=2.0mil/gal = 72mil
FloraBloom= 2.0mil/gal = 72mil
PH DOWN= 30mil
Very important thing with this system is to now wait the 24 hours for the system to adjust.. Do not make any further adjustments to your PH up or Down for 24 hours to allow time for the system to balance.
1/14/2024 Vegetation Week 1 Day 4- Today I just adjusted the PH to ensure that it was right at 6.0
1/15/2024 Vegetation Week 1 Day 5- Today I Cleaned up the lower damaged leaves from the transition from top feeding to roots in the water. She looks good today.
1/16/2024 Vegetation Week 1 Day 6- Today I just took a picture of the beautiful lady for Log. Other than that just normal day to day operations, check the pH, check the Humidifiers and fill as necessary, check level of water in the Res. Everything looks great. onto Tomorrow!!
1/17/2024 Vegetation Week 1 Day 7- Today I filled the humidifers, checked the PH and just let her grow.. Grow baby Grow.....


Processing
Likes
6
Share
@russrahl
Follow
This week they realy started to grow some buds! Blueberry by canuk seeds is really impressing me! girl is not even half way through and already massive buds comming!


Likes
12
Share
@VaruSmokings13
Follow
Comenzando la tercera semanita, con estas niñas, que tienen buen aroma y aspecto, ya aplicamos fert. Por primera vez.
"Crema de caramelo" sweet seeds.
Likes
22
Share
@herbalistssword
Follow
To think people were telling me to chop her off because she looked deformed when she was young! glad I didn't listen to them as she turned out a beautiful plant!
100g of really nice dark purple bud.
Really great strain, grew well without much care and produced really intresting looking buds.


Likes
14
Share
@AndrewC
Follow
So this is the Tear Down week. The timing of it makes it so i will need to the harvest flag in a few days when I can weight and test the plants.
I have included the Cleaning, and Cutting and some Root Porn.
I will make the harvest post in about 4-5 days, when I can trim these plants. There is a lot of Plant here. I got way more than I was expecting. I don't have a scale that measure this amount of plant, without taking like 10 measurements and then adding them together. So I will just be posting the dry weight. I will post the wet weight as dry weight * 1.65.
Autopots: Wow, what a great product. I have been blown away by how well and how easy it was to work with them. They really did solve the watering issues. Excellent product. If you are a beginner, start with Autopots.
-= Lessons Learnt =-
- Overdrive the air to your Autopots. In my control plant, I used a small rectangle air stone (instead of a standard air dome). This lead to root rot and some other issues, it also put significantly less air into the water. The root rot, give the material for the Brown Algae to grow. Using a huge Air-disc-Air-Stone would be an excellent combo to mix in with the air dome itself. Something like this: https://www.amazon.ca/Pawfly-Diffuser-Suction-Hydroponics-Aquarium/dp/B01MY3AQ33 at the bottom and the air-dome on top of it, will be what I do with my next experiment.
- Air stone in the reservoir. I had two instances where algae grew into the res. An air stone would have helped. It would have also helped my control plant get less root rot. Given the amount that the air-domes and air sources got engulfed, having the water have more o2 in it would have only been beneficial.
- Don't grow 6 plants in a 4x4. Since my control plant was about 1/8th the size of the others, I think I could have grown 5 in the shape of a 5 (on a 6 sided dice)⚄ This placement would give a much more spaced canopy for airflow and more importantly light. The sides of some of the plants were lighter green and produced larf due to lack of light penetration.
- This tent was on 19-5 schedule. This worked out very well for this strain. After every lights on, they were in the praying position, so this strain was able to recover in that 5hrs off. If I had more seeds, I would run these again, and try 20-4. I think this strain could handle it. All for all, I think I'm going to 19-5 as my default timing. This kept up a solid DLI.
- Staring at .9EC (really .7 EC cause my water here is .2 EC) Then bumping up at .1 a week, until 1.6EC worked out VERY well. I experimented on this crop all the way up to 1.9EC, which burnt the tips of this plant. I think if I did this strain again, I would do 1.6EC until 3-4 weeks left then crank it to 1.9. It did plump them up when I went to 1.9, however it left them looking rough. Bulk was added though.
- Sticking to 6.0PH for all of veg, and 2 weeks into flower worked great. The plant had solid and consistent color and leaf shape . The plant's did get hurt, due to some issues (as noted on the weeks). I switched to 6.5 PH in the last 3-4 weeks and it helped them recover, and plump up noticeably.
-VPD. The #1 thing I focused on was VPD. I keep it .9kpa range, as best as humanly possible. It was honestly, HUGELY noticeable compared to my other grows. I know truly understand the value of properly dialed in VPD. This is the one lesson that will stick with me forever.
- Super-cropping: On the plants I give the chiropractic treatment too, had much thicker stems as much larger channel internally. I did this treatment to 4 of the 6, and the 4 that had it done has larger buds and recovered from defoliation faster.
TLDR; VPD is king. Super-cropping is worth the time. Keeping PH and EC dialed in were all wins. Autopots kick ass.