
Processing
Likes
Comments
Share


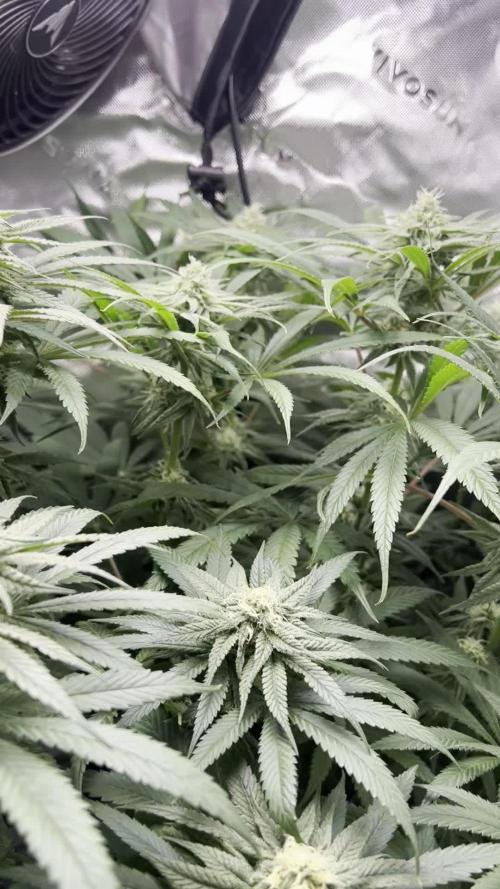
@CreoWeed
Follow
Hey guys, this other week went very cool, I start reducing the nuts to the minimum and I can see really how fattening are the buds.
Now I can see some pretty milky trichomes, and just few cloudy, so I consider to chop in max 2 full weeks... (71 total days from seed) but anyway I'll adapt to how the plant is at that time.
The smell it's absolutely, insanely strong and ill need to buy ASAP a carbon filter to reduce it.
The only issue encountered in this grow was keeping low the humidity, and in fact I was not really able to do so as it stands at 55-65...but without noticing any mold issue on flowers.
Can wait to update this post next week!
Stay tuned, stay high!

Likes
10
Share


@Jorge420
Follow
I been ill for 3 weeks so i am back again with the Green Poison and Auto Trippin 25 plants. From some strong GP i am going to take some Clones and the rest 12/12. AT25 already in flowering week 2, some of them in 6 Liter and some in 10 Liter pots. I was too late with transplanting them from 1 Liter into bigger pots thats why some of them are pretty small.

Likes
2
Share


@Elguacho420
Follow
Buenas a tod@s... Bueno otra semanita más de estas hermosas nenas, ya más grandes y empezando a desarrollar sus frutos, la verdad q están creciendo muy bien, sin problemas, aunq hay veces q la temperatura este un poco alta las voy controlando y van muy bien, este cultivo yo creo q promete para bien... Me gusta ver buenos resultados cada vez q empiezo un cultivo nuevo, super contento y las niñas tanbm... 🙌🏻🙏🏻💀😎💪🏻 Buenos humos para tod@s...🔥🔥💨💨
🇦🇷🤝🏻🇪🇦


Processing
Likes
22
Share


@WolverineGreens
Follow
Bruce is the tallest
Biggest bud is white widow or headband
Best smelling Skywalker
Getting bigger everyday
Res sprung a random leak lost bout 40 gals b4 I caught it. Think everything did what it was supposed to and no damage was done inside the actual room.


Likes
17
Share


@MrbeanTeddyVn
Follow
Chà chà, thời gian thu hoạch của hãng là 63 ngày. Nhưng có vẻ những chồi đã chín sớm hơn dự định, những hạt trichhome cũng đã chuyển sang màu hổ phách. Có lẽ 1 tuần nữa tôi sẽ flush và thu hoạch.


Likes
27
Share


@Roberts
Follow
Things are going great. Took well to the training. Time to watch them grow, trim a leaf here or there if needed. Thanks anyone whole likes and follows.
Likes
18
Share


@Grower_Of_Persia
Follow
week intel:
its time to harvest some of plants the ones that is mature enough. indica dominant plants will done first always so we should harvest them first
because my base nutrients and one of boosters was salt based, i'll do flushing this week to get some relieve to plants in the last days
stresses :
flushing
Drought stress via watering only one time with flushing this week
feeding:
day 1 : i flushed them with Advanced Nutrients Flawless finish and adjusted ph
day 3 : no more feeding from now on
day 5 : no more feeding from now on
guide of the week :
i harvest in 2 parts : first i harvest top of the branches and will let the lower buds to ripe another week then ill harvest the second wave.
indica dominant plants will get done 1 or 2 weeks sooner than sativa dominant plants that will often takes more than 8 weeks so be aware to harvest them sooner.
my dry and cure style is this:
3 days of hanging upside down to get water activity lower to around 0.6 in 50% humidity and 26 C temp (i know its a little high but we are in a hot summer right now and i cant get it lower even with air conditioner) and then after 3 days of drying i remove leaves and stalks, trim buds and move them to jar for the rest of their life :D . and in the first 4 days of curing i open the jar door and let hem get some fresh air in the jar for about 5 minutes and close the jar door again, after 4 days of curing like that buds are smokable but they will get better as they getting cured about 1 month.
im happy as hell with this harvest :D.


Likes
2
Share


@PrinceOfHerbs
Follow
The plants become surprisingly resinous and have a very pungent odor. The Strawberry Gorilla is already turning purple.

Processing
Likes
12
Share


@Therbalist
Follow
Lowered the time by another hour last week and they seem to be flowering under 14 and 10. Nice smell coming off them now, haven't given bloom yet but I plan to tommorow I think.

Likes
15
Share


@Sid93
Follow
the plant keeps swelling at a slow pace. looks bigger every day and smells stronger


Likes
7
Share


Likes
24
Share


@DeepRootsGrowTrees
Follow
SWISS DREAM ROSE 🌹 CBD AUTO
ORGANIC GROW by KANNABIA
Week #13 Overall
Week #10 Flower
This week she's looking amazing she's got a about a week or two left before harvest and she has a 😋 sweet arouma to her!! Stay Growing!!
Kannabia.com
SWISS DREAM ROSE 🌹CBD AUTO

Likes
11
Share


@902EastCoast
Follow
Ladies are looking awesome! They have a week or more left but will see tomorrow when I check the trichs. They smell so good , mouth watering and they chunked out. I see worms in my organic living soil which is pretty neat.
Likes
13
Share


@cheesensugar
Follow
noticed a little rust spotting on #2 and the purple so hit them with some epsom 1tsp/G in the resi...also top fed another dressing of Gaia Bloom 1tsp/G and watered in compost tea. They loved it ! Insane smells off #1 exactly what i want crazy candy lemon rindes terps...i get cakey / pie terps off #2 really sweet and the purple lemonade i get a pine nose and koolaid mix goin on ...blu-mats for the win too 💧💧💧light defo on blocked budsite and dead yellowing bottom leaf✌️
Likes
3
Share


@Whosaysgirlscantgrow
Follow
Last week or so on this one. She’s got one last feed and then we will be heading to flush in the next 3 or 4 days. Aiming for the chop in 7 days ish. She smells like a sweet shop, starting to change to purple in places! I can’t wait!
Still using Monkey Nutes

Likes
2
Share

@ThePurpleAlchemist
Follow
These 2 girls are still growing strong 💪 The smells coming from doing a stem rub are ridiculous! If you've ever smelled blue dream in flower, it smells pretty much exactly like that which makes sense since blue dream is one of the parents of Tropical Cooler.
The plant on the left has buds with more hairs and the plant on the right has more of a pale yellow on the hairs compared to the left. I'm interested to see if there will be any more differences between the 2 phenos.
Also, the top fan leaves on the left have some purple starting to creep in!! 😬I'm geeked to see what they become!
Happy Growing everyone!!
