
Likes
Comments
Share


@jporfiado
Follow
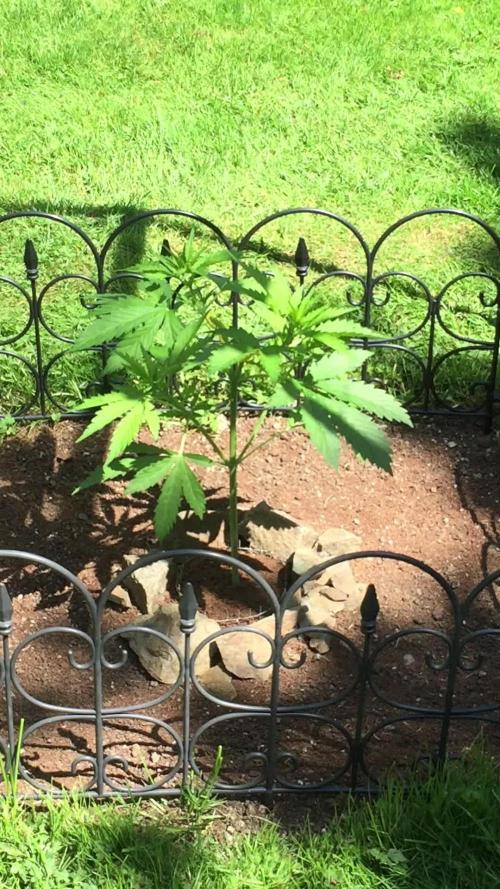
Las plantas se ven bien, me hubiese gustado que estén en una maceta mas grande. Intentare hacerlo esta semana aunque no se si sea lo mejor a esta altura.


Processing
Likes
23
Share


@GrowGuy97
Follow
3 of the ladies are in flush will be cutting them down within the next or 2 & the other 2 probably have another month left! Fingers crossed for harvest!🤞🏼✌️🏼🌱
Likes
3
Share

@MyWetPussy
Follow
Day 36 Cloudy with periods of rain.
Day 37 Cloudy
Day 38 Sunny
Day 39 Cloudy
Day 40 Sunny
Day 41 Sunny
Day 42 Sunny
Week review: Plant is looking healthy with no issues. On day 38 she started to show white pistols. Day 41 I added two bud clips on the top two branches to spread them out some.
😍
Processing
Likes
16
Share

@Matahierbas
Follow
This week all I wanted to see some kind of growth and I kinda see it, they both still look sad , the first plant looks like it's doing "ok" I do see new roots developing so that's a good sign.
The 2nd plant still some brownin' appears on some leaves I don't know BUT I do see new roots growing on her my question is: should I still keep her going? OR let her get the axe?
The deficiency still appears and I've done everything on the book but don't wonna give up on her (just yet) but I really don't know what to do with her? I wonna give her sometime see what she tells me or if u guys know what am doing wrong I would greatly appreciate


Likes
2
Share


@fabialien
Follow
Semana del 9 al 15 de septiembre 2024.
Las Positronics auto aun no Entran a Floración, y ya van bastante avanzadas, mientras las otras, unas van muy flacas y otras si van bastante gordillas.


Processing
Likes
13
Share


@Beast5650
Follow
Water Day (half strength)
- [ ] Kangaroots, Microbe Brew, Grow Big, Distilled Water, Ph-6.8, PPM-890).
- [ ] Lessons Learned - Ph Up/Down from fox farms is super strong, huge upswing in 500ml distilled water with only 0.25ml of pH Up.
- [ ] I think I need to pH water before adding nutrients. Can anyone verify this please?
- [ ] Will transplant to recirculating dwc soon, until then probably watering every 3-5 days with current nutrient mix. Can’t wait to get it under better lights!
- [ ] Most likely going to mainline if it all works out ok.
6/10/19, DAY 26, UPDATE:
Water day due to transplant
Decided to change plans a bit. Transferred to big fabric pot and fox farms ocean forest soil. Will grow plant out and cut clones. Will then put clones immediately into DWC setup. This mother plant will then be moved outdoors to flower. Hopefully it all pays off!
Day 29
6/14/19
Decided to clear all fan leaves that had less than five fingers then top at the 4th node and LST the remaining fan leaves. The goal is to eventually cut two clones off of the the 3rd node and mainline everything else starting at the 4th node. At least 8 colas is the goal, ideally 16. We’ll see tho,
Very surprised at how quickly the leaves pointed back up toward the light and recovered from the lollipopping/topping/LST.
Any and all suggestions are welcome! Lofty goals for my first grow ever, hopefully it all works out.
Likes
27
Share


@valiotoro
Follow
Pheno 1 dark purple : On the nose, it reveals a sharp burst of fresh lemon, layered with a powerful eucalyptus aroma that’s both invigorating and camphorous. A truly refreshing and vibrant terpene profile😈🍋
Pheno 2 Green : this one is a real surprise! If I close my eyes, it’s like Nutella! It’s as if you’ve just walked into a kitchen where hazelnuts have been freshly roasted 🤤🌰
Pheno 3 light purple : It’s a mix of the first two with a hint of amarena cherry at the end🍒🍧
Likes
7
Share


@Sabac
Follow
Primera semana. De mis plantitas.
Creciendo sanamente. Hay 2 que se quedaron un poco atrás en crecimiento, las 17 restantes todas parejas. Esperemos que sigan creciendo de forma normal y sin problemas.


Likes
60
Share


@m0use
Follow
Not a while lot to report on this week. plants are growing well. add in some BTi from a mosquito dunk and will apply some more next week. Plant number 3 Yellow is the most crystaly out of the three and the strongest grower. It also had the highest PH when I checked the other week. IDK if this if anything, I would think it would be doing the worst given its close border to PH lockout. Plants are nice and smell now too. All the little cuttings I took I forgot about and they died, But the clones that where rooted and chilling outside are mostly good. The clones of plant #1 Blue are dead, but plants #2 and #3 aka Red and Yellow are doing just fine.
Starting to get all my deck ready for this seasons grow. I think I will be trying out a good amount of Autos outside, Hopefully they won't mine the soil mix as its been to much in the past.
We will see how they do. Also prepareing a little how to guide for m0uses haus of projects. Styrofoam planters.
Big shoutout to Medic Grow for sponsoring the lighting in my tent, They have provided me with 2x Mini Sun 2's in the 240w configuration, They use the v1 growing spectrum that is a all purpose seed to harvest spectrum so their is no hassle of switching it mid grow. If you're interested in learning more about Medic Grow products please visit the web link below.
https://medicgrow.com/
https://growdiaries.com/grower/MedicGrowLED

Likes
2
Share


@eldruida_lamota
Follow
Que pasa familia, vamos con la cosecha de estas Gorilla Cookies Fast Flowering, de FastBuds.
Por dónde empezar, las flores son bien compactas , y van repletas de resina, tienen tonos por dentro muy bonitos, y tiene un aroma a galleta.
Es muy sencilla de cultivar, es de ciclo corto mdio aunque también si le dais una semana más no pasa nada agradecer se agradece al final.
Mars hydro:
Code discount: EL420
https://www.mars-hydro.com/
Agrobeta:
https://www.agrobeta.com/agrobetatiendaonline/36-abonos-canamo
Hasta aquí todo, Buenos humos 💨💨💨
Likes
1
Share


@Green_Peace
Follow
Added Buddy into the feed halfway through this week. Really impressed with these nutrients so far. All plants look happy, healthy and green.
Likes
44
Share


@SooSan
Follow
12/12 + 130 jours
Vu qu’il y a 16 plantes mais que sur growdiaries on ne peut mettre que 8 variétés j'ai divisé en 2 diaries pour le bas de la tente
1️⃣
🏠 90x60x90
☀️ FC-E 4800 => puissance a 60%
🍁
Black Bomb / Philosopher Seed
Amnesia Lemon / PEV Seeds
Amnesia Lemon /PEV Seeds
Blueberry / PEV Seeds
Blueberry / 00 Seeds = 17g
Wappa / Paradise Seed = 11g
Dark Phoenix / Green House Seed
Quick Sherbet / Exotic Seeds = 14,5
Mango Cream / Exotic Seeds
Banana Frosting / Sensi Seed = 11g
Hindu Kush / Sensi Seed 10,5g
Mix 1 / Sweet Seed = 26,5g
Mix 2 / Sweet Seed = 15g
Mix 3 / Sweet Seed = 22,5g
Mix 4 / Sweet Seed =
📎 https://growdiaries.com/diaries/122084-grow-journal-by-soosan
📎https://growdiaries.com/diaries/124052-grow-journal-by-soosan
2️⃣
🏠 30x60x50
☀️TS1000 => 100w = 54g
🍁
Quick Sherbet - Exotic Seed = 12g
Quick Sherbet - Exotic Seed = 12g
Quick Sherbet - Exotic Seed = 17,5g
Quick Sherbet - Exotic Seed = 12,5g
📎 https://growdiaries.com/diaries/122080-grow-journal-by-soosan


Likes
14
Share


@heavengarden
Follow
The first pistils appeared a little earlier then expected, but it has be developing very well. I’m excited! I believe the growth is going well. I’m very happy and excited!

Processing
Likes
10
Share


@WackoMastermind
Follow
Day 8 | Sun. 7/22/18
N/A
Day 9 | Mon. 7/23/18 2:30AM
1. Fed with Big Bloom, 5.8 pH RO/DI water
2. Setup time lapse camera for 6AM - 12AM (18 hrs.) (1 shot/30 seconds, 2160 frames, shown at 240 FPS)
Day 10 | Tues. 7/24/18
1. Time Lapse
Day 11 | Wed. 7/25/18
1. Time Lapse
Day 12 | Thurs. 7/26/18
1. Time Lapse
Day 13 - Fri. 7/27/18
N/A
Day 14 - Sat. 7/28/18 12:00AM
1. Light water with 5.8 pH RO/DI water

Likes
18
Share


@ChitownCannaChica
Follow
What can I say? I love this little plant! 2 regrets—- didn’t veg it longer (contest is over soon) and did not pop all the seeds (you guys know about light space shortage). This thing grows easy, greasy, and happy. Just love the ease of this baby. Probably will take it down to the wire for the contest entry, but she is a beauty.
Only thing I did this week was a little added a little more soil for a top dress— normal water and lotus nutes and added some Roots Lush soil just to cover some exposed roots. ✌️🏻💚🌱🌿


Likes
3
Share


@Myrnie
Follow
Had to flip finally. My other plant finally broke out of the stunt or whatever slowed its grow so it needed to flip.