The Grow Awards 2026 🏆 


Likes
Comments
Share
@HegauHillsFarmers_M11
Follow
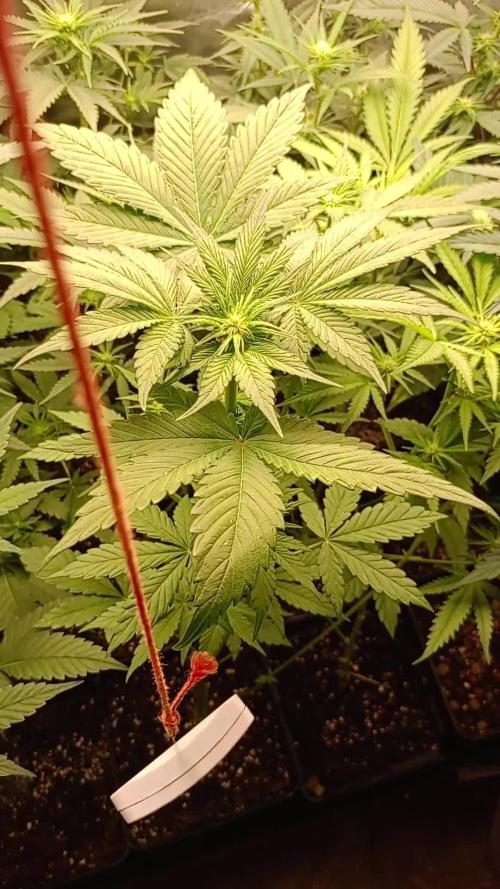
Tag 63 - Beginn der 10 Woche.
Die Blätter haben sich diese Woche leider weiter verschlechtert, Blätter vertrocknen und sterben ab, zudem kommt, dass ich an den einzelnen Blättern Anzeichen von Stickstoff oder Eisenmangel wahrgenommen habe. Deshalb habe ich den ph-wert weiter gesenkt um der Pflanze die Aufnahme der Nährstoffe zu erleichtern. Seit dem ich Mitte letzter Woche den pH-wert gesenkt habe, habe ich den Eindruck, dass das Blattsterben sich verlangsamt hat. Ich werde das weiter beobachten.
Leider kann ich nach wie vor nichts gegen das übermäßige Licht und die Hitze an der Pflanzenspitze machen. Jedoch bin ich beeindruckt wie viele Fehler die Pflanze einem verzeiht, denn die Buds einwickeln sich weiterhin super, sind frostig und duften wahnsinnig süß!
Ich bin weiterhin gespannt wie sie sich die nächste Zeit macht und werde weiterhin mein bestes geben um ihr den Stress zu reduzieren.
Gedüngt wurde an Tag 58 der letzten Woche.
Nährstofflösung:
1 ml/l - Sensi Cal-Mag Xtra Advanced Nutrients.
1 ml/l - Big Bud Advanced Nutrients
1 ml/l - Bud Candy Advanced Nutrients.
1 ml/l - B-52 Advanced Nutrients.
2 ml/l - pH Perfect Sensi Bloom Part A.
2 ml/l - pH Perfect Sensi Bloom Part B.

Likes
8
Share
@IndoorHealer
Follow
Its was great to finally grow my own weed , i felt really good and im so happy with the result , my best choice was to get a experienced guy to help me trought the way , it definitely saved me a lot of time and mistakes , thanks to @bengrowerbr instagram . Now i have two headbangers already flowering on my grow , those are not from any seedbank but they are looking great , i will give her a diarie as well , thanks for being here and lets get medicated!

Likes
5
Share
@Jays_Not_Here_Man
Follow
Seedlings are doing well! The 1 that is about 4 days older is showing good growth. I’ve been able to keep the humidity high enough and haven’t overwatered them yet! They are getting about a cup of water, starting with the outside rim and working my way in. This is about every third day or so. Not much else, it’s been an easy week. Happy Gardening 👊🇨🇦❤️


Likes
7
Share
@Chucky324
Follow
Hello. This is the end of week 9 and the beginning of week 10 of veg.
Quite week for the plants and us. It's above freezing now, but it's one storm after another here.
The plants are dong well and I'll turn over to flowering next week. I'll make clones at that time.
I'm after the best plant so I'll whittle the 14 plants down to 1 or 2 plants when I'm done.
But I have to take 3 clones of each to be sure I get 1 to regrow when it's done. So I'll be doing that this week.
My next trim/prune will be before the 3 week of flowering, before the resin starts to flow.
Through this veg I've been giving a full feeding and then just watering and then a full feeding and then just watering.... You get the idea...
I let the pots dry and hopefully water/feed before I get any wilting.
We've started a new Freak Bros. book. Comic Book #10 Published in 1987. It's the 3rd in the trilogy.
You'll find the first 2 comic books in the story in other diaries. Have a look around in my other diaries and you'll find them.
OK. Have fun out there.
Chuck
Processing
Likes
33
Share
@cojastym
Follow
floweeer
start day 104
change fertilizer from nettle to chicken manure, from my free run chicken yard

Likes
3
Share
@RedbeardGrow
Follow
G.23: le piante sono in salute anche se la g.p. ha le foglie un po' basse, non noto carenze, ma penso che abbia bisogno semplicemente di più acqua (al giorno 21 ho dato 300 ml, al giorno 23 600 ml).
Controllerò domani per vedere se migliora
G.24: le piante hanno risposto bene all'innaffiatura e oggi i vasi erano di nuovo leggeri come ieri, perciò nuova innaffiatura da 500 ml per entrambe.
G.27: come dalle foto ho messo un piccolo umidificatore a causa dell'eccessivo caldo (30% u.r.). Le piante crescono bene. Sto mantenendo le quantità di fert più basse rispetto alle volte precedenti e mi sta ripagando con un bel verde delle foglie.
Questa settimana le piante hanno iniziato ad avere molta più sete e ad ogni giorno che ho pesato il vaso era sempre leggero.
Continuate a seguirmi per nuovi aggiornamenti.

Likes
28
Share
@Salgeezi
Follow
Plants are almost done. Feeding at 400 EC. Slowly getting them ready for flush. The front right lady seems to be about a week behind but it's okay. Shell get cut last.

Likes
50
Share
@Ferenc
Follow
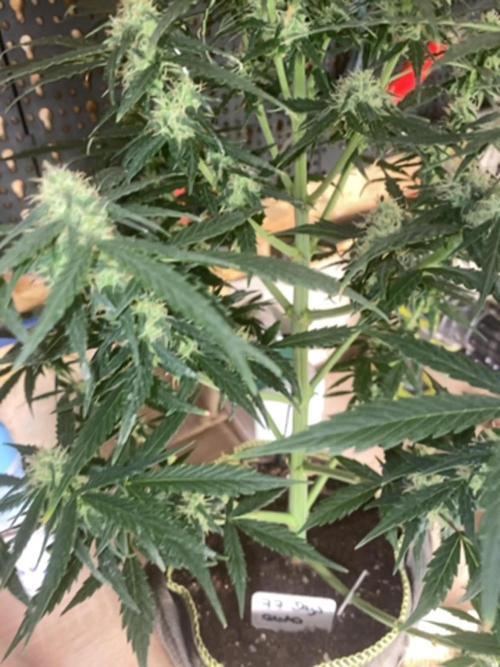
Day 65, 14th of November 2020:
Nice! Topping has stopped her to grow and strech too much which is good she is more chubby type strain so i expect some thickness lol....
Pre flowers and pistils are out so just waiting for the fruit lol ;)
Really nice all good.
Fertilization happens every 2nd day with the ratio and mix above.
I set the lamp 15 minutes shorter to switch off earlier so she receives 11:45 of darkness. I would like to imitate the nature when longer nights come with time till the 4th week (when she will receive 13 hours darkness a day 15 minutes minus 4 times = 1hour) so every week 15 min longer darkness for 4 weeks and then back to 12/12 to have bigger buds from the 4th week....

Likes
5
Share
@Lagriculteur420
Follow
Plant are now growing well after topping stress, I've made a Lil defoliation, I think I'll switch in flowering in 1 week, they seem like their nutrients

Likes
13
Share
@tiasmaaa
Follow
topping for the second time, still one more topping and we'll stop stress them and just let them grow :)
Likes
11
Share
@Farmer1
Follow
Hello growers,today day 17 she got a bit eat by insects but she's fine💪 growing slowly but the last days was so hot 🔥 lucky she have some shadow in the hottest time of the day.
Have a good one 😎✋
Likes
18
Share
@TitanRage420
Follow
Nothing new this week.... See a bit of growth but not a lot.... Gave some nutrients and normal water... Looking good and healthy. Very excited to see how these 3 ladies turn out, that's if they are females, I can't see yet. There's a vid if you want to watch.


Likes
4
Share


Likes
53
Share
@AutoCrazy
Follow
Another week has brought loads of new healthy grow with it. This plant is an absolute Queen!!
It is just a little maintenance from here on out.
😎🍿🍻

Likes
Comments
Share
@MrCandyTerps
Follow
Tercera semana de floracion. Han pegado un buen estiron y se le ha dado una poda de bajos. Comenzamos a subir la ec dandoles mas aditivos.


Likes
1
Share
@Randomjcb
Follow
14 oz dry weight ish think it was 393g’s didnt weigh it for 14days was a stunning plant to grow nice mellow stoned defo happy with it and one i would recommend if u want big yield’s
Likes
35
Share
@MadeInGermany
Follow
Info:
Unfortunately, I had to find out that my account is used for fake pages in social media.
I am only active here on growdiaries.
I am not on facebook instagram twitter etc All accounts except this one are fake.
Flowering day 1
since time change
to 12/12 h.
Hi guys :-) .
The time has finally come 👍
You have been switched to 12/12 hrs and are ready to flower.
Of course, cuttings were cut beforehand to keep the genetics.
For 4 days now she has also been getting Fast Buds from GreenBuzzLiquids.
They were also sprayed again with GBL Fast Plant spray.
She is very healthy and I am excited to see how she gets going again in bloom :-).
This week it was poured twice with 1.2 l each time (for nutrients, see nutrient table above).
Then I filled canisters with fresh osmosis water for the next few weeks 👍.
The tent was cleaned and every plant was checked for health.
At the moment I am tinkering with the ventilation because there are currently 4 fans with 4 activated carbon filters running, which I want to make more efficient by putting a hose through 2 tents.
These are the things about which you desperately at the beginning but learned from them in the end.
I wish you all a nice week.
Stay healthy 🙏🏻
You can buy this Nutrients at :
https://greenbuzzliquids.com/en/shop/
With the discount code: Made_in_Germany you get a discount of 15% on all products from an order value of 100 euros.
You can buy this Strain at :
https://greenhouseseeds.nl/
☝️🏼☝️🏼☝️🏼☝️🏼☝️🏼☝️🏼☝️🏼☝️🏼☝️🏼☝️🏼☝️🏼☝️🏼
Green House Seeds Company Cup Clone 🏆
Type:
Wonder Pie
☝️🏼
Genetics:
Wedding Cake x OG Kush
👍😍
Vega lamp: 2 x Todogrow Led
Quantum Board 100 W
💡
Flower Lamp : 2 x Todogrow Led
Cxb 3590 COB 3500 K 205 W
💡💡☝️🏼
Earth: Canna Coco Professional +
☝️🏼
Nutrients :
Green Buzz Liquids :
Organic Grow Liquid
Organic Bloom Liquid
Organic more PK
More Roots
Fast Buds
Humic Acid Plus
Growzyme Big Fruits
Clean Fruits
Cal / Mag
Organic Ph - Pulver
☝️🏼🌱
Water: Osmosis water mixed with normal water (24 hours stale that the chlorine evaporates) to 0.2 EC. Add Cal / Mag to 0.4 Ec Ph with Organic Ph - to 5.8