
Likes
Comments
Share


@Hattiwatti
Follow
Holaa horses 🐴
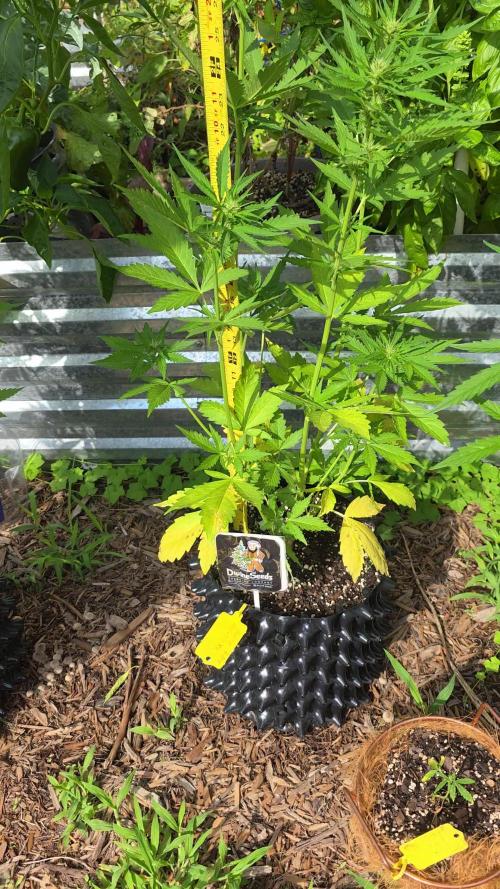
Nice stretch for last week. Auto Kabul just hit 47 DLI marker 🤝 drinking and eating pre flower nutrients. Last week i was thinking how to raise it and now i have to start think how to lower it 😅 Becoming Monster.
Andy's project suffering a bit. Going to move it away from boombox so auto kabul gets more space. It was nice first dripfeed test grow.
16.6 Looks pretty good at the moment.
watered 2L with 1.4ec. Andy moved away.
With High Hopes 🍀


Processing
Likes
12
Share


@Mistertemps
Follow
I had a really great time growing these girls. The question regarding smell went out the window when they were drying!!! I had move my carbon filter and fan out the tent and in the living room. The smell was leaking out the apartment!! I’ve only sampled one of the 5 sisters. Who look so different. But all have the same smell for the most part. Gonna cure them all for the minimum 2weeks and see what that does tobyhe smell and taste also potency. Back to sample test very smooth smoke it was a tiny bit greeny in flavor. And a heavy delayed effect. Like boom my eye are low and heavy. It was great!! 😂😂😂 THANK YOU EVERYONE FOR ALL THE COMMENTS, ANSWERS, AND LIKES! Can’t wait for Round 2!!! Gorillazkittles, gelato.og, GDPxGushers, GELATOxGushers. All from this time!!! Stay tuned! 😎00
Likes
4
Share


Likes
12
Share


@rickhaZe
Follow
-comenzamos la 2da semana de vegetacion con los 11 ejemplares de bsf seed y una cabeca de preto de maconha seed banco brasileño.
- aumentamos 100 ml o 0.1 l de agua, ya vamos en 400ml.
- hay una critical 2 que quedo mas pequeña, seguramente debe ser error de genética u de fabrica.
- esta semana seguimos fertilizando con grotek, al dia 17.

Likes
15
Share


@masterofsmeagol
Follow
7/27 My phone ran out of storage and wouldn't let me take a video. I tried deleting several other videos bit that didn't work either. Finally I wad able to upload a few RANDOM pictures from the "website" camera. But no video. Everything looked so beautiful tjis morning too. Not watering was the right choice. I defoliated a couple septoria leaves on the reveg 10th planet that wad about to receive its third dose of Plant Doctor. The chem dog #4 and mk ultra this will be their second treatment. Seeing the positive impact of the product and finding a few septoria leaves I decided to treat every plant in the garden with plant doctor. I'm still going to do the diy Dr. Zymes but Plant Doctor had been working good and I want to suppress as much as possible. Everything looks great. I started by giving the thirstiest plants a half gallon of water. I then did a root drench of 3tsp per gallon on every plant but the 10gal. A gallon of solution was used on each plant. I really feel like this is a good mood. Previously AFTER I applied Plant Doctor the plants would have a noticeable positive effect shortly after. I'm hoping this will be the case here. I think stretch has stopped. I have one special Kush that has buds already but EVERYTHING is in early flower. I'll fix the phone and get a video up there.
EDIT: WENT BACK AROUND ONE TO DO A LITTLE DEFOLIATION. EVERYTHING LOOKS REALLY GOOD TO ME. I DID DEFOLIATE A COUPLE SEPTORIA LEAVES. BUT REMOVING A LEAF OR TWO FROM A MONSTER REVEG IS NOTHING. REALISTICALLY I SHOULD BE REMOVING MORE FOR BETTER AIR FLOW. THATS SOMETHING ILL NEED TO DO. SO HAPPY THINGS ARE DOING GOOD. EVERYTHING IS IN VARIOUS STAGES OF FLOWER. NEXT FEED ILL BE USING A BLOOM NUTRIENT. NOT SURE BUT PROBABLY LIQUID KOOL BLOOM.
7/28 Didn't have much time this morning. I've got a wife with medical problems and I'm trying to redue my house before the end of the summer so I'm busy to say the least. Still no pm. Not many pests either. The rose bushes behind them have been DEMOLISHED by jpn beetles. I see no negative active reactions from treating everything with plant doctor 3tsp/gallon. The first plant I treated with it was that 10th planet and its gotten three treatments and looks great. I'll get a spot here or there once in a while but for the most part it's supressed. I have some pruning to do. Everything os in early flower but that one special kush is pretty far ahead.
EDIT: SINCE IT WAS MID 80S I WENT OVER AROUND 1 TO CHECK THE GIRLS. THEY LOOKED GREAT. I DEFOLIATED A COUPLE SEPTORIA LEAVES BUT ONLY A COUPLE. I STOPPED AT A LOCAL SHOP AND SHOWED MY BUDDY A VIDEO. HE SAID TO NEVER SPRAY ANYTHING WITH LEAF SEPTORIA WITH "ANYTHING" BECAUSE OF HOW IT SPREADS. I DIDNT MENTION THE CONTRADICTORY EVIDENCE THAT I'VE FOUND IN MY RESEARCH BUT HEY. HE HASNT LED ME WRONG. PLANT DOCTOR SEEMS TO BE DOING THE JOB. THAT AND DEFOLIATING ANYTHING I SEE. IVE WORKED TOO HARD TO LOSE THEM TO A DISEASE THAT MAINLY EFFECTS THE LEAVES. PLANT DOCTOR WILL KEEP IT SUPPRESSED.
7/29 Today is supposed to be really hot. In the 90's. I watered everything a gallon except the thirstier plants got 1.5 and the 10's got 1/2 gallon. I defoliated a few septoria leaves. I'm sure there will be a few more after watering. Instead of alleviating my concerns my buddy kinda got in my head with the septoria talk. Things will be fine. Everything LOOKS gorgeous. He even said, "They look really good and healthy" and "not to get complacent defoliating." The plant in the 50 seems to be worse off than the others. I'll keep an eye on it but if I got spots near the sugar leaves I might just cut that little runt. This was all preventable too. Person mowing the lawn BLEW DISEASED GRASS, SHRUBS AND BIRD SEED IN MY CAGE RIGHT AFTER TRANSPLANT. I legit had to dig out at least a dozen sunflowers or other seeds that sprouted. Realistically things will be fine. The plant I've been treating for three weeks with plant doctor looks great. So do the others. Everything looks good. I just get occasional leaves I previously would've overlooked or attributed to something else. As long as I can keep it suppressed enough through flower I'm good. Anything that isn't good enough will go towards extracts.
EDIT: WENT OVER AROUND ONE. A COUPLE PLANTS IN TJE BACK THAT I WATERED FASTER WERE LIGHT SO I SPLIT A GALLON WITH THEM. THE 10TH PLANET THAT HAS GOTTEN THE FULL PLANT DOCTOR TREATMENT IS DOING AWESOME. I DID HAVE TO DEFOLIATE A HANDFUL OF LEAVES. HONESTLY I THINK IVE PROBABLY HAD THIS YEARS PRIOR AND DIDNT RECOGNIZE IT. IM PRAYING EVERYTHING WORKS OUT. IM DOING MY PART. I'M GOING TO HAVE TO DO SOME MORE RESEARCH.
7/30 Came over to the 10th planet plant in the front row all the way in the back was drooped all down and is yellowing up pretty good. I defoliated what I could and gave it a gallon and a half of water. I defoliated any sep leaves I could find. If that plant foesnt pick up like they normally do I may need to ditch the plant. If it continues to get yellow and look unhealthy I'd rather get rid of it than risk more damage. It was light as a feather so I assume it will be fine. I'll update as I go. Everything else looked good though.
EDIT: DESPITE IMMENSE ANXIETY I GOT THAT FEELING SO I WENT AND CHECKED THEM. THE ONE I WATERED DID PICK BACK UP BUT IT HAS A LOT OF YELLOW LEAVES. THE 10TH PLANET THATS DOING GOOD WAS BONE DRY AND STARTING TO DROOP. I GAVE IT 1.5 GALLONS. THE HUGE MK ULTRA ALSO WAS STARTING TO DROP AND LIGHT AS A FEATHER. I GAVE THAT A FULL WATERING CAN WHICH IS DAMN NEAR 2 GALLONS. THE REST WILL GET WATERED TOMORROW. NO SIGN OF SEP THIS TIME. I WASNT THERE LONG BUT STILL. THE OTHER PLANTS WERE LOOKING GOOD AND ALL PRAYING TO THE SUN. TOMORROW ILL WATER AND FEED.
7/31 Came over this morning to one of my plants on the 10 drooped right over. I shouldve watered it yesterday when I did the others that were light. Coincidentally the three that needed the water were the 3 revegs. I watered what didn't get it yesterday with a gallon each. I then fed everything a powerade bottle. Started liquid kool bloom today. We shall see how that goes. I defoliated quite a few leaves. I think I may have had sep in the past on some plants and just didn't notice. Plants still look good but I keep a good eye on them. And I defoliate a lot. I've taken my buddies advice and not sprayed anything. I don't really have any pests. A pillar here or there or a "A" cricket or jpn beetle. Of there is one four eyed plant bug but I can't seem to kill it. I've almost caught it a couple times. Anyway like usual I'll keep this updated.


Likes
2
Share


@Mr_nugs_lover_David
Follow
Una cepa bastante fácil de cultivar,yo al preparar un súper soil a base de guano,ácidos humicos,bacterias,mi suero de lactobacillus casero,algas marinas y humus,tan solo regue con agua por lo que no tengo mucho trabajo en ese sentido,ademas tampoco le aplique ninguna técnica de entrenamiento cosa que me gustaría hacer si tengo oprtunidad de volver a cultivar esta cepa, sin embargo vi que empezó la floración siendo pequeña de tamaño,término dando una excelente porra central y algunos cogollos bajeros con los que me fui haciendo algunas infusiones con leche entera y también con aceite de oliva para no tener que recurrir al mercado negro y poder asi añadir mis canabinoides a mi sistema para poder mejorar mi lumbalgia y descansar mejor. El aroma es sencillamente exquisito,ha sido todo un placer cultivar esta cepa,lo malo es que es muy poco para mi ya que soy un usuario que necesita una buena reserva de cogollos potentes sobre todo a nivel físico que me ayuden a lo largo del año.muchas gracias y espero que os haya gustado mi trabajo, paz compañeros Canabicos! 💚✌️❤️💛🌱

Likes
102
Share


@Roberts
Follow
Ztrawberriez has sprouted, and is getting acclimated to grow. She will start nutrition in a few days. This will be a 1 gallon perlite grow. It should be just like growing in coco coir from my previous attempt at this. So everything is going good for Ztrawberriez. 🤞🏻for a great grow. Thank you Fast Buds. 🤜🏻🤛🏻🌱🌱🌱
Thank you grow diaries community for the 👇likes👇, follows, comments, and subscriptions on my YouTube channel👇. ❄️🌱🍻
Happy Growing 🌱🌱🌱
https://youtube.com/channel/UCAhN7yRzWLpcaRHhMIQ7X4g
If anyone needs to purchase fastbuds here is a link for my affiliate program
https://myfastbuds.com/?a_aid=60910eaff2419


Likes
5
Share

@smoking_hills9
Follow
Very happy I went Original Sensible Seeds beens this grow. 🤩 All 3 autos from some special american line, and o boy , they don't disappoint.🔥 Bangers genetics 👏🏻 all trees are good size with super thick stalks. So u know what that mean. Super fat buds. Nice smell. I like it a lot 💚

Likes
Comments
Share


@Trichoma
Follow
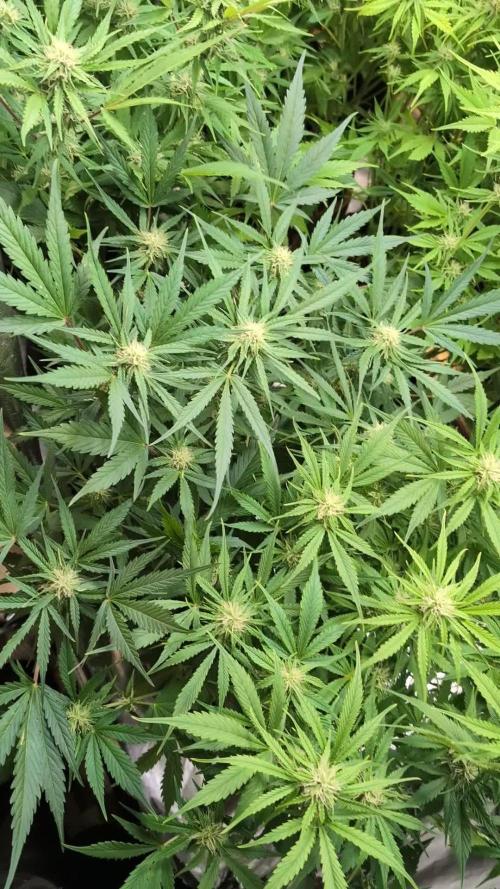
This week I low stress trained plant a bit and removed a few leaves that blocks light for lower nodes so it grows more equally!
In the end I am moving to my main flowering tent.

Likes
111
Share


@DreamIT
Follow
There is little to say yet. I recommend everyone to try this technique at least once. Maximize your harvest and increase your personal experience. If you want more serious proof of how mainlining works, take a look at the diaries of @Canamatoes, my teacher and mentor. More updates later, stay high🤘😁🦄
Likes
6
Share


@Budking420
Follow
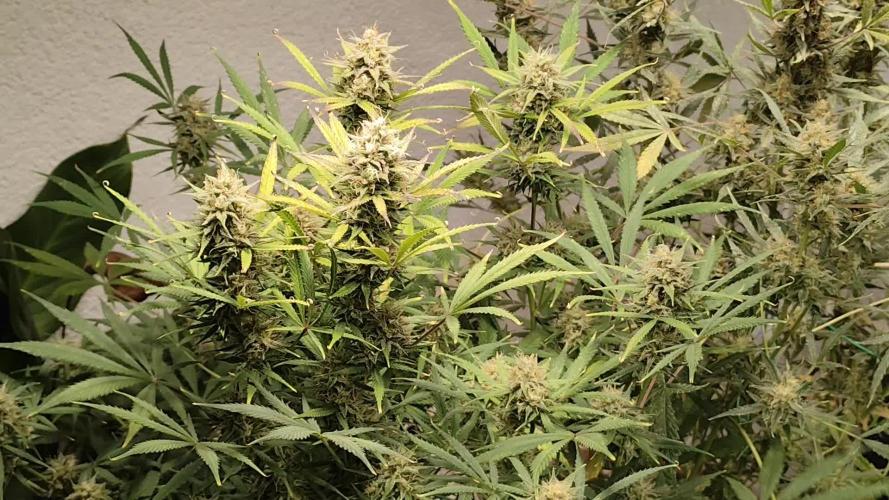
These girls are throwing some gigantic buds already! I'm very excited for this run of strawberry banana. There is already some trichomes building up as well. I had to use a little neem oil to control mildew on mostly the right plant as the left one had hardly any. I'm very pleased with the size shape & overall vigor with these ladies. Check back next week to see just how fast she buds! And dont forget its 4:20 somewhere!!!!!


Likes
5
Share


@Ryno1990
Follow
Week 5 went by fast was a real busy week but the trop cookies is doing awsome in full flower looking great under the medic grow fold 6
Processing
Likes
17
Share


@Mr_Bacon
Follow
Well... I just learned to be more gentle with my ladies I ve broken one of the leaves when I was turning the pot ... poor GG watered with Green Planet nutrients I just hope she won't get mad on me. Nothing really more exciting after those 15 days. Ohh I would forget, I bough a more expensive PH meter because I thought the cheap one that i get from Amazon is not correct. well...
...both of em are showing the same thing.
From 14th day I decided to add some silicone and calmag agent into the diet of RQS ldies because they definitely are growing slower and the EC of the solutions made with RQS GROW tablets were a bit too low.
I also decided to spray my ladies once a week with foliar from vitalink
Likes
8
Share


@Gummi_Ingo
Follow
Check out the video!
7 weeks of flowering have passed. Tops are getting really heavy, I might have to buy bamboo support sticks soon.
Resin production is insane as you can see.
There was mold in one of the head buds and I had to remove a golfball-sized chunk. Some insect made its way in, died there and started rotting.
I struggle to keep the humidity down and now I am watering every second day only. And i bought a third fan (typhoon) that blows warm air from the ceiling above the lamp back onto the tops.
wish me luck for the last 4 weeks

Likes
24
Share

@Growbody
Follow
Herzlich willkommen zu meinem neuen Grow mit der Orange Sherbet Auto von 2Fast4Buds. Die Eltern sind Cookies Auto F5 x Tangie´matic, der Typ ist F3 Feminized Polyhybrid Autoflower. Der Strain war Winner of the American Autoflower Cup 2025, Kategorie Best Auto Hash. Die Aussicht auf frischen Orangensaftgeschmack macht mich wunderfizzig.
Wieder verwendet wurde für diesen Grow der 15Liter Stofftopf von ROOTiES, die Sonnenerde Bio Hanferde, BioBizz Wurmhumus, BIONOVA + zamnesias MonsterBud Mix Living Soil, zamnesias Smart Start Plugs und Plagrons Seedbooster Plus. Hat sich alles bestens bewährt.
Tag 86: 1,0 Liter Wasser. Die Blüten der Orange Sherbet Auto von 2Fast4Buds werden dicker und duften fein.
Tag 88: 1,0 Liter Wasser.
Tag 89: Die Orange Sherbet Auto von 2Fast4Buds hat neue Nachbarn bekommen.
Tag 90: 2,0 Liter Wasser.
Schön, dass du dich für meinen Grow interessierst. Schau gerne wieder rein 👋😎
Likes
9
Share


@Herbz_Unkraut
Follow
another resin monster from seedstockers, with a very special scent, full of flavors! grinded it smelled like peppermint, and vaped it has a great sweet creamy taste!

Likes
24
Share


@TerpTurtle
Follow
14 day dry | Curing in Grove bags, filled 7 QP bags & got 56g of keif out the trim bin from only 2 plants!
More pictures coming! STAY FROSTY GROWMIES


Processing
Likes
17
Share


@Trueorganics84
Follow
Just starting , This is my soil mix!
Only took two days to break soil pretty sweet!!