
Likes
Comments
Share


@TheGreenGroomer
Follow
Hello fellow growers,
I harvested my plant on Day 68 of the flowering stage. The buds are now hung up and drying in an environment with a relative humidity (RH) of 55-60% and temperatures ranging from 18°C to 21°C, I've set up two fans to keep the air moving gently around the drying space. Today marks Day 6 of drying, and I'm aiming for a nice, slow dry to preserve the quality of the buds, followed by a dry trim.
Reflecting on this grow, I can see areas where I could have improved, but considering it's my first time, I believe I've done a commendable job. There are quite a few larfy buds underneath, but the top buds, which were closest to the light, turned out great. I initially thought I had nailed the training techniques, but as soon as I flipped her into the flowering stage, she got out of control. This experience has taught me the importance of being even more disciplined with my training methods in future grows.
Overall, I'm thrilled with the outcome and have learned valuable lessons for my next run. Can't wait to see how these buds turn out after curing!
Wish me luck as I move into the final stages of this journey. Let's Grow!

Processing
Likes
5
Share


@Mrg7667
Follow
Smells like Rubber bands coated in a berry sugar or berry sryup very interesting on the nose!
Harvested day 67 ish maybe a couple more hard ot tell outdoor Split the harvest into drying buds and some to made into fresh frozen hash. i can dry weigh the fresh frozen buds and put that weight in the wet section and i will put the to smoke buds in the dry weight section so total between the two will be the whole plant
Drying was a big mishap got condensation around day 10 of drying and it caused some mold 🤦♂️ right around the time i was going to cure!
Found a peroxide soak that ill post butt it seemed to take off all the mold without affecting tricomb heads! Had to re dry for another week afterward i feel like the re dry maybe messed with the terps because it definitely never got the smell back like i thought but who knows slmost 3 weeks into cure coukd get better but doubt it

Likes
218
Share


@DevilsBud
Follow
Week 9 of Critical RQS
Day 57 FLUSH WEEK!!!!!
I have decided to flush the critical.
Normally the critical needs 7 to 9 weeks of flowering and on week 9 . I don't see a lot of white pistils anymore and tricomes are all cloudy and some ambers it's going to be a exiting week.
Day 58
Flush the plants and run off had a lot of nutrients in it so have to flush for quit a bit
Day 59
Drying the soil out some and then do big flush again hopefully i will get those nutrients out other then that critical is looking awesome 🤘🏻😎🤘🏻
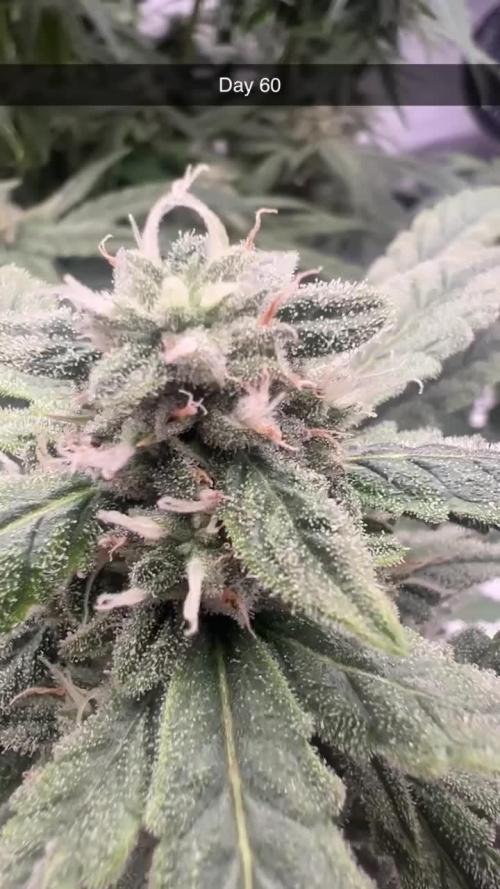
Day 60
Flush them again today and getting the nutrients out of the soil I probably have flush at least for a week i had bin a bit lazy checking with EC meter and now i have to deal with it i don't like to be inconsistent but is was a bizzy week
Day 61
Sunday rest day nothing going on 🤘🏻
Also want to thank everybody for the comments likes etc you know who you all are 👍🏻😍👍🏻
visit www.marshydro.eu
for your best gear and use the PROMO CODE: DEVILSBUD
Fully marshydro supported Setup:
Marshydro GT100X100X180
Marshydro Ts 1000 LED lamp
soil :Plagron batmix
Nutrients :Advanced Nutrients
Advanced Nutrients pH Perfect Bloom
Advanced Nutrients pH Perfect grow
Advanced Nutrients pH Perfect micro
Advanced Nutrients B-52
Advanced Nutrients Voodoo Juice
Advanced Nutrients Rhino Skin
Advanced Nutrients Big bud
Advanced Nutrients Bud candy
Advanced Nutrients Overdrive
Advanced Nutrients flawless finish
Advanced Nutrients Sensizym
BioBizz - Calmag
Mars Hydro tent handy info
Lock All Light Inside: MARS HYDRO Grow Tent Interior is made of diamond mylar. Non-toxic to the environment, no harm to plants. High-quality 1680D canvas being double stitched, (ALL OTHERS BRAND grow tent is 601D canvas) which is tear-proof for perfect light locking, No light leaks or rips at all.
Durability Grow Tent :Stable Metal corner adapters and poles are the trustful supporters of the tent. No rusting nor paint-falling. Quick easy tool-free installation. Carries strong heavy-duty SBS zippers, double layer lining to create a light-proof seal.
Easy Observation of your Plants: Special peek👀 window made by double layers of cloths. Observe the growing conditions of your plants without opening the tent and avoid disturbing plants. The peek window also serves to dissipate heat and ventilate air.
Removable Tray Keep Clean: The package includes a removable waterproof floor tray to hold soil and fallen leaves. The tray can be taken out easily to wash. Removable and water-proof cleaning easy.
Good Ventilation&Fast Assembly: Circular double-sleeved vent holes with adjustable nylon strap for air circulation by exhaust fan, ducting, carbon filter, or reflector. Better allows proper light, heat, and airflow. Quick tool-free installation. Reinforced by a sturdy metal frame to ensure security and stability, supports up to 140lb. Perfectly safeguard your plants to thrive even in winter.

Likes
12
Share

@SugarandTerps
Follow
Bloom W5 Mendo Frost ❄️❄️
2.7
Heute gab 3L Nährlösung Ph-Wert auf 6,6, Plagron Silic Rock, Power Roots, Royal Sugar, Power Buds, Green Sensation und Alfa Boost All-in-One.
Temperaturen haben heute 27°C
4.7
Der Himmel ist heute öfters bewölkt und könnte abends noch mal regnen. Die Blätter sehen gut aus und die Düngerverbrennung ist nicht weiter fortgeschritten.
5.7
3L Nährlösung Ph-Wert auf 6,6, Plagron Silic Rock, Power Roots, Royal Sugar, Power Buds, Green Sensation und Alfa Boost All-in-One

Likes
27
Share


@GODSGIFT_2005_JM
Follow
🥊
🍼Greenhouse Feeding BioGrow & Bio Enhancer
⛺️MARSHYDRO
The ⛺️ has a small door 🚪 on the sides which is useful for mid section groom room work. 🤩
☀️ MARSHYDRO FC 3000 LED 300W
☀️Also special thanks to VIPERSPECTRA P2000 (200W) & XS2000(240w) LED growlights
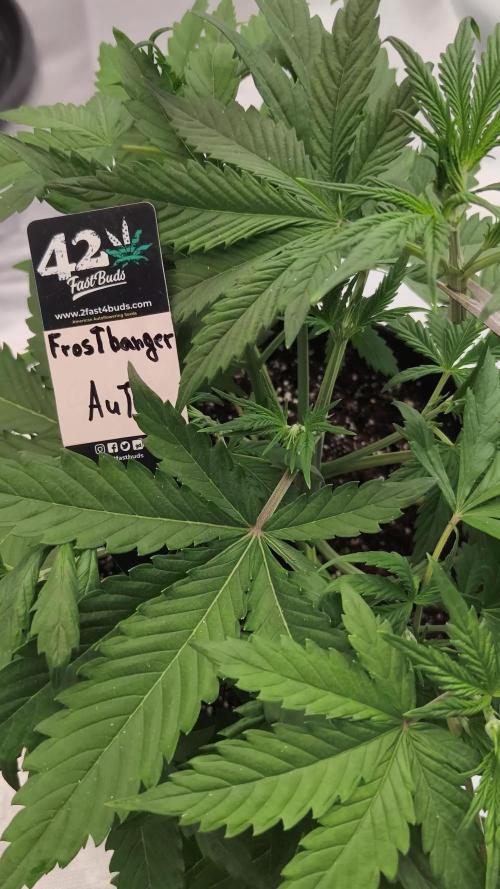
🌱 FASTBUDS 420

Likes
4
Share


@Elguacho420
Follow
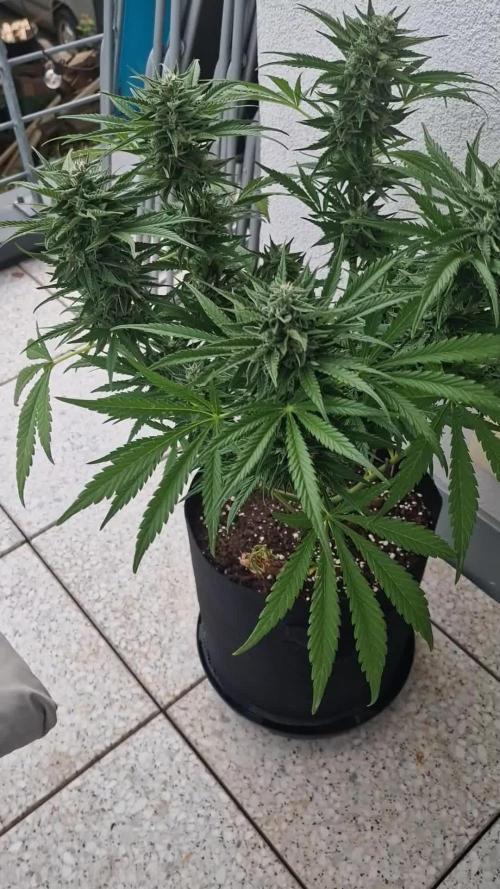
Buenas a tod@s... Otra semanita más de flora para estás hermosas niñas... Creciendo un poquitito más, super bien, super fuertes... Ya faltan pocas semanas y la verdad q lo las veo nada mal, absorben muy bien los nutrientes, aumentado el riego a 1lt x planta, no tienen ningún signo malo de nada, todo perfecto, eh tenido que hacer un poco de defoliación ya q habia muchísimas hojas grandes, se nota la buena circulación de aire, la penetración de luz en las partes bajas ( que aunque algunos no les den importancia o digan que esas zonas le quitan fuerzas a la planta, a mí me gusta dejar que crezca todo tal cual, sin problema.) son cogollos pequeños, pero los aceptamos igual, claro q sí... Buenos humos y buena semana para tod@s a seguir trabajando... 🤗👍🏻🙏🏻
💀😎🇦🇷

Likes
24
Share


@BunnyBud
Follow
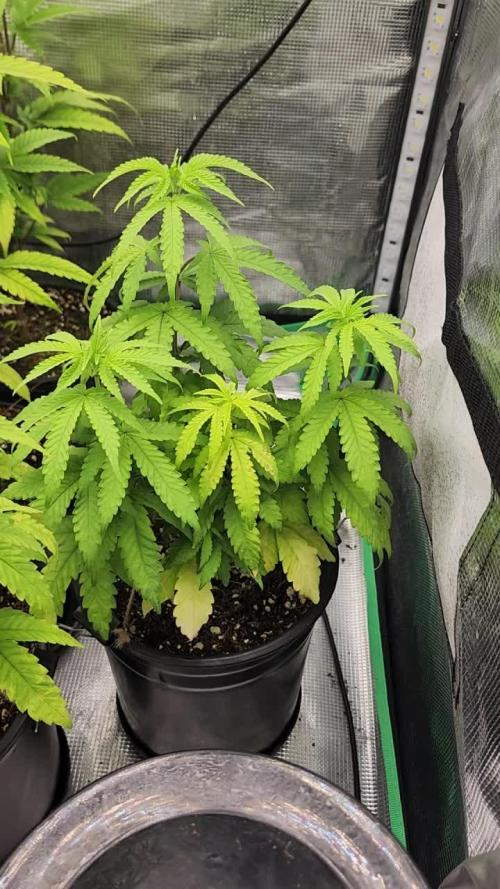
31 Aug. I start the third week of my autoflower. The plant is growing well, but I noticed small yellow spots on the leaf tips, which seem like a mild calcium deficiency. This is probably due to the fact that so far I have been giving water with a slightly low pH, around 6, while the ideal range would be 6.5–7.
At the beginning, to lower the ppm of the tap water (which was around 211 ppm), I mixed it with demineralized water. This brought the ppm down to about 109–140, making it harder for the plant to absorb the available calcium. Additionally, the soil I am using, Biobizz Light Mix, is lightly fertilized but does not contain enough calcium to correct this small initial deficiency.
For this week, I will not add any fertilizers. I simply want to raise the pH to 6.5 and use water with higher ppm, so the plant can better absorb the nutrients already present in the soil.
The lamp is positioned about 35–36 cm from the plant and so far there are no burn issues. Temperatures range between 25 and 30 °C depending on the day, while humidity in the room stays between 40–60%. The humidifier is always on because I keep the window open, but the dehumidifier is not being used, as it is not necessary at the moment.
I also have a new oscillating fan arriving to replace the current fixed one, and I’m waiting for a regulable extractor (90–145 m³/h), which will allow me to control the air perfectly during winter if needed.
This week my main goals are:
Increase the water ppm without overdoing it
Adjust the pH to 6.5
Keep observing the plant without adding any fertilizers
Everything else seems fine and growth is regular. With these corrections, I expect the new leaves to grow healthy and free of spots.
==UPDATE 31/08==
To control the calcium deficiency, I will administer an eggshell solution until I reach 300 ppm (I will boil some eggshells and administer the solution in tap water).
Likes
321
Share


@Tropicannibis_Todd
Follow
🤔🤔🤔🤔🤔 HAPPY GROWING 🤔🤔🤔🤔🤔
We are now 42 Days into flowering and everything is going great 👍 👈 We are now playing the waiting game 42 days down👌
Did a good strip 👌 defolation is complete 👌 and happy with out come 😄
👍 decided to showcase the Mini BigBand , was a extra seed that germed so I kept it as a Mini Me 😊 She's killing it 👈
Except for some watering it's been pretty smooth I've done a little maintenance and manipulation of the canopy 👈
👉Soil Medium Provided by ProMix.ca
👉Nutrients Provided by Agrogardens
👉Lighting Provided by MarsHydro.ca
I would like to thank the many growmies for support throughout the years 🙏 So Let's Do This 👊👊👊 Happy Growing

Likes
58
Share


@Gisbert
Follow
An Größenwachstum ist kaum etwas dazu gekommen. Dafür entwickeln sich die Blüten prächtig und der Geruch ist ein Traum, superintensiv nach Limette.

Processing
Likes
11
Share


@Guerilla_Jack
Follow
Hello growers and breeders.its end of 8week of flowering.. the smeell is so tense , buds are hard like rock and full of resin..this week only watering my plants with flawless finish and then harvest...


Likes
Comments
Share


@Budking420
Follow
This nug is getting huge on top hole mackerel! I'm super excited for this idk what's I'm doing that it likes so much I just fed it grow dots and that's it just been keeping it wet with the self watering ac infinity bases! Check back in a week to see how far it has progressed!

Likes
8
Share

@GREENPHOENIX6262
Follow
04/11 - Both plants are coming along accordingly on time - As stated previously I got careless with the PH and they suffered a harsh PH burn - Since then they have been flushed and nutes in coco stripped - Began introducing nute in micro-dosing stages.

Likes
12
Share


@DrGreenbutterThumb
Follow
This week was great the smell is very pungent, I've been giving the CO2 lights are (I believe) adequate over 200 true watts on 2 plants started with purpinator as well as adjusting the ph and dropping the temperature. And the added spectrum. Try to get to the Anthocyanins and adjust my colors
Likes
81
Share


@UnorthadoxDude
Follow
Welcome to the beginning of week 7 for Karen. Thank you for stopping by!
I'm counting this as the first week of flowering but she's been sending out pistils for two weeks, so I guess that weeks four and five should have been flowering weeks. Sorry about that. Surprised to be here but excited to see the next few weeks.
Day 44: This girl is amazing. She took the horrendous start I gave her for the first three weeks, and just exploded. Look at her now! If you are really interested, now look at Misty and Nesia - imagine what they could do! I am really pleased with Karen here, I think she has more surprises in store. I am very glad I decided to LST or she would be towering above everything else in the tent. I have noted early Mg deficiency, as more advanced on Nesia. Correcting with foliar and re-addition of CalMag to feed.
Day 44.5: Fertigated approx 1.5l. Defoliated approx 10 leaves. Slightly adjusted LST.
Day 46: Fertigated 2l. Karen is very thirsty. Her roots have breached the side walls at the bottom of the pot in 360 degrees... this is the biggest root system I've had on any potted plant to date. She is stretching fast now, I think by the end of next week she will be done stretching. I must get a photo of her stem. The base is ridiculously thick. Overall Karen is shockingly good compared to expectations from the poor start. I can only imagine how big she would be.
She is currently 27cm tall and at least 50cm in diameter. I count at least a dozen colas.
Day 47. She is now 29cm tall and pistils are bursting forth at a phrenetic pace. I have added a comparison shot of my grow space for size reference.
Day 47.5: Defoliated approx 30 fan leaves. Slightly adjusted LST. Rearranged tent and cleaned floor. I have ordered some risers to raise the pots off the floor, this will make it easier to deal with run off. While I was inspecting Karen I had a good look at her roots. The fabric pot she is in has viewing flaps (they were designed for potatoes) and I had a look... every bit of the pot is full of roots, and they're all properly pruned. I see no circulation or binding. If Karen produces at anywhere near the rate she is supposed to then she might yield as much as 150g.
Day 48.5: Rapid changes. Pistils everywhere, more stretching. Karen is very thirsty. Fertigated. Added pot risers and adjusted pot. Did a little LST to separate some bunched colas a bit. Had a really good inspect of the root system. Wow this plant is a beast.
Day 48.75: Fertigated 3l
Day 49: Height 34cm Diameter: 60cm. End of week summary. Really big week, she is stretching quicker and quicker. Today she has developed a striking scent. I will now have to keep the tent closed so temps will rise.
Day 49.5: Removed about 10 fan leaves. On reflection back over this week I think I needed to be taking a top and side photo, so I shall do that from next week.

Likes
14
Share


@GrowerGaz
Follow
The plants have been hanging in large cardboard boxes on strings for two weeks, the room was around 15c as i like a slow drying process. I will give them a final trim before they hit the jars

Likes
19
Share


Likes
121
Share

@Tropicannibis_Todd
Follow
Well growmies ive been looking forward to the FastBud Tester 2307 , the more she went into flower the more the frost would build up , and that's when the terps came out 👉 Sweet , fruity 👈 Buds are tight and full of frost 👈 Couldn't of asked for better Genetics 😉
The smell coming from this girl during the entire grow was just dreamy 👈. Of course I have no clue to what she is but I like it...... Maybe FASTBUDS attempt at a Watermelon 🍉 Strain????
Amazing Job FASTBUDS 👏 I would definitely recommend once they release this one 👍
👉 Big thanks to all my Growmies out there in GD land 👈 Much appreciated 🙏
Thanks To MarsHydro for the TS1000
👉I used NutriNPK for nutrients for my grows and welcome anyone to give them a try .👈
👉 www.nutrinpk.com 👈
NutriNPK Cal MAG 14-0-14👉 All Weeks
NutriNPK Grow 28-14-14👉 Weeks 2 & 3
NutriNPK Bloom 8-20-30👉 Weeks 4 to 8
NutriNPK Bloom Booster 0-52-34👉 Weeks 4 & 9 👌👌
Likes
5
Share


@Scrumie
Follow
She is getting more and more dense everyday, still only week 2 of flower and she is already looking amazing. A lil stretchy but that could turn into some desert colas. Started with some BioBizz top Max. Watering every 2 days now.
really hope she continues to grow and put on some dense colas.
will update with pics and a video towards the end of week 5 which is day 35.
All days are from true leaves. add about 3 days from start of germ
This is first grow and was wondering how she is looking/also look at the shorter and more dense skittles auto on the right in the video above.
Im using my cupboard which has white walls thankfully. Also using a full spectrum LED quantum board 240W, is pumping at full power about 50 cm from top cola
First grow going well
Appreciate any tips with going into full flower and would like to dense up these babies.
Much love
Happy days!
They both doing really great!
feeding every 2 days, about 800/900ml of water (PH between 5.9-6.0) per watering
Bud sights are getting more and more dense, still only about 16 days since first pistols showed. They both still have another 4/6 weeks left. Getting really excited to see how they turn out.
Both starting to smell, very sweat yet pepper smell, can't really put a flavour to smell yet.
Happy days
Likes
62
Share


@Papa_T
Follow
Well here we are a new week for Billie. Come join he on her adventure.
Friday Sep 17 Day 50
-No water still
-Growth on Billie is just unreal
-Added a few more LST staples
-I wanna veg her out a few more weeks
-May have to send her flower earlier than expected
-We’ll see
-Grow my girl
Day 51
-Feeding 2 gallons with aerated tap water base 62.5 PPM
-Add calmag up to 327 PPM
-Add Grow up to 968 PPM
-2 gallon 6.2 PH - 968 PPM
-Runoff 700 ml 5.48 PH - 3300 PPM
-Defoliated a little bit
-Not much more to say
Day 52
-No water
-Responded well to yesterday’s feeding
-Perked right back up after some light defoliation
-just killing it today
-She’s a handful to water FML
Day 53
-No water
-Again growth is crazy
-Might have to re evaluate my plans with her and send her to flower sooner than I want to
-We’ll see
Day 54
-No water
-Still just killing it with growth
-I can’t keep her waiting three more weeks for Penelope to be ready
-Going to have to give up on my original training plan for her
-Going to be too hard to water
Day 55
-No water
-She’s looking happy growth is great
-she’s going to need a hair cut soon
Day 56
-No water
-Still exploding with growth
-I might have to send to flower early
-We’ll see
-Not much more to say for today
This is the end of the week. Join us next week to see what the future brings us!