
Likes
Comments
Share


@xmackobox
Follow
Vale pues arrancamos el seguimiento de estas semillas de Ukhta Genetics estoy muy hypeado y ya impaciente xd
Vamos a tener como gama de fertilizantes a Atami, todo el mundo conoce y sabe lo que esta marca ofrece a las plantas :D
Semillas empezadas a germinar el día 18/06/2024 y van a ser 12 macetas de 1 litro y haremos trasplante entre la 2ª y 3ª semana de crecimiento a la maceta definitiva de 7 litros.
Usare como sustrato el Janeco Light Mix de Atami por supuesto.
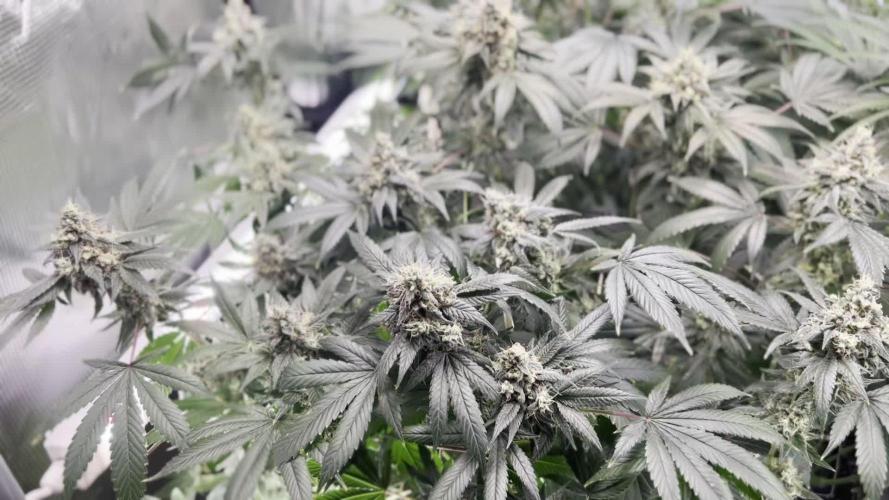
**22/06/2024 Subo nuevas fotos y vemos a las plantas con 4 días desde que se empezaron a germinar.
**28/06/2024 Fotos añadidas de como va la germinación 10 dias despues de empezar y además vemos la nueva cepa, Watermelon ZUM ZUM de Ukhta Genetics.


Likes
130
Share

@Schnabeldino
Follow
📅 Week 13 | Days 92–98 📅 🌼🌸🌺 Flowering Phase 🌼🌸🌺
Day 98 🌞
🔸 Poison Envy continues to develop beautifully. The buds have become noticeably denser compared to last week, with an impressive amount of resin forming. Trichomes are mostly milky now, with a few still clear - no amber ones yet.
🔸 The smell is evolving too: still that strong musty "forgotten laundry" funk, but now with a distinct sweet-spicy berry twist, almost like overripe blackberries. Very pungent!
🔸 Unfortunately, the humidity is still too high, but better than last week (currently 63%), which could become a problem. Today I finally turned on the dehumidifier and increased airflow using all clip fans at max setting. The dehumidifier now maintains a constant relative humidity of 50-60%, which I am very satisfied with. It does make it 2-3 degrees warmer in the tent, but I can live with that.
🔸Now give them 1-2 weeks of overdrive from AN and then only water. She drinks significantly less.
📈 Current Conditions
🌡️🔆 = 27°C
🌡️🌜 = 20°C
💨 VPD Target = 1.4 - 1.6
💨 Humidity = 63% → Target: below 60%
🔦 PPFD = 900 µmol (12/12)
🔦⌚ DLI = ~38
🛠️ Setup (unchanged)
💡 Lights: 2 x Sanlight Evo 4-120 @ 90%
⛺ Tent: 120 x 120 x 180
🍯 Pot Size: 18 liters
🌱 Medium: Bio-Bizz Light Mix
💊 Nutrients: Advanced Nutrients
💧 Water: Tap water (EC 0.5)
Likes
5
Share


Processing
Likes
29
Share


@BloodSweatBeers
Follow
Hope yall had a good week! The girls sure did. Everyday I take a peek and do my daily watering and they're bigger than the day before. Upped the PPM's to ~400 this week, kept the pH at 6.0, and upped the Calmag. Also picked up "B-52" for some root health. Gonna use it on some other plants in the house as well (I grow veggies hydroponically year round). The plants are starting to give off an odor if you smell them up close, pretty neat. Work was a bitch this week so I missed one day of watering, flushed the plants and seems no damage done. Don't wanna make many mistakes like that but its bound to happen.
Here's my boring daily notes for those interested. Have a good weekend and I'll see ya next week.
------
9/8/2020 - Now that the plants have a proper root system and a stronger stem, I aimed the clip on fan at the plants on low. Humidifier is getting annoying to fill everyday, looking forward to when i can dial it down a bit.
PPM - Inflow: 350 - Outflow: 423
pH - Inflow 6.0 - Outflow - 6.1
10/8/2020 - /
PPM - Inflow: 350 - Outflow: 440
pH - Inflow 6.0 - Outflow - 6.1
11/8/2020 - /Missed/
12/8/2020 - forgot to water yesterday (16 hour shift). Went about 18 hours between waterings. The coco was kinda dry so I flushed it first with ph 6.0 water (120ml) - then watered the usual amount (75ml) The outflow numbers were acceptable so no damage done hopefully.
PPM - Inflow: 398 - Outflow: 460
pH - Inflow 6.0 - Outflow - 6.0
13/8/2020 - /
PPM - Inflow: 390 - Outflow: 454
pH - Inflow 6.0 - Outflow - 6.1
14/8/2020 - Bought b52 by advanced nutrients. Suppose to assist root and stem growth, got it really cheap at the hydroponics store.
PPM - Inflow: 398 - Outflow: forgot to test
pH - Inflow 6.0 - Outflow - forgot to test
15/8/2020 - Final day of the week, wiped down the walls and bottom of the tent w/ vinegar&water solution. Cleaned the humidifier. Going to be topped early next week. Wife's digging the grow so far so good brownie points ;). See yall next week
PPM - Inflow: 402 - Outflow: 446
pH - Inflow 6.0 - Outflow - 6

Likes
1
Share


@BIXXIE
Follow
🔥🔥this project & phenotype was scrapped due to some personal things that came up. However, im growing these exact plants again, a very good phenotype found!! check out my recent uploads! 🔥🔥


Likes
21
Share


@KrautFabrik
Follow
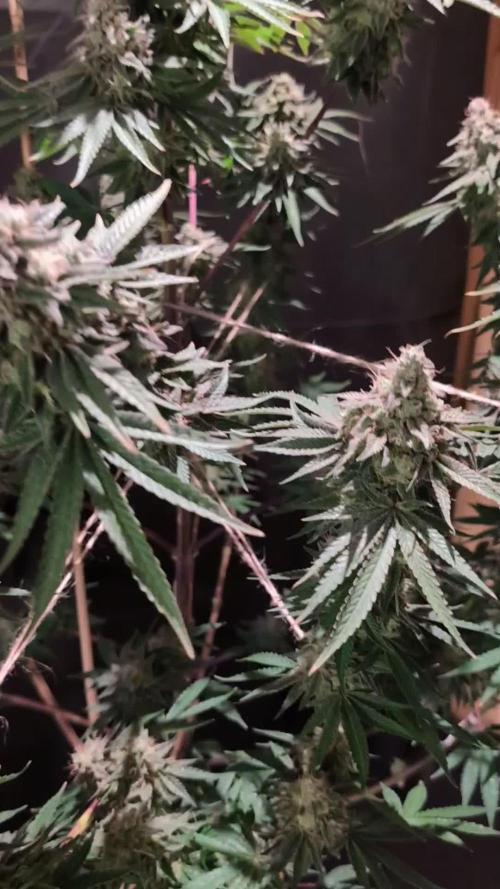
Day 60: flush 💦
Pictures are taken on day 62📸
---------------------------------------------
She is doing great ✌️💦
Happy growing 🕷️🌱

Likes
27
Share


@eldruida_lamota
Follow
Esos fumetillas, que hay de nuevo?
Yo ando actualizando el diario de las do
Sweet dos de sweetseeds.
Son las más lentas en florecer pero no por ellos las peores, ya veremos cómo inchan y forman esas flores que a todos nos gustan.
.
La humedad esta al 45% la temperatura está entre 21/27 grados , y como siempre el ph , ya que es de lo más importante,está en 5,8/6,0.
.
AgroBeta:
1 ml x L Flowering black line , vía radicular.
0,2 ml x L Beta shark, vía radicular.
0.5 gr x L mega PK , vía radicular.
0,8 ml x L Terminator, vía radicular.
0,5 gr x L Engordacogollos, vía radicular.
0,3 ml x L Tucán , vía radicular.
0,1 ml x L Betazyme, vía radicular.
0,3 ml x L Tricoma, vía radicular.
0,05 ml x L Gold Joker, vía radicular.
0,2 ml x L Silver, vía radicular.
.
Hasta aquí todo familia 🕸️ , un saludo y buenos humos fumetillas💨💨💨.

Likes
50
Share


@Rwein93
Follow
Ciao ragazzi e bentornati da me per una nuova pagina di questo diario!😉
Che dire ragazzi tutte le sorelle sono fantastiche.😍
La numero 1 è il capo famiglia, davvero imponente.
La numero 2 ha staccato le altre di 5 cm, ora è lei la più alta con i suoi 155 cm.
La numero 3 invece ha i buds già bellissimi.
Nel complesso crescono bene e forti con una distanza intermodale marcata che le fanno respirare bene. Ora le fragoline misurano circa 1 cm di diametro e quelle della numero 3 misurano circa 1.5 cm💪
L odore inizia a marcare i suoi aromi, pungenti note di mapo (Citrus × tangelo) si mischiano a leggeri sentori di gasolio.😋
Ho defogliato loro nel giorno 67 e ho allargato tutti le apicale dalla pianta 1 con Lst, i nuts rimangono invariati.👍
Eh niente! Anche per questa settimana è tutto ragazzi.
Grazie a tutti per aver guardato e restate sintonizzati per nuovi aggiornamenti.🙏
Buona settimana e felice crescita 🌱 🌱 🌱


Likes
7
Share


@Andres
Follow
she in her second week ... of flowering ... she has a weak smell yet ... but her buds begin to take shape outdoor ... we will see what she offers us in the future ... the substrate is made by me ... and its feeding began the 1 week of flowering with earthworm humus .. red guano and fishbowl water ...


Likes
9
Share


@Mr_nugs_lover_David
Follow
She has performed very good with the lst method, nice plant, fast growth, quality flowers, it's a very good choice for everyone who's looking for a good quality strain at affordable prices. Very nice genetic, this phenotype concretely has a very sweet and floral terps. You can check the other 2 phenos of ak420 here at my page

Likes
10
Share


@CanarianGrow92
Follow
Last week of flowering for our Ztrawberriez from fastbuds 420
This week only water was given to the girls, as at the end of week we are harvesting the plants!
Very nice smells comes out of the tent, cant wait to try all of the fastbuds strains i have in the tent 🤗🤗🤗
Likes
26
Share


@GuerillaGorilla
Follow
What a joy this grow has been.
She was a real beauty. Absolute joy to grow...strong branches but she likes to stretch a lot.
I knew wat to expect. I have grown Lemon Kush outdoors 3 times. The scrog this year was the perfect solution. I will not grow her again outdoors. This was my first time to see her finish. Seeing her flower this year, she just needs the warmth in the end. The climate here rarely offers that.
I must say the dense flowers are amazing also size and yield is incredible. Update about that later.
Trichomes were underdeveloped. I had to harvest early because of mould. The last 3 weeks of flower the temperatures were very low 10-15 C daytime and very very wet.
I believe this stunted the plants. They made a full stop in development and exploded again in the last week. 3 days of sun did more than the 2 weeks before.
Weather forecast were bad so big buds were harvested 25 september. We eventually had more sun than expected and bottom half was left until 2 october. That week made sooo much difference!!
Those bottom buds finally developed some nice trichomes and turned purple.
Of course I wish the big buds could have enjoyed the sunshine during that last week as well.
Most of you will know, being an outdoor grower...Every year is about compromises.
This year was so hot during growth and cold and wet in bloom that mould was unstoppable.
After all I am very pleased with this grow and cant wait to taste some of this.
Probably needs al long cure though to bring back that lemon scent.
Almost seems like all that the rain washed the scent right off her😪
Keep growing y'all!

Likes
27
Share


@Stealthman
Follow
playing around with the on/off cycle timing to find the optimum settings
Likes
16
Share

@GoodTimesOrganics
Follow
Hi liebe Community and Welcome Back! 🌿💚
Willkommen zur achten vergangenen Blütewoche! Blütetag 64
Die Buds haben nochmal an Dichte und Größe zugelegt.
Ich bin beeindruckt, welche Power nochmal zum Ausdruck kommt.
Auf jeden Fall zeigen sich Phenotypische unterschiede in der Gesamtstruktur.
Allmählich kommen wir auf die Zielgeraden. Sie zeigt eine richtig schöne Struktur und wir landen beim Ertrag sicherlich im XL Bereich.
Das Aroma hat bei dieser Pflanze einen stärkeren süsslichen und fruchtigen Touch, wobei inzwischen auch etwas herbere und beißendere Untertöne (etwas Chemisch) hinzu kamen.
Denke nächste Woche ist es Zeit zum harvesten.
Die Umgebungsgegebenheiten sind aktuell gut:
—————
🌞 Temp: 27
🌚 Temp: 18°C bis 19°C
💨 RH: 62%
VPD: 0,96kPa
💡ppfd: 830 mpm
—————
Viele Grüße 👋
Likes
Comments
Share


Likes
20
Share

@Mr_nugs_lover_David
Follow
She's an octopus full of very stinky sweet nuggets man!. I'm in love with this black cherry punch #1 she's in a 30l pot and her performance has been amazing. Very happy with this lady. The aroma of the flowers is suuper sweet very like cherry and like strawberries. Such a pleasure to grow this Cherry pie 🥧🍒 cross 🔝💎👨🌾
PD: I had to tie some of the colas cause they were just Fallin cause of the weight of the nugs.
A set of 2 branches broke because of the weight of the nuggets so I chopped it down the 2 colas and put them in the drying room.

Likes
15
Share


@DevelGrow
Follow
Hallo Freunde 👋 Frost Banger von Fast Buds ist 42 Tage Alt! Sie steht schön in Blüte und baut schön ihre Buds! ✌️🍀💚🍀