
Likes
Comments
Share


@Roberts
Follow
Casey's Rollex OG is still making progress. I neem oil treated after last update. I did twice 4 days apart from one another. It should of killed or sterilized any critters. Time will tell if I got them. She is still making progress. Possibly a little stressed from neem oil. Hopefully the pest are gone. If not then I am gonna get a Insecticide soap. I need to have this resolved prior flower starting in a few weeks. Everything else is going well. Thank you DutchFem Seeds, and Spider Farmer. 🤜🏻🤛🏻🌱🌱🌱
Thank you grow diaries community for the 👇likes👇, follows, comments, and subscriptions on my YouTube channel👇.
❄️🌱🍻 Happy Growing 🌱🌱🌱
https://youtube.com/channel/UCAhN7yRzWLpcaRHhMIQ7X4g

Likes
32
Share


@420lor
Follow
¡Día 21 de floración y decidí darle más luz al escenario verde de Tropicanna Poison! 🌿☀️ Realicé una poda estratégica de las hojas más grandes, permitiendo que esos cogollos en ascenso reciban toda la atención lumínica que merecen. 💡🌺 La planta está respondiendo con energía extra y los resultados prometen ser tan brillantes como el sol que ahora llega a cada rincón. 🚀✂️ ¡Una poda para un espectáculo floral más brillante! 💚🌈 #TropicannaPoisonUpdate #PodaCannábica #FloraciónRadiante


Likes
34
Share


@Fronti89
Follow
Ala Erstes muss ich mich für die Bilder entschuldigen...Mein Handy ist leider defekt und das Ersatz Handy bringt nich so gute Bilder hervor ! Blüte hat richtig gut eingesetzt ,hab Heute ein Paar Blätter geschnitten und ein Paar nach unten bzw. nach innen gebogen weil sie so extrem Buschig sind und ich befürchtete das die neuen Triebe bzw. Blüten nicht genug Licht abbekommen . Die 1 kleinere Pflanze hinten Rechts hab ich leicht erhöht das sie mit den anderen 3 gleich auf ist "unterschied 9 cm" ! Das Netz wird nur zur Stabilisierung der Pflanzen genutzt und gedüngt wird jetzt mit Biobizz :
Grow 1,5ml pro Woche (Montag 0,75 & Samstag 0,75 pro Pflanze )
Bloom 2ml pro Woche (Montag 1ml & Samstag 1ml pro Pflanze )
Top Max 1ml pro Woche (Montag 0,5 ml & Samstag 0,5 ml pro Pflanze)

Likes
20
Share


@WeEdandGrowLover
Follow
The lil Big Bud is still growing really well😎.
I started to add master grower massive bloom from hydropassion since day 45.(0.3gr/L).
She really starts to smell good😊.

Likes
59
Share

@GERGrowDesigns
Follow
Dear Growers ,
Welcome to Week 10 or Flower week 7 // Harvest Day from Kannabia Purple Dream Auto
Whether you're a beginner or an expert, you are warmly invited to join, ask questions, and share your own experiences along the way!
Project Setup & Conditions:
• Brand/Manufacturer: Kannabia Seeds
• Tent: 222cmx150cmx150cm
• Light: 2x 720 Watt Full Spectrum
• Humidity: 50%
• Soil: Narcos Organix Mix
• Nutrients: Narcos Products
• pH Value: 6
The Pictures Showing genetic 1 and 2 Purple Dream Auto
If you want Germinitation results like mine , check out Kannabia Seeds with my link [https://www.kannabia.com/de?ref=61966] and grab the germination device or the strains I used . Trust me – it’s worth it for sure !
Get another 20% Discount at all products using the code [GGD] at the Checkout .
Stay curious and keep up Growing —we look forward to welcoming you back for the next Projects soon!

Likes
11
Share


@adam_pawloski87
Follow
This week has been great! Germination on all 4 Pre 98 Bubbas and 2 Dirty Blondes was a success!! We planted them in there pots an through out the week we gave em each a very light spray down of pure water phd at 6.5 and by Friday they all popped out the soil Let’s go!!!!! Next week we will start light feed on nutrients , so y’all keep them eyes peeled for next updates an I appreciate y’all for following my grow !!😶🌫️💨💨💨🙏🏻💚💯🤙🏻


Processing
Likes
19
Share


Likes
4
Share


@brosef_b_baggin
Follow
The indoor plants are developing a mobile nutrient deficiency(newer growth is pulling from older leaves)in the lower leaves. Nutrients are being locked out(too much of one nutrient is locking out the others in the soil, or temperatures are too cold in the soil) or they are being tied up in solution whenever I mix the lotus nutrients(I’m adding bloom and boost into the same gallon, so maybe the chemicals are reacting with each other and becoming unavailable to the plant). On top of my nutrient dilemma, fungus gnats have found their way to my moist soil and are being a nuisance. From what I found they’re surviving off of my woody material in the soil and will soon try to establish it as a home so I’ve got to go get some IPM.
Outdoors is vibing with the pest pressure so I’ll continue to let it do it’s thing.
Likes
12
Share


@cheetah844
Follow
Nice growth. It's been stormy here so they're a little stressed but will strengthen back up when the sunshine comes back out. I'm thinking, or at least hoping, this is a female 🤞
I topped every bud site on every plant, both indoors & outdoors.


Likes
12
Share

@Xpie77
Follow
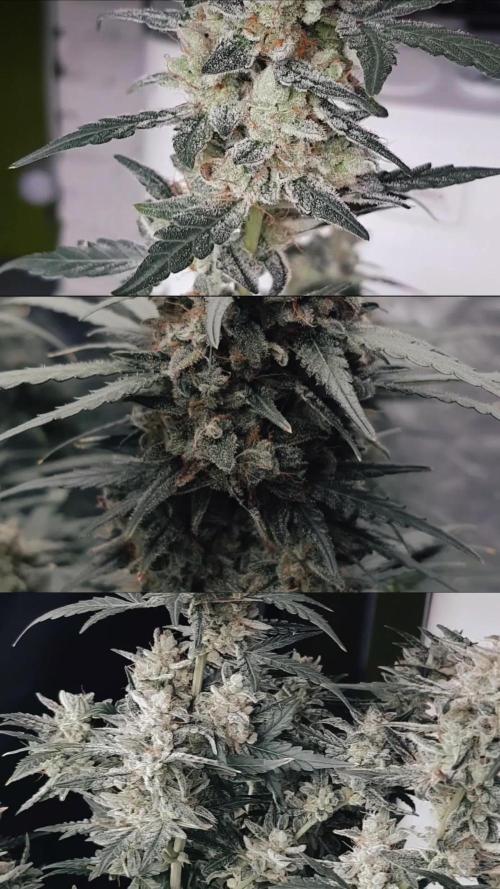
GrowDiary Verslag: The Bird × Red Wine – Feminized F1 Pheno-Hunt (Week 6 Bloei)
Kweker: Xpie77
Datum: 11 januari 2026
Strain: The Bird (Sensi Seeds) × Red Wine (Seeds Genetics) – zelfgemaakte feminized F1-zaadjes
Aantal planten: 16 stuks
Huidige fase: Week 6 bloei
Foto-update (Week 6)
Hier een close-up van één van de buds in week 6 – kijk die insane trichome-laag! De hele top is bedekt met een dikke laag frost, alles glinstert onder het licht. Nog steeds voornamelijk groen, maar de pistillen worden dikker en donkerder, en er zit al een lichte paarse gloed in de calyxen bij sommige pheno’s. De echte paarse/blackout kleuren laten nog even op zich wachten, maar de resin-productie is nu al next level.
De bud ziet er super gezond en harsachtig uit – precies wat je wilt zien in week 6 van een indica-dominante kruising zoals deze.
Stand van zaken in Week 6
De 16 planten zijn in volle ontwikkeling en de bloei versnelt echt:
Bud-ontwikkeling: Buds zwellen flink op, calyxen worden groter en dikker. De toppen beginnen compact te worden.
Trichome-productie: Mega frost overal! Sugar leaves en buds zitten onder de hars – veel pheno’s lijken nu al harvest-ready qua trichomes (maar nog niet qua kleur/rijpheid).
Kleur: Nog grotendeels groen, met lichte paarse hints bij een paar planten. Ik hou de nachttemperatuur laag om de anthocyaninen te boosten – verwacht meer paars in week 7-8.
Aroma: Wordt steeds intenser in de tent: zoete druiven/bessen (Red Wine) met een gassy/funky punch (The Bird). Ruikt nu al als een premium strain.
Gezondheid: Topconditie. Bladeren donkergroen, geen tekorten, goede stretch voorbij, alles gelijkmatig.
Wat te verwachten de komende weken
Nog 2-4 weken bloei (afhankelijk per pheno: 8-10 weken totaal).
Buds harden verder op en trichomes gaan van helder → milky → amber (tijd om te checken met loep!).
Hopelijk meer kleurverkleuring bij de Red Wine-dominante pheno’s.
Beginnen met lichte flush richting het einde.
Conclusie
Week 6 is waar het echt spannend wordt – de frost is insane en de potentie schreeuwt eruit. Deze The Bird × Red Wine F1’s ontwikkelen zich prachtig, en met zoveel variatie in de 16 planten ga ik zeker een paar absolute killers vinden. Nog geen paars spektakel, maar de resin-laag maakt het al de moeite waard!
Stay tuned voor week 7/8 – dan komt de echte magie. 🍇✈️🐦
#TheBird #RedWine #F1PhenoHunt #FeminizedSeeds #ColloidalSilver #Week6Bloom #GrowDiaries #CannabisBreeding #Xpie77
Wat denken jullie: hoeveel weken nog tot harvest, en gaat het paars nog komen? Drop je voorspelling! 🔥


Likes
35
Share


@Canadian
Follow
The plant is doing very well is filling up with flowers everywhere and it has a fruity skunky smell to it very nice I can't wait to see it fully developed .
For now not much to talk about her except that she's doing pretty good developing good and very fast thank you for reading I will continue to update have a happy grow
Likes
6
Share


@TheMayor4434
Follow
In week 8 iv come to the sad realization that nearly all of the plants are at different stages of development. Dispite all the seeds being germinated at the same time. So iv had to take them off the wilma systems and am feeding them manually and there all on different diets. Which is an absolute headache especially as there is 16 plants to tend too. I think iv bit off abit more than I can chew for my first grow I maybe should have started with a couple of plants. I think the large wilma setups are designed for clones really so you know they are all going to progress and eat the same amount at once. It's not for autos . There all looking healthy though:)


Likes
10
Share


Likes
21
Share


@gr3g4l
Follow
la semana empieza con la poda de hojas abanico.
y termina con doblado de ramas.
La nº1 que sacó tres ramas por nudo va por libre, le cuesta más crecer y tengo que ir podando y doblando a medida que va creciendo.
La nº2 y la nº3 ambas terminan la semana listas para despegar.
Likes
9
Share


@Headies
Follow
So I had a little less nutrient last week then i needed. Def a calcium deficiency. I think it's clearing up but this plant has spot all over it. I changed the water, gave it the right amount of nutrients and a little exra hydrated lime for calcium. Hydro is hard. I hoping It's not sick. I hope It doesn't get the other plants sick. Just a few weeks left.