
Likes
Comments
Share


@Maple
Follow
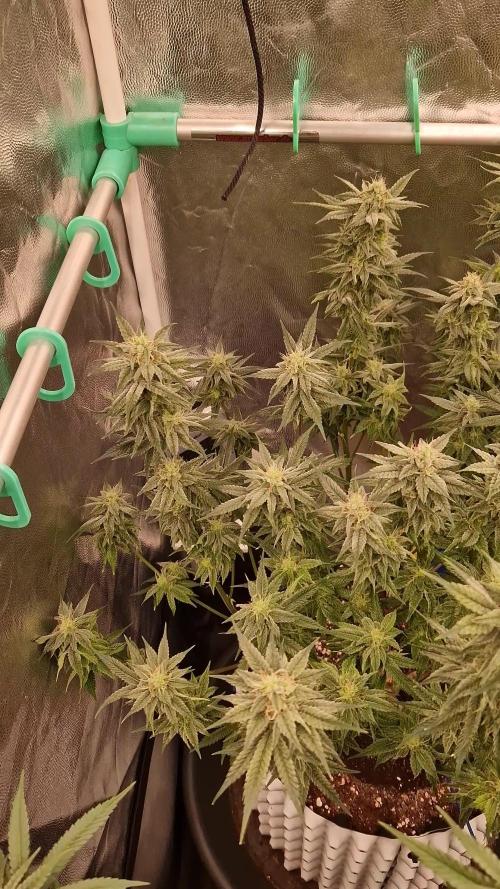
Overall, everything seems to be going very well at the moment. The plants are growing faster than ever and the space on the sides is getting cramped. We still have plenty of space for them to stretch, but the upcoming week will probably be the last one in veg before we'll switch to 12/12. The roots of the plants already reached the bottom of their fabric pots.
Topping:
We decided to top the three largest plants (2x PCK, 1x Gelato). This was only done because we wanted the smaller gelato (top left) to catch up a little. I'm curious how that will work out.
If all the plants had been the same size, we probably wouldn't have done it, because the space at the sides is already tight.
Lamp distance:
As the plants grew, we forgot to adjust the lamp distance until the distance was slightly below 30 cm. The upper leafs are currently looking a little stressed as a result, but it is not too bad. Right now the distance to the lamp is 50cm.
Fungus Gnats:
We added some sf-nematodes to the soil to get rid of fungus gnats. It is unclear where the gnats came from and it could be completely unrelated to the grow. However, we gave the nematodes to all plants so it does not become a bigger problem.


Likes
17
Share


@JonnyKush
Follow
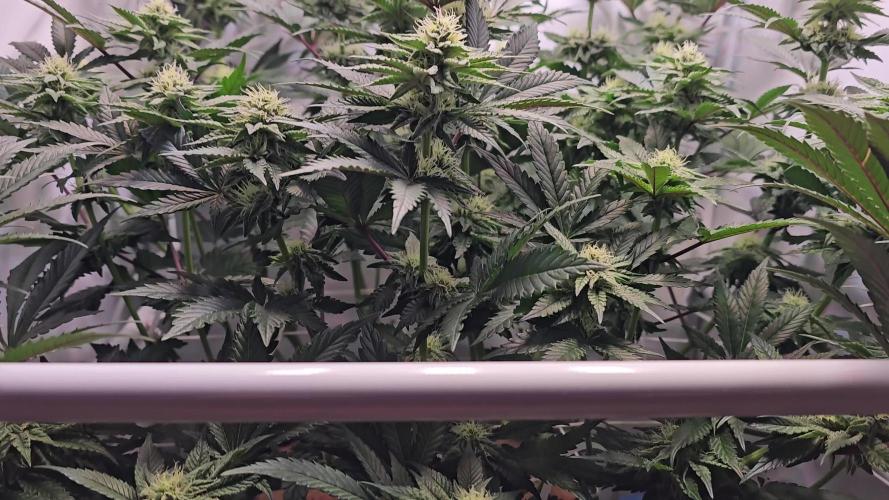
day 73 I was not ready for all this! 🤣🤣 they literally exploded and I started seeing purple on these buds I had to tie them up so the weight of the flowers didn't break the branches. compared to El Patron that I also have in my tent, Purple is much fatter and shorter. they have a very sweet scent and I can't wait to taste it, but alas I will go there a little longer. I have to say that 6 photoperiods are too many for my 1m x 1m x 2m tent. in addition to this I have noticed that they are very hungry. like me and give me some advice. thanks for stopping by, have a nice day and happy cultivation 💜🌳💜🌳💜🌳💜🌳


Likes
16
Share


@BluHaze007
Follow
Sadly Zkittlez #2 will no longer be with us. I had to make an executive decision to remove her. I really wasn't sure what was going on. I noticed that her stem were extremely soft and really sticky with a strong chemical like smell. Being that her stem were extremely soft, I could see how any buds would be able to grow. Since the other three girls were in late bloom and doing extremely well I didn't want to jeopardize their progress in late bloom. She was only a week younger than her sisters. R.I.P. Zkittlez #2
Likes
7
Share


@IguanodonDraper
Follow
Pretty smooth week. Realizing I should've done a bit more defoliation around trellis level where I've got a lot of little budsites competing for space.
Dosidos 1 (purple-er pheno) - beautiful plant with lots of frosty little buds. Nice colors in the pistils this week.
CBS - still looks sickly. Gave her a shot of the Neptune's Harvest this week but she looks about the same. Despite her yellowing and mottled spots on the leaves her buds keep filling in.
BttF2 - Looking pretty good. She's closer to the light than the other 3 but doesn't seem to have any issues with the extra rays.
Dosidos 2 (frostier pheno) - Also looking healthy and dripping with trichomes. Accidentally got a little resin on my hand and it smelled like Sweet Tarts.


Likes
65
Share


@DudeGrowsWeed
Follow
Blue Dream'Matic was cut down on March 17, 2018. The pics are from just before harvest. I'll add a Harvest update on GD after she's dried. But I can tell you she smells sooo strong its incredible. Looking forward the smoke report! 👍

Likes
21
Share


@MG2009
Follow
01/27/2021
Flowering going well
Flowering #2,#3,#6 #6 is a week ahead of#2,#3 will put others in on week 4 for a staggered harvesting
01/30/2022
watered with fungal tea and some aloe mixed in for amino acids and other goodness. Well see how she progresses in 4 days
Also working on some banana peel tea to give a boost of potassium if I do next week it should be available for week 6-7.
Ps.
Fuzzy Mellon (bag seed male)
I will pollinate one lucky branch on #6 as she is my favorite. But number 3(tall and lanky one) will get pollination of one branch as well.
I can't wait to see how they recombine with fuzzy melon smell mixed with burnt rubber and model glue and pine.
#2 no pollination (smaller one) #5 (bonsai) and #8 are males. So 3 female out of 8 seeds. Going to make some feminized seeds next time,so I'll have plenty of female's for a staggard harvest.
Likes
29
Share


@AlbaDiary2
Follow
Buenos humos queridos jardineros!!💚
Espero que la semana fuera bien!
Yo aquí, con las Novarine que no paran de crecer y crecer, son altísimas!
(Casi más que yo, para ser sincera😂)
Están muy olorosas y sacando bellos cogollos!
Nos vemos para la siguiente semana con más!
A pensar en verde💚💚💚💚💚😘😘😘😘😘


Likes
19
Share

@TrickzGrowz
Follow
Da die Ladys echt viel Biomasse hatten, hab ich das Netz rausgenommen, um alle Ladys nochmal zu defolieren.
Bei der Pink Poochie kann man wieder Grounded Genetics typische Terps entdecken. Ein sehr süßer Geruch. Die Knospen zeigen auch langsam, das sie dicker werden wollen.
Likes
Comments
Share


@MrStarOn3
Follow
At the end of week 3 I topped one of the strawberry cough they are all looking good and starting to veg I’m all caught up with the grow diary’s and will add at the end of every week. I’m in Australia and did start a little late into the season but hope to get a decent grow in they will be at my brothers once transplanted and he has a few aswel that I will add into the grow log nothing but sun and water only use a little thrive that’s from Bunnings that I get from my pops shed. They will be in a nicer cleaner soil when transplanted into veggie beds and will have chicken poo as a nutrient source first time ever using chicken poo so see how it goes. Will keep the grow log updated and hopefully everything goes all well for the travel and transplant for the plants in the next few days


Likes
18
Share


@Rinna
Follow
As said before, I'm incredibly happy that I got to harvest a little bit. Never expected her to make it, but she kind off did! The smell was pungent and sweet like an amnesia haze should be, hoping that will be even better after drying and curing!

Likes
10
Share


@Bread_n_Buds
Follow
Going into flowering is always a special moment and we prepare to do it in the best way to make the plant understand that it is time to become a woman and speed up the start of the formation of buds.
We start with 24 hours of darkness this to give a strong break and sign of change to the plant that understands the change of time and prepares to go into flowering.
Our Slurricane was worked with a topping x16 buds that worked really well, we have well aligned branches, here nothing escapes upwards. The small growing bruches are perfectly aligned and it is another fantastic characteristic of plants with low internodal distance.
Another thing that gives the plant the signal of the start of flowering are the flowering stimulators we friends of Plagron use Power Buds.
The start of the flowering program includes the same additives as the vegetative phase Power Roots, Sugar Royal, Pure Zym and adds the flowering stimulant Power Buds. Now the basic fertilizer is Alga Bloom specific for flowering. The shape is very very beautiful as the structure of this plant, I definitely love plants with short internodal distance. Elegant, to see, to photograph, to grow.
Green Sensation will arrive as the hero of the end of flowering and at the same time it will be time to remove Power Roots and a week later the Pure Zym enzymes. It is recommended from the 4th week, if the plants flower fast I start at the 3rd depending on the size of the bud.
Try a seed of this strain that drives us crazy... It's a super News!
---- https://www.zamnesia.io/it/11177-zamnesia-seeds-slurricane.html
Zamnesia Description // Do you want to add a prestigious genetics to your grow room? Slurricane is a premium US strain created by In House Genetics and now available to growers thanks to the breeding processes implemented by Zamnesia. Born from the fusion of Purple Punch and Do-Si-Dos, Slurricane is 60% indica and incredibly vigorous. Whether grown indoors, outdoors or in a greenhouse, this strain can produce large quantities of dense and aromatic buds. Add Slurricane to your assortment and enjoy growing one of the most beloved hybrids in the United States.
All the best that mother nature can offer is on ---- www.zamnesia.com


Likes
14
Share


@Mother
Follow
November 2nd marks another week with "Verlena" and "Carolyn". Verlena has transitioned into flower, yet Carolyn remains in veg. I should be placing them both in their 3 gallon homes this week.
November 3, 2021, Wednesday. Nothing new to report.
November 4, 2021, Thursday. All is well no issues to report.
November 5, 2021, Friday. I watered the girls with MG Organics 11-3-8 and they respond quickly and positively.
November 6, 2021, Saturday. Watered again with MG Organics.
November 7, 2021, Sunday. Day of rest.

Likes
16
Share

@BluHaze007
Follow
I know it is only two weeks but compared to other auto flower plants during this stage I'm starting to think that all three of my girls are stunted. I did have an issue during week 1. My light wasn't 18 inches as Mars Hydro indicated. I still had my lights height at 24inches.
Likes
39
Share

@GreenHobbit
Follow
Woche 13 | Tag 85–91
Der letzte Tanz vor der Axt ?🌲
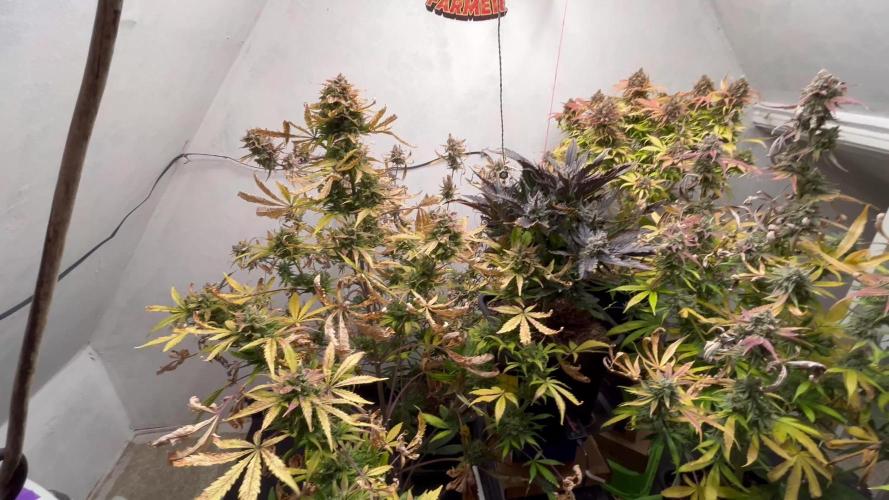
Woche 13 markierte den endgültigen Endspurt für die fünf Autos. Nach über drei Monaten unter den LEDs ist das Ziel nun zum Greifen nah. Die Pflanzen zeigen alle klassischen Zeichen der Endreife: kräftiger Fade, herbstliche Farben, knochentrockene Fächerblätter und eine Harzproduktion, die selbst nach 20 Jahren Growerfahrung noch ein breites Grinsen ins Gesicht zaubert.
Die Purple Punch entwickelt sich weiterhin zum heimlichen Star des Runs. Was auf Fotos oft unscheinbar wirkt, entpuppt sich beim genaueren Hinsehen als massiver Bud-Busch mit erstaunlicher Dichte. Die dunklen Farben, die fast schwarzen Blätter und die dicken, steinharten Blüten machen sie zu einem absoluten Hingucker.
Auch die GMO hat in den letzten Tagen nochmal ordentlich zugelegt. Die Buds sind komplett überzogen mit Harz und die Trichome zeigen inzwischen deutlich mehr Reife als noch vor wenigen Tagen. Die Wirkung dürfte genau in die Richtung gehen, die ich mir für diesen Run vorgestellt habe.
Die Blueberry hat überraschend stark aufgeholt und befindet sich mittlerweile ebenfalls voll im Erntefenster. Ihre Blüten sind komplett bereift und zeigen inzwischen erste Bernsteinfärbungen.
Hyperion präsentiert sich weiterhin als wahre Frostmaschine. Die Blüten sehen aus, als wären sie mit Puderzucker überzogen worden. Während die Trichome noch etwas jünger wirken als bei Purple Punch und GMO, befindet sie sich inzwischen ebenfalls in der maximalen Potenzphase.
Die Runtz liefert zum Abschluss noch einmal ein wahres Farbfeuerwerk. Gelb, Orange, Rot, Grün und Lila treffen auf unglaublich frostige Blüten und machen sie zu einer der schönsten Pflanzen des gesamten Runs.
In dieser Woche wurden erneut zahlreiche Makroaufnahmen gemacht, um die Trichomentwicklung zu verfolgen. Während vor wenigen Tagen noch einzelne klare Köpfe zu finden waren, dominieren mittlerweile milchige Trichome. Erste Amberköpfe tauchen nun auf allen Pflanzen auf und bestätigen, dass sich das Erntefenster endgültig geöffnet hat.
Die Bewässerung wurde stark reduziert. Die Pflanzen zehren inzwischen vollständig von ihren Reserven und zeigen einen spektakulären Fade. Genau so möchte man einen Run kurz vor dem Ziel sehen.
Nach 91 Tagen steht nun die letzte Entscheidung an: Noch wenige Tage Geduld für die gewünschte Menge Amber oder die Axt schwingen. Das Ziel dieses Runs war von Anfang an eine schwere, körperbetonte Wirkung mit maximaler Reife – und genau darauf steuern die Pflanzen aktuell zu.
Die nächste Aktualisierung wird höchstwahrscheinlich bereits der Erntebericht sein.

Processing
Likes
4
Share


Likes
17
Share


@Mr_nugs_lover_David
Follow
She's looking stunning, super healthy and big on her 3rd week, I'll be transplanting her in no time, and once Transplanted we'll start to see how I train my plants, thank you so much everyone! Let's see what awaits us with this beautiful pheno of ak420 by seedstockers! 🌱💎🔝

Likes
29
Share


@Omisan
Follow
OOOOOH at this time i love all of you, growmie 😍
200gr of pure happiness, never before! 🙌
Buds are compact like rock, shine like diamond...it's unbelivable, looks perfect!
At last, mold take me about 20g of buds 😩
But it is ok, the jar is overfull and i'm so happy XD
Now let's wait for the right taste......for now is greatful! 😜
Thanks to Dutch Passion for this opportunity, i'm really proud!! 🙏
Thanks to all of you growmie, for your support 🙏
to the next adventure!
