The Grow Awards 2026 🏆 


Likes
Comments
Share
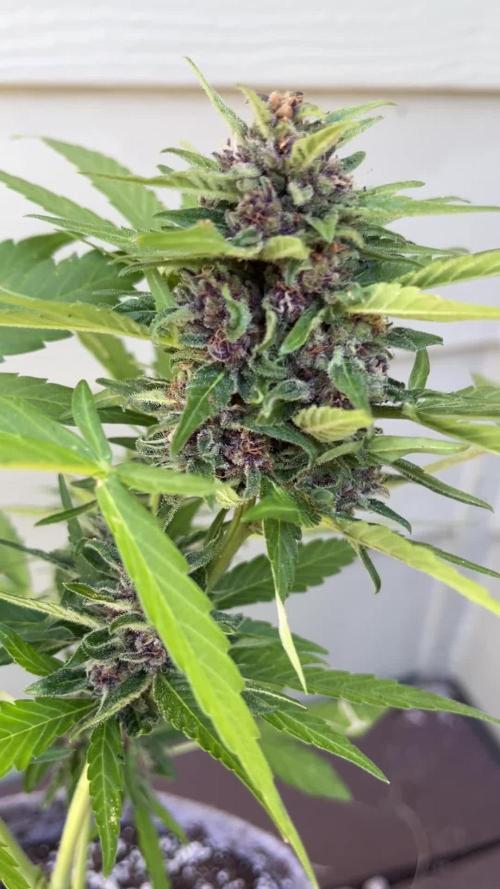
@Juschiln420
Follow
Well it's safe to say the foop will work with legit strong good bacteria! But the focus has to be on the root health when it comes to how much food you can add and still maintain healthy roots.
But the game changer for me has been switching to a air stone, 1st and for most. The recirculation pump suggested by foop when running foop in dwc ran the solution temps into the high 70's around 77°F and anything over 75°F has been where root rot sets in for me. Even switched to way smaller recirculation pump with same results. So switching to running a air stone was big! But also found that running one Vivosun 317GPH Air Pump 15W split to 4 plants was not enough air for the roots to be happy in the foop plants. So I moved to a 2nd air pump, same size per tent. So now it's only split to 2 plants on the foop plants. And that made a big difference! But found after a few weeks that I had to bleed a slight amount of air off because there soo much extra air the humidity was sky rocketing in the tent to high 80%. So there's a sweet spot where they get extra air but not soo much that the humidity is affected.
But the 2nd most beneficial thing I've done is start running Orca. It has made such a huge difference. I think I need to go up with how much I'm using or find something that works even better if possible. But the sweet spot now is 8 to 9ml total of each foop veg/bloom 1,2 and sweener. When I go to 12ml with foop 1,2 the roots take a noticeable hit. So idk how I would go to the recommended 20 to 50ml per gallon as suggested on the foop grow chart.
Currently running around 6 to 10ml orca total per feeding. And adding 2 to 4ml when I add foop 1,2 mid week amd got happy roots!
Also the Seaweed extract has made a difference in the smell the plant puts off. Last few grows have been really muted with smells and this grow I actually get hit in the face when entering grow room. So has made a difference forsure!! I'm soo excited!!
I had skipped a feeding because I had been feeding a few tines mid week. And that's when all the yellow edges showed up I've been trying to get her back on track feeding mid week 4 to 6ml foop 1,2 and has made a difference forsure! I also added a Exhale C02 bag. So hoping that kicks her in high gear, but she already seems to be doing better! I also need to get back to trying to master the art of getting the ph to stabilize and not climb every 24hrs. Currently I have to ph daily
6/24 added 1L, 10ml Seaweed extract
6/25 added 2L
6/26 added 1.5L, 10ml Seaweed extract, 4ml orca, 4ml foop bloom 1&2, 4ml foop sweener, 3ml cal mag
6/28 added 2L
6/29 added 1.5L
6/30 added 1L, 20ml Seaweed extract
7/1 refreshed, gave 20ml hydroguard, 10ml orca, 25ml Seaweed extract, 9ml foop bloom 1&2. 10ml foop sweener, 5.5ml cal mag
Records kept here:
https://1drv.ms/x/c/fa218bbdbbfbd064/EYZwYiJbkHdKqKqmxBKBBEgBMfZ9Lh3BFPJZvpB3_52MaQ?e=v9Y0LL
👋👋👋 Hello, Thanks for checking out my grow!! Please like and follow I really appreciate it!🤟 Please feel free to leave questions and comments below!!👇 I really appreciate all advice!!! Check out my Instagram, you can message me there too! And check out my youtube for more content! Mistakes were made, but what better way then to live it and learn it yourself!!!!
Likes
18
Share
@GreenCasual
Follow
Started flushing. Buds are getting tough, most pistils are turning brown and some trichromes are already amber.
I harvested the two bigger stems on Wednesday (because their sugar leaves were getting yellow and crispy) ; will harvest the rest of the plant on Saturday !

Likes
8
Share
@wheedtobeus420
Follow
Day 32 she’s flowering beautifully like all of a sudden poof. HahH I’m super happy with her. She’s beautiful. I have not ever grown this strain it was my husbands idea we shall see how this turns out so far so good.
Likes
37
Share
@TheIceCreamParlour
Follow
Checking in. Today is 7th day on a flowering light schedule and my girls are just about to show me their flowers. Vegetation is changing shape and a few pistils are growing on each site.
I was struck by thrips the day after my last entry so spent the first few days sorting that problem and really giving them some attention. A simple smoke bomb has rid me of the thrips and in addition I've also given them 2 lost of foliar soap spray which I will continue to do weekly. Despite the thrips my girls have been very happy once again.
Feed wise I dropped the nutes down below the recommendations on the feed chart. Feeding 1 in 2 days at around 1.6 EC where the chart suggests 1.8-2.0 EC. As of this week they will now be getting fed every day.
I defoliated about 15 large fan leaves off each plant twice this week but they just keep kicking back and within 2 days the canopy is thick with vegetation.
I also managed to take a few photos of the second largest plant outside of the tent so you guys could see how my training method has shaped them. Only reason I chose this one as it's the easiest to get out of the tent safely. It measured roughly 18" tall and 40" wide.
Another good week but I'm now nervous about encountering problems as we move deeper into flower as I know they don't cope or bounce back like they would during veg.

Likes
14
Share
@Surfettuccini
Follow
Last week I went away for a while and I had to leave my babies alone. Temperatures dropped so also maturation slowed down. When I arrived home this is what I found! She got darker and colas got even bigger and more sticky. She smells like pine but the odor is not very strong. It is also a little bit cheesy and mouthwatering. My dog was really attracted and tried to eat some. She is amazing! Tomorrow I will upload some better photos I took with my reflex.
Likes
37
Share
@Wastent91
Follow
Eccoci ragazzi, questa nuova collaborazione con Grower choice seeds è iniziata! Dal vigore che ha avuto da subito da quando è germinata, posso dire che stia crescendo una bella ragazza in salute! Se volete sostenermi e acquistare questi semi vi lascio i link qui sotto, che se entrate con il mio link di affiliato avete degli sconti e allo stesso tempo mi aiutate a crescere! Grazie di tutto un buon 420 a tutti!
https://www.growerschoiceseeds.com/ref/445
use code "WARM15" for an esclusive 15% sale on all seeds!

Likes
82
Share
@WhiteEdge
Follow
23.04.2024
Continue into week 8
Replaced all filters in the system and cleaned them.
Mixed a new batch with the following components:
20+25ml AN Connoisseur Bloom A+B
Total volume: 34 liters
Electrical Conductivity (EC): 1.0
Target EC for this week: around 1.0. Adjustments will be based on plant observations.
Performed one long misting session (3 minutes).
Environmental Conditions:
Outside temperatures going up, today is raining but this week start higher temps and humidity
Wedding Cheesecake: One girl is gonna finish in this week, Two others probably in next. Frutti terps in this, Two pheno in total from 3 girls'
Tropicana Cookies: Phenomenal strain; One girl is going to finish this week and second couple days after . Two pheno in Tropicana's girls
Purple Lemonade: Tall plants, massive producer, all three girls will be in 9 week provably. Here so far all three girl share same characteristics and bud structure
Beautiful and high odor in the room!
Lighting Parameters: PAR Map: Maximum PPFD is 950, minimum PPFD is 650.
VPD: Ranges from -1.1 to -1.2.
Daytime Temperature (DT): 23-24°C.
Nighttime Temperature (NT): 19-20°C.
Leaf Temperature: 21-22°C.
Light Distance: 45-55 cm from the plants.
CO2 Levels: 700+ ppm.
HLG Scorpion Diablo: Set at 70%, positioned at a 45-55 cm distance.
Girls drink less water, so for this week and till the end of flowering new misting timing's
Daytime: ON for 70 seconds, followed by 30 minutes OFF.
Nighttime: OFF for 70 seconds, followed by 35 minutes OFF.
Nutrient Tank (NT):
pH: Maintained between 5.80 and 6.00. Stable PH, small drifting up and downs
EC: 1.05.
Temperature: 19-21°C
25.04.2024
TrolMaster toys arrived! Purchase new DST2E, DSP2E, DSH2E, AMP3+probes. Another DSH2E and DSP2E ordered to complete this grow box!
Replaced all filters in the system and cleaned them.
Mixed a new batch with the following components:
25+30ml AN Connoisseur Bloom A+B. Total volume: 17 liters
Electrical Conductivity (EC): 1.05
Tomorrow Tropicana Cookies harvest! Put bucket with this girl on separate line for flushing
Wedding Cheesecake also finish soon, probably in next week, Wednesday think...
Purple Lemonade still need full week or more...Exceptional odors
Temps and humidity otside start to raises, hope i will finish this run before Tropical heat
Lighting Parameters: PAR Map: Maximum PPFD is 950, minimum PPFD is 650.
VPD: Ranges from -1.0 to -1.1.
Daytime Temperature (DT): 23-24°C.
Nighttime Temperature (NT): 19-20°C.
Leaf Temperature: 21-22°C.
Light Distance: 45-55 cm from the plants.
CO2 Levels: 700+ ppm.
HLG Scorpion Diablo: Set at 70%, positioned at a 45-55 cm distance.
Daytime: ON for 70 seconds, followed by 30 minutes OFF.
Nighttime: OFF for 70 seconds, followed by 35 minutes OFF.
Nutrient Tank (NT):
pH: Maintained between 5.80 and 5.95. Stable PH...
EC: 1.05.
Temperature: 19-21°C
26.04.2024
Connect TrolMaster components into the Tent-X system. Program DSP2E, Temperature DST2E, Humidity DSH2E, as well as the AMP3 sensor with PH and EC probes, are all in place.
After calibrating the probes, AMP3 module works perfectly! It has a quick response in measurements, is accurate, and I am very happy about the possibility of online monitoring of liquid values.
After day off use i can tell that all readings are very consistent, compared with Milwaukee, totally without all over the place measurements. Perfectly steady and on spot receding!
The Program device runs flawlessly all day, and I hope it has solved all the problems I had with DH48-S timers.
The humidity control operates without errors throughout the day, and it’s nice to see in the app when the module is active.
Raise light as much as i can..50-55cm from canopy. Set off misting time from 30min to 35min @ day time , and from 35min to 45min @ night time
Flush Tropicana Cookies' for one more day, tomorrow harvest, prepared tent for drying with humidifier , ventilation and temperature and humidity controllers
PAR Map: Maximum PPFD is 850, minimum PPFD is 500.
VPD: Ranges from 1.0 to 1.1.
Daytime Temperature (DT): 23-24°C.
Nighttime Temperature (NT): 19-20°C.
Leaf Temperature: 21-22°C.
Light Distance: 45-55 cm from the plants.
CO2 Levels: 700+ ppm.
HLG Scorpion Diablo: Set at 65%, positioned at a 50-55 cm distance.
Daytime: ON for 70 seconds, followed by 35 minutes OFF.
Nighttime: OFF for 70 seconds, followed by 45 minutes OFF.
Nutrient Tank (NT):
pH: Maintained between 5.80 and 5.95. Stable PH...
EC: 1.05.
Temperature: 19-21°C
28.04.2024
First harvest in this run! Tropicana Cookies No1 is a winner.) First Tropicana Cookies is harvested on 89 day from seed. Total 55 days off flowering.
Fast flowering indeed as fast in vegetative stage. Cut this girl in branches and hang upside-down in smaller tent for drying
Set RH @ 55% , temperatures not able to control so they will be something around 20-21 in drying tent
Second Tropicana will be chopped within a couple off days. Checking trichomes with microscopes can tell that one Purple Lemonade is also going to finish in next days
Somme lady's will take full 9 weeks or so..
Lowering light intensity, EC in tank start to raise slowly so i will start to adjust according to condition. Currently 0.85EC is perfect strength i think
PAR Map: Maximum PPFD is 850, minimum PPFD is 550.
VPD: Ranges from - 0.9-1.0
Daytime Temperature (DT): 23-24°C.
Nighttime Temperature (NT): 19-20°C.
Leaf Temperature: 21-22°C.
Light Distance: 45-55 cm from the plants.
CO2 Levels: 700+ ppm.
HLG Scorpion Diablo: Set at 65%, positioned at a 45-55 cm distance.
Daytime: ON for 60 seconds, followed by 30 minutes OFF.
Nighttime: OFF for 60 seconds, followed by 35 minutes OFF.
Nutrient Tank (NT):
pH: Maintained between 5.80 and 5.95. Stable PH...
EC: 0.85.
Temperature: 19-21°C
Week 8 off Flowering in Summary
80 litter off RO water,
120ml+150ml AN connoisseur A+B
45kW electricity in total for light, Pumps and AC Infinity Fans. 42kW for Light + 2kW Dehumidification + AC Infinity ventilation
Week start @ 1.1EC, nutrient strength., week finish with 0,87EC
Tropicana Cookies is first harvested on day 89 from sprouting , week 8 off flowering
Purple Lemonade is going to be on second place with harvest on day 91, last day off 8 week off flowering
PH was stabile and move from 5.70 min to 5,9 max.
Light distance for this week - 50-55cm from tallest top , PPFD levels around 900 in center, trough whole week. Lowest reading 500 @ corner
Temperature are from 20c at start off day to 24.5c max at some points.
Night temps around 19.5-20c. Outside humidity is generally low
This week i have install TrolMaster AMP3 sensor and humidity, temp and program devices
Day RH is moved from 45% to 55% max, at night times drop to 45-48%
Lighting Parameters: PAR Map: Maximum PPFD is 900, minimum PPFD is 650.
VPD: Ranges from -1.0-1.1.
Daytime Temperature (DT): 24.5°C.
Nighttime Temperature (NT): 20°C.
Leaf Temperature: 22°C.
Light Distance: 45-55 cm from the plants.
CO2 Levels: 700+ ppm.
HLG Scorpion Diablo: Set at 65%, positioned at a 45-55 cm distance.
Daytime: ON for 70 seconds, followed by 25 minutes OFF.
Nighttime: OFF for 70 seconds, followed by 35 minutes OFF.
Nutrient Tank (NT):
pH: Maintained between 5.8 and 6.1
EC: 0.87-1,1.
Temperature: 20-21°C
Likes
3
Share
@Hydlzzz
Follow
I used mammoth microbes, power si, photosynthesis plus, roots organic nutrients, fox farms soil under mixed lighting with an outdoor flower.
Likes
24
Share
@DeepRootsGrowTrees
Follow
SWISS DREAM ROSE 🌹 CBD AUTO
KANNABIA SEEDS
WEEK #8 Overall
Week #6 Flower
This week she's looking beautiful dense purple buds that have trichomes along with the white and orange colored hairs. Great Genetics 👍 from Kannabia Seeds of your looking to grow some CBD!! Stay Growing!!
Kannabia.com
SWISS DREAM ROSE 🌹 CBD AUTO

Likes
43
Share
@DrDuhboto
Follow
Plants are all doing amazing !
They are all growing in a very even and uniform fashion.
Seems like quality genetics so far. Plants are on track to be transplanted by next week or one more tops
Fed with very light dose of supplemental nutrients at 6.5ph
Plants are getting 25k lux.


Likes
1
Share
@ChitownCannaChica
Follow
Temps dropped by 10-17 degrees- especially at night. Have not given any nutrients, just hose water. She seems to be doing fine. Ipm weekly and the cold is making her slow down a touch. Other than that, the frost is developing nicely and countering all this plant has been through with the temp swings, bouts of rain, bouts of dryness, wind, sun, no sun, etc- I should get a decent little harvest! Smell is divine! Has these sweet vanilla pine aromas with a deep purple bud. Probably chopping next week!🏻💚
Processing
Likes
88
Share
@Fergie
Follow
hey guys so we are getting very close now . i collect my new aircon unit tomo morning im going to throw straight in tent and drop down to 18 for last few weeks . I started flush begining of week on both girl looking so nice a d smell is just amazing . Til next week only a few more to go 😀

Likes
5
Share
@JohnnyBarrel
Follow
Week 14- Flo week 5
Pretty good flowering; interesting stage with a profusion of white and thick pistils announcing some meaty buds. All plants are healthy, no signs of nutrients deficiency (Cal/Mag) or excess.
No LST or SCROG; so I don’t really have a canopy, the plants structure are not optimized. However the light is efficient: the 2 light panels (120W x 2) are placed on different heights: it’s well adapted to the plants sizes.
- Special Queen: elegant plant, long branches and lots of of flowers with plenty of whites pistils
- Criminal+: well developed bushy plant, producing numbers of little smelly flowers.
- Indigo Berry Kush: stocky plant, robust. Flowers are enlarging, starting to produce resin and to change into purple color.
- NYC Diesel: rustic, healthy with big sticky flowers.
2 Watering: 3L— 4 plants
-Water rain + Cal/mag + fructification nutrients + p13/14
-Water Rain + Cal/mag + overdrive + Bud XL
To be continued


Likes
2
Share
@CannaIGrow
Follow
Plant is growing good. Still really pretty to me. Hoping to flip around day 60
Likes
19
Share
@GoldenWeedGrower
Follow
Legend
Timestamp: 📅
EC - pH: ⚗️
Temp - Hum: 🌡️
Water: 🌊
Food: 🍗
pH Correction: 💧
Actions: 💼
Thoughts: 🧠
Events: 🚀
Media: 🎬
D: DAY, G: GERMINATION, V: VEGETATIVE, B: BLOOMING, R: RIPENING, D: DRYING, C: CURING
________________________________
📅 D77/B15 - 31/01/24
⚗️ EC: 1.2 pH: 6
🌡️ T: 19-22 °C H: 40-60% (Min-Max values taken from the app.)
🌊 2L
🍗 CalMag - Bloom A-B - Bud Candy - Big Bud - B52
💧
💼 Thanks to the TM+ Pro app and the use of the Humidifier now the T-H of the enviroment is correct and i got quite good VPD (Vapor Pressure Deficit) rate
🧠
🚀
🎬 Added Timelapse video
________________________________
📅 D78/B16 - 01/02/24
⚗️ EC: 1 pH: 5.9
🌡️ T: 19-25 °C H: 45-70 %
🌊 2L
🍗
💧
💼
🧠 Quite time to change res
🚀
🎬 Added Timelapse video, 3 pics and "TM+ Pro" App screenshots of T-H values daily graph, and quite perfect VPD daily rate
________________________________
📅 D79/B17 - 02/02/24
⚗️ EC: 1 pH: 6.2
🌡️ T: 19-25 °C H: 40-60%
🌊
🍗
💧 Added few drops of pH-
💼
🧠 The res was for many time on the upper side of pH range, so now I would like it to goes down to a more acidic solution. I'll do it on the next res change, maybe tomorrow
🚀
🎬 Added Timelapse video but today it was trunked because of a problem on the camera, but I posted it anyway
________________________________
📅 D80/B18 - 03/02/24
⚗️ EC: 0.15 pH: 6.6
🌡️ T: 19-25 °C H: 40-60%
🌊 RES Changed 💦💦💦. Flushing until tomorrow
🍗
💧
💼
🧠
🚀
🎬 Added Timelapse video and VPD, T-H graphs screenshots
________________________________
📅 D81/B19 - 04/02/24
⚗️ EC: 1 pH: 5.7
🌡️ T: 19-25 °C H: 45-65 %
🌊 15L
🍗 CalMag - Grow A-B - Bud candy - B52 - Big Bud
💧
💼 Some defolation and sistemation of buds
🧠
🚀
🎬 Added Timelapse video and VPD, T-H graphs screenshots
________________________________
📅 D82/B20 - 05/02/24
⚗️ EC: 1 pH: 5.4
🌡️ T: 20-25 °C H: 52-84 %
🌊
🍗
💧
💼 Little defolation and raised up the lamp
🧠
🚀 I forgot the humidifier on manual mode, so H increased until 80%and VPD went out of control
🎬 Added 4 pics, one is from timelapse set. Added Timelapse video and screenshots
________________________________
📅 D83/B21 - 06/02/24
⚗️ EC: 1 pH: 5.0
🌡️ T: 19-25 °C H: 45-70%
🌊
🍗
💧
💼
🧠 pH decreased a lot and it's a good thing it stay on the acidic side for a while
🚀
🎬 Added Tmelapse video and screenshots of VPD and T-H

Likes
23
Share
@Jackweed77
Follow
Passata anche la seconda settimana di fioritura🌻 le ragazze 🌱stanno bene💪 e sembrano gradire la loro dieta Plagron🍨...nel prossimi giorni quando inizieranno a nascere i primi boccioli ⚘️ vedremo se la mia impressione è esatta....🧐👍

Likes
13
Share
@BigDaddyK
Follow
I plan to grow the best 2 in hydro and the best 2 in soil
On 40% power
Big Thank you to Medicgrow for the opportunity to use the LED - I am under no pressure or obligation to promote this item , I will give you my honest opinion, and we will see the results , it’s actually a bit bigger than imagined , first test with the lux meter showed awesome spread and distribution, I have one thing that I didn’t understand, using the hangers , you need a degree in engineering to understand , I looked , I pondered, I scratched my head a little smoked a joint , still couldn’t comprehend,so I used 6 ratchets = 🤪
All of them are cuttings I took from a naughty strawberry cheesecake
Ps The big green power supply there’s nothing to do with the medicgrow fold 6 ,( the power supply is in the middle )it’s from another light that I just can’t be bothered to move because I’ve got nowhere to put it
Wednesday-watered the soil , topped up the pots and added 2ml of A+B hydrogrow
Thursday upped the power to 60% this is the recommended setting , but I was a little cautious, I didn’t want to burn anything
Probably going to cull down to 6 this week , 3 of each - throw the others - see what happens

Likes
18
Share
@Staffedition
Follow
Привет друзья. Моей растихе сегодня 119 дней
20.10 перевёл свет в режим 12/12
Начал применять LST технику на 19 дне и продалжаю применять её через день, а 18 августа добавил ДЕФОЛИЗАЦИЮ
С 20.08 ДЕФОЛИЗАЦИЮ делаю каждые 3,4 дня
С 20.08 LST технику делаю каждые 4.6 дней
На сегодняшний день влажность 54%
5.09.2023 заметил высокий Ph 7.9
С 48 дня Ph не ниже 5.8
На сегодняшний день Ph 6.0
Начал кормить с 60 дня Canna Terra Vega
PPM 870
Всем мира и добра!
Не забудь поставить лайк❤️, если понравилась как прошла неделя
И читайте наш TELEGRAM: https://t.me/smail_seeds
#Smail_Seeds 😀
Likes
81
Share
@UnorthadoxDude
Follow
Welcome to the beginning of week 7 for Karen. Thank you for stopping by!
I'm counting this as the first week of flowering but she's been sending out pistils for two weeks, so I guess that weeks four and five should have been flowering weeks. Sorry about that. Surprised to be here but excited to see the next few weeks.
Day 44: This girl is amazing. She took the horrendous start I gave her for the first three weeks, and just exploded. Look at her now! If you are really interested, now look at Misty and Nesia - imagine what they could do! I am really pleased with Karen here, I think she has more surprises in store. I am very glad I decided to LST or she would be towering above everything else in the tent. I have noted early Mg deficiency, as more advanced on Nesia. Correcting with foliar and re-addition of CalMag to feed.
Day 44.5: Fertigated approx 1.5l. Defoliated approx 10 leaves. Slightly adjusted LST.
Day 46: Fertigated 2l. Karen is very thirsty. Her roots have breached the side walls at the bottom of the pot in 360 degrees... this is the biggest root system I've had on any potted plant to date. She is stretching fast now, I think by the end of next week she will be done stretching. I must get a photo of her stem. The base is ridiculously thick. Overall Karen is shockingly good compared to expectations from the poor start. I can only imagine how big she would be.
She is currently 27cm tall and at least 50cm in diameter. I count at least a dozen colas.
Day 47. She is now 29cm tall and pistils are bursting forth at a phrenetic pace. I have added a comparison shot of my grow space for size reference.
Day 47.5: Defoliated approx 30 fan leaves. Slightly adjusted LST. Rearranged tent and cleaned floor. I have ordered some risers to raise the pots off the floor, this will make it easier to deal with run off. While I was inspecting Karen I had a good look at her roots. The fabric pot she is in has viewing flaps (they were designed for potatoes) and I had a look... every bit of the pot is full of roots, and they're all properly pruned. I see no circulation or binding. If Karen produces at anywhere near the rate she is supposed to then she might yield as much as 150g.
Day 48.5: Rapid changes. Pistils everywhere, more stretching. Karen is very thirsty. Fertigated. Added pot risers and adjusted pot. Did a little LST to separate some bunched colas a bit. Had a really good inspect of the root system. Wow this plant is a beast.
Day 48.75: Fertigated 3l
Day 49: Height 34cm Diameter: 60cm. End of week summary. Really big week, she is stretching quicker and quicker. Today she has developed a striking scent. I will now have to keep the tent closed so temps will rise.
Day 49.5: Removed about 10 fan leaves. On reflection back over this week I think I needed to be taking a top and side photo, so I shall do that from next week.
