
Likes
Comments
Share


@Juschiln420
Follow
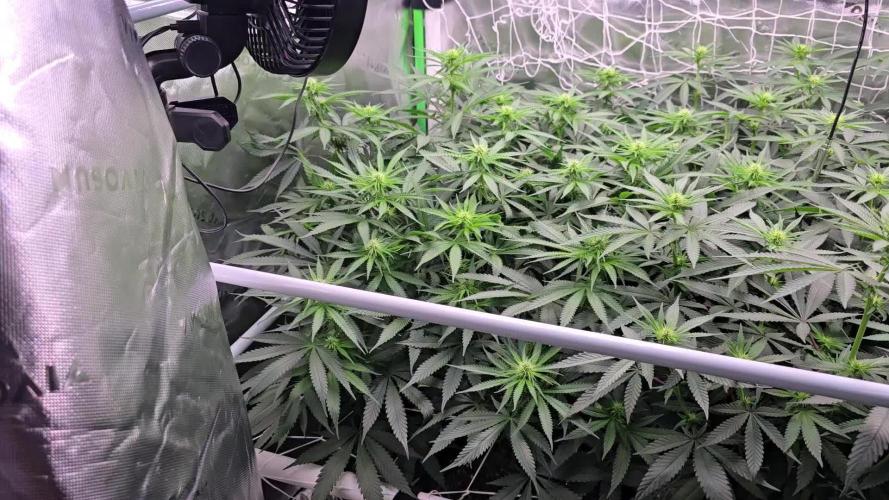
Well it's safe to say the foop will work with legit strong good bacteria! But the focus has to be on the root health when it comes to how much food you can add and still maintain healthy roots.
But the game changer for me has been switching to a air stone, 1st and for most. The recirculation pump suggested by foop when running foop in dwc ran the solution temps into the high 70's around 77°F and anything over 75°F has been where root rot sets in for me. Even switched to way smaller recirculation pump with same results. So switching to running a air stone was big! But also found that running one Vivosun 317GPH Air Pump 15W split to 4 plants was not enough air for the roots to be happy in the foop plants. So I moved to a 2nd air pump, same size per tent. So now it's only split to 2 plants on the foop plants. And that made a big difference! But found after a few weeks that I had to bleed a slight amount of air off because there soo much extra air the humidity was sky rocketing in the tent to high 80%. So there's a sweet spot where they get extra air but not soo much that the humidity is affected.
But the 2nd most beneficial thing I've done is start running Orca. It has made such a huge difference. I think I need to go up with how much I'm using or find something that works even better if possible. But the sweet spot now is 8 to 9ml total of each foop veg/bloom 1,2 and sweener. When I go to 12ml with foop 1,2 the roots take a noticeable hit. So idk how I would go to the recommended 20 to 50ml per gallon as suggested on the foop grow chart.
I tried going to 10ml foop 1,2 on this one but the roots didn't like it and it shows they have never turned back to a blonde or white color again
Currently running around 6 to 10ml orca total per feeding. And adding 2 to 4ml when I add foop 1,2 mid week and got happy roots!
Also the Seaweed extract has made a difference in the smell the plant puts off. Last few grows have been really muted with smells and this grow I actually get hit in the face when entering grow room. So has made a difference forsure!! I'm soo excited!!
Currently has issues getting the humidity below 55% in the grow room. I was running 6 damprids 1 on intake(outside tent) to tent, one on inside of tent(at inlet) and 1 on exhaust(outside tent) for 2x4 tent and 2 hanging at 4x4 tent exhaust and one hanging by ac unit. That brought it down like 5% over all but now I'm running 12 damprids to try and get the room down humidity in the mid 40's. We will see. The house runs a swamp cooler and that basically makes the whole house pressurized. So even tho I sealed the grooe room door and the window with ac the best i can. it's a uphill battle! Once swamp cooler comes on the humidity in grow room climbs like 10%. So here's to hoping🤞🤞🤞🤞
6/25 added 2L
6/26 added 1.5L, 10ml Seaweed extract, 4ml orca, 4ml foop bloom 1&2, 4ml foop sweener, 3ml cal mag
6/28 added 2L
6/29 added 1.5L
6/30 added 1L, 20ml Seaweed extract
7/1 refreshed, gave 20ml hydroguard, 15ml orca, 25ml Seaweed extract, 9ml foop bloom 1&2. 10ml foop sweener, 6.5ml cal mag
Records kept here:
https://1drv.ms/x/c/fa218bbdbbfbd064/EelXI2vd0VdDoZBL4JvZ6xMB7lSyddsPGq8FdBGttRAjgg?e=rY8meL
👋👋👋 Hello, Thanks for checking out my grow!! Please like and follow I really appreciate it!🤟 Please feel free to leave questions and comments below!!👇 I really appreciate all advice!!! Check out my Instagram, you can message me there too! And check out my youtube for more content! Mistakes were made, but what better way then to live it and learn it yourself!!!!

Processing
Likes
2
Share


@Mackinnon
Follow
Outdoors , hurricane came , moved indoors, frost temps , going to Finnish off indoors
Processing
Likes
6
Share


@Syntaxx1313
Follow
Today marks week 9 of the red poison auto flower. I started the flushing process this week. The Trichomes were starting to get milkiy on week 8 so I decided to flush the plant since I am looking for 65 to 80 % of milkiy for my final product. I am going to flush for 2 week for the best results (in my opinion) since the medium I am using is soil.
Instead of feeding her nutrients on October 16 2019 I just gave her the 1.5 gallons of PH(FOR SOIL 6 - 6.8) water with molasses.. I checked the run off water and the PH was 6.8 and my PPM was high at 1336. So on October 19 2019 I did a extreme flush of my auto in a 7 gallon soil pot. (I have tried flushing with certain agents in the past but from my experience and opinion I feel that flushing with just PH water works fine.) Well I flushed the plant down from 1336 to 336. I would have preferred a PPM level below 200 but the water I am using has a PPM level of 270. I actually ended up using 18 gallons of PH water to flush the plant in order to bring the PPM down from 1336 to 336. The PPM kept kept going down and then back up again after every flush so I had to keep adding gallons of water in order to make sure that at least half of the nutrients were washed from the soil. From this point on I will no longer feed her nutrients. I will just give her the regular amount of PH water I've always given her except the only difference is that I will no longer add nutrients to the water. The only thing I will add is molasses in the PH water in her regular feeding schedule. I am hoping to harvest around the 26 of October.


Likes
6
Share

@leithsffs
Follow
Not much to report this week. Just added some Fish Bone Meal and started on the Kool Bloom, too.

Likes
19
Share


@NORTHWALESAUTOS
Follow
Been a great plant to grow. She filled out rapidly in early stages and thicken up to the point the bud are very dence.

Likes
15
Share


@RussianGrower
Follow
Приветствую всех, кто следить за мной. Ваша поддержка очень важна для меня.
На следующий день после того как я обновил прошлую неделю дневника наступило время пересадить растения в более крупное ведро. Я покажу вам как использовать дешовые пивные стаканы для пересадки ваших растений. Вы можете посмотреть это на первом видео.
Когда я пересаживал растения я дополнительно добавил микоризу в большое ведро. Одно из растений "ЛСД -феминизированное" всё ещё показывает замедленный рост, несмотря на то, что я решил подсветить его LED полный спектр. Так же я внёс базовое питание, корневые стимуляторы и стимуляторы роста, в добавок с гуминовыми кислотами. Я планирую сделать из эти растений много клонов и запустить новый дневник в другой палатке, а эти растения потом переставить в маленькую палатку. Если вам интересно следить за приключениями травки в России, подписывайтесь на мой дневник
--------------------------------------------------------------------------------------------------------------------------------------------------------------------------------------------------
Greetings to all who follow me. Your support is very important to me.
The day after I updated the last week of the diary, it was time to transplant the plants into a larger bucket. I will show you how to use cheap beer glasses to transplant your plants. You can watch it on the first video.
When I transplanted plants, I additionally added mycorrhiza to a large bucket. One of the "LSD-feminized" plants still shows slow growth, despite the fact that I decided to highlight its full spectrum LED. I also added basic nutrition, root stimulators and growth stimulators, in addition to humic acids. I plan to make many clones of these plants and start a new diary in another tent, and then move these plants to a small tent. If you are interested in following the adventures of weed in Russia, subscribe to my diary.

Likes
13
Share


@WeedM8
Follow
Hello m8 welcome to this journey with me in this diary will have very interesting strains hope u find something useful
Persi
- [ ] 1st week Veg: germinated in substrate lighting very close so it jets medium high humidity after the 3rd day they started sprouting
- [ ] 2nd week Veg: this week my ventilator broke down and as the temperature stayed very warm nothing developed much
- [ ] 3rd week Veg:fortunately this week i had fixed the ventilation and the temperature has go down a bit allowing the little plants to develop and reinforce
- [ ] 4th week:very good developments in this week I already started feeding a bit two times but i didn’t have to…once was enough
- [ ] 5th week Veg:this week they were very strong green i only had to water them good and keep the ventilators going no stop .They have good hight already ,but as i have to strains together. I want to transplant them when the hight of the other one have stretched… I’m thinking to transplant next week if not the next one
- [ ] 6th week Veg: this week it went great fortunatly i dont have pests that eat my buds i’ve givven a fed once the substrate is very rich already the plants streached very well i will transplant today so be ready m8 i cant wait to show you the progress
- [ ] 1st week Fl:they started stretching and looking very healthy just transplanted
- [ ] 2nd week Fl this week I’ve been away i had a friend taking care of them they stretching very well i hope that she starts putting energy into the flo
- [ ] 3rd week Fl:they are streaching very well ..getting the light very well
- [ ] 4th week Fl:there we aree guys the good stage is heree good high hope dosent effect de prod
- [ ] 5th week Fl:pumping very good this week a lot of changes started already being frosty
- [ ] 6th week Fl:this diaries its not daily updated this week its going’s so great we are close to harvest between next week and the other one . Ill harvest them at diffrent time just because they are not all at the same point of flowi
- [ ] 7th week Fl: im so satisfied from the way that this is going they didnt had any particular stress just that its 29 degrees during light and its going good so farr I haven’t constantly fed like on the peach g and pcr i hope for better taste at the end

Likes
51
Share


@eldruida_lamota
Follow
Esa familia, traigo la última semana de floración de las cookies gelato, increíble lo prietas que están , son flores muy compactas y llenas de tricomas.
Un híbrido increíble, ya se ve productor y además se aprecia potencia en su flor.
Ya deseando pegar machetazo y en unas semanas podré apreciar los resultados.
.
La humedad esta al 45% la temperatura está entre 21/25 grados , y como siempre el ph , ya que es de lo más importante,está en 5,8/6,0.
.
AgroBeta:
Ya tenemos el lavado de raíces realizado, hemos retirado los nutrientes y finalizamos con un estrés hídrico.
.
Hasta aquí todo familia 🕸️ , un saludo y buenos humos fumetillas💨💨💨.

Likes
10
Share


@Archieballs
Follow
All in flower Banana #1 is just starting to put on a bit of weight and showing some amber. Banana ! Will be the first to harvest I think Banana #2 and Skywalker are 1 week behind her. As the end is in site starting to prepare the next grow which will be All Dutch Passion again Auto Ultimate, Auto Daiquiri Lime and Auto Mazar.


Likes
7
Share


@Naujas
Follow
I'm happy :) I couldn't do it as it should have been, my ph meters broke and ruined everything :( well, but I'm very, very satisfied with the result :) a big thank you to my teacher :)@AsNoriu you are super :) without you it wouldn't have been possible :) I learned a lot of useful information from you :) the house is full of lemon aroma :)

Likes
4
Share


@CaptonianMoneymaker
Follow
Waiting till she's big enuf to clone a whole tribe from her next big run only freak show

Likes
10
Share


@TeesTrees
Follow
Day 57 - The plant looks great, healthy! The buds are looks great also.
Day 58 - The plant is looking great i just watered her today looks like she might have a bit of water shock. I gave the plant some PH controlled water but i didn't take into account the soil so the whole thing didn't make a difference.
Day 59 - The plant looks amazing. Defoliated her a little more today.I'm noticing the smell more prominently now as well; Also we done some seriouse decore change today so the whole place looks like a bud box we got the other plants from my diaries featuring in a the video.
Day 60 - She is well and growing.
Day 61 - Was to busy running around didnt take a pic its a shame but its okay.
Day 62 - The buds are forming nicely plant is stretching out for the last time. The plant is also dry and will need watering tomorrow. I raised the light today as she is very tall now and was nearly touching the light.
Day 63 - The plant got fed PH 5 water, so she looks a bit droopy from water shock but; she will spring back to life like she normally does. Looks like the plant is doing well though.
Likes
24
Share


@TerpTurtle
Follow
Took some clones, Transplanted into 25 gallon pots, Flipping to flower
Processing
Likes
7
Share


@Canadian_Bud
Follow
Into week 5 of flower and it's time for a change out of the Nutrients and add some Fresh RO water and Power To Bloom followed 4 days later with some UMP. She is bouncing back just nicely and now takes on more feedings so running the RO water has been a daily task. She looks good and producing well.

Likes
15
Share


@DaddyPrime2
Follow
5/20 I'm in love 😍 the leaves are lime green only because of the frost lmao this plant is ridiculous and Iam so looking forward to where this plants headed. This one bud in the middle is looking more and more purple each day. If the flower from this plant is what I'm hoping it to be, I will definitely be keeping this in my garden, which would be a first. I also never had intentions to do that or medical intentions to be more specific, up until now. Hopefully this will be my first, last keeper
5/22 gave her a tbsp of terp tea
5/26 end of the week 3 flower. She's starting to chunk and gain bud structure. The next four weeks will be


Likes
5
Share


@Hack8d
Follow
Girls start from left Pineapple#1 - WhiteW#1 - WhiteW#2 - Pineapple#2.
59 days after germination. Change feeding Pineapple E. /Big Bud for Overdrive/. White Widow still on Big but but on the next week I wanna change as well. Watering cycle /Feeding - Feeding - only water - Feeding - Feeding - only water/. I wonder about flushing Pineapple on the next week. White widow I will keep longer. I'm really enjoy of Mars Hydro sp250 and mix of two nutrients company. Bought WhiteWidow need more time but can't wait for result. Pineapple start smelly nice. I wanna cure longer for better somke, maby 5-6 month. For the next sezon I really need second Sp250.


Likes
1
Share

@wood4sheep
Follow
2nd grow. Started flowering the first 2 plants and then jammed the other two in as they were getting TALL at 6weeks. Buds came out a little thin, but were 50% red hairs and amber trichomes. I am going to try to crank up the heat and flower longer next time. I’ll be more generous with the nutrients too(800 -> 1200ppm). Harvest pics to come after dry trim.

