
Likes
Comments
Share


@Kronen
Follow
Auto Flower AK Triple Haze (AK3H) by Super Sativa Seed Club: Day 49 From Seed, 24 days flower. Green, healthy, & stacking up nicely. Especially the Coco/Perlite+Fertilizer plants: AK3H #1 & #2. Coco Buds are pulling away from Soil Plants growing more in thickness & length. Weekly Environment: 79F, 51% RH, 1075ppm CO2, & 1100-1500 PPFD 12hr Lighting.

Likes
30
Share

@Hempface86
Follow
Here we are another week.Thank you.Divine seeds for putting together another amazing contest... I'm really hoping this is an annual thing.. With that being said, this girl is doing great.She's in a small pot and she is doing big things! Awesome genetics, just like the first go around... Divine seeds definitely have some good beans .. good luck to all God bless and happy growing ✌️

Processing
Likes
4
Share


Likes
12
Share


@Terp_Bandit448
Follow
Week 3 started off good but ended horrible. I finally made my first big fu🤬k up. After LSTing on day 19 the next day I tried tighten up the LST and ended up snapping the main stock🤦♂️🏾 Forcing me to try and mainline just to save her, so now I’m just hoping for da best. On da positive side at least it happened to one of the freebie seeds from seedsman and not one that I spent a pretty penny for


Likes
2
Share


@Ensign420
Follow
|»» LOG DISCLAIMER: Not intended as a grow guide. Grow logs are posted 3 weeks later and are for my own personal learning reference. ««|
Introduction - Week 09 Summary -
Ensign's log, stardate 17505.5,
Another great grow week!
Growth is ramping up and wow TKO is thriving! Compared to the beginning of the week, growth has just exploded! By the end of the week, she’s bushed out with growth! Almost time to start scrogging!
Most of the week was tending and training the veg tent.
As for the Heady OG BX1 phenos, got the DNA sex test results and found my first regular female! One ended up being a male and had to be culled. The female (#1 pheno), was planted into the 30-gallon fabric pot and has already begun to take off with growth!
Veg tent has been looking green and healthy! The gnat population was ramping up towards the middle of the week. Received the nematodes and inoculated the entire garden.
Plan to start stringing up the scrog frame soon. Anyways,
Onwards to next week!
[START OF WEEK 09]
==========================================================
---------- [ 4x4 MAIN TENT ] ----------
Heady OG BX1 #1 - WEEK 09 - Full Veg
Heady OG BX1 #2 - WEEK 09 - END [Culled]
TKO - WEEK 08 - Full Veg
----------- [ 3x3 VEG TENT ] ------------
Garlic Budder OG#1 - WEEK 02 - Full Veg
Garlic Budder OG#2 - WEEK 02 - Full Veg
Gorilla Goat #1 - WEEK 02 - Full Veg
Gorilla Goat #2 - WEEK 02 - Full Veg
06/16/25 → 06/22/25
This Week's Estimated Goals
----------------------------------------------------------------------------------------------
DLI: ~19 mol/m²/d
PPFD: ~300 μmol/m²/s
VPD: ~1.0 kPa
This Week's Meter Readings & Averages
----------------------------------------------------------------------------------------------
Light On/Off: 16:00 - 10:00 | Wattage: ~325.5W [LV04]
Distance From Canopy: ~48”, 0.00”, 36”
DLI: ~16.46 mol/m²/d
PPFD: ~254 μmol/m²/s
VPD: ~0.99 kPa
Soil %: [46.3, 43.0, 47.9, 56.0, 43.0, 42.6, 42.1, 45.6]
==========================================================
Day 01 - Monday - 06/16/25 - Total Days: 064
-----------------------------------
Daily Averages ~[+01:00]
- Temps: 86.4°F [30.2°C]
- Humidity: 76.4%
- VPD: 1.02 kPa
- Soil %: [46, 43, 48, 57, 42, 41, 41, 46]
-----------------------------------
- [+01:39]: Night check on the 4x4 tent.
--- Aye! The garden is looking green and healthy!
--- Both Heady OG BX1 phenos are ramping up with nodal branching. Definitely can transplant, but still waiting on the DNA sex test results.
--- Wow TKO is raging with growth! She has grown beyond her 20-gallon pot and has almost reached the sides of the tent.
- [+01:43]: Took the starting weight range of each pheno before watering,
------ Heady OG BX1 #1 » 338g → 217.9g
------ Heady OG BX1 #2 » 351.5g → 252.6g
--- General Solo Range: [Dry] » ~65-75g - [Initial Cup Weight] + ~25-45g « [Wet]
--- All phenos were last watered 2 days ago.
--- While on a scale,
--- Gently misted the straw mulch of each cup with RO water.
--- Focused on the straw and sprayed as evenly as possible.
--- Misted 10-20 sprays. Waited a moment, then misted again.
--- Repeated this process for each cup.
--- There was a bit of runoff. Had to wait longer for the soil to re-hydrate before watering slowly again.
- [+02:36]: Took the saturated weight of both phenos after watering,
------ Heady OG BX1 #1 » 325.1g
------ Heady OG BX1 #2 » 343g
--- Marked the final wet weight on the back of each cup. Also marked the watering date on the front.
- [+02:41]: Decided to tape the Farmer Freeman DNA plant tags to the side of the solo cups. They were getting in the way of growth.
--- Placed both phenos back into the tent.
- [+02:45]: Checked the Ecowitt soil moisture sensor data:
------------------ [ 4x4 MAIN TENT ] ---------------
------ 45% - [CH01 FT » G30 - Pheno #1]
------ 43% - [CH02 FB » G30 - Pheno #1]
------ 45% - [CH03 BT » G20 - TKO]
------ 57% - [CH04 BB » G20 - TKO]
------------------ [ 3x3 VEG TENT ] ----------------
------ 40% - [CH05 BL » GR7 - Garlic Budder OG#1]
------ 40% - [CH06 BR » GR7 - Garlic Budder OG#2]
------ 41% - [CH07 FL » GR7 - Gorilla Goat #1]
------ 44% - [CH08 FR » GR7 - Gorilla Goat #2]
--------- Veg: 38% - 45% | Flower: 45% - 55%
--------- General: 30% [Dry] | 45 - 60% [Moist] | 70% [Wet]
- [+02:48]: Checked the 3x3 veg tent.
--- Wow the veg garden is growing along beautifully!
--- All mother phenos are looking healthy and thriving!
--- Gnats are continuing to increase and still waiting on the nematodes.
--- No signs of flooding and environment looks stable. Great!
--- Not much else to do tonight. Grow strong ladies!
Day 02 - Tuesday - 06/17/25 - Total Days: 065
-----------------------------------
Daily Averages ~[+01:00]
- Temps: 86.7°F [30.4°C]
- Humidity: 75.6%
- VPD: 1.07 kPa
- Soil %: [46, 48, 47, 57, 42, 41, 42, 43]
-----------------------------------
- [16:11]: Evening check on the 4x4 tent.
--- Garden is looking healthy!
--- Heady OG BX1 phenos are looking green and wow growth is exploding! May need to defoliate soon, but looking green! Grow strong little ones!
--- Ooo yea! TKO is bushing out! Growth is looking really healthy and perky!
--- Getting warmer in the garden, but VPD levels look okay and all plants are thriving in the higher humidity. Nice!
- [16:16]: Checked the Ecowitt soil moisture sensor data:
------------------ [ 4x4 MAIN TENT ] ---------------
------ 45% - [CH01 FT » G30 - Pheno #1]
------ 42% - [CH02 FB » G30 - Pheno #1]
------ 45% - [CH03 BT » G20 - TKO]
------ 56% - [CH04 BB » G20 - TKO]
------------------ [ 3x3 VEG TENT ] ----------------
------ 42% - [CH05 BL » GR7 - Garlic Budder OG#1]
------ 41% - [CH06 BR » GR7 - Garlic Budder OG#2]
------ 41% - [CH07 FL » GR7 - Gorilla Goat #1]
------ 42% - [CH08 FR » GR7 - Gorilla Goat #2]
--------- Veg: 38% - 45% | Flower: 45% - 55%
--------- General: 30% [Dry] | 45 - 60% [Moist] | 70% [Wet]
- [16:20]: Checked the 3x3 veg tent.
--- Looking great ladies!
--- Veg growth looks healthy and perky!
--- Gnats are still ramping up, but no signs of flooding.
- [16:22]: Quickly checked on the auto-watering system.
--- System is still charged and no leaks or kinks found in the tubing.
- [16:33]: Checked the humidifiers.
--- Tanks are still full and no leaks found.
--- Not much else to do in the garden today. Great!
Day 03 - Wednesday - 06/18/25 - Total Days: 066
-----------------------------------
Daily Averages ~[+01:00]
- Temps: 87.0°F [30.6°C]
- Humidity: 76.8%
- VPD: 1.02 kPa
- Soil %: [46, 42, 48, 56, 42, 44, 42, 42]
-----------------------------------
- [13:05]: Alright! Got the email with the DNA sex results from Farmer Freeman!
--- CA-CAW!!
--- Ahh yea!
--- Got a FEMALE!
--- Also got a male.
--- The #1 is the one!
--- Not looking for males so gonna have to cull the #2 pheno.
--- Anyways, hyped that I finally got a female Let’s go!
- [22:57]: Night check on the 4x4 tent.
--- Ahh yea! Garden is looking beautiful!
--- Ca-Caw! I got Headies!!
--- First off,
--- Females only! Heady OG BX1 #2 has gots to go!
--- RIP.
--- Alright!
--- Need to water the female #1 pheno and plan to transplant tomorrow!
- [23:12]: Took Heady OG BX1 #1's starting weight range.
------ Heady OG BX1 #1 » 325.1g → 215.5g
--- General Solo Range: [Dry] » ~65-75g - [Initial Cup Weight] + ~25-45g « [Wet]
--- She was last watered 2 days ago.
--- While on a scale,
--- Gently misted her straw mulch with RO water.
--- Tried to keep the top growth dry.
--- Misted 5-10 sprays. Waited a few seconds, then misted again.
--- Made sure to reference the watering weights.
- [+00:03]: Repeated this process until the cup weighed 331.7g
--- There was a bit of run off again. Waited a bit before re-watering. Need to slow down Ensign.
--- Marked the watering date on the side of the cup. Marked the saturated weight on the back.
--- Placed her back into the tent.
--- Looking great girl!
--- Ca-Caw! Finally found my very first regular female!
--- Until now, every female cultivar I’ve grown has been feminized.
--- Wow she looks healthy! Already 7-fingers deep into veg and looking green!
--- Could easily have transplanted by now, but going to wait until tomorrow.
--- Personally I like the rootball to be nice and well established before transplanting.
--- Anyways,
- [+00:08]: Checked the Ecowitt soil moisture sensor data:
------------------ [ 4x4 MAIN TENT ] ---------------
------ 50% - [CH01 FT » G30 - Pheno #1]
------ 42% - [CH02 FB » G30 - Pheno #1]
------ 46% - [CH03 BT » G20 - TKO]
------ 56% - [CH04 BB » G20 - TKO]
------------------ [ 3x3 VEG TENT ] ----------------
------ 40% - [CH05 BL » GR7 - Garlic Budder OG#1]
------ 42% - [CH06 BR » GR7 - Garlic Budder OG#2]
------ 41% - [CH07 FL » GR7 - Gorilla Goat #1]
------ 48% - [CH08 FR » GR7 - Gorilla Goat #2]
--------- Veg: 38% - 45% | Flower: 45% - 55%
--------- General: 30% [Dry] | 45 - 60% [Moist] | 70% [Wet]
- [+00:10]: Checked the 3x3 veg tent.
--- Looking beautiful and healthy!
--- All mother plants are green and perky!
--- Woah the gnat population is ramping up!
--- Glad I received my order of nematodes and already have them stored in the fridge.
--- Plan to inoculate tomorrow!
- [+00:23]: Did a bit of super-crop training.
--- Pinched and bent over the taller branches.
--- Oops! Broke a few more branches. The Garlic Budder pheno’s branches are way more brittle compared to the Gorilla Goat phenos. Mulched the trimmings.
--- Heal and grow strong my ladies!
- [+00:27]: Checked the humidifiers.
--- Tanks are still full and no leaks found.
--- Getting hyped for the transplant! Let’s go!
Day 04 - Thursday - 06/19/25 - Total Days: 067
-----------------------------------
Daily Averages ~[+01:00]
- Temps: 85.9°F [29.9°C]
- Humidity: 76.5%
- VPD: 1.00 kPa
- Soil %: [47, 42, 48, 56, 46, 43, 43, 47]
-----------------------------------
- [16:02]: Evening check on the 4x4 tent.
--- Garden is perky and looking healthy!
--- Heady OG BX1 #1 is looking green and ready to be transplanted!
--- Woah TKO is getting larger by the day! Defoliation aside, haven’t done anything but (auto) feed straight RO water.
--- Even the cover crop is raging in both pots. Nice!
- [17:04]: Ca-Caw! Okay! Time to transplant Heady OG BX1 #1 into the 30-gallon fabric pot!
--- The 30-gallon pot has been already pre-amended and ready for some Headies!
--- Alright let's go cutty!
- [17:06]: Gently removed the solo cup from the fabric pot leaving a perfect hole.
------ Sprinkled 1/16tsp of Great White,
--- Dusted the sides of the hole.
--- Also sprinkled a bit around the top soil.
--- Great! Time to transplant!
--- It’s been a day since her last watering.
--- To loosen and unstick the rootball from the cup, I gently squeezed the sides before pressing the bottom upwards.
--- Once fully loosened, I simply Vulcan-gripped the base of the plant and flipped her upside down.
- [17:14]: Heady OG BX1 #1 easily dropped straight out of her cup!
--- Ca-Caw! These are my roots!
--- Wow roots look white and healthy!
--- Did not break up the rootball.
--- Gently flipped her over before carefully placing her into the pre-inoculated hole.
- [17:16]: Pressed and evened out the top soil.
--- Also decided to chop and drop the cover crop.
--- Using a pair of trimmers,
- [17:25]: Trimmed most of the cover crop. Basically trimmed everything above the pot.
--- To help with the transplant, going to give 2 cups of wetting solution.
--- Adding in a few extra microbes.
- [17:36]: Filled a measuring cup with 2 cups of RO water.
------ Added 1/64tsp of Quillaja Saponaria Extract [60]
------ Added 1/64tsp of Recharge
------ Added 1/16tsp of Horticultural Aloe
------ Added 1/16tsp of Horticultural Coconut
------ Added 1/8tsp of Mycrobe Complete
--- Mixed the solution and poured both cups straight into a pump sprayer.
- [17:42]: Misted the straw mulch with the wetting solution.
--- Took my time and tried to go as evenly as possible.
--- Done with the transplant!
- [17:44]: Took the weekly height and light distance measurements.
------ Heady OG BX1 #1 was about 4.75" tall.
------ TKO was about 17.5" tall.
------ Heady OG BX1 #1 was about 48" away from the grow light.
------ TKO was about 36" away from the grow light.
- [17:54]: Took general PPFD readings.
------ Heady OG BX1 #1 was around 254 μmol/m²/s which gives a DLI of 16.46 mol/m²/d under an 18/6 light cycle.
------ TKO was around 312 μmol/m²/s which gives a DLI of 20.22 mol/m²/d under a 18/6 light cycle.
- [18:05]: Checked and updated the Ecowitt soil moisture sensor data:
------------------ [ 4x4 MAIN TENT ] ---------------
------ 45% - [CH01 FT » G30 - Heady OG BX1 #1]
------ 42% - [CH02 FB » G30 - Heady OG BX1 #1]
------ 48% - [CH03 BT » G20 - TKO]
------ 56% - [CH04 BB » G20 - TKO]
------------------ [ 3x3 VEG TENT ] ----------------
------ 43% - [CH05 BL » GR7 - Garlic Budder OG#1]
------ 41% - [CH06 BR » GR7 - Garlic Budder OG#2]
------ 39% - [CH07 FL » GR7 - Gorilla Goat #1]
------ 42% - [CH08 FR » GR7 - Gorilla Goat #2]
--------- Veg: 38% - 45% | Flower: 45% - 55%
--------- General: 30% [Dry] | 45 - 60% [Moist] | 70% [Wet]
- [18:07]: Checked the 3x3 veg tent.
--- Veg garden is looking great!
--- Pots are flood free, but gnats are definitely back!
--- Oops!
--- Found a couple branches that did not survive the last super-cropping. Both found on Garlic Budder phenos.
--- Cut and mulched the dead branches.
- [18:38]: Okay! Time to apply the nematodes!
--- This time going to also add in some microbes along with some Beauveria Bassiana and Bacillus Thuringiensis (subspecies Israelensis).
- [18:48]: Filled a pitcher with 16 cups (1 gallon) of RO water.
--- Also filled another pitcher with 8 cups (24 cups total).
------ Added 1/64tsp of Beauveria Bassiana Plus
------ Added 1/8tsp of Quillaja Saponaria Extract
------ Added 1/4tsp of Recharge
------ Added 1tbsp (3tsp) of WDG3000 Extra Strength BTI
------ Added the entire packet of (5 million) Nematodes
- [19:26]: Mixed the solution before pouring 4 cups straight into a pump sprayer.
--- Misted the solution onto each pot in the veg tent.
- [19:53]: Took my time and watered each pot slowly.
--- Also switched out the yellow sticky traps.
--- Going to also inoculate both pots with the nematode solution.
- [19:57]: Filled the pump sprayer with 2 cups of the solution.
--- Misted the straw mulch for the 20-gallon fabric pot.
- [20:03]: Repeated this process for the 30-gallon fabric pot.
--- Nice! Heady OG BX1 #1 is looking a lot happier!
--- As for the rest of the solution (~4 cups), inoculated various houseplants throughout the house.
--- Should help to prevent or at least reduce the chances of another infestation.
- [20:22]: Checked the humidifiers.
--- Tanks are still full and no leaks found.
--- Wow what a day!
--- Finally have this grow cycle’s veg phase started!
--- As for the veg tent, will continue to check back on the gnat population. Hopefully this treatment works!
--- Grow strong my little ones!
Day 05 - Friday - 06/20/25 - Total Days: 068
-----------------------------------
Daily Averages ~[+01:00]
- Temps: 85.6°F [29.8°C]
- Humidity: 76.9%
- VPD: 0.97 kPa
- Soil %: [47, 42, 48, 56, 46, 46, 43, 49]
-----------------------------------
- [23:03]: Night check on the 4x4 tent.
--- Ca-Caw!!! Ah yea!
--- Heady OG BX1 #1 is looking beautiful and really starting to perk up!
--- Also wow TKO is dominating the tent! Growth is blowing up and nodes are continuing to branch out while staying pretty short and bushy.
- [23:14]: Checked the Ecowitt soil moisture sensor data:
------------------ [ 4x4 MAIN TENT ] ---------------
------ 46% - [CH01 FT » G30 - Heady OG BX1 #1]
------ 42% - [CH02 FB » G30 - Heady OG BX1 #1]
------ 45% - [CH03 BT » G20 - TKO]
------ 55% - [CH04 BB » G20 - TKO]
------------------ [ 3x3 VEG TENT ] ----------------
------ 44% - [CH05 BL » GR7 - Garlic Budder OG#1]
------ 44% - [CH06 BR » GR7 - Garlic Budder OG#2]
------ 45% - [CH07 FL » GR7 - Gorilla Goat #1]
------ 45% - [CH08 FR » GR7 - Gorilla Goat #2]
--------- Veg: 38% - 45% | Flower: 45% - 55%
--------- General: 30% [Dry] | 45 - 60% [Moist] | 70% [Wet]
- [23:15]: Checked the 3x3 veg tent.
--- Wow! Incredible mother growth!
--- All phenos are looking perky!
--- Pots are also looking great and gnats seem to already ramping down. Nice!
- [23:18]: Checked the humidifiers.
--- Tanks are still full and no leaks found.
Day 06 - Saturday - 06/21/25 - Total Days: 069
-----------------------------------
Daily Averages ~[+01:00]
- Temps: 84.5°F [29.2°C]
- Humidity: 76.6%
- VPD: 0.94 kPa
- Soil %: [46, 42, 48, 55, 41, 42, 42, 42]
-----------------------------------
- [08:02]: Quick morning check on the 4x4 tent.
--- Ca-Caw! Good morning my ladies!
--- Heady OG (BX1 #1) is looking green and healthy!
--- TKO is continuing to do her thing and wow she is a beauty! She has almost filled the entire quadrant.
- [08:06]: Quickly checked on the 3x3 veg tent.
--- Veg garden is looking beautiful and healthy!
- [20:23]: Night check on the 4x4 tent.
--- Ahh yea! Garden is beautiful and raging with growth!
--- Heady OG (BX1 #1) is starting to fill in her pot and growth is looking healthy!
--- TKO is looking bushy and perky! In terms of veg growth she’s way ahead of Heady OG and will probably need another defoliation soon. Her fan leaves are getting huge again!
- [20:39]: Checked the Ecowitt soil moisture sensor data:
------------------ [ 4x4 MAIN TENT ] ---------------
------ 46% - [CH01 FT » G30 - Heady OG BX1 #1]
------ 41% - [CH02 FB » G30 - Heady OG BX1 #1]
------ 53% - [CH03 BT » G20 - TKO]
------ 55% - [CH04 BB » G20 - TKO]
------------------ [ 3x3 VEG TENT ] ----------------
------ 40% - [CH05 BL » GR7 - Garlic Budder OG#1]
------ 41% - [CH06 BR » GR7 - Garlic Budder OG#2]
------ 40% - [CH07 FL » GR7 - Gorilla Goat #1]
------ 41% - [CH08 FR » GR7 - Gorilla Goat #2]
--------- Veg: 38% - 45% | Flower: 45% - 55%
--------- General: 30% [Dry] | 45 - 60% [Moist] | 70% [Wet]
- [20:40]: Checked the 3x3 veg tent.
--- Veg garden is growing along beautifully!
--- Mothers are all looking healthy.
--- Growth is looking perky and ready for more training!
- [20:48]: Super-cropped all phenos in the veg tent.
--- Flattened out the canopy by bending a few taller tops.
- [20:55]: Quickly checked on the auto-watering system.
--- System is still charged and no leaks or kinks found in the tubing.
- [20:59]: Checked the humidifiers.
--- Tanks are still full and no leaks found.
Day 07 - Sunday - 06/22/25 - Total Days: 070
-----------------------------------
Daily Averages ~[+01:00]
- Temps: 84.3°F [29.1°C]
- Humidity: 76.3%
- VPD: 0.95 kPa
- Soil %: [46, 42, 48, 55, 42, 41, 42, 50]
-----------------------------------
- [20:04]: Quick morning check on the 4x4 tent.
--- Ahh yea! Headies is looking perky!
--- Heady OG (BX1 #1) is green and getting larger!
--- Wow! TKO has been doing her thing and bushing out with more tops! Growth has reached the scrog frame and looks extremely healthy!
--- Will need to start stringing up the frame in a week or two.
--- Grow strong my girls!
- [20:06]: Quickly checked on the 3x3 veg tent.
--- Mothers are looking healthy and growth is perky!
--- Pots are also looking great and gnat population is definitely lower. Nice!
- [19:00]: Night check on the 4x4 tent.
--- Garden is vegging along beautifully!
--- Heady OG (BX1 #1) is looking great and starting to stretch upwards!
--- TKO is just raging with healthy veg growth! Tops have already stretched beyond the scrog frame! Will definitely need to string the frame next week.
- [19:06]: Checked the Ecowitt soil moisture sensor data:
------------------ [ 4x4 MAIN TENT ] ---------------
------ 46% - [CH01 FT » G30 - Heady OG BX1 #1]
------ 41% - [CH02 FB » G30 - Heady OG BX1 #1]
------ 48% - [CH03 BT » G20 - TKO]
------ 54% - [CH04 BB » G20 - TKO]
------------------ [ 3x3 VEG TENT ] ----------------
------ 40% - [CH05 BL » GR7 - Garlic Budder OG#1]
------ 41% - [CH06 BR » GR7 - Garlic Budder OG#2]
------ 40% - [CH07 FL » GR7 - Gorilla Goat #1]
------ 52% - [CH08 FR » GR7 - Gorilla Goat #2]
--------- Veg: 38% - 45% | Flower: 45% - 55%
--------- General: 30% [Dry] | 45 - 60% [Moist] | 70% [Wet]
- [19:08]: Checked the 3x3 veg tent.
--- Veg growth is healthy and green!
--- Gnats population is down and no flooding. Great!
--- Easy night in the garden!
- [19:15]: Checked the humidifiers.
--- Tanks are still full and no leaks found.
- [19:41]: Time for another grow board wipe!
--- Been an interesting month or so.
--- Finally made it through the germination struggle along with a couple rounds of DNA sex testing.
--- Cycled all mother plants and did a full veg tent reset.
--- Also applied more nematodes. Still have more on the way and plan to apply again more for a preventative integrated pest management regiment.
--- Still need to string the scrog frame next week.
--- Onwards Ensign!
[END OF WEEK 09]
Likes
87
Share


@M420_GROWS
Follow
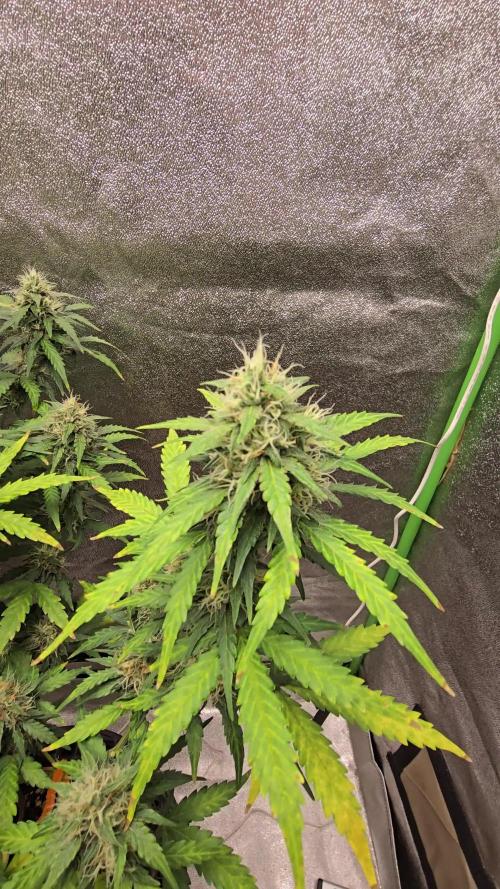
Same height, same 5l/day, slowly swelling up those buds!
Not sure but I think we are running into a bleaching issue again ("sugar leaves are oh so sweet!" issue, remember my first grow?). Well, I guess she may be a bit sensitive to strong lights - I have increased distance to my lamps and dimmed them to 75%, means she get 180W and not 240W actually.
Defoliation goes still very easy - removing couple of fan leaves every second day, no other trainings at all. I had also removed some of very low and small side-side brunches - testers on the way :)
She started to smell stronger in the tent - super tasty!


Likes
6
Share


Likes
12
Share


@GrowGuy97
Follow
Sorry for the lack of updating recently I have a new job & don’t have much time for anything but I just wanted to show how amazing these ladies are doing! Both Strains smell unbelievable & by far some of the frostiest plants I have grown, have taken to fox farm nutrients very & they have not really gave me any issues the entire grow! Will post some more updates around harvest time thanks for following friends!🙏🏼🙏🏼 Happy growing🌱🌱

Likes
170
Share


@Roberts
Follow
Was growing great till I got root rot in flowering. By then it was too late and lost most of her potential. Just harvested her.
Learned more during this grow about hydro. I still got a ways to go. The New Level Hydro bucket works great. Thank you Spider Farmer, New Level Hydro, and AMS.
Once I get the bud processed I will be back for smoke report. I will likely try to grow this again without issues. 🤜🤛🤞
Thank you grow diaries community for the likes, follows, comments, and subscriptions on my YouTube channel. 🍻🌱👍 Happy Growing 🌱
https://youtube.com/channel/UCAhN7yRzWLpcaRHhMIQ7X4g
www.newlevelhydro.com

Likes
46
Share


@Capo420
Follow
This strain was a breeze to grow. The purple phenotype is hands down some of the best herb I have ever tried. Will definitely recommend to anyone looking to grow a highly resilient, highly potent strain. Thank you to all those on this platform.
Grow diaries really made it easy to have my first grow be a success! Until next time Growmies 🤙😎🤙
Likes
77
Share


@cheetah844
Follow
Still waiting on those trichomes ⏳
It both smells & looks beautiful in the room 💚
I'm ready to see full harvest weights & taste test them all 🤗

Likes
37
Share


@Hawkbo
Follow
Pics taken on day 36. Some, if not most of these are lightly seeded, I've checked for herms but cant find no nuts. Sucks but from what I've read and people I've talked to seems like it wont be too big of a deal in the end, some old school growers even prefer lightly seeded nugget, I've never tried it intentionally. The green buzz nutes are working well. I'm almost out of the more PK so I had to add herculean harvest liquid bonemeal to get the ppm where i want it while trying to conserve the Gbl to last the rest of the run. Didnt have the lady to take my pics today so I was limited and had to take them lefty one handed and was shakey af.
This plant is amazing I dont understand the coloring but it's pretty crazy in person. I havnt found any seeds on her yet so I'm hoping shes in the clear.
Threw in a x ray of my new collar bone. Looks like a bunker rake on a golf course. Drop a comment tell me about your worst injury. I did this on Instagram and heard some pretty wild shit so please share for all our amusement😅
Likes
42
Share


@rhodes68
Follow
Four plants in all eventually
1/31 First of the Bond harvests, Pussy Galore first of the FFT-7s, two more follow.
Pussy Dry weight 312 grams
3/5 Holly 665 grams wet into dry - dry 98 grams
Two more F7s to go
3/25
Pussy-1 clone yields 1107 grams wet in dry --- dry yield 181 grams
One FFT-7 Remains Pussy-2 buds look a bit larger
3/28 Pussy-2 wet weight 1295 grams in dry. 242 grams dry. This concludes the FFT-7 harvests


Likes
29
Share


@TheCannaProphet
Follow
----------------------------------
~SEEDSMAN PEYOTE FORUM~
----------------------------------
Characteristics
BREEDER/BRAND: Seedsman
GENETICS: GSC Forum Cut x Peyote Purple
VARIETY: Indica / Sativa
FLOWERING TYPE: Photoperiod
SEX: Feminised
THC CONTENT: 20%+
GROWS: Indoors, Outdoors
FLOWERING TIME: 65 days
MEDICAL CONDITIONS: Glaucoma, Headaches, Migraines, Stress
MEDICINAL PROPERTIES: Yes
EFFECT: Powerful
__________________________________________________________________________________________________________________________________________________________________________________________________________________________________________________________________________________________________________________________________________________________________________________________________________________________________________________
~🤩This run is part of a Seedsman Seeds sponsored PEYOTE FAMILY COOPERATIVE GROW, I'm also cultivating a Peyote Gorilla and Peyote Zkittles that each have their own diaries.💚~
'Peyote Forum is an Indica-sativa hybrid cross between the legendary taste sensation Forum Cookies, a pheno-type of GSC (Girl Scout Cookies), and the highly potent Peyote Purple cannabis strains. This is a must-have strain for your collection which produces very high THC content..
Forum Cookies is a 75% sativa strain which retains the qualities of the original Girl Scout Cookies while adding extra cerebral sativa effects. Despite the dominance of sativa the buds it produces are very dense and rich in resin-exuding trichomes which glisten against the forest green bud-leaves and orange pistils. Some plants may display purple colors in the buds and smaller leaves at maturity.
While yields aren't enormous they are certainly decent and the sheer quality more than makes up for this fact. Flowering takes 65 days give or take. Flavors are pungent and similar to the original GSC showing a pungent Skunk character with notes of nuts and sweet spices and suggestions of earth and pine. THC production will vary between 19 - 28% depending on conditions, lighting intensity and the skill of the grower. The effect is physically relaxing while offering a cerebral twist which is uplifting, relieving stress while also helping with the symptoms of glaucoma, migraines and headaches.
Peyote Purple, however, is an Indica-dominant strain with 90% Indica genetics. Its ancestry can be traced from a single purple pheno-type which was back-crossed for several generations in order to stabilize its qualities. This plant takes 8 - 9 weeks of flowering before it is ready to harvest producing average yields of way-above-average weed. The THC content is very high with plants reaching between 18 - 28%. Its name is attributed to its headiness as this Indica offers some pronounced cerebral effects with a relaxing yet uplifting high which can leave smokers sleepy and somewhat unfocused with heavier use. Therapeutically it is recommended for the treatment of chronic pain, cramps, Insomnia, muscle spasms and stress.
Brought together in Peyote Forum growers can expect some very potent, tasty dank buds with high levels of THC and an uplifting high.'
*description credit to Seedsman Seeds
__________________________________________________________________________________________________________________________________________________________________________________________________________________________________________________________________________________________________________________________________________________________________________________________________________________________________________________
THE SETUP:
~Planted into Jiffy Peat Pellets that were hydrated with de-chlorinated water with SuperThrive added then ph'd to 6.0 @ 80℉
~Grown 100% organic in 10g fabric pots with Mother Earth 70/30 Coco/Perlite medium amended with 2tbs/g of Down To Earth 4-4-4 / 2 cups/g of Earthworm Castings / 1tbs/g of Dr. Earth Flower Girl 3-9-4, 1tbs/g of Dr. Earth Bat Guano, 3/4 cup of Down To Earth Azomite and 1 tsp/g Down To Earth Fish Bone Meal.
~24hr light cycle during Germination / 19/5 light cycle for Vegetation and 12/12 for Flower
~Straight water ph'd @ 6.2-6.8 when needed and weekly Compost Tea's.
__________________________________________________________________________________________________________________________________________________________________________________________________________________________________________________________________________________________________________________________________________________________________________________________________________________________________________________
WEEKLY UPDATES:
9/13- With approx. 10 weeks of growth behind her now she's going into her 5th week of flower now and let me tell you the pictures don't do her justice... This is one phenomenal cultivar! 😍
She was given Compost Tea yesterday and today was still fairly heavy so I skipped watering and just removed a few leaves to maintain light penetration, turned her pot and sat and chatted with her awhile!
9/15- Well she really must have liked that last batch of Compost Tea as she looks exceptionally vibrant today!
She's continuing on her mission of stacking her flowers, which are developing beautifully and have a delicious sweet citrus aroma to them right now.
I did not water yesterday, so today I watered with 1.5g of straight de-chlorinated water that was ph'd to 6.5 @ 72℉ and rotated her pot... Damn she is looking great! 🤩💖
9/17- Yesterday I top dressed her with 1/2 cup of Down To Earth Bio-Fish then watered it in with 1.5g of straight de-chlorinated water that was ph'd to 6.5 @ 72℉.
Her flowering is continuing beautifully and she's smelling stronger every day it seems! I'm staying on top of tucking leaves blocking light and turning her pot daily as well.
9/19- Five weeks of flower on the books! We're halfway there now, she's stacking her flowers tightly going into Week Six and she's looking phenomenal! 🤩
When I watered her today I added 1 tbsp/g each of Kelp Extract and Fish Emulsion (both liquid) to the 1.5g of straight de-chlorinated water she received, which was ph'd to 6.2 @ 74℉.
~Thanks for stopping in! Things should be getting a lot more interesting in the coming weeks...Stay lifted and be Blessed! 😎🙏~
Likes
12
Share


@Dankybongtoker69
Follow
Didn't have someone to come water the plants. 5 days away. Plants dried right out. Defoliated both and fed and watered. We will see what happens. Plant one has mostly orange hairs. Plant two is on the whiter side. Buds are still filling in. I have definitely learned that I need to move on to a more automated system for my lifestyle. Gonna try to make the best of the next few weeks and watch the trichomes turn. Day 66-67 flushed soil with pH water

Likes
85
Share


@Tropicannibis_Todd
Follow
Start of day 70 ...... Dec 18 Start of week 10 ........ 44 DAYS INTO FLOWERING
( SMELLING GREAT ) !!!!!!!
Check out the full grow video on latest weekly update
Super Exceptional Growth Daily
Still adjusting LST when needed and leaf tucking.......
Water Only when needed but its drinking more every otherday and adjusting lights when needed......
Rain Water Only .......
( DAY 26 AND BOTH NL 1 & NL 2 SHOWED PREFLOWERS )
( DAY 49 AND RESIN PRODUCTION HAS STARTED )
( DAY 57 , EQUIPMENT FAILURE , main FAN , over heated😡 tripped breaker , reset light timers , lost a DAY, REPLACED new Main Fan 😁 back up running 👌)
( DAY 70 AND IT SHOWS A SLIGHT DEFICIENCIE MAYBE A CAL/MAG GETTING CLOSE TO END OF LIFE ) IM ALSO DOING VERY LITTLE, SLIGHT DEFOLIATION
( DAY 70 DID ITS FINAL FLUSHING TODAY TO GET RID OF ANY BUILDUP )
( DAY 75 AND ALL IS GOOD , THERE FATTING UP )
I hope you enjoy my growlog...

Likes
16
Share


@Mopish
Follow
24 Jan - 30 Jan
Started Flushing on Sunday night (23 Jan)
----
25 Jan
A lot of leaves are starting to die, from all of the plants, maybe due to nutrients maybe due to climate, or maybe is just the strain on the end of its life.
Either way, I'm planning to harvest next week.