
Likes
Comments
Share


@Grower_Of_Persia
Follow
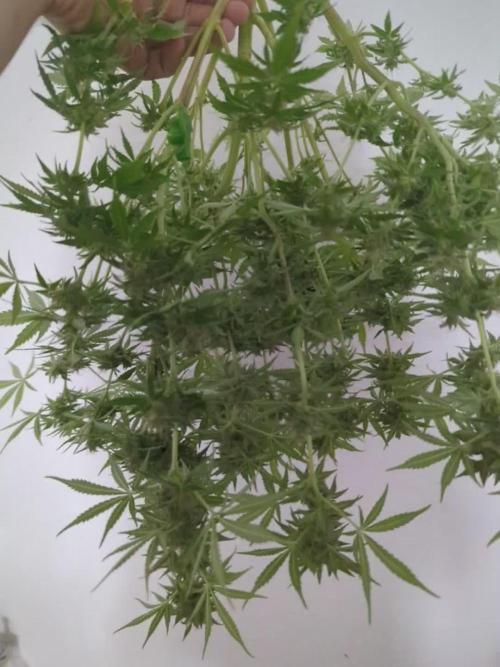
my dry and cure style is this:
4 days of hanging upside down to get water activity lower to around 0.6 in 50% humidity and 26 C temp (i know its a little high but we are in a hot summer right now and i cant get it lower even with air conditioner) and then after 4 days of drying i remove leaves and stalks, trim buds and move them to jar for the rest of their life :D . and in the first 4 days of curing i open the jar door and let hem get some fresh air in the jar for about 5 minutes and close the jar door again, after 4 days of curing like that buds are smokable but they will get better as they getting cured about 1 month.
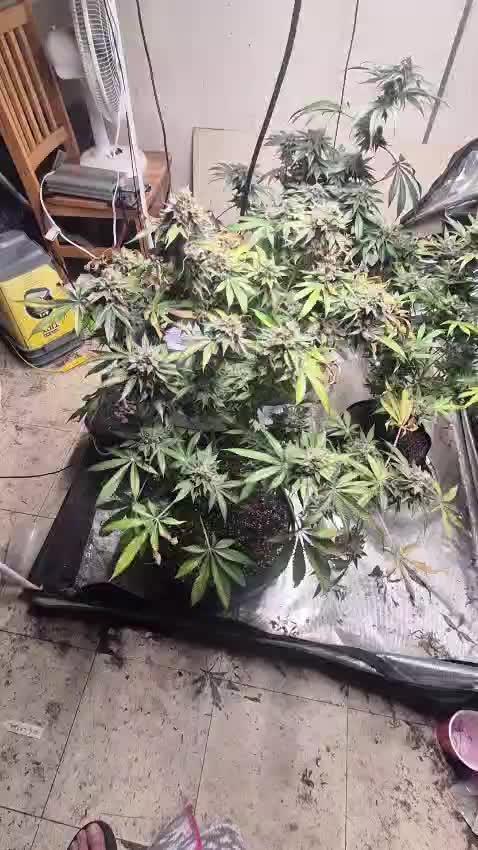
buds are one of the hardest as fucking rocks type of buds! very dense , compact , sticky , smelly , amazing at every aspect
growing stage was 56 days and flowering stage was 75 days total (harvested tops at day 64th)
the total weight of dry buds was : (plant #1 & #3 top buds 56 G + lower buds 22 G ) 78 G + (plant #2 top buds 47 G + lower buds 18 G ) 55 G + (plant #4 top buds 120 G + lower buds 67 G ) 187 G = 367 G


Likes
49
Share


@AsNoriu
Follow
Day 36. Girls are flying !!!
Was comparing my previous dairies here and they look really good, have in mind, two heavy waves of training involved, each time i had a bag full of leaves ...
One more training and i think on day 42 its 24 hours of darkness and FLOWEEEEERRRR ;))
Day 37. Its hard to add anything, because everything going kind off well ;))))
Last night watered them with 6.2 ph, they stop drinking, at least as fast as before, usually my ph is 6.5-6.8, but sometimes i drop to 6.2-6.4 for one feed in a month or so ..SweetSeeds don't like that trick ...
Still leaves praying, loads of new grows after each night , just Kushes overgrew others a bit. Will supercrop them soon.
Day 39. All is going smooth, they drink biobizz nutes feed in one day, phed water in 2, so you would want to overfeed them, Kushes could eat more 4sure now.
Installed last wall fan. Now setup is full...
Kind off ;))) need to find exhaust silent and powerfull 5 inch fan ...
Day 41. This is official - JUNGLES !!! ;)
Change in plans :
Killer Kushes are moved to veg/dry tent, Autos started there will come instead of them. Thinking that way ill lower canopy a bit and make more space for rest 8.
Tomorrow it will be done together with heavy training for Skunks and Cheeses. They will be sent to flower at the end of next week.
Happy Growing !

Likes
7
Share


@WeedleyScott
Follow
Woche 6 lasse ich die Pflanzen etwas hoch wachsen und hoffe, dass sie am Ende der Woche etwas an Höhe gewonnen haben. Eventuell entlaube ich am Anfang von Woche 7 nochmal etwas, damit die Blütephase ohne viel Laub starten kann. Bisher gieße ich aber einfach 1L pro Pflanze alle 2 Tage und lasse sie weitestgehend in Ruhe.


Likes
Comments
Share


@eldruida_lamota
Follow
Vamos familia, actualizamos la quinta semana de vida de estas Fruit cake de Seedstockers, salieron las 3 de 3, 100% ratio éxito.
Aplicamos varios productos de Agrobeta, que son increíbles para aportar una buena alimentación a las plantas.
Temperatura y humedad dentro de los rangos correctos dentro de la etapa de crecimiento.
La tierra utilizada es al mix top crop, por cambiar.
De 3 ejemplares seleccioné los 2 mejores para completar el indoor y apliqué tetra 9 vía foliar, también cambié el fotoperiodo a 12/12 y apliqué una buena poda de bajos, se ven bien sanas las plantas, tienen un buen color y progresan a muy buen ritmo por el momento.
Agrobeta:
https://www.agrobeta.com/agrobetatiendaonline/36-abonos-canamo
Hasta aquí todo, Buenos humos 💨💨💨

Likes
18
Share


@Bread_n_Buds
Follow
Our Do si Dos F1 Hybrid Autoflowering from Zamnesia are in great shape at the moment, they had a bit of a hesitant start but now they are in line or even better than others. They have done so well this last week (I love when they start like a rocket after having fueled up with fertilizers) that we have already reached the good internode for topping autoflowering plants which if you want to do it guys it should be anticipated as much as possible as I explain below. The other one will fly away straight to preserve the main cola which is the main dilemma of topping. The first question you have to ask yourself when topping is, Are you ready to give up the main cola?
Applied Techniques - Given the numerous requests from growers, we decided to show you what happens when applying topping + Lst to autoflowering plants. It is very important to anticipate it as much as possible, autoflowering plants go into flowering at about the 5th intenod, you have to anticipate that moment to give the plant the chance to vegetate as much as possible. In general, when you see that there are two good lateral branches you can do topping, they will go into veg as much as possible and you will have a split plant, I have seen very beautiful results, especially in warm periods in which the plant tends to vegetate a lot, in winter we could have a bit of dwarfism but with a lot of resin for sure.
So I cleaned everything and cut at the top leaving only the main growth line, called Main Lining, the florets will be lowered during growth and the plant will eventually be like "split" in the main line with the various branches.
On photoperiodic plants, however, we will do topping repeatedly, which is not recommended with autoflowering plants so as not to lengthen the times of plants born to finish in 10 weeks too much.
The second week (including a few days of germination) we gave Power Roots 1 ml/l, Pure Zym 1 ml/l, Sugar Royal 1 ml/l, Alga Grow 3 ml/l -
Plagron nutrients are available at Zamnesia in convenient pack formats for all growing styles. I used this one with a simple search you can find the other products.
---- https://www.zamnesia.io/it/12119-plagron-top-grow-box-100-naturale.html
Try a seed of this variety that drives us crazy...
---- https://www.zamnesia.io/en/10664-zamnesia-seeds-do-si-dos-f1-automatic.html
Description Zamnesia // From the team at Zamnesia Seeds comes Do-Si-Dos F1 Automatic. Using consistent and reliable F1 genetics, this strain is not only incredibly easy to grow, but also offers potent and delicious buds. The plants remain small and offer a reliable growing experience that everyone will enjoy.
Growbox and Air System - Secret Jardin DS120w + fans + exhaust fans and DF16 filters kit ---- https://www.secretjardin.com
All the best that mother nature has to offer is at ----www.zamnesia.com

Likes
16
Share


@Northern_Ent
Follow
July 27: staring week 7 and she seems to be preflowering but I’m going to force flower this auto by sticking it in the dark garage with my photoperiod plants. The change to 12 h of darkness for a couple weeks should kick it into flowering mode.
I’ve seen a few growers commenting that their Auto Overdose wasn’t auto flowering and I don’t want to wait any longer to find out. It’s the end of July and things need to be flowering by now to finish in time before winter.
The stem I broke a few days ago is showing signs of life and looks like it will more or less recover. Update: Changed my mind and removed stem as it was slowing overall growth. Cut the loss and move forward. C’est La vie, etc.
July 28: plant has an okay shape considering I broke a stem. Nice lower branches came up after the plant was topped. Looks promising.
July 31: looking good. Removed a single large fan leaf at the top that was shading too many bud sites.


Likes
45
Share

@AsNoriu
Follow
New week, seems ok for first morning, will do heavy feed on day 52.
I already gave away one plant ( strawberry cough photo ) now one of fast diesels still stucked in pre-flower, would love to return to 18/6 regime, just dont want any reveg or hermie. Still lost.
Fingers crossed ;)
Day 53 Morning, leaves a bit down after night, everything looking not bad, thinking to defoliate two midle babies.
Had a big mistake on day 52, they where down, i stayed for one night out and was late with watering for a day, they looked totaly down, like my mobile, thats why no photos, never seen any plant so bad in my hole life... But they are ok now, quess it was on the verge, but damadge was done 100 %
Day 53 evening. I wouldnt be me if i wont be searching ways to screw up the crop ;)))
After many hesitations i decided to do very light defoliation.
And ..... They hated it. Lets give couple days, but 2 huge stresses in 3 days dont give me and girls joy for sure ....
In that rush forgot to make third Fast diesel photo, but i quess she didnt made mind to flower, took like 5 leaves down and left her for a bit,very annoying , she will be a big delay at the end or very early harvest, both ways waste of time....
Plus had to reduce light to 15.5 of day, maybe those 30 min will force her ...
All 3 Fast Diesels are very mag hungry, fed them with epsom salt extra.
Day 54 . Fast Diesel 3 went to 24 hours darkness prison with a heater ;))) hope that will teach her a lesson !
Others got feed with silicic acid, they drink, thats a good sign tho !
Fast Diesel 3 was a day behind from all, even 5 leaves was too much. But its a good time for me to give last trick i can, before downgrading day hours even more.
Day 54 Evening. Girls are praying again, silica always boost them to hapiness ;)
Day 56. Girls are growing, looks like last Fast Diesel starts to make buds from preflower, but a lot of pistils going brown, so either its heat, which i will check today or its hermie ;)))
Could be wind damage, i will check all options today, returned from work, made short shitty video and thats all ;)
End of week.


Likes
6
Share

@Miketama
Follow
🍁 Cultivation Review: Afghan Bullet (Day 84)
Genetics: Afghan Bullet
Flowering/Harvest Time: Day 84
Main Goal: Extraction (Bubble Hash)
Total Wet Weight: 130g
🔍 Plant Structure and Resin Production
Growing Afghan Bullet for the first time, I was highly impressed by its structure. The plant shows exceptional uniformity across all buds, meaning there is a complete absence of apical dominance. The secondary branches fully kept up with the main cola, developing a beautifully even canopy. Another major highlight is the resin production: the plant is literally coated in trichomes, with excellent resin coverage extending even to the small-to-medium fan leaves, a clear sign of its high genetic potential for extractions.
🔬 Harvest Timing: Target Bubble Hash
Harvest took place on Day 84, perfectly hitting the peak of milky trichomes. While the actual ease with which the heads separate from the stalks will only be seen during the washing process, harvesting at this stage is the number one objective for Bubble Hash. Milky trichomes offer the ideal texture and perfect maturity for smooth processing and optimal separation in ice water.
✂️ Harvest Management and Processing
At harvest, I did a rough trim (the ideal approach for fresh frozen, preventing unnecessary damage to the resin glands) yielding a total wet weight of 130 grams. The biomass has been divided as follows:
75g (Select Buds) ❄️ ➔ Freezer (Fresh Frozen): Tossed straight into the sub-zero to lock in live terpenes and maintain trichome integrity for the upcoming wash.
30g (Buds) 💨 ➔ Drying: Set aside for a traditional dry. Since it’s my first time running this strain, I’m very curious to test the dried flower to evaluate its overall aroma, flavor profile, and smoke quality.
25g 🗑️ ➔ Waste Material: Large fan leaves and non-resinous material.
📝 Final Thoughts (First Run)
This strain is shaping up to be a fantastic choice for extraction enthusiasts. The uniform bud development makes canopy management a breeze, and the heavy resin coverage on the mid-sized leaves points toward a great yield in the bags. Looking forward to the wash and the final smoke test!
Likes
27
Share


@Jungle_James_Grows
Follow
Chopped tonight so not weighed them yet will do tomorrow if I can.
Ended up with 290g for 5 plants
But 5 same seeds and 5 different pheno's.
Judging by the looks the heaviest weight is from the one I topped .
Already weighed one plant got 28g dry weight. Got 4 more babies chopped tonight
Likes
67
Share


@Hashy
Follow
Grow diary 11 stage 8.
Day 71 to 80
This girl has developed quicker then the other strains and because of the o.g taking up so much space I decided to put up my older ds60 tent with my old mars hydro purple light. After 3 days my old extractor fan broke and she stunk the house out. I pulled her out the other tent on day 75 and gave her ripen for 5 days before moving onto flawless finish. When I'm happy she flushed its harvest. Not expecting much, maybe 1/2 oz, its hard to guess, she is tiny but solid.
Likes
27
Share


@LockDownGrow
Follow
ok so everything has gone fantastic , no nutrient burns at all , and have been slowly creeping up the base nutrients , i have stopped the cal mag and now adding house and gardens bud XL at full strength these girls are now in full swing of flower and i bought a new ph stick this week ,
i have found when PHing the feed bucket that its best too have air stones in the bucket , add all nuts and then ph but do not use the feed that day as if you check the next day the ph is off again so i left it 24 hours after i add more ph down , and it seems too make the measurements alot easier and stable , i have bent down the main stems " without damaging them onto my netting too A keep the canopy all the same high so my lighting is covering all plants at the same distance and also it allowed the side stems too reach up too ,
i also was sponsored another new led light by kingbo this week so have added another 600watt led too the grow , so now have two 600's and one 900watt , and temps are still fine sitting at 24c lights on and 19-20 off , so am pleased with that , this lady is nice and compact and tight lots of leaves that I had too remove too open up her bud sites , stretch was also minimal ,
Likes
12
Share


@VeeDro203
Follow
We are having good progress. Took clones of weekend at Garry's and Miami Miami 2 and Purple Marmalade 1

Likes
4
Share


@Canaryweed_tf
Follow
Esta semana ha ido super bien, está creciendo muy fuerte, sana y con buen color. cada vez tiene más pelos blancos esperemos que siga así #GorillaKing😍

Likes
59
Share


@JeyGanesha
Follow
Un altra settimana è passata e tutto procede bene.per fortuna non ho più trovato nessun nanners 🙏✌️💪..belle piantine mie, continuate così che farete delle belle pannocchie....
30/8/24 gente ho combinato una bella cazzata.pur avendo esperienza, mannaggia a me,mi sono portato a casa dentro il box, il cazzo di ragnetto rosso... fanculo...
Ho già iniziato a ripulire tutto, box e piante con Neem...li sterminerò tutti 😂..

Likes
77
Share


@DogDoctorOfficial
Follow
Week 10 Flower — The Beauty Before the Finish
This week marks a very special chapter in the Eternity Grow Cup. As we approach harvest, the garden is simply glowing with beauty. Every corner, every canopy, every branch tells a story — and this week, I’ve taken the time to slow down and capture that story as best I can through the lens of my camera.
All the photos you’ll see in this update were taken with care and intention. I use my Sony camera in full manual focus mode, and I don’t just snap and go — I spend time with each plant, each angle, waiting for that perfect moment when everything aligns. These are not just photos to document — they’re my attempt to reflect the feeling of the room, the energy of the grow, and the soul of each plant.
Just like with the videos, I don’t shoot randomly and decide later. I record what matters, and what I record, I use. It keeps me focused, organized, and deeply connected to the process — and I believe it helps me tell the story more clearly, whether through stills or moving pictures.
All five Runtz phenos are finishing beautifully. Each one expressing unique traits, but all carrying the same stunning quality — dense, clean, colorful, resin-rich flowers that fill the room with pride. This garden is finishing spotless, and I couldn’t be happier.
This week’s YouTube episode will reflect that beauty. If you’re seeing this here on GrowDiaries, I highly recommend checking it out in full 4K once it’s live — there are moments that simply can’t be translated in photos alone, even though I try my best. But for those who love the details, the full spread of pictures is right here, as always.
t this point in flower, the girls are not eating — they’re just drinking clean water with nothing but System Clean in the reservoir, at a rate of 0.25 ml per liter. This is part of a gentle, prolonged flush phase I like to implement, giving the plants a chance to metabolize and fade naturally. The goal is to promote clean, vibrant flowers that finish with optimal expression, without rushing the process. No forced flush, just time and care.
Lighting-wise, the spectrum has been tuned with precision — we’re currently running 40% on the whites, with reds and UVs at 100% to drive trichome development, resin production, and color expression in these final days. The plants are loving it — they’re soaking in the deeper wavelengths that signal the end of their life cycle and responding with a final push of energy.
And yes — we’ve been running 11 hours of light and 13 hours of darkness from the very start of flower. It’s not the usual 12/12, and it comes with its pros and cons. On the upside, it helps speed up ripening slightly, encourages more compact flower formation, and mimics the natural seasonal decline in daylight. On the flip side, it slightly reduces the overall DLI (daily light integral), so you need to ensure your PPFD and spectrum are dialed in just right to avoid sacrificing yield. For me, the trade-off is worth it — the plants are expressing themselves beautifully, finishing strong, and packing on the final magic.
Now it’s your turn — I’d love to hear from you. Which phenotype is standing out the most to you in this garden? Which one is catching your eye with its colors, its fade, its structure, or just that vibe that speaks to your soul? Is it the frost? The density? The posture? Each of these girls has her own personality, and I know many of you have been following closely — so drop a comment, let me know: which one is your favorite? Which one would you take home?
This run has officially earned the Dog Doctor Official Wax-Sealed Stamp of Approval. These genetics are beautiful — expressive, vibrant, clean. It’s been a joy to grow them, and an even greater joy to share this journey with all of you. Of course, we still have the final word coming after harvest, drying, and curing — that’s when the full picture reveals itself. But until then, based on everything we’ve seen and lived in this grow… this is the real deal.
To everyone following the journey — thank you. To the sponsors, the community, the silent observers, the passionate growers, the haters, the lovers — I see you all, and I appreciate every bit of energy you send.
This cup has been about more than just growing. It’s been about sharing. Connecting. Creating something beautiful together. And we’re almost there.
Next stop: harvest? provably yes lets see !
Growers love always 🌿❤️
DD
Genetics - Runtz https://www.zamnesia.com/6000-zamnesia-seeds-runtz-feminized.html
Nutrients - Plagron https://plagron.com/en/hobby
- Aptus Holland https://aptus-holland.com/
Controls - Trol Master https://www.trolmaster.eu/
LED - https://www.futureofgrow.com/en
LED - https://www.thinkgrowled.com
Soil - https://www.promixgardening.com/en
Germination - Cannakan https://cannakan.com/?srsltid=AfmBOopXr-inLXajXu3QFgKXCXXos4F1oEvScjMKIB5MR5dk8-GJ-F49
DOGDOCTOR 15% off
Smoking Papers - https://ziggioriginal.com/
Terpene saver - https://grovebags.com/
As always thank you all for stopping by, for the love and for it all , this journey of mine wold just not be the same without you guys, the love and support is very much appreciloved and i fell honored with you all in my life
With true love comes happiness Always believe in your self and always do things expecting nothing and with an open heart , be a giver and the universe will give back to you in ways you could not even imagine so
As always, this is shared for educational purposes, aiming to spread understanding and appreciation for this plant. The journey with nature is one of discovery, creativity, and respect. Let’s celebrate it responsibly and continue to learn and grow together!
Growers Love To you All 💚
#EternityGrowCup #RuntzHunt #GrowersLove #CannabisCommunity #AptusHolland #ProMixSoil #TrolMaster #Zamnesia #Plagron #ZiggiPapers #Grovebags
Likes
120
Share

@Hologram
Follow
OK, im doing an update now becouse my breakup cake is going tranny!!(hermie)
I already have noiticed she was not growing as strong .. but u can blame that on anything , especially when growing outdoor..
but this morning i saw that she was g(r)oing 'bananas'!😢
I have put her aside from the rest (in the back of garden) but think gonna have to terminate her asap!..(and i will, right after this post👍)
The weed she will give will be filled with seeds and those seeds will be hermies too, so wothless..
and if i dont throw her away quick she can infect the rest.
So goodbye breakup cake..😢
who wants to eat a cake when they are breaking up anyway..😒 (just hiding my pain with lame humour 😳)
happy growing for all ✊
Processing
Likes
2
Share


@PlantGod
Follow
This thing is insane!
Rapidly growing everyday. I need to keep it under control for another for about 30 more days before I can fit it in my other tent.