The Grow Awards 2026 🏆 


Likes
Comments
Share
@Hazebuster888
Follow
In der fünften Blütewoche zeigt sich der Erfolg des Scroggens deutlich. Die Pflanze hat das Netz vollständig durchwachsen, und die Blüten verteilen sich gleichmäßig über die gesamte Fläche. Um die Stabilität der immer schwerer werdenden Blüten sicherzustellen, habe ich zusätzliche Netze aufgehängt. Außerdem habe ich die Beleuchtung von 400 Watt auf 720 Watt erhöht, um den Blüten noch mehr Energie zuzuführen und das Wachstum weiter zu fördern. Die Ergebnisse sind bereits sichtbar, mit dichten und kraftvollen Blütenständen, die sich vielversprechend entwickeln.
Likes
12
Share
@YourStonedBuddy
Follow
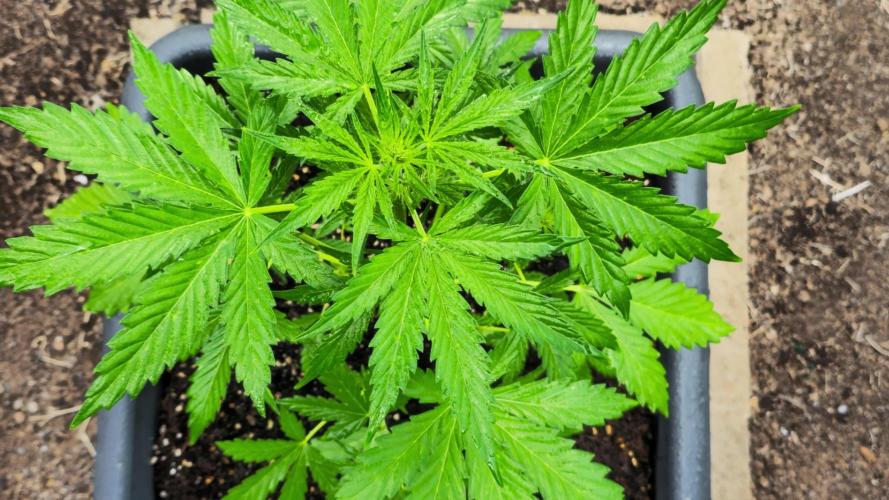
Into the second week of flower and have not seen much stretch in these girls yet. All are showing pistils, I am defoliating a lot to maintain an even canopy.
Girls received their first compost tea and a good top dressing of malted barley.
Pistils development is continuing strong. Looking forward to some more stretching
They ended their week really good, flowering is slowly getting there. Still haven’t seen much stretch from these. #2 is noticeably shorter thus far, with #1 showing the most flower development


Likes
15
Share
@Dirty_rich
Follow
Crecimiento de flores bastante notorio
Aparición de los primeros tricomas, va a buen paso con buena pinta.
Se empezó a notar colores rojos muy tenues en las flores de la mitad de la planta (no en todas)
Quizá en la siguiente semana vaya tomando tonalidades más rojizas, las altas temperaturas no son lo adecuado para el buen desempeño de las antocianinas.

Likes
7
Share
@Maryjane23
Follow
ciao ragazzi
ho fatto i flush a inizio settimana e oggi (circa 10 gg dopo) ho raccolto la pianta
sono molto soddisfatta a sviluppato una cima centrale molto grossa e anche tutte le cime secondarie hanno lavorato bene è ricca di tricomi molto appiccicosa con un profumo dolciastro!!!
in generale l'esperimento fast Buds è andata benone siamo nell'attesa di scoprire quali varietà rappresenta questa bellissima pianta!!!🌱🌱
💡questo splendido risultato non sarebbe stato possibile senza la mia meravigliosa lampada led Viparspectra XS2000 veramente un ottimo prodotto ve la consiglio se volete dei bei rami forti adatti a sostenere le cime grosse che ottieni!!!
this well-known brand offers different solutions look at the official website https://viparspectra.eu/
or Search for it on Amazon:
Amazon US: https://amzn.to/30xSTVq
Amazon Canada: https://amzn.to/38udUVe
Viparspectra UE: bit.ly/ViparspectraUE
Viparspectra USA: bit.ly/ViparspectraUS
continuate a seguirmi 💪
lasciate un like 👍
maryjane23😛

Likes
9
Share
@Hazebuster888
Follow
Habe 2 tage mit dem schneiden verbracht..
Total getrocknet: 750g 👌😊😁
Likes
52
Share
@Hashy
Follow
Grow diary 11.
This grow I'm running 4 diaries, one for each strain in the tent. So my plan is instead of a week being 7 days, my weeks are most likely going to be every 10 days. I think I'm going to take pictures every 5 days so there is a mid week and end week shot.
I'm germinating in my propagation tent which is secret jardin dp60. I soaked the seeds in water for 15 hours. The seeds sank so i took that as a good sign. After the seed had soaked for 15 hours I then soaked the rockwool cube for 30 mins in PH 5.8 water with 0.5ml/L hydroguard. Gave the cube a shake and let it drain for 30 mins before placing the seed pointy side down so the top of the seed is level with the cube. Covered seed with a loose bit of rockwool. Placed into propagator with the sunblaster t5 lights on constant. After 71 hours the seed popped
TEMP
MAX 34.2C
AVG 30.1C
MIN 25.8C
HUMID
MAX 86.3%
AVG 80.3%
MIN 57.2%
VPD
MAX 2.07
AVG 0.83
MIN 0.64
Hopefully back in 10 days.
Likes
29
Share
@420DeepGrow
Follow
Gracias al equipo de Sensi Seeds, Marshydro, XpertNutrients y Pro-Mix, sin ellos esto no seria posible.
💐🍁: Mr Nice G13 x Hash Plant:
Las semillas de cannabis Mr Nice G13 x Hash Plant son 100% Indica. La variedad incluye G13 en su genética; una planta afgana de primera calidad que (según la leyenda) fue sacada de contrabando de un centro de investigación del gobierno por un técnico. Sensi Seeds desarrolló la variedad con el objetivo de mejorar aún más la G13 y el resultado fue Mr Nice, que se lanzó en 1999.
Mr Nice G13 x Hash Plant Regular tiene un tiempo de floración de 60 a 65 días.
Como era de esperar, dada su genética índica, esta variedad no alcanza alturas significativas. Sin embargo, cuando se cultiva en exterior, no es raro que las plantas alcancen unos 190 a 240 cm. En interior, son mucho más compactas, y la planta media crece aproximadamente entre 80 y 170 cm.
Mr Nice G13 x Hash Plant Regular proporciona un colocón corporal increíblemente potente. Es 100 % índica y esto se nota en el efecto de "apagón" que produce, ya que los usuarios afirman sentirse muy relajados y aliviados después de consumirla. Gracias a la genética "doble afgana", las plantas producen un aroma terroso y picante. Este aroma tiene un matiz dulce, rico y penetrante, que se intensifica a medida que maduran los cogollos. Al gusto, es casi como una mezcla de ganja y hachís, ya que es excepcionalmente fuerte y rico.
🚀🌻 Consigue aquí tus semillas:
https://sensiseeds.com/en/cannabis-seeds/sensi-seeds/mr-nice-g13-x-hash-plant
💡FC6500: Eficiencia líder en el mercado: la lámpara de cultivo LED FC-E6500, que ostenta un estatus líder en el mercado, es una solución rentable con un PPE de 2,8 µmol/J y un rendimiento máximo de 2,5 g/vatio. Ofrece un PPF alto de 2026 umol/S y es adecuada para una cobertura de vegetación de 1,50 m x 1,50 m y una cobertura de flores de 1,20 m x 1,20 m.
Iluminación versátil y uniforme.
https://marshydro.eu/products/mars-hydro-fc-e-6500-730w-commercial-led-grow-light/?gad_source=1&gclid=Cj0KCQjw1qO0BhDwARIsANfnkv9IIrYSbmJqz8PqpJOIyWwJfp5bc3SGJgUV68USLQ4tjmXDYwoBuAsaAue3EALw_wcB
🚥 MarsHydro ADLITE UV/IR/RED:
Para lograr un crecimiento óptimo de las plantas y maximizar los rendimientos es un arte simple que depende en gran medida de las condiciones ambientales adecuadas. Reconociendo las limitaciones de la iluminación natural y las soluciones de iluminación tradicionales para satisfacer estas necesidades únicas, lanzamos ADLITE. Estas luces especiales UV, IR y roja están diseñadas para llenar áreas del espectro, proporcionando las altas longitudes de onda que las plantas necesitan para un crecimiento y desarrollo óptimos.
Consigue aqui tu Adlite:
https://marshydro.eu/collections/adlite-supplemental-lights/
🏠 : Marshydro 1.50 x 1.50 x 1.80, carpa 100% estanca con ventanas laterales para llegar a todos los lugares durante el grow
https://marshydro.eu/products/diy-150x150x200cm-grow-tent-kit
🌬️💨 Marshydro 6inch + filtro carbon para evitar olores indeseables.
https://marshydro.eu/products/ifresh-smart-6inch-filter-kits/
🍣🍦🌴 Xpert Nutrients es una empresa especializada en la producción y comercialización de fertilizantes líquidos y tierras, que garantizan excelentes cosechas y un crecimiento activo para sus plantas durante todas las fases de cultivo.
Consigue aqui tus Nutrientes:
https://xpertnutrients.com/es/shop/
📆 Semana 5:
Una vez terminada la fase de estiramiento dedican todo su esfuerzo a crear nuevos pistilos y resina, es hora de engordar estos futuros cogollos.
La carpa esta totalmente cubierta gracias al FC-6500 y los Adlite de Marshydro, se nota la floración mas avanzada que otras veces y con una mayor densidad.
Continuo con las dosis de nutrientes recomendadas por XpertNutrients.

Likes
9
Share
@GYOweed
Follow
Not a great selection. Low yield. Hopefully it will taste and smoke great as it looks.

Likes
9
Share
@Sejnik
Follow
Provedl jsem extrémní defoliaci své jungle. odebral jsem téměř všechny trochu větší listy pro snížení vlhkosti, lepší proudění vzduchu. Světlo nyní svítí na všechny květy.
Bohužel jsem narazil na nějaké škůdce které jsem před defoliací objevit nemohl . Většina napadených listů byla odstraněna a zbytek jsem postříkal vývarem z tabáku.

Likes
117
Share
@PEAKYPLANTERS
Follow
Hello everyone.
sisters and brothers gardeners!
You missed me?
here I am for you in a new explosion of colors in my contents ....
I hope you like them
holy god .... how much glue I see on those fantastic shoots
feel free to leave any comments or questions.
the best harvests at all

Likes
2
Share
@bbs42
Follow
Starting to get some real buds now. Color in leaves changed within 3days. Had me super nervous I screwed up the plant. Thought I was dealing with a ph issue because of how early the leaves changed colors. Green spots on leaves are from me not turing down the light fast enough.


Likes
15
Share
@PiusWaxis
Follow
Here we are at the end of my plant's wonderful eleventh week of flowering, another week full of exciting developments and new discoveries.
The constant and unstoppable growth of the plant has come to an end, showing a beauty and vitality that are a true spectacle for the eyes. 😎
The abundant layer of resin that has formed is a clear sign of the health and well-being of the plant, once again confirming the benefits of the premium nutrients used throughout the entire growth cycle.
TrollMaster's "TENT-X" environmental control system continues to prove its worth, precisely maintaining optimal temperature and humidity levels to promote vigorous plant growth.
The combination of advanced and precision technologies ensures that plants can thrive in a controlled and conducive environment😎
I am thrilled to share with you the latest video showing the temperature, humidity and VPD trends of this last week of flowering, providing further demonstration of the extraordinary performance of the TrollMaster control system and its synergy with the other elements of the grow room.With each week that passes, the anticipation for the new discoveries and challenges that await us continues to grow.
With the constant support of Plagron nutrients, trust in the TrollMaster control system and the excellence of MEDIC GROW LED lighting, I am sure that I am always ready to face any challenge!
Thank you again for being by my side in this extraordinary adventure, dedicated to exploring the wonders of plant cultivation. Together we continue to look to the future with confidence and enthusiastically anticipate the successes that each new week holds for us. 💪👽🌱✨
REVIEW TENT-X:
I was pleasantly surprised by the effectiveness and functionality of the TROL MASTER!
This device is simply amazing, as it has allowed me to monitor the environments I use it in accurately and efficiently.
One of the most impressive features of this device is its ability to operate LED lights easily and intuitively. Thanks to its user-friendly interface, I could easily customize the lighting of my rooms according to my tastes and different situations. I particularly appreciated the possibility of programming the sunrise/sunset simulation, thus creating a more natural situation.But that's not all: the device goes further and manages to keep me constantly informed about the humidity and temperature of the surrounding environment. This feature has proven to be very useful, especially in times when I am not present.
I was able to set humidity limits, so that the device would immediately alert me if the levels exceeded the desired threshold. This allowed me to intervene promptly and avoid excessive oscillations.
The accuracy of the temperature measurements was another welcome surprise. The device is equipped with a high precision sensor that allows me to constantly monitor the temperature of the rooms. Here too I was able to set temperature limits, allowing me to be notified immediately if they were exceeded.
Overall, I was really satisfied.
The TENT-X exceeded all my expectations. Its ease of use, precision of measurements and possibility of customization make it an indispensable tool for those seeking to monitor and optimize environmental conditions.


Likes
3
Share
@Surutra
Follow
Water Change on 05/02
Fresh Water PH 7.3
After Nutrients PH 6.3
3ml PH down PH 6


Likes
10
Share
@NSABND
Follow
Day 29... afternoon very sunny and warm temp 👍
Day 30 damn hot and full of sun 😎👍
Likes
15
Share
@MrJones
Follow
Mr. Jones Fast Buds Moby Dick
╰⊰´🌿 ╰⊰´🌿 ╰⊰´🌿 ╰⊰´🌿 ╰⊰´🌿 ╰⊰´🌿 ╰⊰´🌿
🏡Indoor - 3"x4"x8" Custom Built Grow Closet
🌾This strain likes to stretch, so a heavy training regiment will be needed.
🗓️Germenation - Soaking in Water Strait into Amended Soil.
⚱️3-Gallon Pots 📊6.4 / 6.8 PH
💧 Feeding - Gaia Green Grow / Bloom
🕷️ IPM - We will be using Green Cleaner" 1 OZ per Gallon, and CannControl from Mammoth alternating between products each month for Integrated Pest Management.
🌿╰⊰´🌿╰⊰´🌿 PLANT UPDATES 🌿╰⊰´🌿╰⊰´🌿
🗓️Monday - 11.06.23 Wen head and did a quick experiment, decided to HST 1 plant, topped in 3 spots as well as defoliated, Another plant did some defoliation and LST training, and left the 3rd one alone, let's see how things go!
🗓️Sunday - 11.05.23 These Ladies continue to blow up, I think I am going to top dress before the end of the week, I am going to look at the lagest plant that is doing the best, and maybe top it, defoliate, and maybe some LST, I tend to go easy when doing Autos but think this plant can take it.
🗓️Saturday - 11.03.23 These girls are just blowing up! they are at 5 inches and spreading out nicely, typicly FB Strains start flower in the 4th to 5th week, will be looking at some LST this week.
╰⊰´🌿 ╰⊰´🌿 ╰⊰´🌿 ╰⊰´🌿 ╰⊰´🌿 ╰⊰´🌿 ╰⊰´🌿
📝 Notes - Original Moby Dick Auto is a world-renowned Sativa-dominant giant created from two of the most popular strains ever, the White Widow and Haze cannabis strains which are known for the huge delicious aroma, huge size and yields; It’s an extremely easy-to-grow variety highly recommended for growers of all levels seeking for maximum yields with minimum effort as this strain grows up to 150cm and yields up to 650 g/m2 in 10 weeks without extra maintenance. Thanks to its 23% THC, this marvelous hybrid is all about happiness as it will melt your worries away while boosting your mood, leaving you with a big fat smile on your face and ready to get things done as soon as you take the first hit, making it an excellent choice for social scenarios and busy workdays. The Sativa effect comes hand-in-hand with a mix of lemony, piney, and woody terpenes that translate into that classic aroma every stoner loves.
╰⊰´🌿 ╰⊰´🌿 ╰⊰´🌿 ╰⊰´🌿 ╰⊰´🌿 ╰⊰´🌿 ╰⊰´🌿


