
Likes
Comments
Share


@Roberts
Follow
Gorilla Jealousy F1 is doing good. She is starting to show her colors more. She has about 2 weeks left. She has the musky Gorilla strain smell for sure. Everything is looking good and heading to a finish soon. Next update is the harvest. Thank you Seedsman, and Spider Farmer. 🤜🏻🤛🏻🌱🌱🌱
Thank you grow diaries community for the 👇likes👇, follows, comments, and subscriptions on my YouTube channel👇.
❄️🌱🍻 https://www.seedsman.com/?a_aid=Mrsour420.
This is my affiliate link to seedsman.
Thank you Happy Growing 🌱🌱🌱
https://youtube.com/channel/UCAhN7yRzWLpcaRHhMIQ7X4g

Likes
18
Share


@CRK00
Follow
2nd Week Report 24/10/19 - 31/10/19
25/10/19
I didn't flushed, but I filled the reservoir with 3l of 10% strength solution.
Added to the current solution the same nutrients quantity as the first week (except for "Root Stimulator" and "Enzymes" that the first week were 20% strength and now got back to 10%).
Now the reservoir should be filled with a 20% strength solution
29/10/19
- CMXL is 10cm height and it is growing really well along with his roots.
- LSD is 6cm height and it is growing a little slower like his roots, but both of them look healty. I think in some days should start growing fast like CMXL
Added 2 low frequency (113kHz) Ultrasonic Piezoelectric Discs:
- One for the root chamber that should help with root expansion as it nebulize solution and the fog carries nutriments (like a small aeroponics integration) and will help my attempt of cloning.
- One will stand in a 20% solution next to the plants to increase Humidity (and maybe feed them a little).
I'll try to set them running 24/7
Switched water pump that sprays Rock Wool from 5sec every 30min to 6sec every 60min. Next week I plan to stop using the pump as "Top Feed" if roots will be well developed and probably I will use it as "Recirculation Pump" to keep nutrients in reservoir mixed better
30/10/19
Roots exposed to air inside reservoir got a little yellow after inserting the small fogger, so I will try to keep it 30/30 seconds ON/OFF. I will check next day if it's helpful to existing root o as root propagator for clone trial
Topped CMXL and did a little of LST just by bending the main stem to expose the small growing next to fan leaves.
The cutting was immediately dipped in a solution made by honey and Root Stimulation (the same I use for reservoir solution as it should contain rooting hormone), hoping it covers the cut like a gel and don't let the oxigen get in the cut until there will be some new growing.
After that I put the cutting on the lid without any pot, as you can see in the picture some tape is covering the hole and it holding the topping. I covered it with a small jar to maintain humidity, hope to see some roots next week ;)
I plan to fim LSD tomorrow if tonight grows enough
31/10/19
Filled the reservoir with 6L 20% strength solution and after that added 10% nutriment for 36L directly into the tote (like I did last week).
Now nutrient solution inside reservoir should be 30% strength and it's ready for the 3rd week
Pinched LSD Top with my fingers and applied LST by bending a little the main stem. Hope this FIMming works and returns better yield ;)
Cloning trial didn't worked (I was expecting nothing, just a test), the cut part of the topping is already dry. I knew the topping was too short, next time if I try to clone his stem will be at lest 2cm
Last Update 31/10/19
Next Update 03/11/19 with the next week
See you guys ;)


Likes
79
Share


@Salokin
Follow
Hello Growmies,
We have reached week 16 with our Epic Buzz plants, marking a significant moment in their growth journey. This week, Epic Buzz Pheno #3 showcased its beautiful floral maturity before it was harvested. The vibrant, frost-laden buds filled the tent with a sweet and pungent aroma, highlighting the strain's complex terpene profile. This pheno was particularly lush, sporting richly colored foliage and trichome-packed buds that are a testament to the careful nurturing it received throughout its lifecycle.
Pheno #3 was harvested just after these last photos were taken, with a final wet weight of approximately 500 grams. The intricacies in the colors and textures of the buds were remarkable, showing hints of purple amidst the green, under a thick coat of crystalline trichomes.
As for Pheno #1 and #2, they remain in the flowering stage, developing their profiles and will soon follow in #3’s footsteps to complete their cycle. We look forward to updating the final harvest weight once these remaining phenos have been processed. This stage is crucial as we observe the subtle differences between each pheno, helping in our ongoing efforts to optimize growth conditions and pheno selection for future cycles.
Stay tuned for more updates as we close this chapter on Epic Buzz and begin the next cycle of our cultivation journey.
Stay lifted,
Salokin


Likes
40
Share


@BLAZED
Follow
Week 16 (Harvest)
1-2 Drying day 1
Temperature: 24.5 to 19.5 degrees
Humidity: 65% to 50%
The girls are ready to be harvested!
Before chopping them down, i took a lot of pictures.
I was able to remove most of the soil from the Biscotti #2 to see the rootball.
I hang the plants as a whole to have a slow dry.
The exhaust fan is on setting 4.
2-2 Drying day 2
Temperature: 19.1 to 17.5 degrees
Humidity: 62% to 57%
I changed the exhaust fan to setting 2 because setting 4 was a bit high in my opinion.
3-2 Drying day 3
Temperature: 19.9 to 18 degrees
Humidity: 62% to 59%
Today i checked up on the drying plants, and i see there are some buds touching other buds, so i chopped the plants in half.
The buds are still to the main stem for a slow dry, but are hanging more spreaded out to prevent any budrot issues.
I changed the exhaust fan to setting 1, as someone told me that it was enough air movement for drying.
4-2 Drying day 4
Temperature: 19.8 to 18.5 degrees
Humidity: 62% to 59%
5-2 Drying day 5
Temperature: 19.9 to 18.8 degrees
Humidity: 62% to 59%
Today i checked on the drying plants and the buds are shrinking a bit, they are getting a little bit crispy on the outside aswell,
I hope they wont dry as fast, and i aim for a 12/14 day dry.
For the next grow i already germinated 2x Chemdog (GreenHouseSeeds) 2x Gorilla Kush (GanjaFarmerSeeds) and 1x Deep Candy CBD (GreenHouseSeeds)
And I have some upgrades planned aswell!
I bought a autopot kit with 4 15L pots, this way the plants will have water and air 24/7 whenever they need it. I have seen alot of great results using autopots so i am very exited to try it out!
And I bought a small camera so i can shoot some weekly timelapses!
Feel free to Follow me if you like to get notified for the upcoming diaries!
Thanks for checking out this diary, peace!
(More harvest updates coming in the next couple of days!)
Huge thank you to Zamnesia for the seeds, and Plagron for the collection of nutrients, and the opportunity to participate in the POWERBUDS contest!
It was a fun and learningful adventure!

Likes
8
Share


@Whosaysgirlscantgrow
Follow
It absolutely stinks of pineapples in here! They’re looking fabulous! Dripping with trichomes and thickening up day after day! I can’t wait until they’re finished! I think they’re going to taste amazing!


Likes
154
Share


@Tropicannibis_Todd
Follow
💩Holy Crap Growmies We Are Back💩
Code Name FBT2311
Well growmies we are at 14 days in and everything is going great 👌
👉 Started to do some low stress training👈 We all ready got , some Pre-flower showing already 👌
Lights being readjusted and chart updated .........👍rain water to be used entire growth👈
👉I used NutriNPK for nutrients for my grows and welcome anyone to give them a try .👈
👉 www.nutrinpk.com 👈
NutriNPK Cal MAG 14-0-14
NutriNPK Grow 28-14-14
NutriNPK Bloom 8-20-30
NutriNPK Bloom Booster 0-52-34
I GOT MULTIPLE DIARIES ON THE GO 😱 please check them out 😎
👉THANKS FOR TAKING THE TIME TO GO OVER MY DIARIES 👈

Processing
Likes
10
Share


@CanadianFillmore
Follow
Start of week 2, day 8 of flowering. The plants are sagging a bit in these photos, as I took them just before feeding, except for the pics in the grow room, they are just after feeding. So far, they all look good and healthy, a few leaves are showing some small deficiency signs, hopefully that will go away as additional nutrients are added over the grow cycle.

Likes
12
Share


@Cannibalgardens
Follow
Well she is putting on the height and buds have been forming up nicely ... Good to see some buds again in my tent been to long . The smell is fruity to me and she shows no signs of slowing yet lol those bottom branches are reaching up as well. I love resilience of these plants she takes transplanting well and ph issues all my fault ... I'm still learning but getting better every week and so will she ... Till next week cheers family and grow on ...

Likes
5
Share


@Tower84
Follow
Es sieht alles sehr gut aus, ich habe mich dafür entschieden noch ein paar Tage zu warten bis auch bei den unteren Buds die Trichome größtenteils milchig sind - da ist jetzt etwas Geduld gefragt, aber ich denke in den nächsten Tage dürfte es soweit sein. Die Buds sind sehr kompakt gewachsen und wirken sehr frostig. Unter der Lupe sind man einen dichten Besatz an Trichomen und manche Stile der Trichome sind schön lila gefärbt. Bin super gespannt auf das Endergebnis und ich versuche die letzten Tage die Raumtemperatur zu reduzieren (18 Grad). Die Lichtintensität habe ich abermals reduziert auf Stufe 7 der Sanlight ( max. 1000 PPFD / 43 DLI mittig Headbud / Durchschnitt 780 / DLI 34 mittig).

Likes
157
Share

@Tower84
Follow
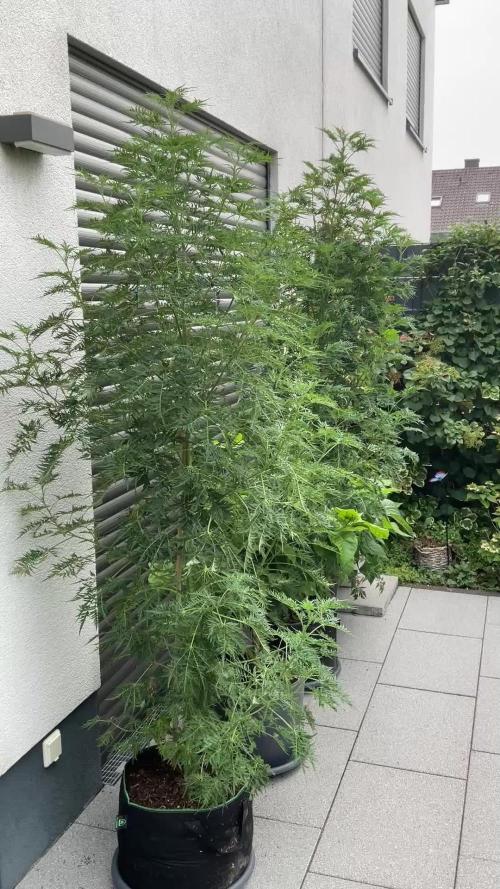
🌿 Woche 16 – Mentha de Croco 🇩🇪
Die beiden Mentha de Croco entwickeln sich weiterhin fantastisch! 💚 Die linke Pflanze hat inzwischen etwa 180 cm, die rechte beeindruckende 193 cm erreicht 🌱. Beide sehen wunderschön aus und wachsen weiterhin extrem säulenförmig nach oben – echte Wolkenkratzer im Garten! 🚀
Leider gab es gestern ein schweres Unwetter mit starken Windböen 🌩️🌬️. Dabei sind beide Pflanzen umgekippt. Durch ihre hohe, schlanke Wuchsform sind sie einfach etwas anfälliger für solche Wetterlagen. Ein schwererer Topf als die 30 Liter hätte hier sicherlich für mehr Standfestigkeit gesorgt.
Zum Glück ist der Schaden überschaubar geblieben. 🙏 Lediglich einige Blätter sind abgebrochen, ansonsten haben beide Pflanzen das Unwetter erstaunlich gut überstanden und wirken weiterhin kerngesund. 💚 Beim Wiederaufstellen konnte ich außerdem sehen, dass die Wurzeln den Topfboden bereits vollständig durchwurzelt haben – ein gutes Zeichen für ein kräftiges Wurzelsystem. 🌱
Morgen gibt es wieder einen frisch angesetzten Komposttee, um das Bodenleben weiter zu fördern und die Pflanzen für die nächste Wachstumsphase optimal zu unterstützen. 🍵 Ich bin gespannt, wann die erste Pflanze die 2-Meter-Marke knackt! 🌿📈
🌿 Week 16 – Mentha de Croco 🇬🇧
Both Mentha de Croco plants continue to perform beautifully! 💚 The left plant has now reached approximately 180 cm, while the right one is an impressive 193 cm tall 🌱. They both look absolutely stunning and keep growing in a very upright, column-like shape—true skyscrapers in the garden! 🚀
Unfortunately, a severe thunderstorm with strong winds hit yesterday 🌩️🌬️, causing both plants to tip over. Their tall, narrow structure makes them naturally more vulnerable to these conditions. A heavier container than the current 30-liter pots would definitely have provided better stability.
Fortunately, the damage was minimal. 🙏 Only a few leaves broke off, and overall both plants came through the storm remarkably well and still look incredibly healthy. 💚 While standing them back up, I also noticed that the roots have already fully colonized the bottom of the pots—a great sign of a strong and healthy root system. 🌱
Tomorrow they’ll receive another freshly brewed compost tea to further support the soil biology and keep them thriving. 🍵 Now it’s only a matter of time before the first plant breaks the 2-meter mark! 🌿

Likes
7
Share


@KannaKullektiv
Follow
Hiiigh friends 🙌
Welcome to week 4. 😍
They have grown well in size and the one on the far left has overtaken her two sisters although she shows signs of a deficiency. 😊
I have noticed a calcium magnesium deficiency because I only water with osmosis water. What to you think?
See you next week. 👋
Arturo for KannaKullektiv
🙏


Likes
12
Share


@most_dope
Follow
i was thinking about harvesting half and letting the bottom half finish but after chopping some of it i just ended up taking it all down. i knew i wouldnt get a crazy amount of weight from the early mess ups but im guessing it will be about 2 oz when dried. im happy with anything thats smokeable for a first time grower tho and i cant wait to get started on 2 more ladies :D im thinking maybe do the purple punch but this time use a 5 gallon pot so i can see her at her best ! the roots were sure cramped in this 2gallon lol. thanks for reading and following my journey :D
Likes
Comments
Share


@JararacaHaze
Follow
We’ve reached the eighth week, and the plants continue to tell their stories. Two of them have revealed themselves as males, fulfilling their role in genetics, while the others keep growing vigorously. The dynamics of the garden change, but the journey remains steady and promising.
During flowering, I stick to my consistent approach: I don’t change how I provide water and biofertilizers. I believe regularity is the key to a healthy and balanced transition. Additionally, I’m not a fan of heavy defoliation; I prefer to respect the plants’ natural rhythm, removing only the leaves that fall off easily, as if the plants themselves are telling me they no longer need them.
Observing each stage of this cycle is an exercise in patience and learning. Each plant has its own personality, and watching them is like uncovering a secret only nature can reveal. I can’t wait to see how the garden will bloom in the coming weeks!
Likes
35
Share


@g_slim
Follow
The weather has been better: 3 days with no rain and the other days had at least a couple of hours of sun, more or less.
We fed compost tea on day 61, other than that mother nature provided rain during the week.
I put up netting for the other two Passion #1 (1+4). It is not pretty, but useful, both have taken well to the LST. The pictures on day 66 show it. Number 4 is finally comming along, although number 7 is still far ahead.
The ICE are still filling in. I hope they are ready by mid July, because I plan to go on vacation and wanna harvest before then. They are producing resin, but I am not impressed yet.
The Cream are going to be ready by mid July for sure. Number 8 is already showing up to 20% amber triches, depending on where you look. I might harvest the main bud next week and let the sides sit for another week or so. Number 9 will need 2 more weeks at least, from what I can tell. I havent even ckecked her triches so far.
Defoliated all autos some more and took of the lowest shoots on the Passion.
Addendum: unfortunately the time lapse on my security cam bugged out and I had to start a new one. I hope, this one will record until October...


Likes
7
Share


@Green_fingers
Follow
Just been chopped toon al the lower branches off and put them away separate but will update on the total yield
Likes
5
Share


@psychonaut420
Follow
Left her to start regenerate and came back to better development than I thought side branches are now streaching out nicely and the one I topped worked nicely and is starting to grow at regular pace and the top node I FIMimed 2 baby nodes are popping out and nodes below very healthy and streaching outwards
Likes
7
Share


@x_grower
Follow
Last week plants were looking super healthy and responded very well to the second topping so I decided to flip the light schedule few days later. They already started stretching and the smell is noticeably enhanced.
Likes
13
Share


@NordicClosetGrower
Follow
Finally received a couple of humidifiers to test from the local shop. These shitty low cost humidifiers will not really do, I can only have them on non stop until the water runs out. If I connect them to a sensor that switches them off, it won't go back on because it doesn't have a mechanical switch, I have to press on each time.
Still, let's see if this helps my poor dry leafs a little bit