
Likes
52
Share


@Roberts
Follow
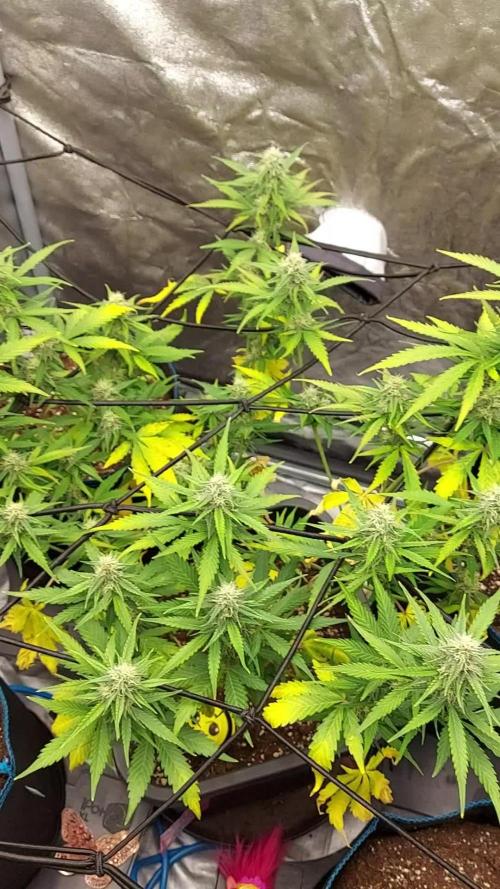
FBT2403 is about half way through bulking. She has a fruity, sour, herbal smell at the moment. She has a nice layer of frosty goodness on her. She has been growing well. Thank you Medic Grow, Agrogardens, and Fast Buds. 🤜🏻🤛🏻🌱❄️🌱
Thank you grow diaries community for the 👇likes👇, follows, comments, and subscriptions on my YouTube channel👇. ❄️🌱🍻
Happy Growing 🌱🌱🌱
https://youtube.com/channel/UCAhN7yRzWLpcaRHhMIQ7X4g
If anyone needs to purchase fastbuds here is a link for my affiliate program
https://myfastbuds.com/?a_aid=60910eaff2419

Likes
12
Share


@2Stones1Bird
Follow
Checkout my Instagram @smallbudz to see the Small budget grow setup for indoor use, low watt, low heat, low noise, step by step.
12/01/2020 - Fed her 1.5l of 6.6PH water with 0,2ml of each: Cal Mag (Atami), Grow, Bloom and Max, and 0,5ml of each: Heaven, Alga-mic and Vera, noticed some run off, I use about 1/4 of the nutrient dosage on the chart, to achieve about 100/150PPM (500 scale).
Now using the perfect PPM worsheet made by Grow Boss.

Likes
8
Share


@Greazy77
Follow
Yo,yo. She getting quite big for her little tent, managed to keep her low and wide. Pretty impressed with the growth lately, looks like she’ll be a busy little bush. Lots of calmag needed for this girl, still think I need to up it a bit though. Getting to the best part of the grow, when buds start taking shape and is always my favorite part. Thanks for checking in, stay safe and by all means keep it realz.
Greazy77


Likes
63
Share

@squalino
Follow
📖 Chroniques de l'Oasis : La Marque Blanche
🐪 Chapitre 8: Les Joyaux de la Sultane
Date : 15 Avril 2026
Âge : J+56
Taille : 68 cm (+2 cm)
Une nouvelle semaine commence dans l'immensité de mon Oasis de toile.
Je reste là, à l'entrée de mon campement, à admirer la Sultane de loin.
Je me demande avec une patience infinie quand elle sera enfin prête à livrer son secret final.
Le chemin est encore long, mais chaque jour est une nouvelle sultan que je contemple. .
Elle continue de s'élever, atteignant désormais 68 cm. Mais c'est sa parure qui me fascine : elle se veti de joyaux de plus en plus massifs.
Le blanc de ses pistils, encore d'une pureté absolue, reflète la lumière de la lampe tel un miroir, au point de m'aveugler lorsque je m'approche.
installation du filet
Pour soutenir le poids de sa future parure de diamants je guide son corp vers la lumière, j'ai installé le filet scrog. C'est mon tissage protecteur pour écarter et maintenir ses futures bijoux, afin que chacune devienne un pilier de cristal.
🏜️ Le Climat du Sanctuaire
Chaleur : 25°C le jour / 21°C la nuit.
Humidité : 50% (L'air sec du désert pour protéger la résine).
Lumière : Intensité 75%, maintenue à 55 cm de la couronne sacrée.
L'Élixir de Vie
aujourd'hui (15/04)
, j'ai offert à la Sultane son élixir afin qu'elle ne manque de rien:
Volume : 1,5 litres d'eau.
Précision : Ajustée à un pH de 6,3.
🔬 descriptif de la sultan
Le Miroir de Cristal
: C'est frappant les pistils sont d'un blanc électrique. Ils ne font pas que pousser, ils capturent les photons de ta lampe pour créer cet effet de "miroir" dont je parle. La production de résine (ma poudre d'étoiles) commence à s'épaissir sur les bords des petites feuilles.
Vigueur Royale :
Les +2 cm montrent qu'elle a encore de l'énergie pour se structurer avant le gonflement final. Le vert des feuilles reste profond malgré le début de sacrifice des feuilles du bas, signe que mon pH de 6,3 permet une absorption parfaite.
📜 L'Anecdote du Rif : Le Secret du "Ghbar" et de la "Zriba"
comment les anciens faisaient grossir leurs "buds" dans le temps...
Dans les montagnes du Rif, bien avant les engrais en bouteille, les paysans utilisaient la technique de la Zriba.
Ils construisaient des petits enclos de cannes ou de pierres sèches autour des plus belles plantes pour les protéger du vent trop violent, créant un micro-climat chaud et humide à la base.
Pour le gonflement:
ils utilisaient le "Ghbar" :
un compost de fumier de chèvre et de mouton, fermenté pendant des mois avec des restes de plantes.
Mais leur vrai secret pour des fleurs massives était l'effeuillage sélectif lié aux phases de la lune.
Ils enlevaient les grandes feuilles d'ombre uniquement lors de la lune descendante, croyant que cela forçait la "sève sacrée" à refluer vers les fleurs. Ils appelaient cela "nourrir les perles".
un grand merci a tous ceux qui me suivent cela me fait énormément plaisir et vous souhaite une bonne lecture.
MUSIQUE DIAPOSITIVE ( LORD KOSSITY HE SEXY WOW )

Processing
Likes
5
Share


@Blakoby
Follow
This weeks a little early, wanted to show the cut. Going to flower in 1-2 weeks depending on how she recovers.

Likes
1
Share


Likes
20
Share


@Dingle_Dangle
Follow
16/01/2022 - Day 91 - First day of the 14th week.
Small one being "eaten" by WPM [see snow video], not much I can do, RIP
Big one still on the grind, confirmed that it's like she has been topped, there are two main stems but she did all by her self.
She is suffering WPM, too, of course, but being a little bigger and stronger I'm removing as much as possible.
Wish me good luck and let's hope in sunny mild days 🤞☀️
- DD

Likes
10
Share


@thephalanx420
Follow
Day 51 - 1F - Trimmed up most fan leaves and lower nodes. Used some low stress training to keep the canopy low and even then lowered SCROG netting to start training through flowering stretch.
Took a couple clones as well (not sure if i'll grow them out yet or not - just wanted to try my new fog cloner i built.

Likes
2
Share

@Barzenegger
Follow
This is the last week, I've given them another tank filling, but the Chem Beyond Diesel CBD was chopped on day 69F, which was the second day of the week, SAD CBD, and NYC Diesel CBD followed on day 73F. I left the for a couple more days, but also chopped it on day 76F, which is already the next week, but I won't be creating another diary entry for that one as it was 3 days long and nothing happened.
The foxtailing makes it look like there are still a lot of white pistils, but most of the inner/lower ones are finished, the trichomes look ok, and I am growing impatient again.

Likes
17
Share

@DogDoctorOfficial
Follow
Animal Mints — Legends of the Frozen North
Part 2 — Drying, Trimming & Preserving the Harvest
Before we begin, once again, we want to apologize for dividing this harvest into multiple reports. We know it can feel like a long journey to follow week after week, but honestly, this is the only way we can properly document everything in the level of detail that these plants deserve.
Harvesting, drying, trimming, curing, resin collection, storage methods, smoke reviews… all of these stages are part of the final medicine. And instead of rushing through it in one giant post, we prefer to slow down and share every step in the most educational and transparent way possible.
So welcome back to the frozen north.
This is Part 2.
⸻
Ten days later, the room had completely changed.
The giant living plants we harvested in the previous report had now transformed into hanging medicine. Slowly drying in darkness, at around 18–20°C and roughly 60% humidity, allowing the moisture to leave the flowers gradually instead of forcing them dry too quickly.
For the first couple of days, humidity was brought slightly lower to help remove excess external moisture, but after that, conditions stabilized again for the slow dry we love so much.
And then came that moment every grower knows.
That little click.
That beautiful snap in the branches that tells you the plant is finally ready.
Not too wet.
Not too dry.
Just right.
And honestly… after seeing these girls hanging there for days, fully intact, massive branches swinging slowly in the dark, it was finally time to begin the next ritual.
Trimming day.
⸻
Gloves on.
Scissors ready.
Trim bin prepared.
Medicine beside us.
Mr. Baggy supervising operations as always.
One branch at a time, we carefully broke the plants down by hand, slowly removing each flower from the stems before shaping every nug individually.
No rush.
No machine trimming.
No shortcuts.
Just patience, resin, and respect for the plant.
And these Animal Mints girls absolutely covered everything in trichomes.
The moment trimming started, the gloves became sticky almost immediately. Thick resin building layer after layer until eventually it rolled naturally into small dark hash balls directly from the fingers and gloves themselves.
This is one of those little moments we genuinely love about harvest season.
That sticky resin coating the gloves is essentially concentrated trichome resin — cannabinoids, terpenes, waxes, oils, and all the aromatic compounds that make the plant what it is. With a little warmth from the hands and gentle pressure, it naturally rolls together into traditional finger hash.
Simple. Ancient. Beautiful.
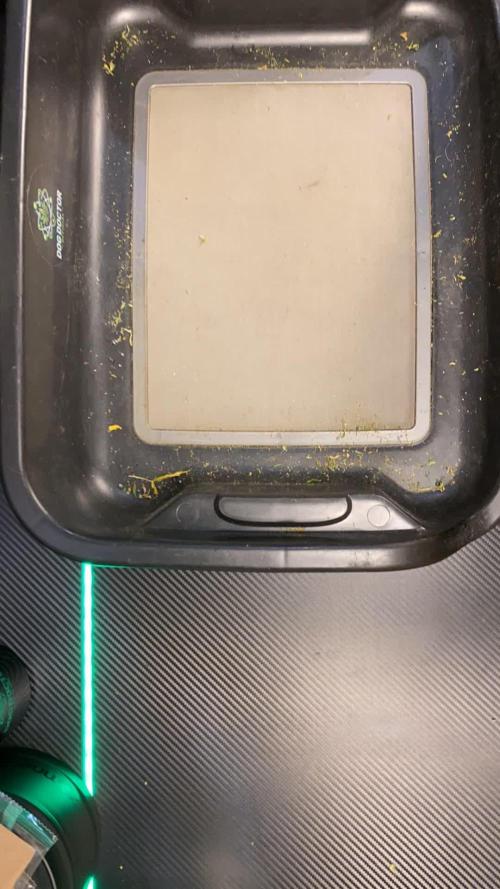
And of course… we also continued our little Moroccan-style “drums” with the trim.
By gently agitating the dried trim across the screens, we collected an absolutely beautiful amount of dry sift. Bright golden-yellow resin, soft and sandy, full of aroma and life. No exact scale numbers this time — this was more about enjoying the process than chasing statistics — but the quality spoke for itself immediately.
Honestly, this type of hash is one of our favorite ways to enjoy the plant.
A little inside a joint, slowly melting together with the flower, enhancing both flavor and depth without overpowering the experience.
Pure magic.
⸻
Now let’s talk numbers.
And honestly… these girls performed beautifully.
Plant A gave us:
127g
Plant B gave us:
247.8g
Plant C gave us:
287.9g
For dense, compact, heavily resinous flowers grown 12/12 from seed, this is an outstanding result in our eyes.
Especially considering the morphology of these plants.
This style of growing continues to impress us more and more every single run. The plants remain relatively compact vertically, but the flower production becomes incredibly efficient. Tight node spacing. Massive bud stacking. Heavy trichome production. Strong support structure. Dense flowers without absurd plant height.
The frozen north delivered once again.
And standing there in the studio holding entire branches in both hands… honestly, it was impossible not to smile.
Happy grower moment.
⸻
Once trimming was complete, the next mission began:
Preserving the terpenes.
Because harvest means nothing if the cure is bad.
So this time we decided to test multiple storage methods side by side.
Some flowers went into traditional glass jars — still one of our absolute favorite methods for long-term curing. Stable, simple, reliable, and something we continue to trust deeply.
Some flowers went into vacuum-style Zamnesia metal containers, where air can be partially removed while maintaining stable conditions inside.
Others went into vacuum plastic containers with pressure-sealed lids.
And finally, part of the harvest also went into Grove Bags, since the yield was simply too large not to use multiple preservation systems.
Inside several containers we also added 62% humidity control packs.
These packs are not “magic terpene creators” or anything like that — they simply help stabilize relative humidity inside the container, preventing flowers from becoming either too dry or too moist during curing.
The flowers themselves were already dried correctly before storage. That part is important.
Humidity packs are not there to fix bad drying.
They are there to help maintain stability afterward.
And honestly, one of the most exciting things now will be revisiting these exact same flowers months later to compare how each storage method affected aroma, texture, smoothness, and terpene expression over time.
Because curing is alive.
Medicine changes.
Terpenes evolve.
And that journey is part of the magic too.
⸻
One thing we also want to mention is how much easier trimming became with the curved point Zamnesia scissors.
It might sound like a tiny detail, but those curved tips genuinely help reach deep into dense flowers without damaging structure, allowing cleaner trimming while preserving the natural shape of the buds.
Small tools. Big difference.
⸻
By the end of this session, trays were full, jars were packed, hash was collected, gloves were destroyed by resin, and the studio smelled absolutely unreal.
pine, diesel and earthy.
Animal Mints is looking amazing.
And honestly… looking at those giant trimmed branches in the studio lights, it was one of those moments where you simply stop for a second and appreciate the entire journey from seed to harvest.
Because this is more than growing plants.
This is preservation of flavor.
Preservation of resin.
Preservation of time, patience, and intention.
⸻
But we are still not done.
Not even close.
The next report will be the final chapter of this frozen journey:
the smoke review, terpene breakdown, curing evolution, flavor analysis, effects, and our complete final thoughts on Animal Mints from seed to harvest.
And trust us…
This girl still has a lot to say.
⸻
Huge thanks once again to everyone following this journey:
Zamnesia for the genetics, Plagron,FOG Lighting, the gear sponsors, the community, GrowDiaries, the growers supporting from day one, the silent followers, the commenters, the critics, the legends, the OGs…
And of course, thank you to everyone taking the time to read these reports week after week.
The frozen north continues.
📡 DELETED @ 1K Please stay tuned.we never quit https://www.youtube.com/@TheDogDoctorOfficial NEW 🙏 Thank you for your patience and continued support.
FOR DISCOUNT CODES AND MORE JUST FOLLOW THE LINK https://website.beacons.ai/dogdoctorofficial
📲 Don’t forget to Subscribe and follow me on Instagram and YouTube @DogDoctorOfficial for exclusive content, real-time updates, and behind-the-scenes magic. We’ve got so much more coming, including transplanting and all the amazing techniques that go along with it. You won’t want to miss it.
GrowDiaries Journal: https://growdiaries.com/grower/dogdoctorofficial
Instagram: https://www.instagram.com/dogdoctorofficial/
YouTube: https://www.youtube.com/@dogdoctorofficial Deleted by Youtube - https://www.youtube.com/@TheDogDoctorOfficial NEW
Vimeo : https://vimeo.com/dogdoctorofficial Under construction stay tuned ⸻
Explore the Gear that Powers My Grow
If you’re curious about the tech I’m using, check out these links:
🔆 Lighting & Environmental Control
• Future of Grow — Advanced LED lighting technology
https://www.futureofgrow.com/
DISCOUNT CODE: DOG20
• Lumiflora — Under-canopy LED lighting
https://lumiflorade.com/
• TrollMaster — Environmental controllers and automation gear (past collaboration)
⸻
Genetics
• Zamnesia Seeds — Genetics used in this project
https://www.zamnesia.com/
⸻
🌱 Soil, Substrates, Boosters & Root Support
• Plagron — Substrates, bio mixes, and supportive products
https://plagron.com/en/
⸻
🎒 Storage, Curing & Preservation
• Grove Bags — Curing and storage solutions
https://grovebags.com/
⸻
📸 Photography Equipment & Tools
(Not sponsors, but part of my creative toolkit)
• Sony A6700
• Sony full-frame macro lens + few more
• Stacking photography workflow - learning
• iPhone (for behind-the-scenes shots)
As always, this is shared for educational purposes, aiming to spread understanding and appreciation for this plant. Let’s celebrate it responsibly and continue to learn and grow together.
With true love comes happiness. Always believe in yourself, and always do things expecting nothing and with an open heart. Be a giver, and the universe will give back in ways you could never imagine.
💚 Growers love to all 💚
📸 P.S. – The Eye Behind the Lens
All photos in this diary (for now — except for the ones showing the camera, which I took with an iPhone) are taken with a Sony A6700 paired with a Sony full-frame macro lens and a few more.
Photography is part of the story — it’s how we share the fine textures, the glow, and the quiet details that words can’t always capture.
I’ve also started experimenting with photo stacking — a technique where multiple images, each taken at a slightly different focus point, are layered together to create one perfectly sharp image from front to back.
It’s not digital enhancement or AI; it’s pure photography — a way to reveal the plant’s beauty in microscopic depth, from trichome to petal.
You’ll even see a few shots of "ghost me" capturing the shots — camera, lens, setup — because every grow deserves not just to be cultivated, but documented like art.
FOR DISCOUNT CODES AND MORE JUST FOLLOW THE LINK https://website.beacons.ai/dogdoctorofficial
NEW DISCORD - Official Server Invite Link : https://discord.gg/ksjAkA5T74

Likes
41
Share


@Fatnastyz
Follow
Week 2 of flower
12-5
She is growing nicely. She got a good dose of microbes yesterday.
2k ml she got cal/mag 5ml per gal, Drops 1ml, dusting of yucca, Kelp 1/16th tsp, EM 1 1 ounce per gallon and 1/2 tsp recharge.
Top dress is soon. She will only get water x2 waterings.
12-7
2.5 liters plain water ph 6.2 removed any leaf pointing inwards. Fully watered love it. Doing great.
Hope not to touch a leaf for a week. Fat chance, but heres for hoping 🤞
12-10
Removed some leafs
12-11
Looks like water tomorrow.

Likes
17
Share


@eldruida_lamota
Follow
Que hay familia, actualizo la segunda semana de floración de estas Runtz F1 automáticas de Zamnesia.
Vemos que las 5 están en perfectas condiciones, tienen un buen color y van creciendo a buen ritmo.
Empezaron a brotar flores hembra, ya estamos en floración.
Empiezo por supuesto abonando una pequeña cantidad de la gama Agrobeta.
La temperatura está 25 grados y la humedad anda entorno al 50%. Riego cada 48 horas.
Hasta aquí es todo estas próximas semanas veremos cómo van avanzando.
Agrobeta:
https://www.agrobeta.com/agrobetatiendaonline/36-abonos-canamo
Mars hydro:
Code discount: EL420
https://www.mars-hydro.com/
Os comento que tengo un descuento y para que compréis en la web de Zamnesia de un 20%, el código es ZAMMIGD2023
The discount 20% and the code is ZAMMIGD2023
https://www.zamnesia.com/
Hasta aquí es todo, buenos humos 💨💨💨
Likes
3
Share


@Kern420
Follow
Woche über haben sich die Blüten weiter entwickelt. Die Trichome wurden mehr und man fängt an erste Terpene zu riechen.
Wir haben Donnerstag (BT 2) stark entlaubt und schauen jetzt wie die Pflanzen wachsen.
Papaya entwickelt die dicksten Buds bisher und allgemein ist sie der OG G.O.A.T
Likes
19
Share


@EmeraldLakeCannabis
Follow
It's been a wonderful week despite a handful of deficiencies mainly affecting the UKBS varieties. UKBS 2 seems to be getting hit with a phosphorus deficiency; which fingers crossed will be solved next watering. UKBS 2 had some PH issues which led to multiple deficiencies, those seem to have been remedied at this time as no further symptoms are appearing.
I really want the weather to get nice already, the tent is turning into an absolute jungle and I need to clear some space. I'm quite glad I've never tried to flower 4 plants in a 2x4.
4/3/2021- Did some bending and twisting, as well as a bit of defoliation with UKBS 2, to make it branch outwards slightly as well as lighten up on how much shade it's creating in the tent.
4/5/2021 - Some kind of cal/mag issues are cropping up on UKBS 1 and Carl 1, looking to resolve those ASAP.
Likes
27
Share


@adam_pawloski87
Follow
Over all was an amazing grow, super sticky dense nugs with smell of berries, highly recommended for everyone!!
Likes
19
Share


@1juan420
Follow
All pictures are taken on day 22
We still have pretty cold nights here but she is doing great
Neither windy days nor some insects trying to eat her leaves are gonna stop her
Likes
3
Share


@Rko41
Follow
Engraissage pour fonky monk et Time loop , rinçage et flush pour ice pie et enchantress


Likes
61
Share


@MadeInGermany
Follow
Everything is going great.
They have been growing very strongly for 2 days.
The roots literally explode. the 4 girls were sorted out and will stay :-) tomorrow I will top them for the first time.
Next week comes the update :-) happy growth everyone
