


Likes
2
Share


@InsideAz
Follow
What an amazing plant, was really a pain for me because it had weak branches and my lack of knowledge on this plants structure showed throughout the grow.
Despite my shortcomings this plant did outstanding, I think it is the best Marijuana I’ve grown alongside the Lovers Moon and Nana plants
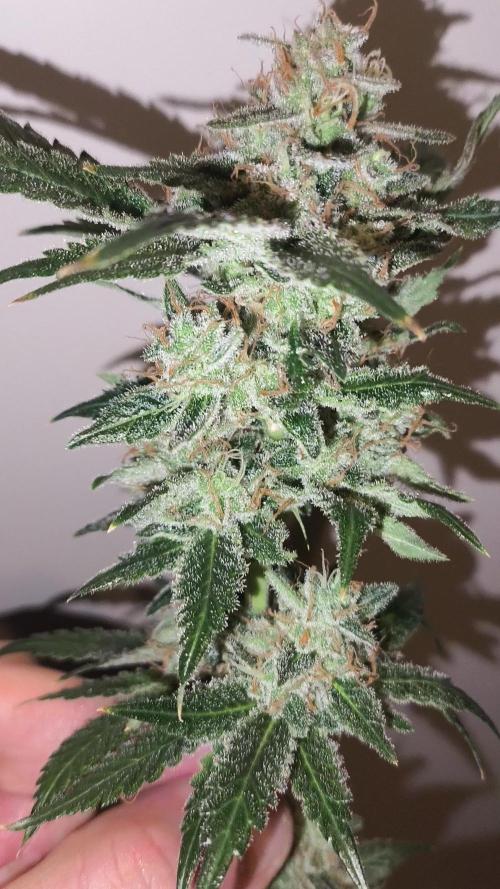
Dipping into the stash 1 month into cure and it tastes amazing. Not harsh at all, smells of a powerfully dank herbally pine with hints of pepper in the aftertaste. 1-2 months more of cure and this plant will be at its peak she’s only getting started. I’ll still be dipping into the stash whenever I please at this point.
Been putting alot of effort into my cure and keeping my jars fresh and below 58% rh
My goal is 50-55. Have tried higher humidities in the past and had complaints or problems with the smell short and long term. So far the 50’s humidity has been doing well and you can tell the closer to 50 they get the better they smell. With time.
I will try to upload edited pictures of the buds to make them closer to what I see with the naked eyee
If you read all that I really appreciate your interest and know that photos are hard to take of frosty bud (: 🌞
Likes
6
Share


@Elguacho420
Follow
Buenas a tod@s!, bueno novena semana de flora de estás tropicanna poison, seguramente ante última o última semana, les falta nada... La plata está hermosa, más allá de sus hojas marchitas tiene unos frutos super pretos, compactos, pesados y mucha resina... Tanbien ultima semana de nutientes. Aclarando q es mi segundo armario, y sigo teniendo algunos problemas q mejorar, siempre trabajando humildemente, planta humilde y muy hermosas, no tengo experiencia, escucho todas las opiniones, pero eso no me define, me encantan mis plantas y cada día trabajando para q sean mejor.. falta muy poco... Un saludo y buenos humos para tod@s!!! 💨💨🔥😎⚕️💪🏻
🇦🇷🤝🏻🇪🇦

Likes
1
Share


@Goldstay87
Follow
3rd jan 2025
The seeds arrived
I right away let it sit in a glass of purified water over night while prepare a soil
4th jan 2025
Put seed in a cup of pre-mixed soil
6th jan 2025
Clearly Germination visible on both
At this moment i do not have any gear even a tent or proper grow light and nutrients solution. only with 80w 169led 15*15cm led grow light so i let them grow in a diy modded grow box and purified water

Likes
3
Share

@Liquido
Follow
Prima raccolta della mia vita, molto soddisfatto, dopo una settimana in flush ho deciso di tagliare in quanto i tricomi stavano diventando ambrati, dopo questo ciclo sicuramente ho capito l'importanza del Lollipoping e sicuramente al prossimo saprò come valutare la gestione


Likes
25
Share


@Sators
Follow
Hi folks.
Day 29 does again topping for two previous topped branches. Same nutrients.
Day 32 does some bottom leaves trimmed.
Day 35 does set up net and watering with 2L nutrients mix.

Likes
12
Share


@BlaKX
Follow
Ai Gude Growmies,
Alter Tobi (NL auto)🧓🏼🌌:
5.6= 21cm 8.6=29cm +8cm
Canna Terra Vega
Gorilla Punch Auto 🦍👊🏻🚗:
5.6= 20,5cm 8.6= 25cm +4,5 cm
Canna Terra Flores / Canna Boost
Mimosa Cake Auto🍹🍰🚗:
5.6= 23cm 8.6= 30cm +7cm
Canna Terra Vega
Habe mich gegen das Toppen entschieden da es noch mehr Stress bedeuten würde und ich beim ersten mal Autoflower Genetik
lieber auf Nummer sicher gehen wollte da.
Endlich bin ich auch wieder im Wochen takt das es immer Sonntags die neue Woche hochladen kann.
Fangen wir beim Alten Tobi an dem Sorgenkind nachdem Blatt Schaden fing er an sehr gezackte und verformte Blätter zu entwickeln. Natürlich ist der Punkt das die Erde am anfang zu trocken war und ich tauchen musste um die Erde richtig zu wässern. Denke der ganze Stress ist daran schuld und ein Teil die Genetik weil die anderen 2 haben sich wie ich empfinde gut entwickelt. Oder meint ihr die Pilze wo im Topf wachsen haben damit was zu tun was ich mir nicht vorstellen kann oder ?
Die GPA wächst sehr gut in die Breite und entwickelt massive stabile Seitentriebe. Sie ist den anderen geschätzte 5-7 Tage voraus. Hatte gehofft das sie mehr in die Höhe schießt da die anderen ihr 5cm voraus sind. Werde wahrscheinlich einfach sie. Höher setzen das sie mit den anderen gleich hoch ist. Sie hat als einzige schon Blüte Dünger und Booster bekommen vor 2 Tagen seitdem explodiert sie förmlich🤯
Zu guter letzt die MCA sie hat die trocken und wässer Phase gut überstanden. Leider hätte ich den Vega Dünger nicht erhöhen müssen da sie jetzt leichte Adlerkrallen hat. Ansonsten habe ich sie nur entlaubt da für LST die Triebe noch wachsen müssen und sie ist nicht so Dicht verzweigt ist denke ich geht es ohne solange an alle Triebe ausreichend Licht fällt.
Da ab jetzt bei allen definitiv die Blüte beginnt habe ich vor 2 tagen die ADlite Red-55 (660nm Deep Red 55w) zugeschaltet und die Haupt-Lampe von 60% (400w) auf 80% (520w) geschaltet da es endlich die Temperaturen wieder zu lassen.
Die 2 anderen Pflanzen sind Fettkraut Pinguicula spec. "Guatemala" meine natürliche Insekten Falle. Diese Art ist sehr robust und kann auch mit Kalk haltigen Wasser gegossen werden.


Likes
9
Share


@SelfCultivationGrower
Follow
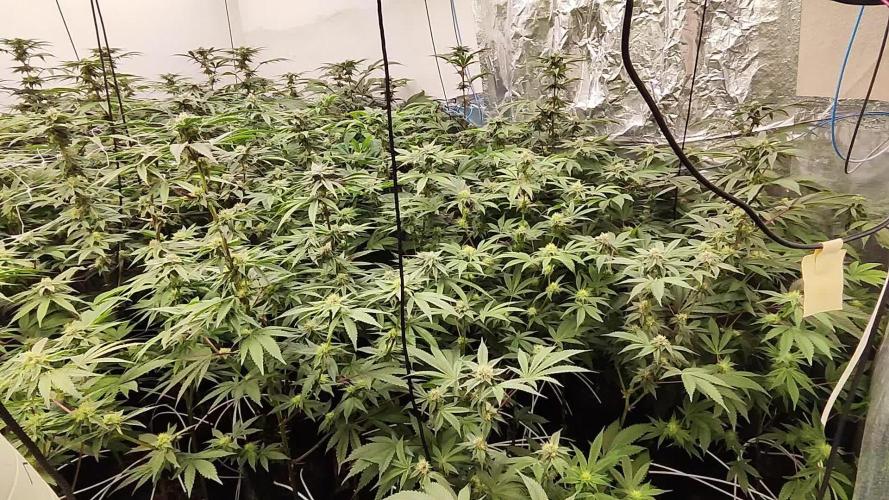
Full flowering mode😁 early stretch is done but all 3 strains are heavy growing ones. I do defoliation almost everyday but new leafs are comming fester than i can remove them.
Likes
3
Share


@Xico_Beloteiro
Follow
The Strain is a great smoke just price seed but you pay for the quality right, eventhught it could be better as I F*@&^ things up with the soil

Likes
3
Share

@PapaTerps
Follow
Holy Snow - Greenhouse Seed Co.
Day 52
🚿 watered twice this week, with 2L of RO tap water, mixed with the defined nutrients, individually, in order and pH'd to 6.3. I've upped her nutrients again, increasing the Grow to promote growth, as well as the BioHeaven and Acti-Vera to help with the plants metabolism and overall health 👌🏻
✂️ She's had a good amount of work performed this week, from a second round of topping, lollipoping and Defoliation as well as this, Ive also altered her low stress training a bit, pulling the outer stems down so the canopy was more even 💪🏻
🌸 This will more than likely be her last week in veg, when space becomes available in the flower tent, she will be moved over to there and will then be on a 12-12 schedule 🙏🏻


Likes
26
Share


@darb35
Follow
Day 7 - little bit of water with Acti+Heaven, will move into the 9L pots in about a week just saving some space outside the tent. (Ph 7)(5 cm)
Day 8 - little bit of water with Acti+Heaven (Ph 6.8)(6 cm)
Day 9 - little bit of water with Acti+Heaven (Ph 6.4)(7 cm)
Day 10 - little bit of water with Acti+Heaven (Ph 7)(7 cm)
Day 11 - little bit of water (Ph 6.4)(8 cm)
Day 12 - little bit of water (Ph 6.4) moved into their 9L final pots, PPFD at 230 (35%)(9 cm)
Day 13 - little bit of water with Acti+Heaven+Grow (Ph 6.4)(9 cm)
Likes
13
Share


@StoneyMelony
Follow
Overview of my grow:
Tent: Secret Jardin DS120 4 x 4 (120 cm by 120 cm)
Lights: 2 x 120 Watt CTlite c4 clusterled
Climat: Trotec Dehumidifyer 240 watt- 10L/24h
Filter: Prima Klima carbon filter PK2600
fan: 2 x Secret Jardin 20watt osc. fan
Pots: Gronest 4 x 11 liter airpots
Water : automated water system
PH: bluelab
Nutrients: Plagron cocos A + B
Plagron PK 13/14
ATA cal/mag
Epsom salt
Week 9 She grew again another 15 cm this week instead of fattening up. this was not what i was hoping for. But it is a amazing cherry tree and she is different then all the other autos i did before, There is a very nice smell, also very different so we'll she but she is taking her time compared to the others.

Likes
3
Share

@CheeRz
Follow
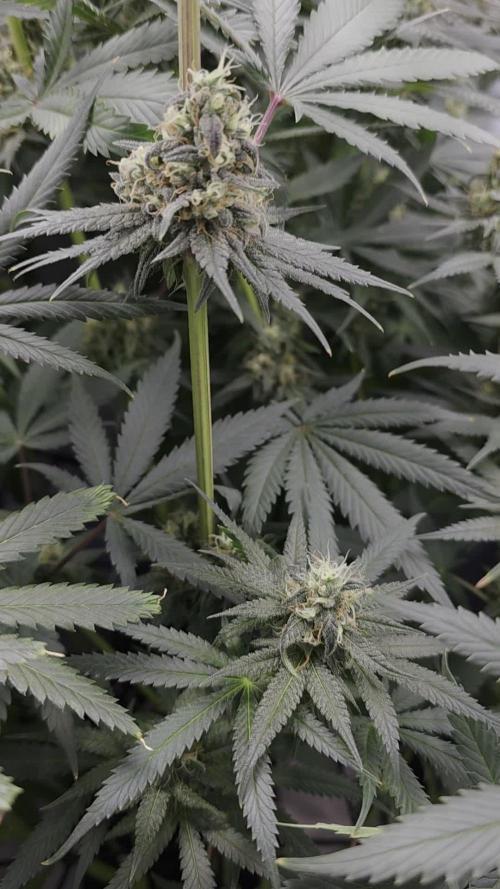
FLOWER WEEK 8: Late Bloom Ripening & Heavy Stacking | AK-47 XL
🌿 FLOWERING PROGRESS
We have advanced into Week 8 of the flowering phase, and the AK-47 XL is deep in her final ripening stage. The plant has successfully navigated the peak of the summer heat and is now putting all of its remaining energy into swelling and resin production.
The colas across the Scrog net have become remarkably thick and heavy, showing massive structural density. The trichome coverage has expanded even further, giving the entire canopy a frosty, glistening silver appearance under the lights. Pistils are increasingly turning amber-orange as the buds mature and harden into solid chunks. The overall health of the canopy remains strong, successfully utilizing the maxed-out nutrient profile to fill out every single top above the screen. 📈
💧 NUTRIENT FEEDING & WATERING
The plant is keeping up a high metabolic pace, effectively absorbing the heavy nutrient doses to maximize the final weight and compact structure of the buds.
Current Feeding Schedule (per Liter):
Bio-Bloom: 4.0 ml/l
Top-Max: 4.0 ml/l
Bio-Grow: 1.0 ml/l
Bio-Heaven: 5.0 ml/l
Acti-Vera: 5.0 ml/l
Calmag: 1.0 ml/l
Parameters (Weekly Averages):
pH: 6.3
Relative Humidity (RH): 58.9% (Good, dropping trend to secure the dense buds)
Temperature: 27.8°C
VPD: 1.54 kPa (Perfect sweet spot for late-stage ripening and metabolic drive)
CO2: 565 ppm
💭 GROWER'S NOTE
👀 Status Report: The environment is looking great for late bloom. Having the weekly average humidity at 58.9% with a steady VPD of 1.54 kPa provides the plant with the exact transpiration drive it needs to pack on weight without stressing the tissue. The maximum feeding of Bio-Heaven and Acti-Vera at 5.0 ml/l each has done wonders to keep the plant vibrant and active through these final weeks. The aroma is incredibly strong and pungent now. We are approaching the finish line, and she looks absolutely legendary! 🚀l km

Likes
3
Share


@Unculti_responsable
Follow
Esta semana hicimos la última poda de bajos y alicales , es una de las últimas podas q hacemos! Después de esto la vamos a pasas a 10 litros y ya la mandamos a florecer creo q esta más q lista para arrancar el proceso de floración

Likes
43
Share


@GODSGIFT_2005_JM
Follow
📸 some macro shots
🍼Greenhouse Feeding BioGrow & Bio Enhancer
⛺️MARSHYDRO
The ⛺️ has a small door 🚪 on the sides which is useful for mid section groom room work. 🤩
☀️ MARSHYDRO FC 3000 LED 300W
☀️Also special thanks to VIPERSPECTRA P2000 (200W) & XS2000(240w) LED growlights
🌱 FastBuds 420
Likes
40
Share


@MrJones
Follow
47th Parallel Crowly's Comet
🔹⊱╮🔹╰⊰🔹 GROW Started 03.10.24 INFORMATION 🔹╰⊰´🔹⊱╮🔹
🌞Environment - Maintaining 80F and 65%Humidity
🌾Training - Nothing this week just letting the seedlings veg out.
⚱️2-Gallon 📊6.2 PH
💧 Feeding - Using Horti Grow 8-11-21, Bloom 5-15-26, Late Bloom 0-24-26, Cal 12-0-0
🌞Medic Grow Smart 8 760 Watts
🕷️ IPM - CannControl from Mammoth and Mosquito Bits as needed
🔹⊱╮🔹╰⊰🔹 PLANT UPDATES 🔹╰⊰´🔹⊱╮🔹
📝 Notes - These girls have completely transformed into their new buckets and have started to drink up, increasing the amount of fertigation, (Nutrients and H20), and defoliation to expose the lower growth.
🗓️03.29.24 Maintaining Temps and Humidity - Plants are Looking Great!
🗓️03.30.24 Today fed with Hort-Grow @ 3.3 GRMS Per Gal, and Horti-Cal @ 2.5 GRMS Per Gal. I defoliated the plants to water them better and the middle growth could get more light and develop.
🗓️03.31.24 Maintaining Temps and Humidity
🗓️04.01.24 Today fed with Hort-Grow @ 3.3 GRMS Per Gal, and Horti-Cal @ 2.5 GRMS Per Gal. Check out the amazing growth and recovery after the defoliation!
🗓️04.02.24 Maintaining Temps and Humidity, watching these ladies are just nailing the veg phase.
🗓️04.03.24 Today fed with Hort-Grow @ 3.3 GRMS Per Gal, and Horti-Cal @ 2.5 GRMS Per Gal
🗓️04.04.24 Maintaining Temps and Humidity, closing out week 2 of veg and these ladies will need to be defoliated again, this new nutrient line from Greenpnaet is killing it, and so easy to use!
╰⊰🔹╰⊰´🔹⊱╮🔹╰⊰🔹╰⊰🔹STRAIN INFORMATION🔹⊱╮🔹╰⊰🔹╰⊰🔹╰⊰🔹⊱╮
Crowley's Comet / https://www.47thgenetics.com/product-page/crowley-s-comet-10-fem-birdseeds
It's everyone's favorite piece of space rock, Crowley's Comet! The culmination of reversing our Matterhorn cut off Mr. Crowley to Intergalactic Runtz, and the results were out of this world (I had to do it). These ladies were slow to start, but once they hit their stride they put any worries we had to rest. Compact, short-framed, and robust. They pack beautifully boulder-like flowers that reek of garlic and sickly sweet cotton candy. Dark green to a mosaic of purples, yellows, and silvers. Frost production is off the charts, the internode spacing is tight, and they certainly will impress in their last few weeks of flower. This is one of our favorite crosses in the new fem lineup. If you're looking for your hype fix, here you go.
Yield: Heavy to XL
Flower Time: 63 days
Feeding Schedule: Heavy
Likes
45
Share


@masterofsmeagol
Follow
LAST WATER 6/4
6/5 The sun has been relentless and has caused some bleaching and burns on some older leaves. It seems that the gmos ate having the hardest time (except one). It's been extremely hot though. It's overcast and we are supposed to have thunderstorms and a few more mild days. Plants loved tje water yesterday. I hope it does rain. Plants are growing and seem to be surviving. Burns are on old growth. If I notice more I'll put my back tarp up which will block the sun in the afternoon and put them in shade. I wish I had done that earlier. Oh well. With what these girls have encountered and overcome I think I'll be OK.
EDIT: IT WAS IN THE 80'S TODAY. PROBABLY HIT 90. I HAD TO GET MY CAR INSPECTED AND WAS GONE EXPECTING IN THE MORNING THAT THE THUNDERSTORMS WOUKD START. INSTEAD WE HAD A VICIOUSLY SUNNY HOT DAY UNTIL 4PM. AT 4PM SHIT HIT THE FAN AND IT RAINED SO HARD I WAS UNABLE TO DRIVE. I LIVE IN MAINE SO I KNOW HOW TO DRIVE IN INCLIMENT WEATHER. THIS WAS ANSOLUTE ZERO VISABILITY. I WANTED TO PUT A TARP UP TO SHIELD THE GIRLS FROM THE SUN BUT I WASNT ABLE TOO. WHEN I GOT TO THE GROW RIGHT BEFORE THE STORM IT HAD RAINED A LITTLE AND IT SMELLED SO GOOD. LIKE SOIL. I THINK THIS DOWNPOUR WILL REALLY HELP THE GIRLS. ONLY TIME WILL TELL.
6/6 Plants faired ok through the storm. The 3 earliest transplants and what WERE the nicest looking gmos are getting some burns and bleaching. It's all on old leaves though. I think they're pulling out of it and will grow through it. Some plants seem to not be stressed at all. With tje elements being the way they have I'm suprised they aren't far worse. I was going to put up my back tarp to block sunlight later in the day but I didn't. The burns are on the other sides of the plants and it's supposed to be overcast with showers for a full day. It's clear right now but the new growth and tops of the plants seem fine now. When I got there a few were limp. As soon as the sun came up though they all perked back up. Only time will tell.
6/7 Showers today. It's good to have a break from that horrific 80-90 degree weather with 90% rh isn't run for me or the plants. Plants are recovering from the burns quite nicely. Obviously the burnt leaves won't repair but they did a good job of shielding some of the others. Things are going.
6/8 Still overcast with showers. I removedc a couple burnt fan leavesxand accidently ripped off a bud site.
6/9 Another overcast day. Rained last night. Soil is saturated from all the rain we've gotten. Plants seem to be settling in nicely. The 3 GMOs that WERE the best looking plants are the ones in the worst shape. The got transplanted a day earlier in a lot of sun and wind. They're coming back though. I've noticed that after it rains and they get even a little sun they grow significantly. Those event horizons are tough. The toasted toffy is a reveg but it looks like its going to be a huge plant. I have the 3 seedlings still in small pots. I'll transplant them soon.
6/10 Overcast and a chance of showers. I removed a few bleached fan leaves on a few of my GMO'S that strain took the most damage. They are bouncing back though. We've had a few dayscof rain and milder weather. Few more days with a chance of showers then back to the sunny days. Plants seem to have come out of shock and out grown the light burn. After the rain, when the sun comes out they grow a noticeable amount. Things are still going fairly well.
6/11 Rained and I didn't do
