


Likes
Comments
Share


@GeminiCQC
Follow
Can't wait for each of them to finish out. Giving them hopefully their full amount of water, less with the auto as it was stunted by the 12/12.

Likes
4
Share


@Midge
Follow
Much better harvest to end this first greenhouse grow. 48g dry on this plant. Still quite airy, but resinous and great smell. More relaxed effect than harvest 1.
I could have done with another week or two with her, but the humidity was regularly into the 90s, there was very little sun and nearby tomato plants were starting to grow mold. I cut and ran, I need these meds to get me through the winter.
Final total for both plants 59g. With a bit of luck, this should keep me medicated for a while. Indications are good.

Likes
17
Share


@DOOBS_N_BREWS
Follow
Moby Dick XXL Overview-
Growth ~ *Grown under a spider farmer sf2000 only in a 4x4 tent*
Initial Veg period was 5 weeks. I did not top her and I performed very minimal LST/ defoliation. I started her right of the bat with the microbials (Mammoth P/ Recharge) and then later added my NFTG feed int week 4. She really started to explode in growth in week 4/5. I honestly did not notice one yellow leaf up until the very end when I started to flush her. This strain is very very tolerant I would say and grows HUGE. I started seeing signs of flowering in week 6 and it was history from there! She exploded with even more growth nearly doubling its size in flower (3.5 ft to be exact) and she grew many massive colas slammed with milky trichomes and dank smells! Buds grow long and slender as opposed to small/dense like golf balls.
Nutrients ~
She was potted into a 6-gal fabric airpot w/ M3 soil. Like I do with most my plants I started her slowly with just microbial feeds (w/Mammoth P and Recharge) and I did not start using my main nutrient line (Nectar for The Gods) until week 4. I really like using a foliar spray to feed also. I kept a simple feed schedule with this one and it worked out really well. I try to follow this schedule (Shown below) as close to possible with some obvious interruptions to it here and there.
Microbe tea /VEG ONLY*foliar spray
No Water
Feed /VEG ONLY*foliar spray
Microbe tea
No Water /VEG ONLY*foliar spray
No Water or Flush (every two weeks)
Aroma/Taste ~
One of my favorite parts about this plant was its aroma. Very pine like but sharp and unique . Its described an exotic wood smell and I definitely get that. Its so refreshing and earthy it’s a VERY nice change of pace from the fruitier strains. You do get a slight citrusy smell but the pine/ wood smell is really the overpowering smell. It is by far the smelliest auto I have ever grown so I really really respect how well of a job Dinafem did on these genetics. They obviously didn’t just focus on the size of the plant! She has a nice smooth flavor that is earthy and sharp . The wood flavors linger a bit which is very nice!
Effects~
Almost instantly felt it in my head. Blessed with a euphoric feeling of calmness and almost a numbness to reality. I felt it for sure and it was very potent. 1 joint had me feeling it very hard and th high lasted what felt like an hour or so which is not the case for me usually! Its attributed to the sativa dominance this plant has. Im so used to growing hybrids or indica dom plants I almost forgot what sativa highs felt like! Thanks Moby Dick XXl for slapping me in the face and reminding me!!
Overall thoughts~
This plant is really easy to grow, and she stays true to her name and grows massive. This strain should be tried by any auto lover 100% I think Dinafem nailed this strain all across the board. Was pleasantly surprised with how tolerant to nutrients/ light she is. I had the light closer than suggested most her flowering and she didn’t stress at all. I cant really come up with a negative thing to say about this plant, maybe the buds are airy but that’s because she is very sativa dominant it was a bastard to trim her for sure.
Drying/ Curing method~
-Dried for 11 days in a low humidity environment/ completely dark area with good airflow. Hung her as an entire plant with all the leaves still on her.
-Dry trimmed her (very hard strain to trim)
-Put right into mason jars and sealed shut for 3 days then began burping her (I am not using boveda ***)
-Burped twice a day for 2 weeks straight and maintained 60-62 humidity.
-Slowed down burping to once a night the third week .

Likes
7
Share


@MadeInGermany
Follow
Hey everyone 😃.
We arrived last week and everything is going according to plan 👍.
It has now had enough time to use up its nutrients and will be in the darkroom for the next 2-3 days before it is harvested 👌.
The trichomes are 70% Milky and 30% amber 👍.
As always, a detailed harvest update will follow before the last update 👍.
Until then, I wish you all the best, stay healthy and let it grow 🍀
You can buy this Strain at
https://thecaliconnection.com/original-sour-diesel.html
You can buy this Nutrients at
https://greenbuzzliquids.com/
Type:
Original Sour Diesel ( Clone )
☝️🏼
Genetics:
Fem seeds- Original Sour Diesel to Original Sour Diesel BX3 RVSD Male
Reg seeds- Original Sour Diesel x Original Sour Diesel BX3 Male
👍
Vega lamp:
2 x Todogrow Led
Quantum Board 100 W
💡
Bloom Lamp :
2 x Todogrow Led
Cxb 3590 COB 3500 K 205W
💡💡☝️🏼
Soil :
Canna Coco Professional +
☝️🏼
Fertilizer:
Green Buzz Liquids :
Organic Grow Liquid
Organic Bloom Liquid
Organic more PK
More Roots
Fast Buds
Humic Acid Plus
Growzyme Big Fruits
Clean Fruits
Cal / Mag
Organic Ph - Pulver
☝️🏼🌱
Water:
Osmosis water mixed with normal water (24 hours stale that the chlorine evaporates) to 0.2 - 0.4 EC. Add Cal / Mag 2 ml per l water every 2 waterings . Ph with Organic Ph - Pulver to 5.8 .

Likes
3
Share


@MicroHidroGrow
Follow
Bueno, para no perder a nadie, el sistema que manejo es con dos indoors en paralelo. Uno en flora y otro creciendo la madre. A la madre la hago crecer hasta sacarle esquejes. Luego pasan al otro indoor, la madre y los esquejes, y ahí comienza la floración. Y ahí mismo comienza la nueva madre en el indoor pequeño.
La variedad es de un banco argentino que no sé si sigue existiendo. Se llama "kali seeds" y la variedad es superhaze. Que en teoría tiene unas 10 semanas de floración.
Día 01. Puse la planta para obligarme a terminar el prototipo. En este caso decidí usar madera de palets y algunas otras cosas que encontré en la calle. Ya casi termino todo, pero me falta armar los cierres. No voy a hacer puertas, dado que no está centrado, así que uso una tela de microfibra que ayuda a opacar mucho y era
mas barata que el blackout. Ademas es impermeable y me sirve para un nuevo mecanismo de seguridad para fugas que quiero implementar. Es bastante simple, pero me soluciona mucho. Hoy no hay mucho más que mostrar. Cuando lo haya terminado voy a ir mostrando como va quedando.
No me voy a enroscar con los tsp. Voy a poner lo que use aca.
Ahora puse un litro de agua con un poco menos de 1g. de Feeding Grow de Greenhouse. Al menos por ahora, ya que tengo que comprar medidores porque los míos ya no dan confianza.
Día 4. Ya estoy terminando de acomodar el indoor. Lo forré con refractario e instalé las "puertas" que en realidad son telas tipo blackout, pero mucho más finitas. Me falta terminar de ordenar la electricidad para que cada sector tenga su timer. Van a ser 3 timer diferentes. Por un lado van a ir luces y ventilaciones de flora (12hs). Por otro lado bombas de aire, bomba de agua y probablemente vientos de floración (15 min/hr). Y por último luz y ventilación del modulo de madres (18hs).
Hice el cambio del depósito, a uno de 5 litros, ya que los próximos 10 dias pienso intentar mantener la misma solución (mantuve la proporción 1g/L de feeding grow). La planta tuvo un ataque de una plaga que fue a sus primeras hojas. Por suerte en el momento puse tierra de diatomeas y parece haberse detenido. Pero se pueden ver los amarillos en las puntas. No me preocupa, dado que en hidroponia esos problemas se resuelven y la planta se recobra enseguida. Ahora igual habrá que ir monitoreando, dado que me había olvidado de desinfectar el indoor, cosa que hice luego de este ataque. Tengo fé que llegando al mes y medio de crecimiento, ya esté en condiciones de cortar unos esquejes.
Día 07. Por el momento el crecimiento viene rápido cómo suele ser en hidroponia. En unos días le voy a estar haciendo el corte apical. La ansiedad me viene ganando, pero sigo con fé. Esta semana tengo que comprar un par de aditivos y medidores que me están faltando. Pero ya está todo encaminado.
Likes
3
Share


@FordWenty
Follow
Super happy with how things are going for a first grow. I did some LST and regularly bend fan leaves to expose more areas to light. Feeding only water with a tiny bit of liquid fertilizer.

Likes
62
Share


@Santica_Garden
Follow
............................................... ............................................. ............................................ ............................................

Likes
2
Share

@PapaTerps
Follow
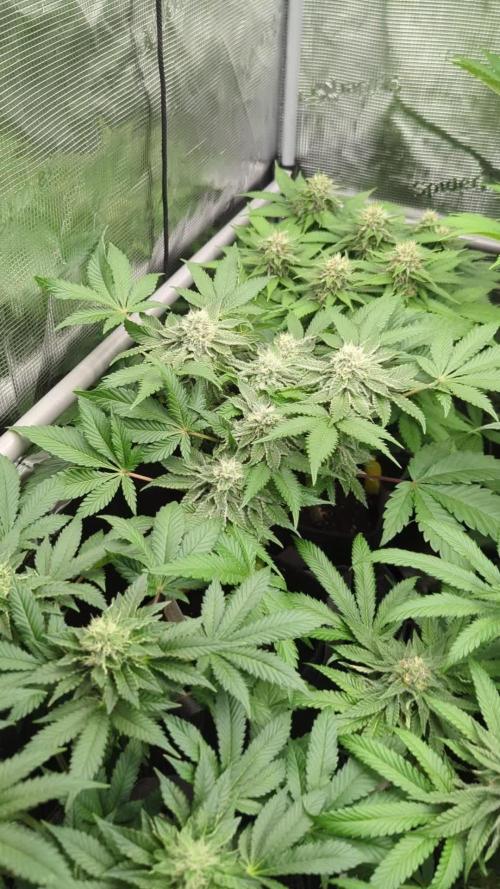
Sugar Rock - Silent Seeds ft. Cookies
Week 5 Bloom
🌸 She has bulked a good amount, but her trichome development has been impressive, she's super frosty and her fragrance has exploded too!! She smells just like candy heavy cereal milk - so she's definitely leaning more into her Cookies heritage! Temperatures, as we all know, have been crazy this year - it's still in the high 20s here, so it has been difficult managing the VPD in the tent; but the girls seem to be doing just fine ( I'm expecting the % to not be amazing; which is okay for me ) - but other than that, every is going great!
✂️ I've removed some of her flower budsites and fan leaves that were just too far behind, and I've removed a couple of her sugar leaves to improve light penetration to the top budsites.
💧 Watered every three days with 3L of RO water - nutrients were mixed individually, in order and then finally pH'd to 6.3. I've altered her nutrients to meet her demains for week 5-6 of bloom 👌🏻
💡 PPFD: ~900
♒ VPD: 1.58kPa
🌱 Days from seed: 68
🌸 Days in Bloom: 40
Likes
25
Share


@Brebzzz
Follow
I top one to see What happened, i gave her 8 liter per week to respect the cycle dry/wet hôpe all its good
4/12 end of the 4 week
Begin of a good and weak smel

Likes
9
Share


@MOSS_FIGURE
Follow
This week i flushing a plant 7-10days and use ice burn then close a light before hardvest 2days


Likes
3
Share


@LAShugars
Follow
Total dry weight is 3.5 ounces. Smells amazing!!!! Can not wait for it to be cured. This plant was pretty easy. Did some LST early on seems to have paid off.

Likes
42
Share

@BlaKX
Follow
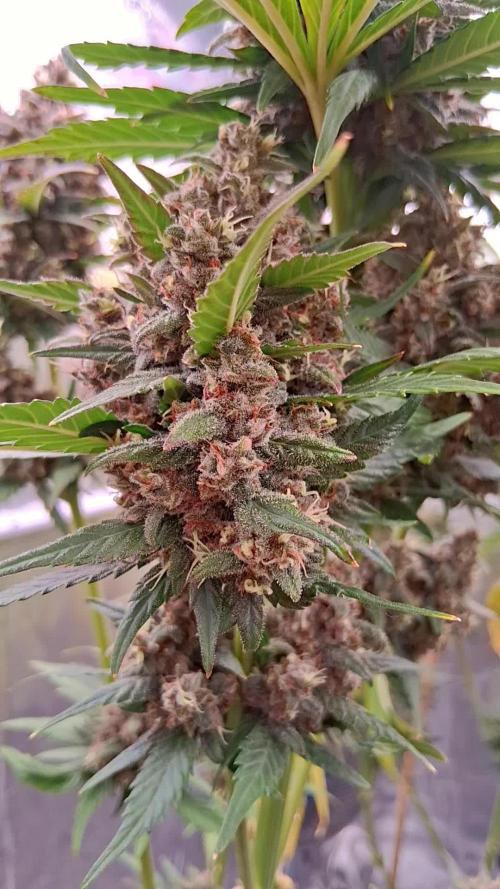
High Growmies und Willkommen zur 9 Woche mit 3 Tagen Verspätung ,
Diese Farben und Ausmaße der Blüten von der BPP rf3 setzt Maßstäbe!
Durch des reduzieren vom Blüten Dünger und erhöhen vom BOOST hat sie in den 10 Tagen seit dem letzten Update wunderschön angefangen zu Herbstln und ihre Reserven angefangen zu verarbeiten.
Leider ist durch des Foxtailing schwierig mit dem Mikroskop Bilder von den Trichomen zu machen wo man die Reifen sieht statt die neuen glasige.
Ansonsten ist sie bis zum Wochenende Ernte reif!


Processing
Likes
9
Share


@TheWeedPimp
Follow
The 2 out in the bush growing really tall
Doing topping on one of them
Been a week full of sun... next couple of days lots of rain.. and then lots of sun! Can’t wait to see them grow taller and taller 😍


Likes
53
Share


@Grow_for_Happiness
Follow
Was another good week, had mostly sun and only two days of rain, one of them being today. No vertical growth again this week but she is really filling in. Back on nutrients 3 days a week but cut water back to 6L in morning and an extra 4L in afternoon (only when very hot and soil dries faster).
Did a good defoliation on day 2 of the week, removed any branches growing inwards and cleaned up all around. No shock next day and by end of week almost filled back in again. Will give it time to grow through net but for sure 1-2 more defoliation in the future. Gotta keep good airflow through the middle to avoid problems down the road.
So originally I had planned on just using the garden stakes, but that's just not going to cut it so McGivered a good support system. 2x2x12 screwed into the corners of the skids (fit perfectly in existing holes) and horizontal supports to strengthen it up. Netting around and two rows up near the top. Ready to take on the weight that this girl is going to put on.
I would think that should start flower in next week? 🤞 end of July but they're still getting 12hours direct sun + 3-4 hours a day of sun filtered through tree canopy. If she don't start soon it's gonna be a late finish!

Likes
47
Share


@Wicked_Stix
Follow
I had to kill one of my photoperiod plants because it was hermie so I decided to move the FBTO1 and FBTO13 into the room with them since I had space in there. So now they are on 12 hour light and they seem to be much happier with the environment. This will be my first time flowering autos on 12 hours so curious to see how they do.
Nutrients per gallon
.5 tsp maxigro
.25 tsp armor si
.25 tsp calimagic
.1 tsp 90/10 humic/fulvic acid


Likes
Comments
Share

@Chubbs
Follow
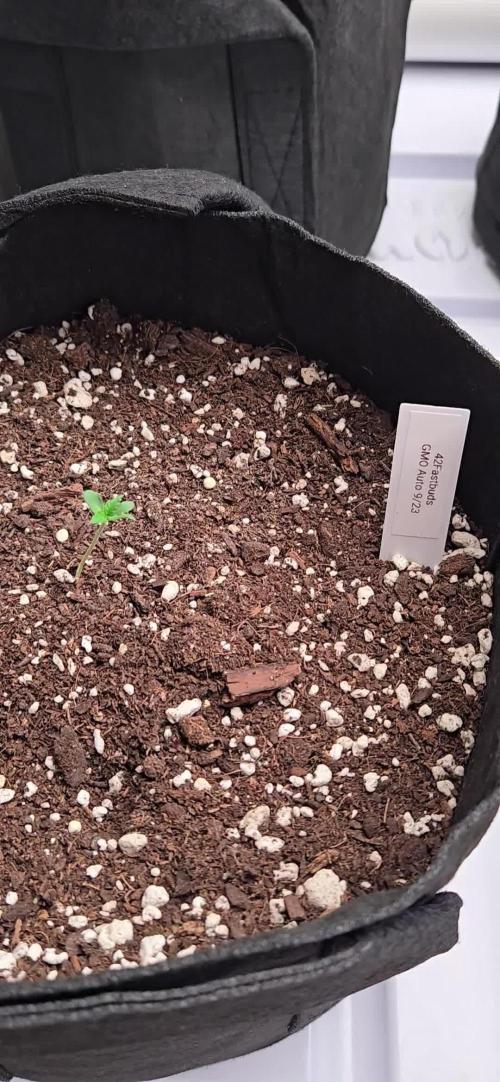
What up fam, so glad to hear back as it's taken me 7 weeks to complete my grow room build and start a new batch of Fastbuds Autos. I'm so happy to start the new room with GMO Auto so I decided to run it on my big tray 4ftx16ft. Still running the same brand of soil RootsOrganics707 but this will be a first on tables. I also got new lights that are definitely more watts but hooked/daisy chained to a controller. All in all Happy Growing.
Processing
Likes
11
Share


@PowerofNature96
Follow
To germinate the seeds I put them in hot water for 12 hours, I put them in a dish with slightly damp paper and closed it with the film. The seeds are germinated in 48 hours. At this point I put the seeds in plastic cups previously drilled and filled with a mix of ground professional plus 30%, coco professional plus 69% and mychorrhize 1%, at a depth of 3 cm. Then I watered with 5 ml of distilled water with rhizotonic and NPK + micro elements 20-10-10 ph: 6.0 and c: 0.5. After 3 days the little ones came out. At 7 days from the seed the young plants exhibit an incredible vigor and an already thick and strong root system.
