The Grow Awards 2026 🏆 


Likes
Comments
Share
@Alpinefarmer
Follow
Ciao a tutti,
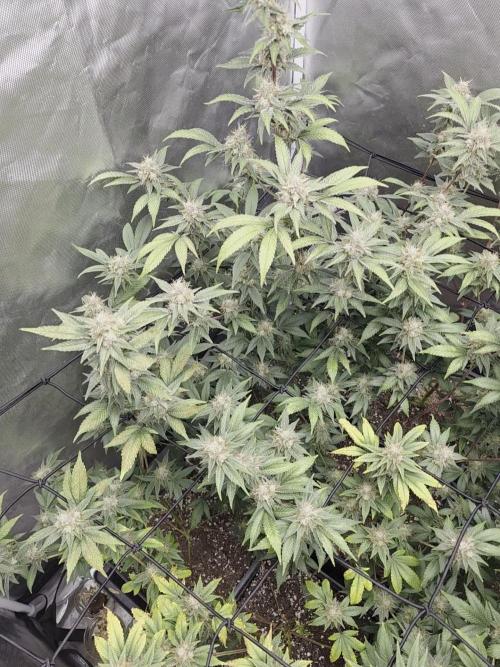
eccoci di nuovo, sono passati 8 giorni dall'ultimo aggiornamento.
oggi siamo arrivati al giorno 40 di fioritura, i fiori sono raddoppiati di dimensioni e sono gia duri come delle pepite che si riempiono di resina giorno dopo giorno aromatizzando tutto il locale di agrumi.
Negli scorsi giorni ho avuto un problema di sovrafertilizzazione, dopo una mia prima analisi penso sia un accumulo di nutrienti immobili contenuti nei concimi AN che ho aggiunto alla mia solita fertilizzazione dato che volevo azzardare e vedere se ci fossero dei miglioramenti.
Era dall'ultimo post che le piante iniziavano a mostrare segni di una concimazione troppo sostenuta, nella vasca l'EC era 2.4 e a partire dal giorno 35 dopo ogni 24 ore avevo un aumento dell'EC di 0.3-0.4, cosa che regolavo aggiungendo acqua riportandolo ad un valore di 2.4 e aumentando il PH a 6 per vedere se le piante riuscissero a metabolizzare meglio i nutrienti in eccesso, pensando che le piante lo avessero sopportato dato che le conoscevo e sapevo che potevano mangiare tanto tanto. ERRORE *****
il giorno 39 sono intervenuto cambiando la vasca e mettendo solo acqua con PH=5.8 che cambierò giornalmente almeno fino al giorno 41. quando poi tornero ad aggiungere i concimi ma ad una dose inferiore.
per il momento posso dire che l'aggiunta dei concimi AN non ha avuto gli effetti desiderati sulla dimensione dei fiori. Quantità e qualità della resina e dei suoi terpeni non posso notare alcuna differenza dato che attualmente le temperature sono relativamente basse e preservano bene tutti i terpeni motivo a cui attribuisco il loro grande profumo che come detto è inebrianti, adoro chiudere gli occhi e annusare le cime PURA AROMATERPIA :P
Vi direi addirittura per il momento di aver esagerato con i prodotti e ho pure speso soldi inutilmente creandomi un problema di concimazione

Likes
10
Share
@WeedleyScott
Follow
Wasser rein und wachsen lassen mehr passiert hier gerade nicht mehr.

Likes
9
Share
@Herbz_Unkraut
Follow
another resin monster from seedstockers, with a very special scent, full of flavors! grinded it smelled like peppermint, and vaped it has a great sweet creamy taste!

Likes
22
Share
@BlackHatGenetics
Follow
12/7/2017 - Placed 2 SODK seeds into a shotglass full of water. When they sink they will go into a wet paper towel in a ziplock bag. Once sprouted they go into Root Riot cubes with Mykos packed in the hole where the seed, inside a clone dome just on the floor in the tent. Once they break ground and the root is hanging out the bottom of the root of the cube they will go into their final pots, 5 gallon MaxxYield (maxxyield.com) Super Pots.
soil:
the top half of the pot is Bush Doctor Coco Loco with Mykos mixed in (3 tbsp)
the bottom of the pot is Fox Farm Ocean Forest with Mykos mixed in (3tbsp)
12/9/2017 - The seeds have sprouted and are now in their root riot cubes. Day 1.

Likes
1
Share
@NorthStarCannabis
Follow
She was not getting enough light outside. Given proper light and Sensi-Grow nutrients, she's growing like crazy!! Soon it will be time to start LST.
Likes
30
Share
@GYOweed
Follow
THIS is VLST or Very Low stress training -done neatly.
Am i right.
Transplanted to 3 gal from 1 gal: so it shall get 3 times bigger
am i roit.
Flipped to 12 12 hit low ppm auxin will need to hit it with med ppm cytokinin tomorrow probably for extra cheat codes so i can win the contest fairly.
Am i roit
Likes
20
Share
@m0use
Follow
Ok, so I forgot to take any pics on week two and holiday time week 3 came up real fast. so we are going to skip over any of the week two details. just watered em and they grew.
This week we did a nice little transplant into their final 2gal pots. Fortified with a bunch of amendments and Acti-Sol, everything is listed in the video. Any question just let me know.
I don't age my medium at all and I think I should start doing this to avoid some other things, I just find it hard to do it in winter time indoors as soil can be stinky with amendments and I like it to stay in the tent under the carbon filter.
Medium I used is 40% coir, 30% perlite, 20% compost, 10% vermiculite and 10% worm castings. Then the amendments are added into that at the rate of 30-60ml per 1Gal of medium. This batch has Gaia 4-4-4, Gaia Insect Frass, Giaia Diatomaceous Earth, Gaia Rock Dust, Acti-Sol Seaweed Meal, Acti-Sol Shrimp/Crab Meal, Acti-Sol 4-3-2, Acti-Sol 4-6-8 and Bokashi. Nice little mix, water it in with a bit of magnesium and microbes dissolved into the water. The bokashi should help break everything down and make a bit of a acidic environment for all the meals and rock dust to become available. Roots looked good, not a dense as some runs but still nice. I feel the soil might be a bit hot so will expect some burnage on them hopefully its nothing to crazy. Will ph down with a mix of citric, malic and ascorbic acids. They are in a rate of something like 50-60%/40-30%/5-10%, its written down in my of my notes just can't find the pad ATM.
Also more videos vs anything this week. I like em more but processing them is annoying AF.
Side note, my lights timer was on 12/12 not 16/8 so it explains why they went into bloom, switch it back and will top the plants next week one they start to reverse their ways and get comfortable in the new pots. Also got ride of the chive seed start as it was looking sad, plus I got a bunch of European chive varieties in the mail yesterday and want to try them out. see if they really have any different taste and what ones I like better.
Till next week.


Likes
6
Share
@valiotoro
Follow
Hello everyone 😎
Week 5 of flower for the Cherry CoCo🍒
She is doing very well,growing at fast pace and with a beautiful green colour on the leaves.
For the nutrient 2ml/L terra bloom + 1ml/L power buds🔥
One is ready & and it’s time to flush with Terra Aquatica FlaSSsh Clean

Likes
76
Share
@TheFattyMcCoy
Follow
Hey yall!
Thanks for tuning in this week.
Had a great look under the microscope of my soil, I just ordered a camera for my scope so next week look forward to seeing and identifying some beneficial microbiology!
Another round of compost tea, I added Kiwi 🥝 😋 Fermented Juice, to this round of tea. Also adding food for the bacteria (simple sugars) and for the fungi (complex carbs). I suggest using diverse food for increased biodiversity.
The mycelium network is really established at this point. Which is why I highly recommend to keep reusing your soil, and the larger the pot size the better. I am in 10 gallons for now. Once I move into our house will be into living beds, 100 gallon +
If you can't be in a bed, use 25 gallon. You will benefit in time.
So at this point only using inputs I have made from organically grown plants, mostly grown in house. Anything else was wildcrafted, sustainably, so if I take something from nature I am replacing it with something else. Balance in all things.
Added the fruit for pushing the flowers. Pistol hairs are growing.
This strain is a sativa dominant, and thus my flowers are not as compact and "looser" than indica dominant strains I have always grown.
Review on this sativa dominant cultivar is: harder to grow than most strains, longer flowering time is also a pain while increasing my costs with more days with the lights on.
Getting COAs on the finished flowers and I will post on here, I am hoping for higher levels of THCv, let's get into the rare cannabinoids and higher terpenes!

Likes
14
Share
@FlonGrow
Follow
Pflanzen bekommen wieder gegen Ende calmag mangel . Bekomme das irgendwie net in griff
Likes
12
Share
@Bluemels
Follow
Tag 25: Die Fat Banana scheint klein doch sie versteckt noch ein wenig ihre Arme. Sie ist sehr kräftig.
Tag 30: Ich beginne mit LST und scrog.
Likes
21
Share
@BLAZED
Follow
Week 14 (2-5 to 8-5)
2-5
Temperature: 27.3 degrees (lights on) 19.5 degrees (lights off)
Humidity: 69% (highest) 52% (lowest)
Watering: 2000 ml.
3-5
Temperature: 24.2 degrees (lights on) 19.3 degrees (lights off)
Humidity: 68% (highest) 50% (lowest)
Watering: None.
No pictures.
Increased the light's power output to 90%
LUX: 22.500
4-5
Temperature: 24.1 degrees (lights on) 20.3 degrees (lights off)
Humidity: 63% (highest) 43% (lowest)
Watering: 1000 ml.
5-5
Temperature: 24.8 degrees (lights on) 20.3 degrees (lights off)
Humidity: 66% (highest) 43% (lowest)
Watering: 1000 ml.
No pictures.
6-5
Temperature: 24.4 degrees (lights on) 19.4 degrees (lights off)
Humidity: 66% (highest) 44% (lowest)
Watering: None.
7-5
Temperature: 24.4 degrees (lights on) 19.2 degrees (lights off)
Humidity: 66% (highest) 44% (lowest)
Watering: 1000 ml.
8-5
Temperature: 24.2 degrees (lights on) 19.4 degrees (lights off)
Humidity: 65% (highest) 48% (lowest)
Watering: 1000 ml.

Likes
3
Share
@clstr8
Follow
4-12-20: last week before she goes 12-12. i wish i didnt have to limit the lights but shes in with some photos.

Likes
3
Share
@Dysons12
Follow
Day 7 i I transplanted the seedlings in jiffy’s to the DWC basket water level was “just” touching the bottom of the basket which meant there was 1mm- 2mm air gap between the water level and the jiffy’s. The high pressured air in the water to spit when air was released at the top which kept the bottom of the jiffy moist which had minimal roots showing to the exterior of it.
Day 7-13 I originally had 7.5 litres of water that was to the bottom of the basket. I replaced the water on the 13th which meant the water was changed after 6 days at such an early stage I will regularly change the water in the buckets. You can change every 7-14days but I am taking no chances.
I refilled and added nutrients on Day 13 which was yesterday. And the plants are doing really well and are a nice VEG green colour. Hard to tell on the pictures with the light colour but you can see their progress.
When I replaced the water this week I put 6.5L of water in each bucket With nutrients PH’d as close to 5.8 as possible. Some varied from 5.72 - 5.9. I have noted these on each bucket so that I can check if one does better than the others or shows deformities or stress I can amend it to match the others but hopefully not in such a close proximity of 5.8ph with an EC of 700+-
The roots are now showing in every pot with the longest being some 6inches.
The new Wakyme grow light is top notch so far with VEG button on only. Anyone contemplating buying one it cost me £99.00 from amazon and so far is performing just how I would like.
Humidity has been taken care of with a cold air intake fan which is pulled from another area of the building of a cooler environment.
Temperatures are spot on where I want them but I do allow a 2degree +- allowance but it does change back to its original temperature quickly enough.
5 more speed bud germinated and 2peyote critical feminised photoperiod germinated.
Crystal candy XL auto ordered x10
Gorilla glue, Pineapple Express and Cali Kush waiting in the wings. I have these already
If I can be anymore help to anyone let me know. Your diaries are helping me and hopefully I can provide the same to you

Likes
8
Share
@legolas40
Follow
The plants are maturing extremly fast, the amber thricomes are apearing so fast and the flushing started to prevent to get much CBN. The BIG DAY is soon!

Likes
20
Share
@Rob96
Follow
Cut the net down now as all stems hardened in place. Had a reshuffle and as the Dos Si Dos much taller i have moved lights to top and propped my other 3 up on boxes to level the height more.
Really pleased with this plant so nice and short but spread with lots of tops, smells really nice cant wait to see how this fattens up.
Had to do a little late trimming to open up bottom just removing little bits and leaves well under the lights.
Done this mainly to help with the airflow and just to give plants little more space as i suffered a little rot on my first grow as was cramped and struggled with humidity however got good dehumidifier and plenty of airflow so fingers crossed it stays well away this time.
Overall plant looks really strong and healthy cant wait to see how these last 4 to 5 week turn out.

Likes
13
Share
@Bryankush
Follow
Giorno 1 è molto bella e in completa salute, questa settimana sarà la più cruciale per la vegetativa
Giorno 7 la sera viene annaffiata con 2L di acqua
Likes
36
Share
@ganjameister
Follow
Flowering Day 56
Fade treating is going on and Kmintz is starting to show its true colours. The smells is getting more intense every day! Harvest in likely one week


Likes
8
Share
@Mo_Powers
Follow
it is stable in the wind, withstands hot days and continues to grow. it is showing the first signs of flowering. i think it will go into full bloom next week. she still has 2 months before i move. i hope she makes it. she gets fertiliser every 2 days.