
Likes
Comments
Share


@Skunkiest_bender39
Follow
It was an honor! Hat Von Anfang bis Ende Spaß gemacht die Dame. Mal Probleme gehabt mit Fäule, nach Kontakt mit Regen! Im Wintergarten untergebracht, musste die Fäule weichen. Ne ohne Spaß, hat einfach aufgehört zu faulen und mega produziert! Denke aber ohne greenhouse eher ein Fall für den Kompost geworden;)☮️

Likes
2
Share


Likes
7
Share


Likes
41
Share


@gottagrowsometime
Follow
Welcome to my Auto Cinderella Jack(s) grows from Dutch-Passion.
Both ladies have been on water for 10 days. The synthetic got a hard flush and the organic was soft flushed (water for 10days to rid of excess nutrients in soil)
Was such a pleasure to grow both girls. The organic has lovely bright orange hairs with very dense hard big buds. Calyxes are nice and big with a nice leaf to calyx ratio. (Not much to trim)...The Synthetic girl has a completely different structure. Has shorter buds, that are very dense and has a lot more frost. Has lovely hints of purple throughout it. All buds are lovely and tight/dense and very stinky and sticky. Both plants needed the full dose of the FC 3000 and I've no doubt that I'd of gotten a different bud structure deeper into the canopy. (Its not larf) just not as hard the deeper down into the canopy, (some of the bud)
All ladies (autos) have been in a dark rest 24hrs now and will get another 24hrs in a dark tent. Hoping to see glistening resin upon harvesting.
Plants will be harvested in this grow week and dried, then after I taste and get the measure of both plants as for quality I'll rate them then.
HARVEST DAY. 48Hr rest. And they nice and glistening. Glad I rested them. You really can see the resin. I harvested whole. Pult the whole plant(s) up from the stem and broke away the clay and took the main roots that come from the stem. The organic, boy, she was bet in. Took me all my strength to break away her main roots. They were mm thick. Very nice root structure also. The synthic, the soil just broke apart before I could take out upon my pulling..put my back into it thinking would be the same. Strong, but nowhere near as good a root zone as the nearly all organic beat her hands down. As for bud size, she took that to. They equally smell very fruity and have a very light gasey smell. But very fruity. More that than anything. I'm sure I'll put my finger on it as the days go by. Let's hope they both dry nice and I can keep a steady temperature. (REMINDER if room drying this time of Yr. Turn off your radiators)
More pics to come and info on how the process is going..
Thanks for dropping by. Be sure to like so I can visit your diaries. Either way thanks for dropping by.


Likes
5
Share


@FourVentiFarms
Follow
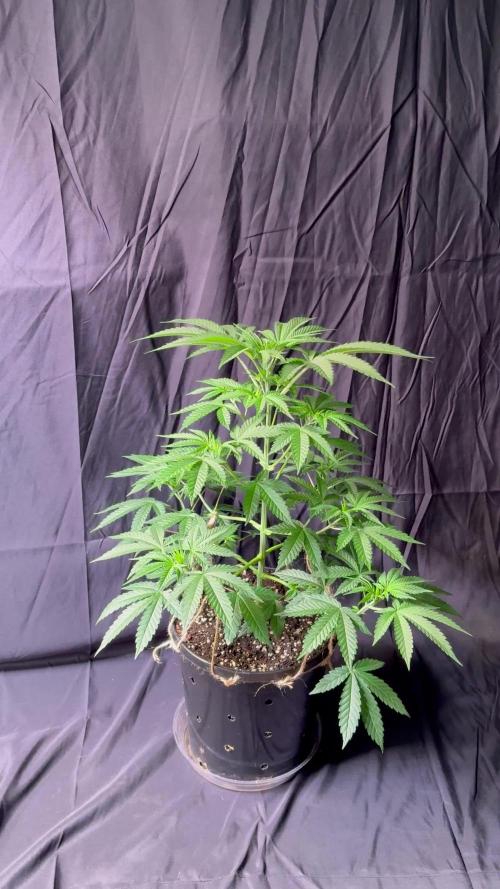
Week from 10/07 to 16/07
Going smoothly, plant already feeling great in the new pot.
I used sticks to make a star cross frame at the base so I can pull branches in every direction
Now it’s a matter of letting everything grow and adjust the branches until around the 20th of August when it will start flowering

Likes
8
Share


@Monkeyboy
Follow
Wer now at 48 day, from seed in a green house, only water from tap every day and once a week where I have saved my old coffee grounds I water them down and give a bit of that.
So nice and big and green.
Hopefully all ends well. These were meant to be 75 days seeds, if so not long now.
Angain thank you everyone for you tips and support.


Likes
49
Share


@AsNoriu
Follow
Day 119. Will update later. This grow is almost finished ....
Jar day - all is done, now cure left.
Happy Growing !!!
P.S. if you are searching for Killer Kush, she got separate diary, my favourite of all 3 strains.
Likes
24
Share


@Caertner
Follow
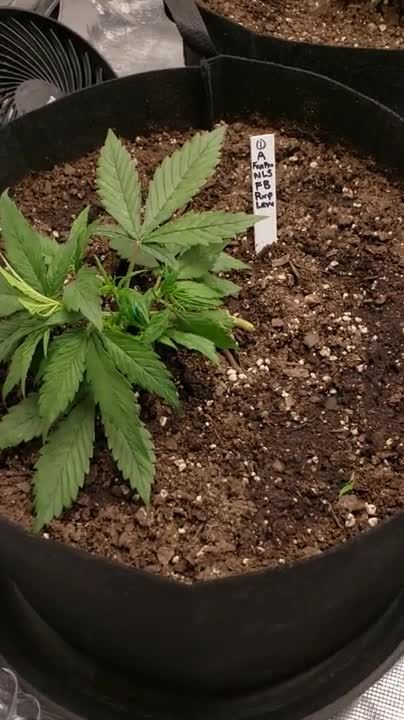
Nun geht es los... "Rosi", "Claudia" und die etwas divenhafte "Franziska" konnten sich etwas stabilisieren.
Mal sehen, wann der Hydro-Boost anfängt... (*freu*). Claudia hatte Glück mit dem Netztopf und hat bereits anfang der Woche eine Wurzel im Wasser...
Tag 18: Rosi hat wohl Ärger mit dem Netztopf... Claudia legt schon los und Franziska will gepflegt werden. Ich denke ich mache aus ihr einen Bonsai ;)
Gesamt: Diesmal war das Umtopfen wohl sehr stressig... next time direkt die Keimlinge in den Blähton.

Likes
6
Share

@Ninjabuds
Follow
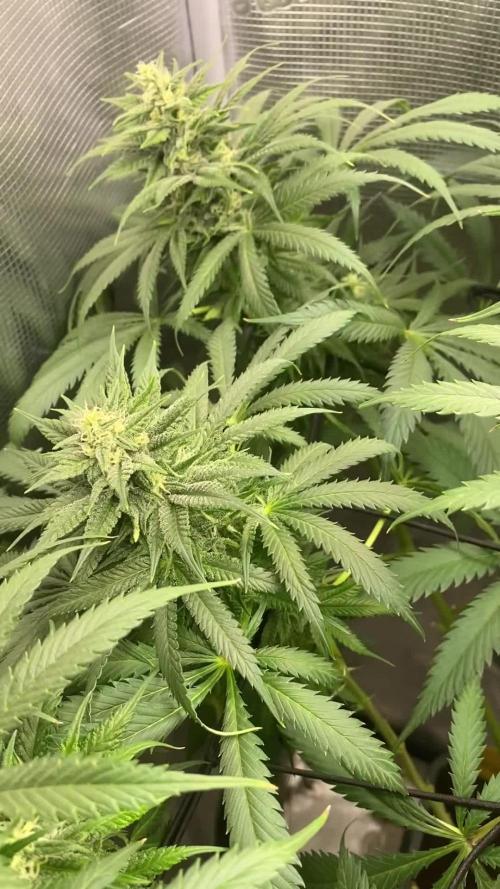
TEST RUN OF THE ELUFAH UAP-1500
The papapayton is a really super smelly plant! I love the nice thick leaves there very plump. Also the plant has good structure durring veg. This plant is gonna be a great plant when all is done.
Likes
93
Share


@Natrona
Follow
FBA2502 Plants 1-6
Week 7 May 11– 17
FLOWER 3
Nutrients :
Micro 25 ml
Gro 10 ml
Bloom 30ml
CalMag 30 ml
Recharge 10ml
Green sensation 16.5ml
Power buds 7.5 ml
5/11 PH 6.56, PPM 1560, temp 69
2ltr each
5/12 PH 6.31, PPM 1120, temp 68
1 ltr each
5/14 PH 6.66, PPM 1280, temp 70 1 ltr each
5/15 PH 6.66, PPM 850, temp 72 1 ltr each
5/11 Defoliation, feed, pics & videos
I made 4 gallons, used 3 to water then poured the runoff back into the rest in the bucket. The next feeding, I added a gallon of tap water to residual and ph to 6,31 temp 69 & PPm 1120. Did the same on 5/14 and 15 using up the remainder of the feed solution.
I must monitor and control the tent environment manually. For the past month, the humidifier has been an issue putting out way too much humidity; often leaving water in the bottom of the tent. In addition, the temperatures are also out of control. I added an AC last week to keep the temperature below 80. I finally determined the exhaust vent is also broken and has been for some time.
I have been giving good reviews on the AC infinity system. However, during the time I’ve owned this tent (2 yrs), I had to replace the lights twice, fans, humidifier and now the vent twice also. Everything but the tent containment has been replaced. AC infinity does stand by their products, but they are in California, and it takes at least 2 weeks to receive the replacement. This is extremely frustrating at the critical transition to flower for my equipment to fail again. For the time being until a replacement arrives, I pulled the 4” exhaust vent from my 3x3 and hooked it up. I have the AC pushing air in and the exhaust pulling air out. This should create a neutral pressure tent environment-neither positive nor negative. I do have 3 circulating fans in the tent to move air around the plants.
It looks like growth spurts have slowed and plant height has been reached. Now is the time for buds to fatten and frost up. All of them (6) are short remaining less than 3 ft. They range from 15 to 31 inches. The tallest #4 &5 and #6 have very light leaves and appear nutrient deficient compared to the shorter phenotypes. Pictures taken later in the week show fading on a few the older leaves. All are receiving the same solution and are in the same soil blend. Moving the gals in and out of the tent for their glamor shots, I bent one limb and snapped another. The bent one I taped with a splint and the snapped one I medicated manuka honey and wired it back to the main stalk.
Leaves look like sativa leaning. I hope FBA2502-2 is a good daytime. I’m getting excited to see what develops in the next month or so. News Break: I’ve been informed that 2502 is FastBuds New Frostbanger and is indica for nighttime. I’m disappointed that I didn’t get a sativa to test because I really need a daytime strain. The 2 Blue Cheese plants I just grew are also nighttime.
Upon opening the tent, a faint odor was detected, and some stickiness was observed during the process of defoliation. Pictures of the puffy buds even show differences. #4 &5 buds hairs are different from the others being crinklier and the others are straighter. Some like #2 &5 are showing frost on the leaves. Wow at the beginning of flower to have that much frost. They are living up to the new strain’s name.
I’ve noticed that when I water, sometimes water shoots out of the side holes I the air pots. I will pack the soil firmly into the sides for future runs.
Measurements:
#1 15”
#2 20”
#3 17”
#4 30”
#5 31”
#6 24”
Your likes and comments are appreciated. Thanks for stopping by.
Growers love 💚🌿
💫Natrona💫
Likes
8
Share


@pzwags420
Follow
Week 12 has started well. The flowers are still growing and the smell is still great :) I applied weekly nutrients on day 1 of week 12. On week 12 day 4 I added Z7 enzyme to my reservoir and I defoliated the girls to bring in more light to the lower canopy. On day 5 I decided to harvest two colas from Pheno 2. It seems to be finishing faster than the other phenos(mostly amber hairs although trichomes are not mature after closer inspection... I want to experience what effect I get from early harvest so to compare to later harvest. From now on I will leave the plants alone until they are all closer to harvest. 😅

Likes
91
Share


@PEAKYPLANTERS
Follow
ladies and gentlemen .... welcome to the end of this other journey together in the enchanted valley of Peakyplanters 🌈 My God .... the plant in front is really impressive 😲
it literally branched its flower around the net and a huge cactus came out of it !!! it was a real shame not to be able to balance the nutrition of the other two, this is the proof that each plant has its own diet!
So, in a way, it lacks a little structural strength ... but all in all it wasn't that bad ... I only suffered a bit in the final weight
Its flowers have a very particular smell 😋
Processing
Likes
10
Share


@CanadianFillmore
Follow
Start of flushing for the blueberries, both blueberry plants have very heavy, sticky, stank buds, I'm looking forward to harvesting these beauties!
Start of the last week of nutes for the super lemon haze, she has packed in the weight, buds have filled out nicely and stickier than the blueberries. She's still hungrier than the Blueberries, taking an extra 2 liters of feed each week. If the trichomes are showing cloudiness by day 5 of this week, I'll flush her early.

Likes
4
Share


@ebone4206
Follow
I'm lowering her nutes slowly and picking up thus past week. I'm down to 200 -300 ppm going in and I still got over 1000 ppm runoff. I'm going to just give her PhD water and get the runoff to 400.
Only 1 leaf faded 2 or 3 weeks ago but nothing else major. The leafs are looking like they are trying to fade but nothing noticeable and most are still green. Her tricomes are less clear now but it has seemed like this will be a reg photo. Could be what I did on my end for it to be almost week 9 or 10.
I want the leafs to fade more before I pull and see some amber tricomes.
We did chop a branch and let it dry in the tent above the light. Someone, not me was anxious to try lol. It dried in 3 or 4 days lol. will say it was not harse one bit. Smoke was white. I felt a little something but nothing to be like whoa. I felt it for like 5 mins in my head. The smell was amazing. Not as potent because of thr way it was dried. It broke down nice. The smell stood out more when I broke it down. I broke it down with my hands. I did a dry hit and taste nice and hit of sweetness. I rolled a wrap and smoked that first. I put the rest in my vape and had the same outcome. It was very dense. Didn't take pix of weigh it sorry. Forgot to add we cut a small piece off as in the pixels. We smoked the big nut and thr small ones in the vape. Nice clean hit.
That makes me question the flushing aspect but this is my first grow so will see when I do a proper dry.
I can't wait to cut these bad girls.
i need a break 😩.
I started lowering the feed last week slowly but found out my runoff is not really changing. 🙃
It had been hard to keep the humidity down when lights are off. I have a big dehumidifier on my ac but it doesn't work like I want, it likes to shut off constantly and the ac only works keeping it down but if it's to cold the humidity goes up. If it get to cold in the lung room the ac blows out humid air and that goes straight into the tent. Also where I live one day the humidity could be over 90% and that night or next day be in the 30%. And it summer it's like low 20 or 30s and rises at night. Our nights usually cool down to the 60s in the summer.
So a little worried about drying. I was thinking of getting a small portable dehumidifier inside the tent.
Other than that she's looking like she's almost ready.
Likes
11
Share


@OleGrow
Follow
Cherry A causing me all sorts of issues. She's falling on top of Cherry B. And in turn, Cherry B is hitting into my other plants (Grandpa Stash).
Also noticed what looks like pollen sacs on day 78.

Likes
26
Share

@TheCannaProphet
Follow
😎Week 3
8/2- Here we go into week three and I'm looking to see some explosive growth happening in the tent soon!😃 The girls are all running 2 1/2" to 4" in height with the Seedsman Gelato OG's and FastBuds Purple Lemonade currently kicking all the others butts!💪 Gave a good watering this morning 2hrs after lights on with non-chlorinated water ph'd to 6.4. I plan on maintaining that watering schedule from here on out. I refilled the humidifier with non-chlorinated water ph'd to 6.5. Love the new setup with the two HLG quantum boards, 4 plants per light, and currently running at 400w per light. I'm looking forward to some record yields with this new setup using these 650R's! Temp's/RH/VPD are where they need to be at this point with daytime temp's maxing @ 83 Deg F/ nighttime @ 68 Deg F, RH @ 55%, VPD @ 9.0😀
8/3- Started compost tea last night, ingredients were; 5g de-clorinated 7.0ph water & 5tbsp unsulfured molasses, 4 cups worm castings, 1 cup alfalfa meal, 1 cup kelp meal, 2tbsp bat guano, 1 scoop Great White mycorrhiza and 3tbsp Neptunes Harvest seaweed extract which were added after the air was turned on and the 'bag' was in the bucket.
I fimmed the FastBuds Purple Lemonade #2 and Seedsman Gelato OG #1, LST'd the FastBuds Crystal Meth #1 & #2, and the Seedsman Zkittles #1. Whilst doing all that I noticed my old friends the fungus gnats so I immediately placed sticky traps in all pots....little bastards! I went online and ordered Nematoads who will have a field day with the gnats!
The girls all got watered in from the top and bottom with de-chlorinated straight water ph'd to 6.6 @ 76deg 225ppm, lights still @ 36" above the soil and running @ 400w each.😎
8/4- Gave the girls compost tea for breakfast. The tea had brewed for 38hrs., had 854ppm and ph'd @ 7.1...PERFECT! I split 4g of the tea between the eight ladies @ 1/2 gallon each. I also topped the FastBuds Crystal Meth #2 and Seedsman Gelato OG #2 and checked and adjusted LST on all. Temp's, RH, and VPD all on point with the girls are showing it!
8/5- Soil felt moist so skipping water today and will feed early AM. All the ladies have taken on a deeper shade of green and are really starting to take off since receiving the compost tea yesterday and they'll be going crazy by the end of this week going into week four. The FastBuds Crystal Meth #1 & #2 are both showing early flowering signs already and are starting to get some purple coloration in new growth which looks natural, not a deficiency. I topped the FastBuds Purple Lemonade #1 and Seedsman Zkittles #1 and checked/adjusted LST on all.
8/6- Gave a good watering this morning with 4g of de-chlorinated water ph'd to 6.8, went through, and tucked leaves on all the girls to keep exposing lower bud sites to the light so that we have a nice even canopy for flower! All the girls have either been topped, fimmed or LST'd at this point and all I'll be doing from here on out is tucking leaves and possibly some very minor defoliation if needed,
8/7- All the girls look very happy this morning and are starting to get ready for that stretch at the beginning of flower. The FastBuds Crystal Meth's are the shortest, along with the Seedsman Zkittles #1 and the CM's are already showing pistils but I'm not declaring that they're in 'flower' quite yet.
8/8- Gave all the ladies a good water in this morning with .5g each of de-chlorinated water ph'd to 6.9 @ 76deg. Went over all the girls and tucked shade leaves to expose bud sites, removed a couple of the ones that couldn't be tucked, and were blocking numerous bud sites. I also continued with LST on all bending branches outward to expose them to more of that HLG 650R goodness!


Likes
22
Share


@CanarianGrow92
Follow
Another week for the persian pie 😁 so far so good, only 2 and half weeks left, we gave some candy and for the rest only water! Hopefully things continue to go good! She showed a lot of thc so I'm sure it's going to be a strong smoke
Likes
57
Share


@Grey_Wolf
Follow
Looking For a Keeper
cream of the crop seeds purple paralysis
10th March 2021
So Far So Good for these two , it hasn't rained again since the last downpour but the clouds hanging around this afternoon
look very ominous indeed. 😐
I only water early morning now so that the soil is fairly dry again on top by the time the sun sets in the evening.
this is to limit the extra moisture that could hinder the plants resistance to mold .
I also gave them a good old feed of my Worm castings tea mixed with Mollasses & Seaweed mix. 💪💪
Cheers for stopping by 👍
