The Grow Awards 2026 🏆 


Likes
Comments
Share
@Biglegs_Cupboard
Follow
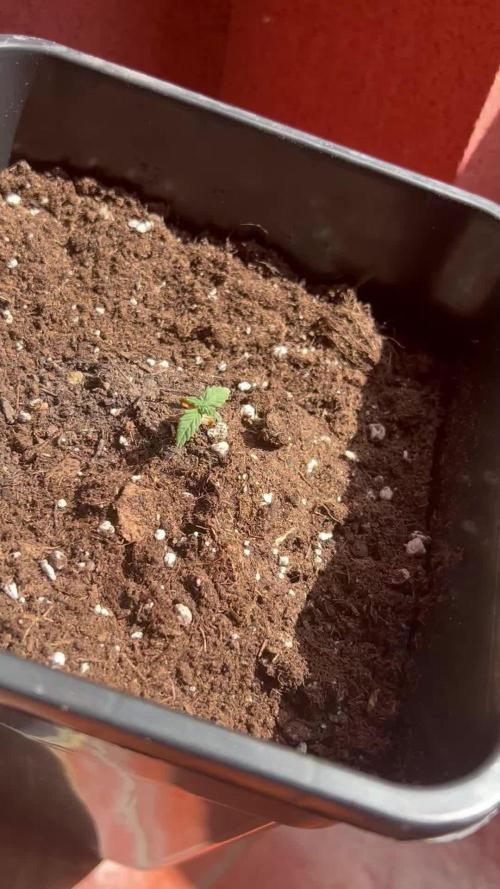
Week 2: Moving the Twins Outside
After a slow start, I decided to move the twins outside and plant them together in a 5-gallon pot. Space is limited, and with how slowly they’ve been growing, they’re not getting their own pots this time.
I’ve had slow starters before, and they don’t usually yield much, so I’m keeping my expectations low. Since these two have been particularly slow, they’re sharing a single outdoor pot. The medium I used is a mix of 50% coco, 30% soil, and 20% perlite—this should provide good drainage and aeration.
I used Great White from Plant Revolution during the transplant. The taproots on both seedlings were barely visible, which made me nervous—especially with autos, since they can be sensitive to transplanting. But it had to be done.
Now, they’re settling into their new outdoor setup, and I’ll be watching closely to see how they respond.
Current Setup:
Medium: 50% coco, 30% soil, 20% perlite (now in a 5-gallon outdoor pot)
Transplant: Used Great White when transplanting
Taproots: Barely visible on both seedlings
Lights: Moved outdoors
Nutrients: Biobizz Fish Mix for now; Big Plant Science later if needed

Likes
11
Share
@eldruida_lamota
Follow
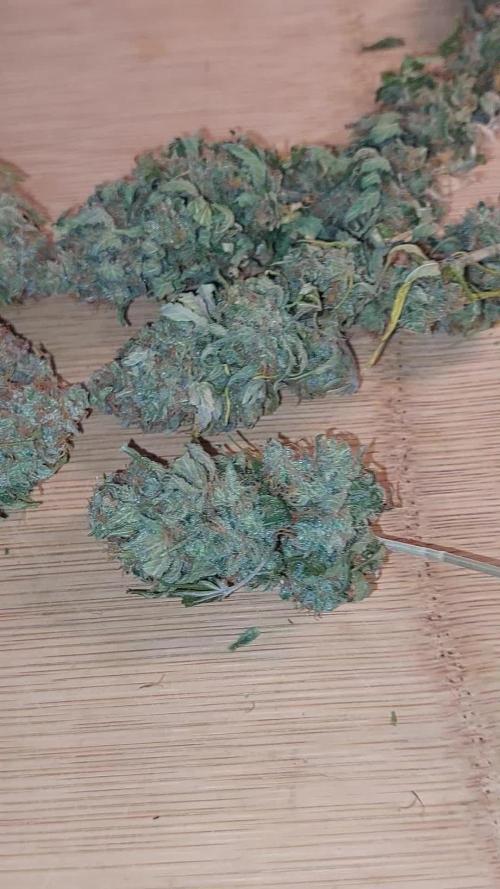
Venga familia ya viene la cosecha de estas GG4 de MSNL, que ganas que tenía ya de darles tijera.
Para empezar me dieron gato por liebre, nunca mejor dicho, me dijeron que era feminizada de temporada y resultó ser autofloreciente. Eso muy mal.
Las flores aparte se ven resinosa y tienen colores llamativos.
La planta sin más, típica rudelaris que sinceramente detesto.
Fue una genética con la que no disfruté cultivarla, aunque es bastante fácil de cultivar.
Agrobeta:
https://www.agrobeta.com/agrobetatiendaonline/36-abonos-canamo
Mars hydro:
Code discount: Eldruida
https://www.mars-hydro.com/
Hasta aquí es todo , espero que lo disfrutéis, buenos humos 💨


Likes
16
Share
@JohnnyBlaz3
Follow
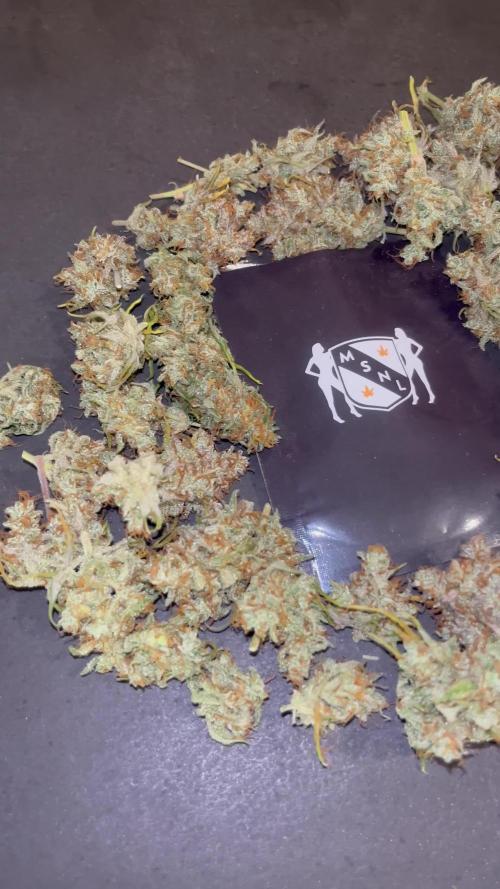
Wow what a strain! The flowers are absolutely caked with trichs, making the flowers look heavily frosted. The smell is pungent and pretty dank smelling. The taste I find to be pretty mild. Where this strain stands out is the very powerful punch it packs! WOW lol this one will have you staring at a blank tv screen for 30 minutes before you remember what you were doing lol no complaints on this strain, have it growing again this run too! Thanks for following along!!! On to the next one!

Likes
115
Share
@DogDoctorOfficial
Follow
Harvesting the Bounty of Cherry Cola Auto
Dear fellow cultivators, we've reached the triumphant culmination of Cherry Cola's journey as we delve into Week 13 – Harvest Time! Join me in celebrating the fruition of our labor and the bountiful rewards awaiting us as we harvest the radiant buds of Cherry Cola Auto.
As the sun sets on Week 13, the air is filled with anticipation and excitement. Harvest season has dawned upon us, marking the culmination of Cherry Cola's remarkable journey from seed to harvest-ready beauty.
In the heart of the garden, Cherry Cola stands tall, her branches heavy with the weight of abundant buds. Each bud is a testament to her resilience, her vigor, and the care and dedication invested in her growth.
With meticulous care and precision, the time has come to harvest Cherry Cola's radiant buds. Each cut is made with reverence, ensuring that only the finest, most pristine flowers make their way into our stash.
As the buds are trimmed and cured, an aromatic symphony is unleashed, filling the air with the tantalizing scent of Cherry Cola's terpene-rich profile. It's a sensory experience like no other, a celebration of nature's bounty.
As we gather the fruits of our labor, let us take a moment to reflect on the journey that has brought us here. It's been a labor of love, a testament to patience, perseverance, and the boundless wonders of nature.
In conclusion, let us raise a toast to Cherry Cola Auto – a true champion of the garden, a symbol of resilience, and a source of boundless joy. May her harvest be plentiful, her flavors unforgettable, and her legacy enduring. Until next time, happy harvesting, fellow enthusiasts! #CherryColaHarvest #BountifulBuds #GrowersPride
Nutrition: @aptusholland @aptus_world @aptus_
Love, Care, and Attention: @dogdoctorofficial
As always, thank you all for joining me on this journey, for your love, and for it all. My horticultural odyssey would never be the same without you. Your love and support are cherished, and I feel both honored and blessed to have you in my life
Friendly reminder all you see here is pure research and for educational purposes only
Growers Love To you All 💚 💚 💚
Likes
22
Share
@RDWCGrowing
Follow
4/27/2024 Flower Week 10 Day 1- Water Change Day!!!! Still about a week out.. but her grow sister is ready.. I setup the Dry tent, and I have moved everything in the Cannatrol so I have room for 2.2lbs wet in the cannatrol and everything else will be hanging.. I have my AC unit in the tent, I have my Dehumidifier's setup and I have my fans. I have one more fan that will be delivered tomorrow and I needed one more Carbon filter and inline fan and that will be here tomorrow as well. As soon as they get in I will go ahead and check one more time on the Trichomes of her grow sister and as long as she is where I want her to be.
My Dry tent temp will be 70 and my RH will be 55. Timber......
I added 36 gallons and the accompanying Nutes
I added the following Nutes:
CalMag= .50Mil/Gal= 18Mil
FloraMicro = 2.3Mil/Gal= 83Mil
FloraGro= 1.3Mil/Gal= 47Mil
FLoraBloom= 4.0Mil/Gal= 144Mil
ORCA = .5Mil/Gal= 18Mil
SIGNAL= 3.0Mil/Gal = 2.0Mil
Liquid KoolBloom= 2.5mil/Gal = 90Mil
EPSOM- 1 Big pinch
4/28/2024 Flower Week 10 Day 2- Did a Trichome check just to see where she is.. I think still about a week or 2 out.. will just keep looking every couple of days and see where we are. I love being able to grow.
4/29/2024 Flower Week 10 Day 3- Didn't do anything today but just get a few photos...
4/30/2024 Flower Week 10 Day 4- Didn't do anything today..
5/01/2024 Flower Week 10 Day 5- Didn't do anything today but get a few pics..
5/02/2024 Flower Week 10 Day 6- took Her grow sister down today.. Her grow sister was just ready and it giver her more space and light to herself..
5/03/2024 Flower Week 10 Day 7- Didn't do anything today but get a few pics.. She is already starting to darken up on the side that her grow sister was on that didn't get much light.
Since I took down her sister yesterday I have 4 days until I can take her down.. I will need to move the flower once dry from the cannatrol and put that in an auto cure tub and then put in a fresh 2.2lbs of wet from this harvest. Excited..

Processing
Likes
93
Share
@MadeInGermany
Follow
Welcome to the Zamnesia Spring Cup.
Hi everyone :-)
I hope you are all fine 🙏🏻.
This week the lady has developed really well 😍👍, which probably has something to do with the Monster Bud Mix that she has been using for a few days 😎.
I will top her tomorrow for the first time. After a few more days, I will spontaneously decide whether to do LST or a few more times top :-)
Depending on what time allows and how it develops 🤗. It seems to be a very nice genetics.
This is how you are used to from Zamnesia 😍🙏🏻.
I wish you all a good start to the week, stay healthy 🙏🏻 and let it grow 😎👍
Zamnesia Spring Cup 🏆
Type:
Runtz
☝️🏼
Genetics:
Zkittlez x Gelato
👍
Vega lamp: 2 x Todogrow Led
Quantum Board 100 W
💡
Bloom Lamp : 2 x Todogrow Led
Cxb 3590 COB 3500 K 205 W
💡💡☝️🏼
Soil : Canna Bio
☝️🏼
Nutrients : Monster Bud Mix
☝️🏼🌱
Water: Osmosis water mixed with normal water (24 hours stale that the chlorine evaporates) to 0.2 EC. Add Cal / Mag to 0.4 Ec Ph with Organic Ph - to 6.0 - 6.3
💦💧

Likes
3
Share
@birdmountain
Follow
Kein Höhenwachstum mehr aber dafür immer kräftigere Blüten. Es ist eine Freude, den Hauttrieb zu betrachten. Langsam beginnt sie auch stärker zu duften, es ist aber noch gut akzeptabel. Sie hat saftig grüne, leicht glänzende Blätter und siehr sehr gesund aus. Der Bananenschalensud, bzw. die Jauche wirkt.
---
No more height growth but ever more vigorous flowers. It's a pleasure to look at the main shoot. It is also slowly beginning to smell stronger, but it is still quite acceptable. It has lush green, slightly shiny leaves and looks very healthy. The banana peel decoction or liquid manure works.

Likes
26
Share
@Z420Organics
Follow
🍋 Amnesi-K Lemon – Harvest Report! 🍋
Harvested at 83 days! ✂️
Definitely in my top 3 favorite sativas — what a beauty! 🌿
Flavor: Bright citrus lemon with a floral hint in the buds 🌸🍋
Effect: Strong, uplifting head high — classic sativa vibes 💨🧠
The plants produced beautiful, dense buds loaded with trichomes ✨
The aroma is wow — sweet, zesty, and unmistakably lemony 👃
Grow experience: Easy, smooth, and very rewarding 🌱
Kannabia really nailed it with this one — well done! 👏🔥
This is definitely a strain worth exploring if you love vibrant sativas!


Likes
18
Share
@BufoAlvarez
Follow
Did first nutrient feeding w fox farms nutes. Very little. Things were going perfect then I woke up this am to slight curling again. I changed light distance and put in my other light as well so I’m now in need of ac unit or another fan bc it’s getting hotter, 85. Or I figure I could run my exhaust fan 24/7 and take it off my humidity switch but then I got to possibly get another humidifier bc the exhaust fan takes the humidity out of the room. Idk but the girls all in all are looking good to me.
started lst on 6/30
using grow big and big bloom now


Likes
9
Share
@Skinnytalls420
Follow
Day 33-13/01/22 they look really well I’m just trying to make space in my other tent so I can move half of them out and be more organised but I think this is the last week of veg!!!

Likes
148
Share
@BioBuds
Follow
Well, she keeps disappointing me a bit. If you see her development compared to the two other strains, she is miles behind. Not stretching that much, and flowering stays behind. Im checking for male signs every day as I suspect she might go on me.
All conditions are the same. This is a 9 euro seed. 4 of them didn't germinate. 50 bucks down the shitter. The plant right next to her comes from a one dollar seed, xtrakush at weedseeds.site.
That's why I plead for the growers to share their lucky shots and give the small-time breeders a break.
Also a plea for an expiry date on the products, for the price vs cost of production, we can expect that service.
that way renowned breeders also protect their name when third parties sell old seeds to growers that leave bad reviews.
Maybe she surprises me yet, but we are long way from the silverback we wanted.
Thanks for checking in, see you next week!!
Bud

Likes
12
Share
@Kinghaze
Follow
-Week 3 of flower.
The plants are starting to look better since I corrected the ec and ph.
The buds are swelling en the new growth is nice and green.
Let's hope they have recovered by next week so they can get back to full focus on the buds.
Likes
8
Share
@Mo_Powers
Follow
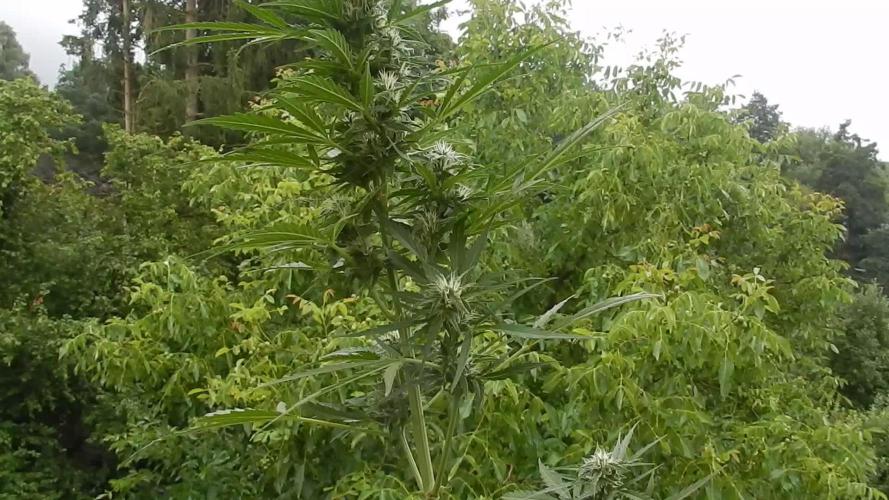
it grows and grows and grows. it looks very healthy and strong. the changeable weather doesn't bother it at all. the first small pistils can be seen. it gets a nice nutrient mix from biobizz root and grow.


Likes
5
Share
@Mr_nugs_lover_David
Follow
She's being grown without any training method,just 100% natural and organically grown,in her soil mix she has guanokalong seaweed powder,complete organics and grow and flo by florians living organics which is full of humic and fulvic acids and 10 different types of mycorrizae and beneficial fungus,plus I'm watering with guanokalong extract and also my lactobacillus liquid made by myself,she looks super happy and green,she's definitely a big lady and she loves her house 😍💚🌱 #organicmedicine ✌️
Likes
2
Share
@Daniss98
Follow
Hi the plants have been on the balcony but unfortunately there wasn’t many sunny days i planted them 30th September, what you guys think? It will grow orwill start flowering soon?
Any tips to make it grow faster from here?


