
Likes
Comments
Share


@Comfrey
Follow
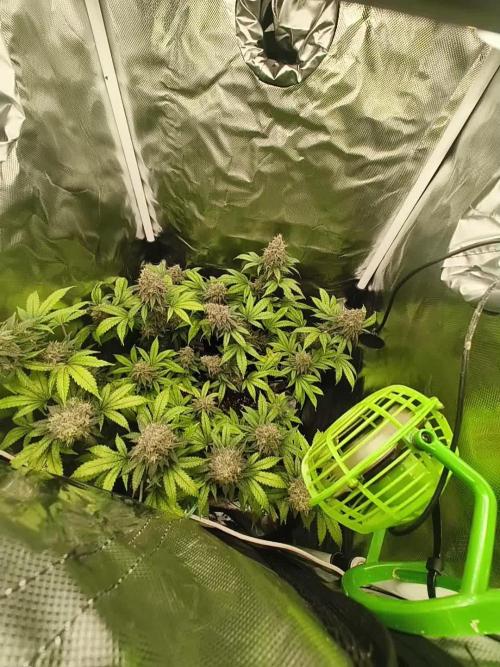
Drei Eiswasser Spülungen und etwas kühlere Nachttemperaturen haben zwar etwas an der FarbeRichtung bläulich geändert, allerdings blieb das erwartete Purple vollständig aus.
Die Blüten sind sehr klebrig und der Duft ist deutlich aber nicht besonders intensiv.
In der letzten Woche habe ich einige männliche Blüten heraus geknipst und mir sind auch ein paar Samen aufgefallen. Das selbe Problem hatte auch meine Hindu Kush.
An Tag 97 habe ich die Pflanze nach 48 Stunden Dunkelheit abgeschnitten und kopfüber aufgehängt.

Likes
75
Share


@Jef79
Follow
EXOTIC SEEDS
STRAWBERRY COLA
Effect - Relaxed
Genetics - ((Strawberry Banana X Mango Cream Auto)F4 X Monster Mash) F3
Yield - 550 - 600 G/M2
Potency - High
Flowering Time - 8 Weeks
Great auto strain for beginners to veteran growers.. No problems with her throughout grow.. She's extremely short, stocky and produced very tight resinous flowers with beautiful colours all over her!.. Initial smoke after dry and simple curing was very pleasant fruity cola with a skunky after taste.. Nice and relaxing buzz from her also.. Definitely worth growing again..
www.exoticseed.eu
https://www.viparspectra.com/?aff=454&utm_source=affiliate
https://partners.viparspectra.com/create-account?ref=454
Coupons -
code: Itxsgdvip
code: JEF
https://www.amazon.com/dp/B08CHCFCG1?ref_=ast_sto_dp


Likes
63
Share


@Chubbs
Follow
420Fastbuds
StrawberryGorillaAuto Week8
What up grow fam weekly update on these 3 gorgeous girls. Getting super hot in my tent as summer time is here. Over all besides some crispy leaf tips and having to water more frequently all is good.


Likes
5
Share


@pzwags420
Follow
Cantaloupe haze needed a good flush brought runoff from 2000 ppm to 1100ppm will continue to monitor.


Likes
5
Share


@Big0zGrower420
Follow
Here we are now,
7 days from seed and looking good. Just been giving water and I did a top dress of earthworm casting and organic fertilizer with mulch over the top. Weather is good for the next while, hoping to get some good growth this next couple weeks
Likes
35
Share


@Rangaku
Follow
Ended up being a pretty successful grow , had a few challenges with summer temps but after switching from HID lights to LED lights mid flower ( which was stressful at the time ) the girls didn’t miss a beat . They aren’t dry completely yet after hanging for 10 days maybe another 3 or 4 days and I’ll know dry weight etc … that total decreases every day tho , can’t help but throwing a handful of bud on the dehumidifier every morning.
Processing
Likes
22
Share


@Luv2Grow
Follow
Day 43 - First day of week 7 today and she looks really good just not sure if she’s really starting to flower yet. I’m hoping this is just typical of the GC strain.
Day 44 - No major changes, she’s growing and I’m loving the looks of her. Will continue uploading daily pictures.
Day 45 - She’s looking really good and budding more and more each day. Gave her straight pH’d water today and tomorrow and will give her another feeding on Saturday. She’s drinking almost a gallon of water a day.
Day 46 - Things are looking good with this girl. Bud sites are growing daily and this thing is a beauty. Gave her another feeding of just pH’d water and will “feed” her tomorrow.
Day 47 - ALL is looking good and she’s looking purdy. Gave her a feeding with the foxfarm nutes today. Did a true measurement to the biggest branch and she’s at 25.5”. Will continue to measure each day to see how much she’s growing in a 24 hour period.
Day 48 - Looking gorgeous and still stretching. Grew another two inches and is sitting at 27.5” right now. She’s really starting to fill in now and looking forward to the next few weeks.
Day 49 - The way thing thing is growing, she’s gonna be a beast. Gave her straight pH’d water tonight and will give her a feeding tomorrow. Looks like she finally stopped stretching, sitting at 27.5” still so hopefully she’ll start putting on the weight.

Likes
12
Share


@Lysidious
Follow
Was bummed out plant got red mites at the end but that’s fine, it didn’t not impact the grow (or at least I didn’t notice.)
Harvested at the end of the 6th week of flower. Trichomes had already started turning amber due to heat degradation (couch lock party) what trichomes that were not dust ridden or amber was milky so I’d say it’s ready.
Choosing the best time to harvest is still puzzling for me due to the fact that this is my 4th time harvesting cannabis.
Thanks for reading... more info to come ...TBC
Likes
31
Share


@BigBadLion
Follow
Happy new year everyone! I hope everyone had some amazing festivities! 😃
Regarding my babies I think I might be underfeeding them and one might be shocked thanks to the heat and the lack of nutrients I gave them, last week's runoff water scared me and the plants might be suffering because of that! Most of the issues starts to get more noticeable later during the week! 😖
I started giving them few nutrients to see how they would react and at the end of the week it's clear that I had to give them waaaaay more 😵 Besides that I also moved them to their final pots and I topped Pistachio, out of the two she's the one that looks the best. I also defoliated them a little. I also believe they didn't get a transplant shock (I mean, they would've been worse if that was the case haha) and I added more mycorrhizas during the transplant (I heard they help a lot with hot climates and I need help with that badly)
Anyway, thanks for reading!
Stay tuned for the next update! 😉

Likes
29
Share


@ChiefGrowAutoflowers
Follow
Still battling humidity although I think I have finally came up with a solution that allows my co2 too flourish as well. I connected my outlet carbon fan to my humidity control and changed my settings to the green ban of my vpd chart. I’ll keep you guys in the loop on that.
Likes
10
Share


@Blazeman
Follow
Auto looks done.
Pakistan Valleys look almost done.
Candy may need another couple weeks.
What do u think i should do guys? Should i wait and harvest all together? Or harvest the auto now, then the kush and lastly the Candy? What's the best way.
Also i had been planning to dry them all in my tent. If I do a staggered harvest, i have to build a box or empty out a closet to try and dry them in 😫


Likes
42
Share


@rhodes68
Follow
Easy grow not a huge yielder but there were circumstances to deal with here so very happy
Both plants finished up in the 200 gram range so good grow
Get it enjoy it

Likes
6
Share


@HomeGrown_Medicinal
Follow
End of week 4 and I have a bit more to report this week.
On day 22 I topped this girl and she was a little slow to react, turns out my thermometer was in a bad spot and the girls were getting hammered by the heater 🤦♂️ lesson learned. Since re-positioning the thermometer they have bounced back and happy as Larry again, thank goodness.
On day 27 i had brewed up my first compost tea and fed them a bit more than usual. The tea had a cup of Herbi's brew starter, a cup of work castings and a cup of organic compost. They loved it. I used the remains as a top dress afterwards.
Today, on day 28, I defoliated and started LST, she's praying to the lights right now and I'm stoked!
Hope you've all had a good week and thanks for checking in 🙏
Likes
31
Share


@Mrs_Larimar
Follow
HAPPY 420
Today iam entering the SEEDSMAN 420 Growoff with the Following strain
the Tangerine Snow F1 Fast
All will start Indoors under SANlight Flex 25, and move Outdoors.
Only one Plant stays indoors, to see the performance under best Conditions
because my Outdoor Garden is hard^^
As the strain is fast flowering i expect to end this Journey in the last weeks of September.
Just before the " big Rain" starts
So i started with letting them soak, and then the seeds will move under a humid Kitchensponge
unil i see a sweet Taproot.
then they will go into the Final Pot, filled with lovely TerraPreta mj mix
the grow will be supported with Biotabs fertiliser
BREEDER INFO
Tangerine Snow F1 Fast Feminised is a 75% sativa, four-way cross of (Boost x Tangelo) with (Lavender x Power Plant).
This Fast F1 hybrid is bred from Cali genetics and boasts great citrus terps, high resin production for extracts,
high levels of THC, very good yields and excellent mould resistance.
Tangerine Snow F1 Fast can be grown indoors as well as outdoors. Indoor flowering times are between 8 - 10 weeks
while harvest time in northern latitudes is during September while in the southern hemisphere growers will be harvesting during March.
Recommended climate regions are hot, dry, humid and warm. These are tall, semi-branched plants that grow in excess of 200cm
and display a high degree of vigour with very good uniformity.
In common with many other heavily sativa-dominant strains, Tangerine Snow F1 Fast offers excellent resistance to mould
as well as to plant pests and diseases. The combination of citrus terps and plenty of resin makes thi
a very good extract strain with the 'washing' method delivering very good yields of hash.
The citrus terpene profile is reminiscent of mandarins and tangerines and also has sweet candy notes.
THC production has been lab-verified at a strong 24% while CBD is low. The effect is uplifting and energising,
perfect for use during the day and early evening.
Likes
8
Share


@jayizrollin
Follow
Top Gun #2 finishing up nicely, checking for mold every day, humidity is back in the 50s.
I just trimmed up Top Gun #1 yesterday. 9 day dry, humidity started dropping into the 40s the last couple of days.
Only one other tip of the buds had some mold on it. I’m smoking it idc🤷.
Total dry weight was 50grams minus the molded buds, I’ll make butter with those.
Small plant but smoking it right after drying it was one of the best things I’ve tried, very proud.

Likes
3
Share


@123Grow
Follow
114 Days left as of 11/6.
Disclaimer: 56 days left to veg. Which ever plant is 3 ft or taller in 56 days will be flipped. In 1 week, I will be transplanting into 3 gallon containers that leaves 49 days. When there are 2 weeks left, I choose which ones go into the 5 gallon containers for flowering. After the transplant recovery, I do heavy defoliation and lollipopping. Wait 1 week to recover, and flip time…..Which just so happens to be: New Years!!!
This week ( and past few days) has been on target. I am seeing growth everyday I open the tent. I don’t know why, but the first 2 weeks of my grows move super slow. Then in week 3-4, it’s like a rocket ship.
11-11 (51 days left) - kicking some ass now. 2 of the RuntZ might make it, the Hulk-Berry is def going to make it pretty close to 3 ft tall. Hulkberry has 21 days to be transplanted, RuntZ will be transplanted in 14 days.
Likes
10
Share


@Gutismoke102
Follow
Just feed the girls some compost tea and overall they look healthy growing stronger by the day... she has a lot of bud sites and is getting thicker by the day
