
Likes
Comments
Share


@TerpTurtle
Follow
14 day dry | Curing in Grove bags, filled 7 QP bags & got 56g of keif out the trim bin from only 2 plants!
STAY FROSTY GROWMIES


Likes
18
Share


@DaddyPrime
Follow
I believe I couldve done better with this strain. I shouldve fed veg nutes earlier and payed attention to ph but i didnt have my ph pen until later in the grow. All in all though shes super frosty. Responds better to training rather than not. Takes about 4/5 weeks to veg and she couldve done 9/10 weeks of flower but i chopped at 8.
Started trimming and drying on 4/3 and didnt finish until 4/7. But some of the early chop will be dry in the next couple days

Likes
11
Share


@Professor_Daank
Follow
7/20: All three are doing great. I'm hoping to extend Plant 1's vegetation week so that the others catch up to her for the flip, which is eventually coming. I added RapidStart this week. I've heard great things, we shall see. More root, more fruit. Trimmed 2 lower fan leaves that were not getting any light.
7/21: Our time is drawing near for the flip! Are those........ STIPULES?
7/22: LSTing hard. Much good. Nutes niiiice. She's just letting me bend her all sorts of ways for that light.
7/23: LST for you and me, to grow some weed so happily... la la la
7/24: They are just perky tonight!
7/25: Last day of week 4. I started some bloom nutes this morning to prep, and tomorrow I lollipop 'em! I also got a new microscope for the trichomes later on, can't wait to see what's photos and videos I get.


Likes
15
Share


@Buddyboy_03
Follow
End of Week 4 (for those following along at home) and there are trichomes everywhere! Both of these plants are putting out sugar like there is no tomorrow. Velvet Moon is smelling a lot like tropical punch drink (Holy Punch x Dosi Dos) and it’s delicious. The Black Apple has a much weaker smell which isn’t really defined for the nose yet.
I stripped a few more side branches this week as things were tangling up as there was too much going on. Both look very happy and have plenty of air flowing through them now.
BAH is slightly taller than VM. Both stretched approximately double their height and not much more. That may have been due to me topping the plants 3 days before flip to try and keep heights limited. It worked well as i am at the exact distance to the light i wanted to be for 100% power (50cm).
BAH has has some stems go a pink/res colour but no other plant changes.
It’s hot here due to summer so been running the girls at night and they sleep during the day.
Looking forward to documenting the bud development over the next few weeks as these stack weight and start maturing.
I think this will be a 10 week flower minimum.


Likes
15
Share


@emeraldlabs
Follow
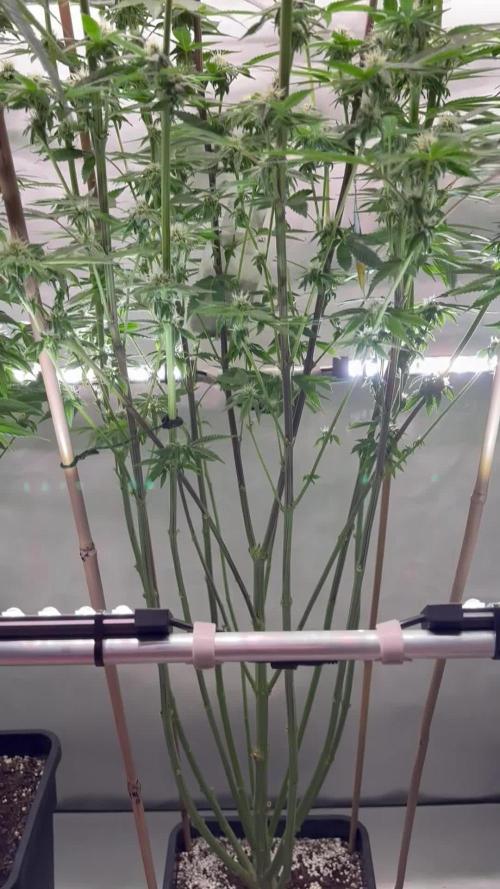
All is running smoothly. Upped calmag and started feeding tiger bloom. A few yellow leaves on bottom every couple of days. Will be doing a heavier defoliation this week.
Photos/video taken 77 days after breaking soil, day 14 of flower
Likes
9
Share


@PersasH
Follow
Solo he cosechado una de las dos honey peach. A la más grande aún le faltan un par de semanas. El cogollo está muy resinoso y denso. Huele fantastico!! Citrico y dulce.

Likes
11
Share


@GorillaZativus
Follow
👑Actualización Jardin 30-33 días . 6 macetas de 18 , 4 genéticas .
⌛️Videos , en este orden :
Primer Video
🎥 🎥🎥🎥🌬️🌬️
🌱Slurricane x Tropicanna Cookies F2
@crisol_seeds
🌱Og Strawberry Starkiller x Tropicanna Punch F3
@secretfile.cl
🌱Gorilla Glue 4 @bsfseeds @bsfseeds.usa
Segundo Video
🎥 🎥🎥🎥🌬️🌬️
🌱 Gorilla Glue 4 @bsfseeds @bsfseeds.usa
🌱 Skywalker Haze @dutchpassion.official
🌱 Skywalker Haze @dutchpassion.official
📸
Fotos :
📸Todas
📸Gorilla Glue 4
📸 Og Strawberry Starkiller x Tropicanna Punch F3
📸 Slurricane x Tropicanna Cookies F2
🌱Hoy foleo a sustrato : King Crab 👑
0,5 ml en 1 litro .
Ec : 0,5
Ph: 6,2
🌱metimos más amarres al y full lst ,
y podas .
🌱 @baconlinecl @bac_online_nl
Likes
13
Share


@FlavoursUk
Follow
Day 15 - The start of week 3 and the girls are really taking off, from 1-2 Inches of vertical growth daily. Consuming a good amount of water, almost leaving the bucket empty. lol.
Lightly defoliating to keep the bud sites exposed to light, as they get bushy very fast and recovery is only taking a day for them to bounce back. Pretty happy with how things are going right now. Slightly increased the EC by .2 but not enough to burn them.. which is the goal. Grateful for my trolmaster unit as it has made keeping tracking of my parameters much easier and effortless.
Day 16- Topping up the res with RO water every two days. Otherwise I'm sure it would be empty! Pistils are showing and the bud sites are very visible. Seeing one pheno with slightly more sativa dominant traits. Luckily I took clones so I can run the best pheno next time around, although all these plants are special. Still going through the flower stretch. Excited for what is to come. Stay tuned for the results.
Day 18 - As you can see, the difference is night and day over a period of 2 days they have had an explosion of growth. They were
heavily defoliated on day 17 and bounced back within a day. Happy plants preying. Bud sites are forming everywhere now. Not much to report. Until the end of week 3 in a few days. Bring on week 4.
Follow my Instagram and YouTube (link in bio)

Processing
Likes
Comments
Share


@Cannibalgardens
Follow
Well it's all about the bulking now she hasn't been having any more upward stretch at all .. This lady smells cirtus and skunk a very good smell .. it's also travelling across the yard now a good smell and sizeable buds developing I can't wait for the end on this one ...great genetics over at @originalsensibleseeds

Likes
51
Share

@MadeInGermany
Follow
Flowering day 18
since time change
to 12 / 12 h
Hey guys :-)
The ladies have recovered well from the cold thanks to the heating mat and have developed beautifully 👍.
During the check today I saw that despite spraying neem oil 3 times, there are still a few trips :-( .
Now I've ordered nematodes again specifically against trips for leaf and substrate.
I will use that immediately 👍.
Watering was done twice this week, each time with 1.3 l (nutrients see table above)
Next week I will remove the lowermost shoots so that the energy goes into the upper buds.
Fresh osmosis water was mixed with tap water and put into the 100 liter tank so that the water can stand and I'll have enough next week :-)
Otherwise everything was cleaned.
Have fun and stay healthy 💚🙏🏻
👇🏼👇🏼👇🏼👇🏼👇🏼👇🏼👇🏼👇🏼👇🏼👇🏼👇🏼👇🏼
You can buy this Nutrients at :
https://greenbuzzliquids.com/en/shop/
With the discount code: Made_in_Germany you get a discount of 15% on all products from an order value of 100 euros.
👇🏼👇🏼👇🏼👇🏼👇🏼👇🏼👇🏼👇🏼👇🏼👇🏼👇🏼👇🏼
You can buy this strain at :
Clearwater Seeds
Water 💧 💧💧
Osmosis water mixed with normal water (24 hours stale that the chlorine evaporates) to 0.2 EC. Add Cal / Mag to 0.4 Ec Ph with Organic Ph - to 5.8 - 6.5
MadeInGermany
Likes
11
Share


@Buddyhighs
Follow
Another week donnnnnnne 💪🏽!
Soo yeah the stretch has finished and the buds are stacking I fucked up a little at the start of the week, i set the lights to full power. She’s at 300watts. I turn the timer down to 11hours. But I didn’t realise it turned the timer off by mistake 😬 she ran 24 hours a day for two days 😫. I hope she don’t get pissy with me but so far so good. A part from that there noting to report on. No nutes this week just water.
Until next week let’s get it 💪🏽!

Likes
6
Share


@420medic
Follow
The structure on these 2 girls are beautiful, I believe they are starting to pre-flower so this is the last technical week of veg. I hope they stretch a little so they get taller and not so squatty.


Likes
12
Share


@GanjaFarmer101
Follow
Really enjoyed growing this - easy, resistant, and very high yielding.

Likes
7
Share


Likes
44
Share


@APOLLO
Follow
Good day folks
Hot week so the temps and humidity has escalated, an ongoing battle, Annoying but manageable.
She is in a stretch and will continue for a week or so, Once, there I will defoliate her then. I am flushing all the plants twice a week, being home all day helps lol
She is doing okay health wise. She drinks a lot and has not shown any alarming signs of any nature, which is why I took a clone off her as experiment and also cos I liked her 😍
I promised to update on the clones I took (Better add em now before I forget ). Day 11 both were rooted and were transplanted to new homes too and are doing okay 😊
see yall next week, stay safe

Likes
8
Share


@Manijuana
Follow
This week is officially week 1 of Ms. Hypnotic and she doing very well. I haven't had to water her much but that hasn't been an issue! Will start watering this week! But she's happy and so am I! Will update with pics
Likes
209
Share


@Rock_n_Roll_Randy
Follow
Day 107 for the 54 plant grow. 42 different strains of photoperiods and 12 different autoflower strains in the:
8X8 GROW TENT WITH THE NEW FC-E6500, FC4800 AND TSW2000 AND THE NEW 5X5 GROW TENT WITH A TSW2000 👍and they are being fed GREEN BUZZ LIQUIDS all organic/vegan fertilizers🤘.
I only pinched the tops on 2 or 3 plants but I defoliated every plant ALOT. it slowed the vertical growth alot but it's exactly what I wanted. I can keep track of the plant sizes, how they grew, how healthy they were, how easy they were to grow and how good the final product is👍 every plant was given the same strength of GREEN BUZZ LIQUIDS and I'm keeping track of which plants were happy with the suggested amounts and which plants seemed to want more or less🤘
ALL THE AUTOFLOWERS ARE NOW CHOPPED.
The girls are loving their MARS MANSION and WITH THE 5X5 INLAW SUITE and everything is doing good and looking nice and getting bigger👍 They are all starting to look like buds now and the bud sacs are swelling and they are all getting nice and frosty and starting to stink ALOT. MARS HYDRO ALWAYS GETS EM FROSTY👍.I AM NEVER DISAPPOINTED With how awesome these lights are🤘. KEEP KILLING IT MARS🤘👏👏
BREEDERS AND SEEDS:
DIVINE SEEDS:
MAZAR, OPIUM, WHITE WIDOW, OG KUSH, PABLO ESCOBAR, DIVINE INDICA.
AUTO WHITE WIDOW
AUTO PABLO ESCOBAR
AUTO WHITE RUSSIAN
AUTO FRACTAL
AUTO MONTREAL
AUTO OPIUM
AUTO KABUL
AUTO MAZAR.
WEEDSEED EXPRESS:
GREEN CRACK, GHOST TRAIN HAZE, LITHIUM OG, CHEESE.
DOCTORS CHOICE:
DC KUSH, AUTO NIAGARA, AUTO ROCK MACHINE.
EXOTIC SEEDS:
HIPPIE BERRY, MALASANA GELATO, EXOTIC ANIMAL.
GENE/MEME SEEDS:
BLACK HELL.
ORIGINAL SENSIBLE SEEDS:
PURPLE PUNCH COOKIES, WEDDING CAKE, PURE KUSH, GORILLA COOKIES.
SWEET SEEDS:
BLACK JACK, GORILLA GIRL, SWEET ZKITTLES.
EMERALD TRIANGLE SEEDS:
GORILLA GLUE, MASTODON KUSH.
SEEDSMAN SEEDS:
BLACK SUGAR, PEYOTE FORUM, PEYOTE WIFI, BADAZZ COOKIES OG, PURPLE GHOST CANDY, STRAWBERRY BANANA GRAPE, L.A. PEYOTE KUSH, PEYOTE WIFI CBD, FUEL DOG, CRITICAL PURPLE KUSH.
AMSTERDAM MARIJUANA SEEDS:
GIRL SCOUT COOKIES EXTREME, GREEN CRACK.
QUEBEC CANNABIS SEEDS:
BRUCE BANNER, GREEN CRACK, QUEBEC CBD 20:1.
I 💚 GROWING MARIJUANA:
SKYWALKER OG, BANANA KUSH, BLUEBERRY CBD.
FOR EVERYTHING MARS HYDRO VISIT:
www.mars-hydro.com
www.marshydroled.ca
PROMO CODE: rocknroll
VISIT THE ALIEXPRESS STORE:
@marshydro_aliexpress
Instagram: @marshydropenny
https://youtube.com/channel/UChU5ZWwNi-DvnO3oWVU3ceA
https://greenbuzzliquids.com/
#greenbuzzliquids
@GreenBuzzLiquids
https://greenbuzzliquids.com/en/shop/
PROMO CODE: rocknroll
https://www.youtube.com/watch?v=8hEqyS1jPpI
https://growdiaries.com/diaries/112437-grow-journal-by-rock-n-roll-randy/week/593118
Thanks for taking the time to read and check out my diary🤜🤛
FC-E6500 LED GROW LIGHT:
FC-E6500 grow light with 3978pcs OSRAM BridgeLux Diodes & Moso Driver, market-leading PPF 2.7 µmol/J, Max 2.5g yield/watt with 30% higher Average PPE, more cost-effective when compared to same style type lights. Only consumes 650W, perfectly cover 5x5ft (personal), 4x4ft (commercial) grow space. Innovative Precise Uniform Lighting-Built-in removable bars interval & dimmability enable the exact & dynamic PPFD control over each of the plant growing stages, FC-E6500 detachable bars deliverSuperior Heat Dissipation: Real Aluminum heatsink together with 6 slim profile passive cooled bars (THINNER & LARGER surface) and detachable Meanwell Driver, create less heat. save 50% hydro than other old grow lights! Driver can be mounted remotely on the side of a grow tent/rack or on an adjacent wall to remove heat from grow space. Full Spectrum UV IR LED: With Yield Max spectrum (660nm Osram enhanced Deep Red,2800k-5000k,730-740nm IR,380-410nm UV LEDs), Average PPFD the FC-E6500 LED grow lamp enables cultivators to produce BIG FAT Dense Buds, perfect for full-cycle hydroponic, soil, grow tent/grow room.
Dimmable Commercial Grow Light: Cost-efficient, easy dimming & daisy chain With a max up to 20 lights, IP65 Waterproof, master light easily controls the rest. Perfect for commercial & home horticulture.
FC4800 LED GROW LIGHT:
GET THE MAX FROM MARS👍: Welcome one of the newest members of the Mars Hydro family🤜🤛🤘. The Mars Hydro FC 4800 480W LED Grow Light can accommodate up to a 4' x 4' area for flowering. It has OVER 2000 LED chips consisting of the best selling Samsung LM301B diodes which has a Luminous Efficacy of: 220 lm/W
0.2 W, 3 V mid power,
Osram 660nm Diodes, Infrared light and UV LIGHT👍. It boasts the incredible efficiency of 2.8 µmol/J, maximum 2.5gram yield per watt with 30% higher Average PPFD. This High-intensity spectrum is beneficial for plants at all stages - from veg to bloom, and creates Big dense Buds👍. achieve 50% higher yields & quality compared with the old lights! Only consumes 480W for 4x4ft personal grows, and 3x3ft for commerical grow. It comes with a dimmer and daisy chain function with a maximum of up to 15 lights, the master light controls the rest👍. Wide 6-bar design offers even & wide canopy coverage and can maximizes your grow space. slim 180° FOLDABLE DESIGN... YES I SAID FOLDABLE🤘🤣 , making it compact and easy to install, it's IP65 WATERPROOF and will give you no worries while growing in a humid environment and makes it a flexible high performance commercial grow light for enormous SUPER FROSTY yields.😛😛😛. MARS GETS EM FROSTY BOYS👍
AWESOME HEAT DISSIPATION: The Low energy consumption FC4800 growing light has 6 passive-cooled bars and an aluminum heat-sink a removable driver you can upgrade later or have it outside your tent. with zero noise you can save up to 50% in your electricity bill compared to HID's or HPS lights!
It also has a removable driver so you can upgrade it in the future or have it outside your grow space for better heat control in your growroom👍
UPGRADED FULL SPECTRUM: Yield Max Spectrum with enhanced red (Top-Bin Samsung 3000k-5000knm, Osram 660nm Deep Red), speed up blooming & fruiting, perfectly suited for full-cycle growing. The FC4800 LED grow lamp was born for Big Buds, perfect for commercial, grow tent, grow room, hydroponics, and all soil grows.👍
THE BEST SAMSUNG DIODES: THE FC4800 has Top Bin genuine Samsung Osram Diodes, combined with remarkable 2.8 µmol/J Efficacy, 30% higher Average PPFD, 50% less energy consumption, to maximize your yields. They give you a TRUSTED 3 years warranty 100% Satisfactory guaranteed!!!
X2 TSW2000 LED GROW LIGHT:
INCREASE YIELD AND CROP QUALITY WITH MARS HYDRO LED GROW LIGHTS: NEWEST SMD LED technology provides the highest PAR/LUMEN output (1122umol@18") and can make you get 30% higher yield compared to OLD blurple led lights. Max 2.5g yield per wattage and achieve maximum quality and quantity, much better than traditional HPS grow systems
LOW ENERGY CONSUMPTION LED GROW LIGHT: Consuming only 300W true output with 684 LEDS! It saves up to 50% energy than other led grow lights. Perfect for 3.5x3.5ft bloom stage, 4x4ft veg stage. Over 90% light energy can be absorbed by plants, it will have higher intensity in a MARS HYDRO grow tent with diamond design mylar, or by crossing over using multiple TSW2000
HIGH EFFICIENCY FULL SPECTRUM INDOOR GROW: 3000K 5000K and IR 660nm 760nm RED, makes it close to natural light, highly engineered to provide improved growing performance for plants at all stages of growing, rapid plant response from seed to flower; Uniform and wide-beam light distribution for your plant's optimal growth
8x8 & 5X5 GROW TENT:
The MARS HYDRO 8x8 and 5x5 Grow Tent interior is made of a unique diamond design mylar which is highly reflective. (Other companies mylar and reflective rate is as low as 50%, and it won't provide efficient light. They use thick 1680D oxford canvas, and being double stitched, it is tear proof and perfect for locking in the light. Their grow tent keeps 100% of the light inside the tent and helps your plants absorb more light. EXTRA-THICK material means No light leaks or rips at all.👍
Strong Stable metal corner adapters and poles are the trustful supporters of the tent. It's very sturdy, neither rusting or paint flaking off. quick and easy tool-free setup. They use heavy-duty metal zippers, with double layer black lining, by far the best on the market which creates a light-proof seal.
6" INLINE FAN WITH DIGITAL TEMP/HUMIDITY CONTROL
Mars Hydro 6'' Inline Fan uses a mixed-flow design to maintain peak performance in a high static pressure environment.
GROW TENT FAN: MARS HYDRO inline fans are designed to ventilate hydroponic grow rooms, transfer heating/cooling, cool AV closets, and exhaust odors.
EFFECTIVE VENTILATION: Variable speed controller for easy fan speed adjustment. Optimal ventilation for your planting.
LOW NOISE LEVEL: Durable plastic fan housing and blades for extremely low noise(32dB-A); create a truly quiet growth environment.
EASY INSTALLATION: Removable duct ends with locking tabs for quick removal and easy maintenance and a cord length of 4.9 feet for hassle-free setup. This grows tent fan with a controller for easy fan speed adjustment.
BASIC PARAMETERS: Ventilation exhaust fan size: 6” | Dimensions: 315mm*225mm*210mm. | Weight: 2.7. | Airflow: 402CFM | Noise: 32dB-A | Bearings: Dual Ball.
Likes
6
Share


@HUMO_Cultiva
Follow
Update of Goofiez 2 of compound genetics!! On RDWC it’s literally super fast grow !! We are doing a pheno hunting of 12 plants and we seed 4 of them that are the best at the moment