
Likes
Comments
Share


@ButterfliesLittleFarm
Follow
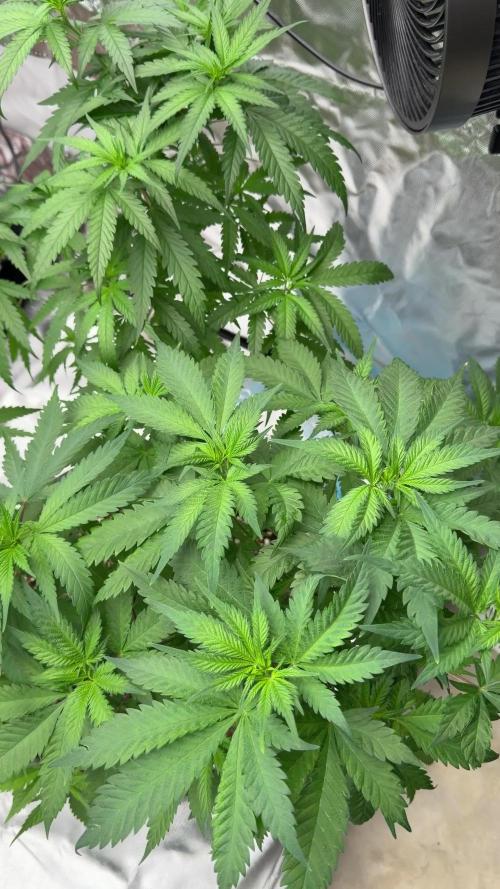
Hello Diary,
White Widow has completed its last week, the journey has come to an end.
Two days after the photo shoot, I harvested White Widow along with her roommates.
73 days since I put the seeds in the ground.
65 days since the start of the vegetation.
Really very fast, although it has somehow become the standard on my small farm.
But I am still fascinated by how quickly the plant goes through its cycle when it has the most ideal conditions.
I don't necessarily mean myself, I try to give the plants the best I can and know how.
As you can see in the photos, the result is impressive, White Widow turned out to be a real beauty.
This phenotype painted White Widow in purple.
The flowers are hard and dense, the branches bend under their weight.
One branch even broke when I was setting it up for the photo shoot.
That purple color gives it a special look.
Some of the leaves have taken on autumn colors, which is also one of the signs that it has matured.
This week I continued to observe the samples under the microscope, waiting for the trichomes to turn milky.
On the day of the photo shoot, which was day 63, most of the trichomes were milky, some even brown.
The smell is very intense, the whole room smells like plants when I open the grow box.
I barely wash my fingers after examining the plants.
Watering was standard, every three days.
This week I stopped adding nutrients, I just lowered the p.H. to 6.0 and water the plants with clean water.
After the photo shoot, she was in the grow box for two more days to drink all the water from the soil so that the drying would be more efficient.
Before cutting, I removed all the leaves from the plant to also make drying easier and have less work to trim the dried flowers.
But also to prevent the formation of potential mold.
After cutting, I left her upside down in the grow box to dry.
Now I'm waiting for the flowers to dry well and to see how much White Widow has really rewarded me.
See you when that happens.
Here's what the last week looked like.
19/09/2024 - Day 57.
Watering.
I prepared 9 liters of water, lowered the pH to 6.0 and used that amount to water all three plants on the farm.
22/09/2024 - Day 60.
Watering.
I repeated the same procedure as three days earlier.
24/09/2024 - Day 62.
I watered them all with 1.5 liters of water each plant so they would be fresh for the photos.
25/09/2024 - Day 63.
End of the last, 9th week since Purple Lemonade began its journey. Photos.
27/09/2024 - Day 65.
White Widow has been harvested.
That's almost all from me for this diary, the final report that follows after drying and testing remains. Thank you all again for your support and comments.

Likes
1
Share


@Dabking
Follow
Flushed the plants a bit early, which caused yellow leaves. Going to hit it with some 4-35-26 for two more weeks and then flush again & then chop.
Chopped on day 87-89.
All three plants vary. Excited to see how they smoke after drying and curing.

Likes
3
Share


@Leonardo_DaGrower
Follow
As you can see from the pics she has entered her death cycle. I saw a lot of the buds tightening up this week and she gaining some density.

Likes
27
Share


@Salokin
Follow
This plant was an absolute joy to trim. This plant consisted of buds and stems only, so I am actually curious what the dry weight will be.


Likes
2
Share


@Little
Follow
Empieza la semana 5.
Un dia de estos, cuando tenga tiempo, pondre la malla para SCROG, espero no ir demasiado tarde.
Todas las plantas se ven bastante bien excepto la más pequeña, que sufrió de quemaduras en los primeros días de vida. Aun así, voy a optar por dejarla crecer para ver que puede salir de ahi.
Un saludo a todos y buenos humos!!
Likes
4
Share

@Flavors
Follow
🌱 Sticky Broccoli – Grow Diary 🌱
Week 9 | Late Vegetative Stage | Coco + Perlite
This week included topping, lollipopping, and continued LST ✂️🌿
Final structural work is coming together as the plant nears flower transition.
Topping has created multiple strong main colas 🚀
Lower growth was lollipopped to focus energy on the upper canopy.
LST continues to spread the plant evenly under the future canopy 🌐
Light penetration has improved significantly.
Canopy is now wide, flat, and well-organized.
Airflow through the plant has increased 🌬️
Foliage remains healthy green with no deficiencies 💪
Plant is handling training with minimal stress.
Roots fully established and supporting vigorous growth ?
Watering steady with slight runoff 💧
📈 Focus next week: finalize canopy, install/adjust SCROG, and prepare for flip to flower 🌸🔥
Likes
58
Share


@AsNoriu
Follow
Day 97. Fast Buds Thank You !!!!
Day 109. Girl is in jars and waiting for Christmas ;)))
Happy Growing !
Processing
Likes
6
Share


Processing
Likes
6
Share


@Silverback_Guerilla
Follow
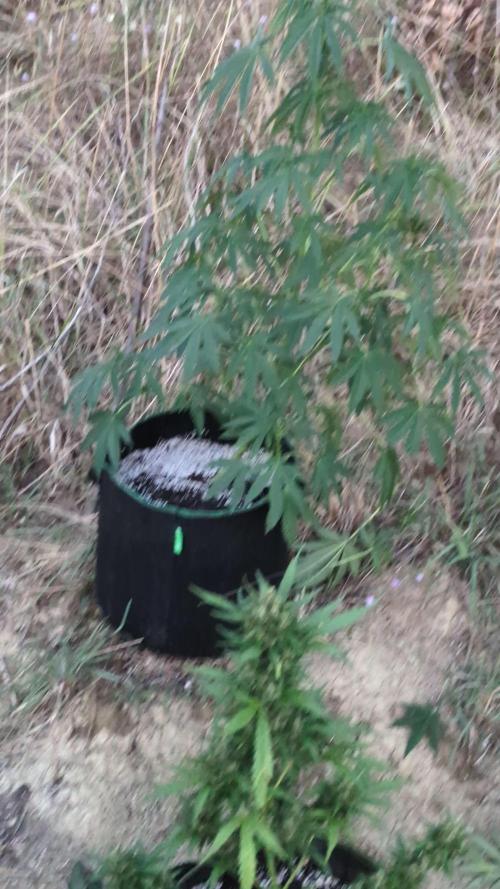
SUNDAY 5/5:
Rearranged the gardens..have 17 plants in the 4 x 5 now...yowsa!
MONDAY:
Plucked some dead leaves and did a trichrome check on her. She's getting close now! Prolly about 70% cloudy and 5% amber!
TUESDAY:
I observed some white spots on a few leaves here and there, so I sprayed her today with Trifecta Crop Cure, a concoction of a bunch of natural plant oils. I already decreased the humidity in the room to 45% with my new 70L dehumidifier, so I think she'll be fine. I'll spray her again tomorrow and the next day, then I'll have to hope that did the trick, because she is already in the harvest window.
WEDNESDAY:
I watered her today and included a bunch of terpinator, bud candy, bembe, and cha ching. It was her last dose of any nutes...flushing with spring water from here on out.
THURSDAY:
Took a couple of photos and tried installing my new Solacure FlowerPower UVB light, but it was dead on arrival.😢..back to the 15.0 reptile UVB lights for now I guess...

Likes
2
Share

@Guerrilla_grower777
Follow
08/09/2025 19:30
All of the plants in flower even the one who had big problems with boar,the photoperiodic ones started a lot later than i expected that means i have to stay here until the end of october
#1 gorilla z auto 74 days from seed
Plant seems to slowly die in front of me,not much wheight more than the last time
Trichome check tell Is almost ready with a lot of milky and not much amber at all,plant have still some new pistils and i think it's the kind of plant that does not stop producing new stuff, in fact is starting to foxtail
#2 frostbanger auto 67 days from seed
Leaves are fading this one is going to chop soon ,buds are just rock hard and the smell is so powerful compared to the gorilla z
Trichomes are at 50/40/10 clear,milky,Amber
Still not enough milk for me ,but they will change fast
#3 Apricot auto 48 days from seed
Very small plant but buds are fattening a lot ,smell Is the fruitiest and color Is the best,deep purple with red pistils slowly showing
#4 Coco Fresh 39 days from seed
After all this is coming well,stretched likes crazy in this 5 days and finally starting to flower
Sprayed water with spider poison on her as i've seen some spider mites
#5 Coco Milk 51 days from seed
Flowers started to show everywhere didn't check the height but this one is tall for real,as she drinks a lot i got to find some way to give her water perpetually like a dripping system
Defoliate a bit but i did after the video sorry
You can check the differences with the small final video 😄
#6 small check of every plant
Pic #1 Final look after the sunset
Pic#2 two small buds i wet trimmed to check the trichomes ,yet looking amazing
Pic #3 Anonymouz Sultan static apricotz i'm smoking right now,if you know you know🔥🔥🔥

Likes
8
Share


@Kayotic
Follow
Day 58
Watering every 2 to 3 days
Gave blood meal with last water
Not much of a change this week
Defoliation and retied down
Forgot to turn fan back up for one night, so humidity was at 77%

Likes
11
Share


@NachoTheDog46
Follow
08 Feb 2022
Update:
Little check after I removed plant n.9 (the little 2nd blackberry banana), all 8 plants are beautiful, the colors of the leaves, the grow, the smell, the temperature, the humidity of the soil everything is nice and goes fast and strong 🤜🏼☀️🤛🏾
Light regime ☀️22/2🌑 temp ☀️22.5/28.5 🌑 17.5/21 humidity 59%
All plants looks now gorgeous as hell hahahahha color and grow looks going good
10 Feb 2022
Update:
After 30 days of life, for the "Wedding Cake" it's already flowering time! 😬

Auto Blueberry Banana · Anesia Seeds

Wedding Cake Automatic · Zamnesia Seeds
Do-Si-Dos Automatic · Zamnesia Seeds
Girl Scout Cookies Automatic · Zamnesia Seeds

White Choco Autoflower · Amsterdam Genetics

Californian Snow Auto · Fast Buds
Diesel Automatic · Zamnesia Seeds

Purple Power Auto · Amsterdam Marijuana Seeds AMS
Likes
3
Share


@DarbGrowDiaries
Follow
This little candy is growing fast, hope I don't fuck it up with the irrigation system.
Might have some more hot days ahead of us, hopefully I can maintain 27-28 when it gets too hot outside.

Likes
22
Share


@valiotoro
Follow
Sooooo impressed with the size & quality of the buds😳
Super dense & sticky✂️
The smell is sweet fruity mix berries🤤🍓
Likes
49
Share


@masterofsmeagol
Follow
5/10 Got up super early for wife's appointment at 7 came home and transplanted 4 of the purple punches. Transplants went good. Soil was too dry and a couple fell right in the hole but I was messing around showing my dad. It just got dropped in the hole a little harder lol. The other that happened to is fine though. Definitely make sure your soil is moist enough before transplanting. My transplanting technique for 3 gallon is to put soil on bottom. Set cup in at appropriate distance then replace cup with plant with soil filled cup and fill around it. Leaves the perfect hole. Then you just snip the cups twice on each side, peel it down and fold the cup down and cradle the bottom and in the hole it goes! Holes have mykoscand a little like water. I water a little after transplant. I misted soil whole mixing it up.
5/11 Dad left the windows open last night "because the soil smell was bothering Lynda." I couldn't ficking believe it. They were all fine when I got back but still. Everything is transplanted into 3 gallon containers bit that 1 purple punch that is a little bit dwarfed. I looked at the bottom of the cup and drainage wasn't as good. Must've been the last cup and the jail didn't go all the way through in a couple places. I increased the drainage on that little dwarf and I'll transplant it when I get time. We are going to have some good weather coming up. I need to get my cage moved, my bags sanitized and get on a good watering routine.
UPDATE: Went back over at four and everything's dry as fuck but the leaves are uo and every one of them looks happy so I'm holding off watering. I'll start with a quart probably tomorrow. Also cleaned out tge cage and secured the handles to move it. Only thing left is cleaning and sanitizing. These girls have a south facing window and they LOVE it. It was 80 today. I hope we have an early season.
5/12 Transplanted the last purple punch today. I could easily tell the problem was drainage. It was the last cup I had stacked when I drove the nail threw so it didn't pierce all the way the the other slips and tac holes apparently weren't enough. Used mykos and same soil mixture. Soil was extremely dry. I lifted a pot with dry soil and these were heavier. Commercial buddy said to start with a quart a pliant and see how it goes but I kind pussed out and only gave them 24fl 0z a plant. Half the quart. I asked if I should water more and he said to just wait and see how they like this water and up it to a quart next time maybe quart and a half. Im just leery of overwatering. When i watered SOME of them the water literally just sat there and took forever to absorb. Plants werent wilting though. Soon theyll be going outside during the day and in mdoors at night.
UPDATE: Went back over at two and everything looks AMAZING. Healthiest looking plants I've grown. Leaves all pointed up. I'm taking my commercial dudes advice and hoping the water next watering. For now, they're doing amazing.
5/13 Everything is doing greatcso far. Gotta figure out when to start nutes. Considering adding silica but don't want to raise ph to much. I'll consult with others but my the soil blend I'm using is full of nutes.
5/14 Rushed morning and I wanted to water bit the plants looked great still. Sticking my hands deeper I can feel a little moisture deeper down or in the drain holes so I decided to give the blueberry cheese and the 10th planet a "touch of kindness" which was a small circle of water from a small watering can around the outside edge of whete the rootball should lid be. I'm working on getting a watering g schedule down.
UPDATE: Went back over at five and everything was looking good with leaves praying. Maybe my half measure helped. Doubtful but still. Tomorrow I plan to water. Since the soil has tons of nites ill probably hold off a little while longer before starting the nutrient schedule. I want to make sure I've got the watering down first. One thing at a time.
5/15 The 10th planet and Blueberry Cheesecgot their first REAL watering since transplant. Still being cautious I watered 28fl Oz a plant. I phed the water with an indicator solution and ph down. I gave the purple punches a "cup of kindness" which was a circle of water around the transplant hole. Can't waif to get a watering schedule down. I wanted to start nutes but my soil is full of them and i believe it's too early. I didn't see ANY run off from this watering. I think that's good as I'm not looking to wash away the nutes in the expensive soil I use. I need to start HST as well but I'm doing things proper and "one at a time". That way if I run into a problem I'll know what I did and how to rectify it. At least I hope.
UPDATE: Went back over at 3 leary that I may have "overwatered" but the plants ALL looked AMAZING and had shot up like an inch! Looking into hst and will probable fim a few. Top a few and leave one to grow naturally. Can't wait to see how these girls do outside.
5/16 Wow. Just wow. Plants are doing phenomenal! Since the watering went really well I watered the purple punch bit I only used about 16fl Oz as the plants were a little smaller than the others. I'll up it to a quart next time like I did with the others. I want to USE the nutes in my soil so im not washing them all away by watering to run off. I topped 2 10th planet's and FIMed one of them. I want to see how the respond then I'll begin training the others. Off to a Great Start!
5/17 Glad I held off watering. It's raining today. Just showers. We haven't gotten any of that extreme wind we usually do. I have the plants supported but I still worry. Definitely more than I should. Plants are still doing good and acclikatimg to their new homes.

Likes
27
Share


@pifflestikkz
Follow
Day 85
Day 42 Flower
21/06/24 Friday
Watering outside pH 6.2
Day 86
Day 43 Flower
22/06/24 Saturday
Another light water today, pH 6.2 water only.
Picture update 🤩
Day 87
Day 44 Flower
23/06/24 Sunday
feed today pH 6.2
Oh wow how her buds are really starting to burst 😍
The smell is phenomenal, lemons and limes tropical, heavenly.
She is coated in trichomes already, so sticky.
Day 88
Day 45 Flower
24/06/24 Monday
Water with calmag pH 6.01 3L
No run off.
Day 89
Day 46 Flower
25/06/24 Tuesday
Feed today pH 6.0
She seems to be loving the 6.0 pH range the last 2 weeks so stinking with till flush now.
She has really thrown some weight on,
Added another cane to support 4 arms as there struggling to hold themselves up, arms with buds are over 50-69cm long 😍
Picture update - check out her octopus 🐙 base ✌️💚
Day 90
Day 47 Flower
26/06/24 Wednesday
Water and calmag today pH 6.1
Day 91
Day 48 Flower
27/06/24 Thursday (End of week)
Feed again today as she is drinking plenty and showing no signs over doing it yet 😁 5L 5-10% run off.
Really noticed the swelling up this week, adding props for weight gain, and noticeable blanket of trichomes all over the plant including fans, quite a beautiful sight to see for an auto.
Likes
36
Share


@Ganjagrandaddy
Follow
Day 21 Flowering: Hi all, hope we are all good and green..This week has been the foundation for flowering weeks using their stretch period. They are all in a good position for getting plenty of light in their own space. I only had to do a little light leaf tucking to keep all the budlets with light on them. .The Herz o g is looking nice and open structured with decent sized nuggets forming
Her nodes are still spaced apart but her main should have a joined up cola at some point.
Strawberry Cola has really spread out nicely and matched the size of the other ladies . she has some very good bud growth too.
Monster mash is really thickening upnwith bud sets now and I can see howna big yield is achievable from this strain. Nice formations of buds on her more natural frame too. Onward andnuoward grow its. now it should get interesting. be safe.

Likes
56
Share


@Master_weeda
Follow
Bonjour à tous les padawans et maîtres jedis
Jour84 arrosage avec 2 litres d'eau ph6.3
Jour86 arrosage avec 2. 5litres d'eau ph6.3
Jour89 arrosage avec 2 litres d'eau ph6.3
LE MEILLEUR MOMENT POUR RINCER SON CANNABIS
Le rinçage commence en général deux semaines avant la récolte. Si le plant a une période de floraison de huit semaines, le rinçage doit commencer six semaines après le début de la période de floraison. Il est préférable de regarder de près les trichomes sur le plant pour déterminer quand votre cannabis est prêt à être récolter. Si les petits trichomes commencent juste à passer d’une couleur transparente à une teinte laiteuse et blanche, c’est une bonne indication que les plants peuvent commencer à être rincés. Il faut s’arranger pour que la majorité des trichomes aient changé vers la couleur désirée pour la récolte après deux semaines – ça devient plus facile à faire avec l’expérience, alors accrochez-vous !
Le rinçage peut également être un bon moyen de remettre à zéro la terre quand un plant est toujours en phase de croissance végétative. Parfois, un cultivateur suralimente par accident son cannabis, ce qui provoque un changement de couleur et un flétrissement du bout des feuilles. Ceci est appelé une « brûlure par nutriments ». Rincer la terre peut éliminer les nutriments excédentaires, ce qui aide à résoudre le problème. Cependant, c’est une mesure drastique à ce stade de la culture, alors assurez-vous que le problème soit bien une brûlure par nutriments et non quelque chose d’autre.
Le rinçage ne concerne pas que le moment de la récolte. Cette technique peut aussi être mise en place durant la phase de croissance afin de débarrasser le sol des nutriments. Bien évidemment, les nutriments permettent à votre plante de rester en bonne santé et vous assurent des rendements maximaux, mais une trop grande quantité peut causer une accumulation et un état statique durant lequel la plante ne peut plus y accéder.
Le blocage des nutriments peut être causé par une accumulation saline ou des niveaux de pH incorrects. Ces deux causes peuvent être résolues par un rinçage de votre plante à l’eau claire. Les fluides viendront pousser les nutriments en dehors du substrat et le débarrasseront de l’accumulation, permettant ainsi aux racines de pouvoir accéder à nouveau aux nutriments.
EMPÊCHER LE BLOCAGE D'ABSORPTION DES NUTRIMENTS AVANT QU’IL NE POSE PROBLÈME
Au mieux, le blocage des nutriments peut être un problème, au pire, il peut être un vrai désastre. Comme le dit l’adage, il vaut mieux prévenir que guérir. Il vaut mieux prendre de l’avant pour empêcher le blocage des nutriments plutôt que de s’y atteler lorsque c’est trop tard.
Empêcher le blocage des nutriments peut se faire par le biais d’un rinçage de routine. En rinçant vos plantes une fois avant la floraison et une fois au milieu de cette dernière, vous minimiserez l’accumulation de nutriments.
LES ENZYMES À LA RESCOUSSE
Après le rinçage pour contrer l’accumulation ou le blocage des nutriments, vous remarquerez peut-être que vos plantes ont une apparence vert foncé, c’est le signe d’un excès de nutriments. Dans ce cas, certains cultivateurs choisissent d’ajouter une formule riche en enzymes à leur substrat.
Au cas où vous auriez oublié vos cours de biologie, les enzymes sont des protéines qui catalysent les réactions. Elles aident à rincer le substrat en décomposant l’amidon, les glucides et les nutriments. Il existe sur le marché toute une variété de produits qui contiennent des formules d’enzymes très efficaces.
Si l’eau ne suffit pas à vos plantes, ces petites protéines ne feront qu’une bouchée de l’accumulation de nutriments !
COMMENT BIEN RINCER SON CANNABIS
Rincer votre plant de cannabis est un processus simple. À chaque fois que vous apporteriez normalement des nutriments, vous rincez à la place. De l’eau du robinet non traitée est tout ce dont vous avez besoin pour rincer, assurez-vous juste que son pH est sans danger pour le cannabis. La plupart de l’eau de puits a un pH sain et ne nécessite pas de traitement, mais s’il est nécessaire de traiter l’eau de rinçage pour avoir un pH adapté, faites-le. Les ajustements du pH seront donc la seule chose à considérer.
Inonder la terre avec autant d’eau fraîche qu’elle puisse contenir. Laissez l’eau durant quelques minutes pour qu’elle puisse absorber les nutriments, puis inondez la terre encore pour rincer les nutriments loin du plant. Si vous cultivez en intérieur dans des pots, notez la couleur de l’eau qui s’échappe du fond des pots. Elle sera tâchée et aura une couleur sale. C’est à cette étape qu’un appareil de mesure des TDS (Total des Solides Dissous) est utile. Si vous récupérez et mesurez le TDS de l’eau « évacuée », elle devrait avoir un taux de 1300ppm, ce qui est assez élevé. Il est important de rincer le plant jusqu’à ce que total baisse à un niveau de 50ppm, ou du moins qu’il s’approche du TDS de l’eau fraîche que vous utilisez pour rincer le plant. La couleur de l’eau d’évacuation va s’éclaircir et apparaîtra plus propre. Vous devez tirer autant que possible de minéraux dissous du plant.
Comment et Quand Rincer les Plants de Cannabis
Rincer les plants de cannabis avant la récolte peut faire la différence entre les meilleurs têtes ou la plus rude pour la gorge. Cette petite tâche est simple et facile à faire. Ajoutez juste de l’eau ! Attention car le moment du rinçage joue un rôle critique.
Le b.a.-ba du rinçage de ses plants de cannabis.
Sommaire:
1. Qu’est-ce que le rinçage ?
2. Le meilleur moment pour rincer son cannabis
3. Empêcher le blocage d'absorption des nutriments avant qu’il ne pose problème
4. Les enzymes à la rescousse
5. Comment bien rincer son cannabis
6. Comment rincer ses plantes en hydroponie
7. Les résultats du rinçage de son cannabis
8. Quand éviter de rincer son cannabis
Vous avez enfin fini vos cultures et vous vous retrouvez avec un magnifique plant couvert de super têtes, maintenant sèches, vous avez fait le curing et vous êtes prêt à fumer – et pourtant quelque chose ne va pas. La weed semble ne pas vouloir se consumer et quand vous tirez une bouffée, c’est comme si on vous avait donné un coup de poing dans les poumons et vous toussez en craignant pour votre vie ! Le goût est rude et décevant. Si c’est une situation que vous avez vécue, il y a des chances pour que vos plants n’aient pas été rincés correctement avant la récolte.
Cette fumée bien loin d’être agréable est provoquée par la présence dans le plant des nutriments et minéraux utilisés lors de la culture, ce qui altère la façon dont le plant se consume. Rincer le plant élimine ces nutriments restants, ce qui améliore la qualité des sensations. Heureusement, le rinçage des plants de cannabis se fait facilement et sans effort, et cela vous permet de produire des têtes douces et délicieuses en un rien de temps.
ARTICLE LIÉ
Comment Utiliser les Nutriments pour Cannabis
QU’EST-CE QUE LE RINÇAGE ?
L’acte de rincer un plant implique d’utiliser de l’eau pour éliminer tout nutriment présent dans la terre. Une grande quantité d’eau est passée à travers la terre et drainée sur une base régulière. Tous les minéraux et nutriments présents dans la terre sont rincés avec le temps avec l’eau, ce qui laisse une terre propre.
Mais pourquoi vouloir éliminer tous les minéraux de la terre ? N’est-ce pas mauvais pour la récolte ? En fait, cela aide à la récolte de manière significative. Quand les nutriments sont éliminés de la terre, ceci force le plant de cannabis à utiliser tous les nutriments toujours présents dans le plant. C’est comme pour le corps humain. Quand on consomme beaucoup d’aliments, ce que nous n’utilisons pas est transformé en graisses. Dans les situations extrêmes où la nourriture est rare, le corps s’appuie sur cette graisse stockée pour tirer de l’énergie.
Comme rincer force le cannabis à utiliser tous les nutriments restants dans le plant, aucun ne devrait rester et altérer les têtes récoltées. Cependant, si vous le faites trop tôt, cela peut nuire à la santé du plant, le moment est donc clé.
LE MEILLEUR MOMENT POUR RINCER SON CANNABIS
Le rinçage commence en général deux semaines avant la récolte. Si le plant a une période de floraison de huit semaines, le rinçage doit commencer six semaines après le début de la période de floraison. Il est préférable de regarder de près les trichomes sur le plant pour déterminer quand votre cannabis est prêt à être récolter. Si les petits trichomes commencent juste à passer d’une couleur transparente à une teinte laiteuse et blanche, c’est une bonne indication que les plants peuvent commencer à être rincés. Il faut s’arranger pour que la majorité des trichomes aient changé vers la couleur désirée pour la récolte après deux semaines – ça devient plus facile à faire avec l’expérience, alors accrochez-vous !
Le rinçage peut également être un bon moyen de remettre à zéro la terre quand un plant est toujours en phase de croissance végétative. Parfois, un cultivateur suralimente par accident son cannabis, ce qui provoque un changement de couleur et un flétrissement du bout des feuilles. Ceci est appelé une « brûlure par nutriments ». Rincer la terre peut éliminer les nutriments excédentaires, ce qui aide à résoudre le problème. Cependant, c’est une mesure drastique à ce stade de la culture, alors assurez-vous que le problème soit bien une brûlure par nutriments et non quelque chose d’autre.
Flushing
Le rinçage ne concerne pas que le moment de la récolte. Cette technique peut aussi être mise en place durant la phase de croissance afin de débarrasser le sol des nutriments. Bien évidemment, les nutriments permettent à votre plante de rester en bonne santé et vous assurent des rendements maximaux, mais une trop grande quantité peut causer une accumulation et un état statique durant lequel la plante ne peut plus y accéder.
Le blocage des nutriments peut être causé par une accumulation saline ou des niveaux de pH incorrects. Ces deux causes peuvent être résolues par un rinçage de votre plante à l’eau claire. Les fluides viendront pousser les nutriments en dehors du substrat et le débarrasseront de l’accumulation, permettant ainsi aux racines de pouvoir accéder à nouveau aux nutriments.
EMPÊCHER LE BLOCAGE D'ABSORPTION DES NUTRIMENTS AVANT QU’IL NE POSE PROBLÈME
Au mieux, le blocage des nutriments peut être un problème, au pire, il peut être un vrai désastre. Comme le dit l’adage, il vaut mieux prévenir que guérir. Il vaut mieux prendre de l’avant pour empêcher le blocage des nutriments plutôt que de s’y atteler lorsque c’est trop tard.
Empêcher le blocage des nutriments peut se faire par le biais d’un rinçage de routine. En rinçant vos plantes une fois avant la floraison et une fois au milieu de cette dernière, vous minimiserez l’accumulation de nutriments.
LES ENZYMES À LA RESCOUSSE
Après le rinçage pour contrer l’accumulation ou le blocage des nutriments, vous remarquerez peut-être que vos plantes ont une apparence vert foncé, c’est le signe d’un excès de nutriments. Dans ce cas, certains cultivateurs choisissent d’ajouter une formule riche en enzymes à leur substrat.
Au cas où vous auriez oublié vos cours de biologie, les enzymes sont des protéines qui catalysent les réactions. Elles aident à rincer le substrat en décomposant l’amidon, les glucides et les nutriments. Il existe sur le marché toute une variété de produits qui contiennent des formules d’enzymes très efficaces.
Si l’eau ne suffit pas à vos plantes, ces petites protéines ne feront qu’une bouchée de l’accumulation de nutriments !
Comment et Quand Rincer les Plants de Cannabis
COMMENT BIEN RINCER SON CANNABIS
Rincer votre plant de cannabis est un processus simple. À chaque fois que vous apporteriez normalement des nutriments, vous rincez à la place. De l’eau du robinet non traitée est tout ce dont vous avez besoin pour rincer, assurez-vous juste que son pH est sans danger pour le cannabis. La plupart de l’eau de puits a un pH sain et ne nécessite pas de traitement, mais s’il est nécessaire de traiter l’eau de rinçage pour avoir un pH adapté, faites-le. Les ajustements du pH seront donc la seule chose à considérer.
Inonder la terre avec autant d’eau fraîche qu’elle puisse contenir. Laissez l’eau durant quelques minutes pour qu’elle puisse absorber les nutriments, puis inondez la terre encore pour rincer les nutriments loin du plant. Si vous cultivez en intérieur dans des pots, notez la couleur de l’eau qui s’échappe du fond des pots. Elle sera tâchée et aura une couleur sale. C’est à cette étape qu’un appareil de mesure des TDS (Total des Solides Dissous) est utile. Si vous récupérez et mesurez le TDS de l’eau « évacuée », elle devrait avoir un taux de 1300ppm, ce qui est assez élevé. Il est important de rincer le plant jusqu’à ce que total baisse à un niveau de 50ppm, ou du moins qu’il s’approche du TDS de l’eau fraîche que vous utilisez pour rincer le plant. La couleur de l’eau d’évacuation va s’éclaircir et apparaîtra plus propre. Vous devez tirer autant que possible de minéraux dissous du plant.
COMMENT RINCER SES PLANTES EN HYDROPONIE
Le rinçage des plantes en hydroponie est bien plus simple que de se débarrasser des nutriments en terre. Les cultivateurs en hydroponie pourront simplement drainer leur système et le remplacer par une eau au pH neutre.
Le rinçage des plantes en hydroponie est aussi un processus bien plus court. Une fois que la réserve d’eau aura été modifiée, les plantes en hydro n’auront pas accès aux nutriments externes. Pour cette raison, un rinçage de deux jours suffira.
LES RÉSULTATS DU RINÇAGE DE SON CANNABIS
Après la récolte des têtes, prenez du temps pour bien faire le curing pour atteindre le potentiel le plus élevé. Un affinage correct par curing permet de réduire encore plus le côté rude des têtes, en éliminant des choses comme un excès de chlorophylle. Vous serez étonné de voir la différence que ce petite effort peut avoir sur votre produit. Tout votre travail se sentira dans la première bouffée de cette weed douce comme de la soie, qui caresse la gorge comme du miel. Le plus doux de la nature. Vous pouvez donc améliorer la qualité de votre cannabis en ajoutant juste de l’eau !
QUAND ÉVITER DE RINCER SES PLANTES
Le seul moment où nous recommandons d’éviter le rinçage de son cannabis est lorsque l’on travaille avec une terre biologique amendée ou un super soil. Ces substrats ont été développés avec précaution afin d’héberger des micro-organismes bienfaisants tels que des bactéries ou des champignons. Cette délicate biodiversité pourrait être éliminée et endommagée par le rinçage.
Une fois de plus, l’absence de rinçage ne devrait pas poser de soucis, car aucun nutriment externe ou synthétique n’aura été ajouté au substrat. À la place, les plantes comptent sur les micro-organismes pour décomposer la matière organique et la livrer aux racines.
May the force be with you 💪

Likes
116
Share


@DogDoctorOfficial
Follow
Harvesting the Bounty of Cherry Cola Auto
Dear fellow cultivators, we've reached the triumphant culmination of Cherry Cola's journey as we delve into Week 13 – Harvest Time! Join me in celebrating the fruition of our labor and the bountiful rewards awaiting us as we harvest the radiant buds of Cherry Cola Auto.
As the sun sets on Week 13, the air is filled with anticipation and excitement. Harvest season has dawned upon us, marking the culmination of Cherry Cola's remarkable journey from seed to harvest-ready beauty.
In the heart of the garden, Cherry Cola stands tall, her branches heavy with the weight of abundant buds. Each bud is a testament to her resilience, her vigor, and the care and dedication invested in her growth.
With meticulous care and precision, the time has come to harvest Cherry Cola's radiant buds. Each cut is made with reverence, ensuring that only the finest, most pristine flowers make their way into our stash.
As the buds are trimmed and cured, an aromatic symphony is unleashed, filling the air with the tantalizing scent of Cherry Cola's terpene-rich profile. It's a sensory experience like no other, a celebration of nature's bounty.
As we gather the fruits of our labor, let us take a moment to reflect on the journey that has brought us here. It's been a labor of love, a testament to patience, perseverance, and the boundless wonders of nature.
In conclusion, let us raise a toast to Cherry Cola Auto – a true champion of the garden, a symbol of resilience, and a source of boundless joy. May her harvest be plentiful, her flavors unforgettable, and her legacy enduring. Until next time, happy harvesting, fellow enthusiasts! #CherryColaHarvest #BountifulBuds #GrowersPride
Nutrition: @aptusholland @aptus_world @aptus_
Love, Care, and Attention: @dogdoctorofficial
As always, thank you all for joining me on this journey, for your love, and for it all. My horticultural odyssey would never be the same without you. Your love and support are cherished, and I feel both honored and blessed to have you in my life
Friendly reminder all you see here is pure research and for educational purposes only
Growers Love To you All 💚 💚 💚
Likes
56
Share


@KingSalomonsWeed
Follow
Das war ein aufregender Lauf. Problemlos, aber aufregend sexy.
So ab Blüte fühlte es sich an wie das Video. Aufregend, Anziehend.
Das ist total geiles Weed!
9 Punkte
Sehr Empfehlenswert für Feinschmecker, die wenig Zeit haben.
Und trotzdem ne starke Brise um die Ohren gehauen bekommen wollen.
03. Februar
Oh Jungs?
Knallt gut!
Schmeckt gut!
SWEET SEEDS, SUPERSORTE!
06. Februar
Munchies und ein tiefer zufriedener Schlaf inklusive. " GEIL "
