
Likes
Comments
Share


@OrganicBuds030
Follow
Forbidos wächst klein und buschig, eigentlich genau was ich suche. Bin gespannt ob sie das Topping genauso gut wie Jelly Breath annehmen werden.

Likes
23
Share


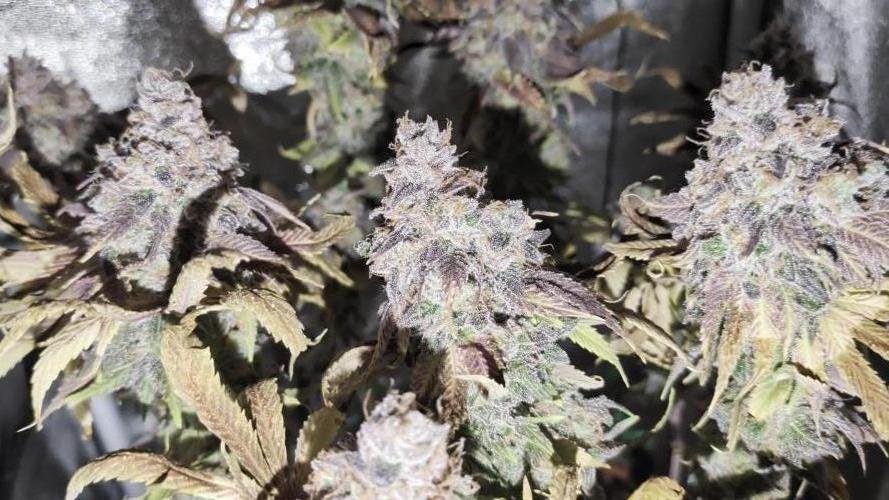
@Sators
Follow
🌱Day 64.💚
🌱Day 66.💚
🌱Day 68.💚
🌱Day 70. Hot reason why in UK most grow tent heat up, my grow tent temperature reach already 36 degrees. O lalaaa…I will get experience…😆💚

Likes
4
Share


@hinterhofgrower
Follow
🌱:
💧 : 8l, switch to 0,5ml/l Pk 13-14 on day 59
💡 : Dli: 45 mol/m²/d
🤔:

Likes
29
Share


@Naujas
Follow
70 days from seed!!! wow I just confirmed once again that Zamnesia seeds are not bad :) the girl is growing really well despite the lack of space, high humidity, the girl just ignores all this and does not pay much attention to it and focuses all her energy on the maturation of the flowers, which are really very stiff ;) Plagron nutrients also worked flawlessly throughout her growth, this is my first growth with these nutrients :) I am happy that they are there, I will definitely use them in the future :) well, there is not much left until the harvest, Good luck to everyone in the competition and in your cultivation :).


Processing
Likes
5
Share


@Mr_nugs_lover_David
Follow
Wonderful haze berry pheno, looks super pretty, this pheno number #1 looks very "perfect" because of the shape of the leafs and so. She's gonna be an awesome plant, let's see what I can Do guys! 💚🌱💎❤️👨🌾
Likes
10
Share


@Pechu420
Follow
Her scent is incredible, something sweet. The buds developed quickly, and now appear to be getting fatter. Let's see what these last 4 weeks of flowering will be like. 12/12 from the beginning, left it with an acceptable size, but in the next cultivation I will start LST ties from earlier, to make better use of the light. Let's see the difference.
Likes
3
Share


@Earthsower
Follow
She has started to move again with no further deficiency so I will continue her draught and see if she improves more!

Likes
19
Share


@GoldenWeedGrower
Follow
Legend
Timestamp: 📅
EC - pH: ⚗️
Temp - Hum: 🌡️
Water: 🌊
Food: 🍗
pH Correction: 💧
Actions: 💼
Thoughts: 🧠
Events: 🚀
Media: 🎬
D: DAY, G: GERMINATION, V: VEGETATIVE, B: BLOOMING, R: RIPENING, D: DRYING, C: CURING
________________________________
📅 D91/B29 - 14/02/24
⚗️ EC: 0.9 pH: 5.8
🌡️ T: 19-25 °C H: 50-70 %
🌊 6L
🍗 CalMag - Bloom A-B - B52 - Bud Candy - Big Bud
💧
💼 I filled up all available space in the pot, preparing all for 3 days out. I'll be back on Sunday the 18th of February
🧠
🚀 I'm preparing all for 3 days out
🎬 Added timelapse video and screenshots
________________________________
📅 D92/B30 - 15/02/24
⚗️
🌡️ T: 18-23 °C H: 50-80 %
🌊
🍗
💧
💼
🧠
🚀 First day out
🎬
________________________________
📅 D93/B31 - 16/02/24
⚗️
🌡️ T: 18-23 °C H: 50-80 %
🌊
🍗
💧
💼
🧠
🚀 Second day out
🎬
________________________________
📅 D94/B32 - 17/02/24
⚗️
🌡️ T: 19-23 °C H: 40-70 %
🌊
🍗
💧
💼
🧠
🚀 Third and last day out
🎬
________________________________
📅 D95/B33 - 18/02/24
⚗️ EC: 0.8 pH: 5.8
🌡️ T: 19-23 °C H: 40-70 %
🌊 1L
🍗 CalMag
💧
💼
🧠
🚀 I'm baaaackkkk !!! 😎😎😎
🎬 Big job on media. I edited the cumulated time lapse videos and splitted day by day. Also uploaded the screenshots from the TrolMaster App for each day out. Great!
________________________________
📅 D96/B34 - 19/02/24
⚗️ EC: 0.8 pH: 5.6
🌡️ T: 19-23 °C H: 40-70 %
🌊
🍗
💧
💼
🧠
🚀
🎬 3 pics and a video added. Added timelapse video
________________________________
📅 D97/B35 - 20/02/24
⚗️ EC: 0.8 pH: 5.3
🌡️ T: 20-24 °C H: 50-65 %
🌊 5L
🍗 CalMag - Bloom A-B - B52 - Bud Candy - Big Bud
💧
💼 Some defolation
🧠
🚀 First signs of ripening
🎬 Added timelapse and screenshjots. I also prepared a timelapse of the entire week with some music 🎵🎵🎵 and weekly rate of T-H and VPD 📈📈📈


Likes
Comments
Share


@RatmanJR
Follow
Day 35 post flip.
Plants are doing phenomenal. Buds are finally starting to fatten up and can tell they are ready to get going. Smell is amazing. They are starting to develop a slight lavender scent. In my experience that means this thing will be focus inducing.
Slight light burn on a few leaves. Gonna let it go and continue riding the line.
Nothing but recharge this week for its tea. Been hitting it hard and all that build a flower and bananas should be available now.
God bless
Likes
13
Share


@DonKrika
Follow
Everything running smoothly, buds getting bigger and trichomes production increasing.
DAY 126 -Molasses
PH - 5.84
PPM-914
Solution Temp - 22.4
Watering Volume - 4.1L
DAY 129 - Nutes
PH - 5.83
PPM- 2620
Solution Temp - 24
Watering Volume - 4L


Likes
29
Share


Likes
36
Share


@HAPPYWEEDS
Follow
La planta aguantó bastante bien todos mis fallos, finalmente no fue todo lo productiva que me habría gustado. Pero teniendo en cuenta todo lo que hice mal creo que puedo darme por satisfecho. Personalmente creo que debería haberla dejado crecer una semana más. Ya tengo todo preparado para mi segundo cultivo, en el cual incluiré muchas novedades (cepas, iluminación, nutrientes, etc). Esta vez detallaré mucho más todo el seguimiento del cultivo. Nos vemos pronto! 👽
Likes
5
Share

@BasedBuds_89
Follow
This plant was fairly easy to grow, I know I can get better results with the strain but I need to go bigger. Im going to pop another Red Devil Auto seed from WSE and redo this diary right away.

Processing
Likes
10
Share


@TrimQueen
Follow
So, guys.. This is her first month blooming. 4 complete weeks has passed. Here we are for 2 more. Gave Her a super powerful egg shell fert (all powdered - Phosforium Whelthy.)
07/10/20 - We are in the middle of week 5. Thats the way they look like. For me a good number of buds and they are as dense as I thought they would be by this time. I think everything is under control despite some foxtails cuz the heat. Loving the experience.
Processing
Likes
4
Share


@Andres
Follow
she grows healthy ... with top crop complete substrate... the days are cloudy and under the temperature ... let's hope as we go with it ..
Likes
16
Share


@BudXs
Follow
Super busy with a move and a big garden reno. Sorry, this is the only update for this week

Likes
4
Share


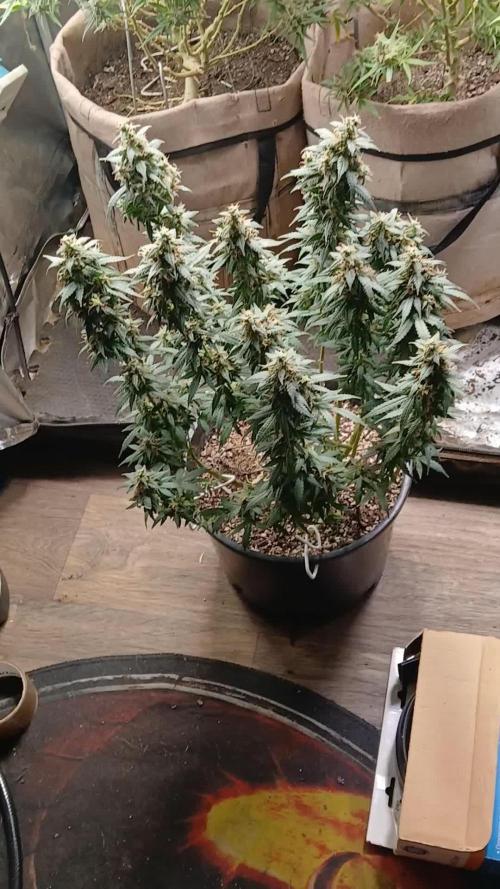
@LittleBigTrees
Follow
The plants have limited space and are in 4 litre pots too keep them controlled.
This week I defoliated again and started adding sugar royal.